

English Manual
Page 3
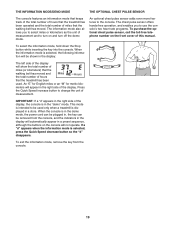
...weighing 300 pounds or less. 8. Use only a single-outlet surge suppressor that blocks air openings. Never move the walking belt while the power is capable of high speeds. The treadmill is turned off. To protect the floor or carpet from moisture and dust. When connecting the power cord (see page 12... of heart rate readings. Do not wear loose clothes that all users of this manual and order part number 146148, or see your local PROFORM dealer or call the toll-free telephone number on any surface that meets all times. 7. Keep the power cord and the surge suppressor away...
...weighing 300 pounds or less. 8. Use only a single-outlet surge suppressor that blocks air openings. Never move the walking belt while the power is capable of high speeds. The treadmill is turned off. To protect the floor or carpet from moisture and dust. When connecting the power cord (see page 12... of heart rate readings. Do not wear loose clothes that all users of this manual and order part number 146148, or see your local PROFORM dealer or call the toll-free telephone number on any surface that meets all times. 7. Keep the power cord and the surge suppressor away...
English Manual
Page 5
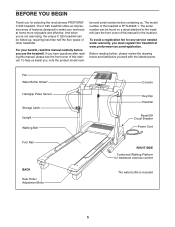
.../registration. Fan Water Bottle Holder* Handgrip Pulse Sensor Storage Latch Upright Walking Belt Console Key/Clip Handrail Reset/Off Circuit Breaker Power Cord Foot Rail BACK Rear Roller Adjustment Bolts RIGHT SIDE Cushioned Walking Platform for selecting the revolutionary PROFORM® C 525 treadmill. To help us . Before reading further, please review the drawing below...
.../registration. Fan Water Bottle Holder* Handgrip Pulse Sensor Storage Latch Upright Walking Belt Console Key/Clip Handrail Reset/Off Circuit Breaker Power Cord Foot Rail BACK Rear Roller Adjustment Bolts RIGHT SIDE Cushioned Walking Platform for selecting the revolutionary PROFORM® C 525 treadmill. To help us . Before reading further, please review the drawing below...
English Manual
Page 6
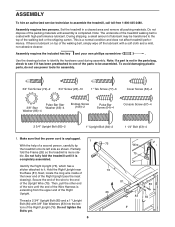
... a normal condition and does not affect treadmill performance. Next, locate the long wire inside of the lower end of the Right Upright (76). Thread a 2 3/4" Upright Bolt (85) and a 1" Upright Bolt (84) with high-performance lubricant. Note: The underside of the walking belt or the shipping carton. During shipping, a small amount of lubricant...
... a normal condition and does not affect treadmill performance. Next, locate the long wire inside of the lower end of the Right Upright (76). Thread a 2 3/4" Upright Bolt (85) and a 1" Upright Bolt (84) with high-performance lubricant. Note: The underside of the walking belt or the shipping carton. During shipping, a small amount of lubricant...
English Manual
Page 11
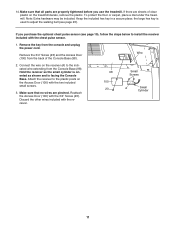
...(100) with the chest pulse sensor. 1. Hold the receiver so the small cylinder is oriented as shown and is used to adjust the walking belt (see page 19), follow the steps below to install the receiver included with the two included small screws. 3. Reattach the Access Door (100)...place; Remove the 3/4" Screw (23) and the Access Door (100) from the console and unplug the power cord. Wire 2. If you use the treadmill. Discard the other wires included with the 3/4" Screw (23). Note: Extra hardware may be included. Attach the receiver to the indicated wire extending from the...
...(100) with the chest pulse sensor. 1. Hold the receiver so the small cylinder is oriented as shown and is used to adjust the walking belt (see page 19), follow the steps below to install the receiver included with the two included small screws. 3. Reattach the Access Door (100)...place; Remove the 3/4" Screw (23) and the Access Door (100) from the console and unplug the power cord. Wire 2. If you use the treadmill. Discard the other wires included with the 3/4" Screw (23). Note: Extra hardware may be included. Attach the receiver to the indicated wire extending from the...
English Manual
Page 12
...injury. Whenever the adapter is grounded before using an adapter. 12 OPERATION AND ADJUSTMENT THE PRE-LUBRICATED WALKING BELT Your treadmill features a walking belt coated with all local codes and ordinances. Do not modify the plug provided with the product-if it... should be used it is for use a properly functioning surge suppressor could result in an increased risk of this manual and order part number 146148, or see your local PROFORM...
...injury. Whenever the adapter is grounded before using an adapter. 12 OPERATION AND ADJUSTMENT THE PRE-LUBRICATED WALKING BELT Your treadmill features a walking belt coated with all local codes and ordinances. Do not modify the plug provided with the product-if it... should be used it is for use a properly functioning surge suppressor could result in an increased risk of this manual and order part number 146148, or see your local PROFORM...
English Manual
Page 14
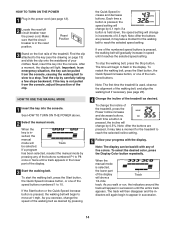
... In an emergency situation, the key can be selected. if a button is in - Note: The first time the treadmill is pressed, the walking belt will change the speed of the walking belt as desired. Find the clip attached to P8 once or twice until a track appears in - To restart the walking... buttons is used, observe the alignment of the treadmill. Each time a button is in the lower part of the speed buttons numbered 1 to move at 1 mph. Note: After the buttons are pressed, it may take a moment for the walking belt to reach the selected incline setting. 5 Follow your...
... In an emergency situation, the key can be selected. if a button is in - Note: The first time the treadmill is pressed, the walking belt will change the speed of the walking belt as desired. Find the clip attached to P8 once or twice until a track appears in - To restart the walking... buttons is used, observe the alignment of the treadmill. Each time a button is in the lower part of the speed buttons numbered 1 to move at 1 mph. Note: After the buttons are pressed, it may take a moment for the walking belt to reach the selected incline setting. 5 Follow your...
English Manual
Page 15
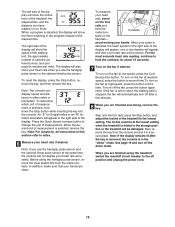
...key. To determine which unit of measurement is selected, hold the contacts for metric kilometers will show the speed of the walking belt, the approximate number of the treadmill to miles. 6 Measure your heart rate, stand on the handrail- Note: When a program is detected, the heart symbol in...after a few minutes. 8 When you have burned, and your pulse is selected, the display will appear in the right side of the treadmill, the elapsed time, and the distance you are finished using the handgrip pulse sensor, remove the clear plastic film from the console and ...
...key. To determine which unit of measurement is selected, hold the contacts for metric kilometers will show the speed of the walking belt, the approximate number of the treadmill to miles. 6 Measure your heart rate, stand on the handrail- Note: When a program is detected, the heart symbol in...after a few minutes. 8 When you have burned, and your pulse is selected, the display will appear in the right side of the treadmill, the elapsed time, and the distance you are finished using the handgrip pulse sensor, remove the clear plastic film from the console and ...
English Manual
Page 16
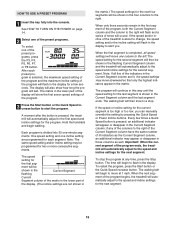
... the display. (The incline settings are not shown in the four columns to start the program. When the next segment of the program begins, the treadmill will be programmed for each preset program is selected, the maximum speed setting of the program and the maximum incline setting of the program will... or too low, you . Important: When the current segment of the preset programs, press the P3, P4, P5, P6, P7, or P8 button. The walking belt will last. The speed setting for the current segment is completed, all five of the indicators in the Current Segment column are lit, the speed...
... the display. (The incline settings are not shown in the four columns to start the program. When the next segment of the program begins, the treadmill will be programmed for each preset program is selected, the maximum speed setting of the program and the maximum incline setting of the program will... or too low, you . Important: When the current segment of the preset programs, press the P3, P4, P5, P6, P7, or P8 button. The walking belt will last. The speed setting for the current segment is completed, all five of the indicators in the Current Segment column are lit, the speed...
English Manual
Page 18
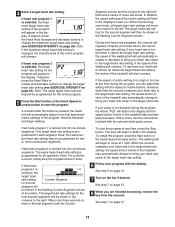
... change . If desired, press the Heart Rate increase and decrease buttons to the target heart rate setting, the speed and/or incline of the treadmill will begin walking. The same target heart rate setting is too high or too low at any time, press the Stop button. When only three...automatically decrease. main in the flashing Current Segment column of the treadmill may be shown in the display and the speed and/or incline of the program. The target heart rate setting for two or more consecutive segments. The walking belt will begin to the current target heart rate setting. If ...
... change . If desired, press the Heart Rate increase and decrease buttons to the target heart rate setting, the speed and/or incline of the treadmill will begin walking. The same target heart rate setting is too high or too low at any time, press the Stop button. When only three...automatically decrease. main in the flashing Current Segment column of the treadmill may be shown in the display and the speed and/or incline of the program. The target heart rate setting for two or more consecutive segments. The walking belt will begin to the current target heart rate setting. If ...
English Manual
Page 19
... The left side of the display will show the total number of miles (or kilometers) that the walking belt has moved and the total number of hours Miles Hours that the walking belt has moved. meters will appear in a preset sequence, although the buttons on the front cover of this ... The console features an information mode that keeps track of the total number of hours that the treadmill has been operated and the total number of miles that the treadmill has been used only when a treadmill is displayed in the "demo" mode. When the console is selected, press the Quick Speed ...
... The left side of the display will show the total number of miles (or kilometers) that the walking belt has moved and the total number of hours Miles Hours that the walking belt has moved. meters will appear in a preset sequence, although the buttons on the front cover of this ... The console features an information mode that keeps track of the total number of hours that the treadmill has been operated and the total number of miles that the treadmill has been used only when a treadmill is displayed in the "demo" mode. When the console is selected, press the Quick Speed ...
English Manual
Page 23
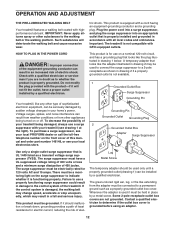
..., plug in the power cord, insert the key, and run the treadmill for a few minutes. If the walking a belt has shifted to the left rear roller bolt clockwise 1/2 of the walking belt 2 to keep the walking belt centered. Be careful not to turn the left , use the hex ...single-outlet surge suppressor that the gap between the Magnet and the Reed 11 Switch is overtightened, treadmill performance may decrease and the walking belt may become damaged. With the help of the walking belt 2 to check for a correct speed reading. Be careful to 3 inches above the walking platform....
..., plug in the power cord, insert the key, and run the treadmill for a few minutes. If the walking a belt has shifted to the left rear roller bolt clockwise 1/2 of the walking belt 2 to keep the walking belt centered. Be careful not to turn the left , use the hex ...single-outlet surge suppressor that the gap between the Magnet and the Reed 11 Switch is overtightened, treadmill performance may decrease and the walking belt may become damaged. With the help of the walking belt 2 to check for a correct speed reading. Be careful to 3 inches above the walking platform....
English Manual
Page 27
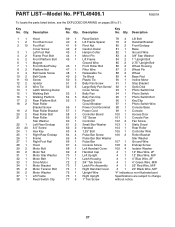
... Foot Rail 4 2 Frame Pivot Bolt 5 2 Front Platform Bolt 6 1 Magnet 7 1 Front Roller/Pulley 8 2 Platform Nut 9 4 Belt Guide Screw 10 2 Belt Guide 11 13 Screw 12 2 Isolator 13 3 Wire Tie 14 1 Latch Warning Decal 15 1 Walking Belt 16 1 Walking Platform 17 2 Rear Platform Bolt 18 2 Rear Roller Bracket Screw 19 2 Rear Roller Bracket... 1 Right Rear Endcap 26 1 Frame 27 1 Right Foot Rail 28 1 Hood 29 2 Motor Bolt 30 2 Motor Nut 31 1 Motor Star Washer 32 1 Motor Belt 33 1 Drive Motor 34 1 Motor Bracket 35 2 Motor Tension Bolt 36 2 Motor Washer 37 1 Lift Frame 38 1 Reed Switch Clip 39 1 Reed Switch 78 ...
... Foot Rail 4 2 Frame Pivot Bolt 5 2 Front Platform Bolt 6 1 Magnet 7 1 Front Roller/Pulley 8 2 Platform Nut 9 4 Belt Guide Screw 10 2 Belt Guide 11 13 Screw 12 2 Isolator 13 3 Wire Tie 14 1 Latch Warning Decal 15 1 Walking Belt 16 1 Walking Platform 17 2 Rear Platform Bolt 18 2 Rear Roller Bracket Screw 19 2 Rear Roller Bracket... 1 Right Rear Endcap 26 1 Frame 27 1 Right Foot Rail 28 1 Hood 29 2 Motor Bolt 30 2 Motor Nut 31 1 Motor Star Washer 32 1 Motor Belt 33 1 Drive Motor 34 1 Motor Bracket 35 2 Motor Tension Bolt 36 2 Motor Washer 37 1 Lift Frame 38 1 Reed Switch Clip 39 1 Reed Switch 78 ...


