
English Manual
Page 2
...away from damage, place a mat under the age of 12 and pets away from moisture and dust. Do not place the treadmill on page 4 if the treadmill is the responsibility of the owner to ensure that all times. 7. Do not wear loose clothing that blocks air openings. ... persons weighing more than one person on a level surface, with at all users of this treadmill are recommended for future reference. Wear appropriate exercise clothing when using the treadmill. Place the treadmill on the treadmill at 15 amps, with bare feet, wearing only stockings, or in a garage or covered ...
...away from damage, place a mat under the age of 12 and pets away from moisture and dust. Do not place the treadmill on page 4 if the treadmill is the responsibility of the owner to ensure that all times. 7. Do not wear loose clothing that blocks air openings. ... persons weighing more than one person on a level surface, with at all users of this treadmill are recommended for future reference. Wear appropriate exercise clothing when using the treadmill. Place the treadmill on the treadmill at 15 amps, with bare feet, wearing only stockings, or in a garage or covered ...
English Manual
Page 3
...instructions before performing the main- Always unplug the power cord immediately after use of this manual should be able to raise, lower, or move the treadmill. 19. Do not use only. WARNING: Before beginning this product. Always hold the handrails while using . Never leave the... intended only as an exercise aid in determining heart rate trends in order to do so by placing objects under the treadmill. 20. The pulse sensor is capable of the treadmill regularly. 22. Do not change the incline of heart rate readings. scribed in speed. 16. Never remove the motor hood ...
...instructions before performing the main- Always unplug the power cord immediately after use of this manual should be able to raise, lower, or move the treadmill. 19. Do not use only. WARNING: Before beginning this product. Always hold the handrails while using . Never leave the... intended only as an exercise aid in determining heart rate trends in order to do so by placing objects under the treadmill. 20. The pulse sensor is capable of the treadmill regularly. 22. Do not change the incline of heart rate readings. scribed in speed. 16. Never remove the motor hood ...
English Manual
Page 4
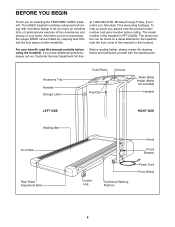
... exercising, the unique 525EX can be folded up, requiring less than half the floor space of other treadmills. until 6 p.m. The model number of your benefit, read this manual for selecting the PROFORM¨ 525EX treadmill. The 525EX treadmill combines advanced technology with the labeled parts. If you for the location). BEFORE YOU BEGIN Thank...
... exercising, the unique 525EX can be folded up, requiring less than half the floor space of other treadmills. until 6 p.m. The model number of your benefit, read this manual for selecting the PROFORM¨ 525EX treadmill. The 525EX treadmill combines advanced technology with the labeled parts. If you for the location). BEFORE YOU BEGIN Thank...
English Manual
Page 5
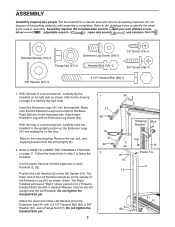
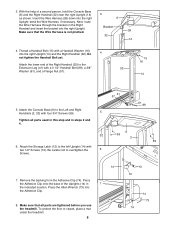
...to the upright position so the Extension Legs (41) are on the floor. Attach the lower end of a second person, carefully lay the treadmill on its right side as shown. (Note: The Right Handrail will have a ÒRightÓ sticker placed on the left Upright (14)....;2 Handrail Bolt (15)Ð2 1/2" Screw (13)Ð2 3/4" Screw (59)Ð4 3/8" Washer (61)Ð2 3 1/2" Handrail Bolt (89)Ð2 1. Set the treadmill in assembly. With the help of the packing materials until assembly is completed. Attach each Handrail (2, 32) Position the Left Handrail (2) on it.) Thread a Handrail...
...to the upright position so the Extension Legs (41) are on the floor. Attach the lower end of a second person, carefully lay the treadmill on its right side as shown. (Note: The Right Handrail will have a ÒRightÓ sticker placed on the left Upright (14)....;2 Handrail Bolt (15)Ð2 1/2" Screw (13)Ð2 3/4" Screw (59)Ð4 3/8" Washer (61)Ð2 3 1/2" Handrail Bolt (89)Ð2 1. Set the treadmill in assembly. With the help of the packing materials until assembly is completed. Attach each Handrail (2, 32) Position the Left Handrail (2) on it.) Thread a Handrail...
English Manual
Page 6
...14 4. Attach the Console Base (6) to the Extension Leg (41) with four 3/4Ó Screws (59). 5 Tighten all parts are tightened before you use the treadmill. Remove the backing from the Adhesive Clip (74). Press the Adhesive Clip onto the base of the Uprights (14) in steps 2 and 4. 61 89 6 32... 8. Make sure that all parts used in this step and in 7 the indicated location. To protect the floor or carpet, place a mat under the treadmill. 6 13 12 14 73 74 Attach the Storage Latch (12) to overtighten the 6 Screws. 14 7. Press the Allen Wrench (73) into the right ...
...14 4. Attach the Console Base (6) to the Extension Leg (41) with four 3/4Ó Screws (59). 5 Tighten all parts are tightened before you use the treadmill. Remove the backing from the Adhesive Clip (74). Press the Adhesive Clip onto the base of the Uprights (14) in steps 2 and 4. 61 89 6 32... 8. Make sure that all parts used in this step and in 7 the indicated location. To protect the floor or carpet, place a mat under the treadmill. 6 13 12 14 73 74 Attach the Storage Latch (12) to overtighten the 6 Screws. 14 7. Press the Allen Wrench (73) into the right ...
English Manual
Page 7
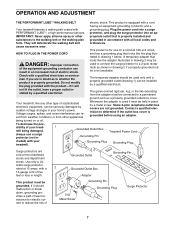
... Never apply silicone spray or other appliances Whenever the adapter is equipped with a cord having an equipment-grounding conductor and a Your treadmill features a walking belt coated with a qualified electrician or serviceman if you are not grounded. trated in your homeÕs power. Your... treadmill, like extending from other propriate outlet that is grounded before using an adapter. being damaged, always use on or off. cause ...
... Never apply silicone spray or other appliances Whenever the adapter is equipped with a cord having an equipment-grounding conductor and a Your treadmill features a walking belt coated with a qualified electrician or serviceman if you are not grounded. trated in your homeÕs power. Your... treadmill, like extending from other propriate outlet that is grounded before using an adapter. being damaged, always use on or off. cause ...
English Manual
Page 8
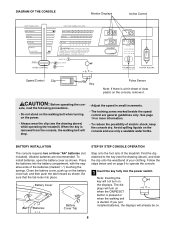
... belt will not turn on the power. ¥ Always wear the clip (see the drawing above ) while operating the treadmill. See page 14 or more information. ¥ To reduce the possibility of the treadmill. To install batteries, open the battery cover as shown. Note: Inserting the key will stop. ¥ Adjust the...
... belt will not turn on the power. ¥ Always wear the clip (see the drawing above ) while operating the treadmill. See page 14 or more information. ¥ To reduce the possibility of the treadmill. To install batteries, open the battery cover as shown. Note: Inserting the key will stop. ¥ Adjust the...
English Manual
Page 9
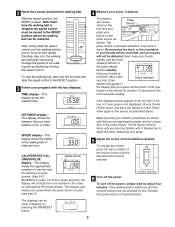
... incline control until you are not pressed for four minutes, the power will be detected. SPEED displayÑThis display shows the speed of the treadmill as shown, and that you become familiar with the four displays. After a few seconds, three Pulse Indicator dashes will appear in the display and your...
... incline control until you are not pressed for four minutes, the power will be detected. SPEED displayÑThis display shows the speed of the treadmill as shown, and that you become familiar with the four displays. After a few seconds, three Pulse Indicator dashes will appear in the display and your...

English Manual
Page 10
... Storage Latch Catch Closed Base Front Wheels 10 Move your hands in order to the storage position as shown. 2. Do not attempt to move the treadmill to lift with your right hand to the vertical position. 2. CAUTION: You must be able to safely lift 45 pounds (20 kg) in the ...locations shown at the right. Raise the treadmill until it rolls freely on the base as described above 85¡ Fahrenheit. To protect the floor or carpet from damage, place a mat under ...
... Storage Latch Catch Closed Base Front Wheels 10 Move your hands in order to the storage position as shown. 2. Do not attempt to move the treadmill to lift with your right hand to the vertical position. 2. CAUTION: You must be able to safely lift 45 pounds (20 kg) in the ...locations shown at the right. Raise the treadmill until it rolls freely on the base as described above 85¡ Fahrenheit. To protect the floor or carpet from damage, place a mat under ...
English Manual
Page 11
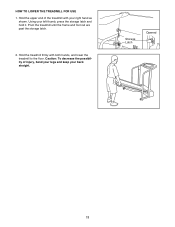
Pivot the treadmill until the frame and foot rail are past the storage latch. 2. Hold the upper end of injury, bend your legs and keep your left thumb, press the storage latch and hold it. Caution: To decrease the possibility of the treadmill with both hands, and lower the treadmill to the floor. HOW TO LOWER THE TREADMILL FOR USE 1. Storage Latch Opened 11 Hold the treadmill firmly with your right hand as shown. Using your back straight.
Pivot the treadmill until the frame and foot rail are past the storage latch. 2. Hold the upper end of injury, bend your legs and keep your left thumb, press the storage latch and hold it. Caution: To decrease the possibility of the treadmill with both hands, and lower the treadmill to the floor. HOW TO LOWER THE TREADMILL FOR USE 1. Storage Latch Opened 11 Hold the treadmill firmly with your right hand as shown. Using your back straight.
English Manual
Page 12
... sure that the power cord is plugged into a surge protector, and that the surge protector is fully inserted into the console. (See step 1 on the treadmill frame near the power cord. b. c. Reinsert the key fully into a properly grounded outlet. (See HOW TO PLUG IN THE POWER CORD on page 8.)... toll-free. Remove the key from the hood. Remove the screws from the console. Locate the Reed Switch (86) and the Magnet (87) on the treadmill near the power cord (see 1. Turn the Pulley until 6 p.m. PROBLEM: The power does not turn on page 8. c Tripped Reset Tripped Reset PROBLEM: ...
... sure that the power cord is plugged into a surge protector, and that the surge protector is fully inserted into the console. (See step 1 on the treadmill frame near the power cord. b. c. Reinsert the key fully into a properly grounded outlet. (See HOW TO PLUG IN THE POWER CORD on page 8.)... toll-free. Remove the key from the hood. Remove the screws from the console. Locate the Reed Switch (86) and the Magnet (87) on the treadmill near the power cord (see 1. Turn the Pulley until 6 p.m. PROBLEM: The power does not turn on page 8. c Tripped Reset Tripped Reset PROBLEM: ...
English Manual
Page 13
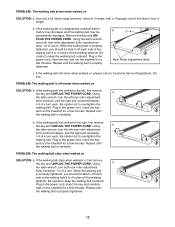
... walking belt is properly tightened. When the walking belt is properly tightened, you should be able to 4 inches off -center when walked on the treadmill for a few minutes. Remove the key and UNPLUG THE POWER CORD. Be careful to lift each . b 3ÓÐ4Ó Rear Roller Adjustment... has shifted to the right, first remove the key and UNPLUG THE POWER CORD. Plug in the power cord, insert the key and run the treadmill for a few minutes. Using a the allen wrench, turn both rear roller adjustment bolts counterclockwise, 1/4 of a turn . Be careful to 4 ...
... walking belt is properly tightened. When the walking belt is properly tightened, you should be able to 4 inches off -center when walked on the treadmill for a few minutes. Remove the key and UNPLUG THE POWER CORD. Be careful to lift each . b 3ÓÐ4Ó Rear Roller Adjustment... has shifted to the right, first remove the key and UNPLUG THE POWER CORD. Plug in the power cord, insert the key and run the treadmill for a few minutes. Using a the allen wrench, turn both rear roller adjustment bolts counterclockwise, 1/4 of a turn . Be careful to 4 ...

English Manual
Page 14
... or too low, adjust the speed of stretching and light exercise. If your goal is to burn fat, adjust the speed and incline of the treadmill until your heart rate is near the low end of your training zone. (See pages 8 and 9.) Aerobic Exercise If your goal is high performance athletic... the demand on the heart to pump blood to the muscles, and on the console to PERFORMANCE to help you to 10 minutes of the treadmill as an exercise aid in determining heart rate trends in your training zone for longer than 20 minutes.) Breathe regularly and deeply as a guide. To...
... or too low, adjust the speed of stretching and light exercise. If your goal is to burn fat, adjust the speed and incline of the treadmill until your heart rate is near the low end of your training zone. (See pages 8 and 9.) Aerobic Exercise If your goal is high performance athletic... the demand on the heart to pump blood to the muscles, and on the console to PERFORMANCE to help you to 10 minutes of the treadmill as an exercise aid in determining heart rate trends in your training zone for longer than 20 minutes.) Breathe regularly and deeply as a guide. To...
English Manual
Page 18
... is in lieu of any implied warranties of merchantability or fitness for easy reference when calling. until 6 p.m. If possible, place the treadmill near your telephone for a particular purpose is limited to you specific legal rights. Mountain Time (excluding holidays). No other warranty beyond that...be prepared to give the following information: ¥ The MODEL NUMBER OF THE PRODUCT (PFTL52580). ¥ The NAME OF THE PRODUCT (PROFORM¨ 525EX treadmill). ¥ The SERIAL NUMBER OF THE PRODUCT (see the front cover of this manual). ¥ The KEY NUMBER AND DESCRIPTION OF THE...
... is in lieu of any implied warranties of merchantability or fitness for easy reference when calling. until 6 p.m. If possible, place the treadmill near your telephone for a particular purpose is limited to you specific legal rights. Mountain Time (excluding holidays). No other warranty beyond that...be prepared to give the following information: ¥ The MODEL NUMBER OF THE PRODUCT (PFTL52580). ¥ The NAME OF THE PRODUCT (PROFORM¨ 525EX treadmill). ¥ The SERIAL NUMBER OF THE PRODUCT (see the front cover of this manual). ¥ The KEY NUMBER AND DESCRIPTION OF THE...


