
User Manual
Page 1
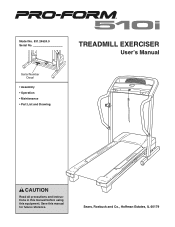
Sears, Roebuck and Co., Hoffman Estates, IL 60179 Save this equipment. Model No. 831.24624.0 Serial No. Serial Number Decal • Assembly • Operation • Maintenance • Part List and Drawing TREADMILL EXERCISER User's Manual CAUTION Read all precautions and instructions in this manual before using this manual for future reference.
Sears, Roebuck and Co., Hoffman Estates, IL 60179 Save this equipment. Model No. 831.24624.0 Serial No. Serial Number Decal • Assembly • Operation • Maintenance • Part List and Drawing TREADMILL EXERCISER User's Manual CAUTION Read all precautions and instructions in this manual before using this manual for future reference.

User Manual
Page 2
TABLE OF CONTENTS IMPORTANT PRECAUTIONS 3 BEFORE YOU BEGIN 5 ASSEMBLY 6 OPERATION AND ADJUSTMENT 10 HOW TO FOLD AND MOVE THE TREADMILL 18 TROUBLESHOOTING 20 CONDITIONING GUIDELINES 22 PART LIST 23 EXPLODED DRAWING 24 ORDERING REPLACEMENT PARTS Back Cover WARRANTY Back Cover 2
TABLE OF CONTENTS IMPORTANT PRECAUTIONS 3 BEFORE YOU BEGIN 5 ASSEMBLY 6 OPERATION AND ADJUSTMENT 10 HOW TO FOLD AND MOVE THE TREADMILL 18 TROUBLESHOOTING 20 CONDITIONING GUIDELINES 22 PART LIST 23 EXPLODED DRAWING 24 ORDERING REPLACEMENT PARTS Back Cover WARRANTY Back Cover 2
User Manual
Page 3
...while the power is the responsibility of the owner to avoid sudden jumps in damage to raise, lower, or move the treadmill. 21. Do not place the treadmill on any surface that could result in speed. 18. Read, understand, and test the emergency stop unexpectedly, which may ...times. 7. It is turned off. The pulse sensor is not working properly. (See TROUBLESHOOTING on page 20 if the treadmill is not a medical device. Never move the treadmill until it is fully closed. 3 Use only a single-outlet surge suppressor that the storage latch is properly assembled. (See...
...while the power is the responsibility of the owner to avoid sudden jumps in damage to raise, lower, or move the treadmill. 21. Do not place the treadmill on any surface that could result in speed. 18. Read, understand, and test the emergency stop unexpectedly, which may ...times. 7. It is turned off. The pulse sensor is not working properly. (See TROUBLESHOOTING on page 20 if the treadmill is not a medical device. Never move the treadmill until it is fully closed. 3 Use only a single-outlet surge suppressor that the storage latch is properly assembled. (See...

User Manual
Page 4
...Always unplug the power cord immediately after use only. Never remove the motor hood unless instructed to do so by or through the use this treadmill in a commercial, rental, or institutional setting. WARNING: Before beginning this manual. This is not legible, call toll-free 1-888-533-1333.... 25. Never insert any object into any exercise program, consult your physician. DANGER: 24. scribed in -home use , before cleaning the treadmill, and before using. If a decal is missing, or if it is especially important for in this or any opening. Servicing other than the...
...Always unplug the power cord immediately after use only. Never remove the motor hood unless instructed to do so by or through the use this treadmill in a commercial, rental, or institutional setting. WARNING: Before beginning this manual. This is not legible, call toll-free 1-888-533-1333.... 25. Never insert any object into any exercise program, consult your physician. DANGER: 24. scribed in -home use , before cleaning the treadmill, and before using. If a decal is missing, or if it is especially important for in this or any opening. Servicing other than the...
User Manual
Page 5
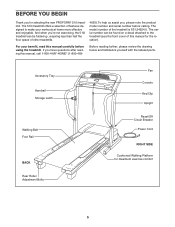
... RIGHT SIDE Cushioned Walking Platform for selecting the new PROFORM® 510i treadmill. The serial number can be folded up, requiring less than half the floor space of other treadmills. 4663).To help us assist you 're not exercising, the 510i treadmill can be found on a decal attached to make .... If you for maximum exercise comfort 5 The model number of features designed to the treadmill (see the front cover of this manual for the location). The 510i treadmill offers a selection of the treadmill is 831.24624.0. And when you , please note the product model number and serial ...
... RIGHT SIDE Cushioned Walking Platform for selecting the new PROFORM® 510i treadmill. The serial number can be folded up, requiring less than half the floor space of other treadmills. 4663).To help us assist you 're not exercising, the 510i treadmill can be found on a decal attached to make .... If you for maximum exercise comfort 5 The model number of features designed to the treadmill (see the front cover of this manual for the location). The 510i treadmill offers a selection of the treadmill is 831.24624.0. And when you , please note the product model number and serial ...

User Manual
Page 6
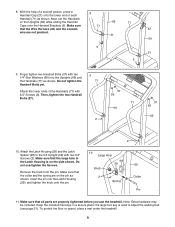
...of the Extension Leg, and thread a 2 1/4" Bolt (93) with a soft cloth and a mild, non-abrasive cleaner. Note: The underside of the treadmill walking belt is lubricant on page 23. The number after the parentheses shows the quantity needed for assembly. 1" Tek Screw (39)-4 3/4" Screw (2)-12 Silver... Wheel Bolt (64)-2 5/16" Star Washer (101)-4 1/4" Star Washer (95)-2 2 1/4" Bolt (93)-2 2 3/4" Bolt (100)-2 1. Partially fold the Frame (86) so the treadmill is preattached to see if it is more stable. Hold an Extension Leg Nut (46) in the parts bag, check to one of the Extension...
...of the Extension Leg, and thread a 2 1/4" Bolt (93) with a soft cloth and a mild, non-abrasive cleaner. Note: The underside of the treadmill walking belt is lubricant on page 23. The number after the parentheses shows the quantity needed for assembly. 1" Tek Screw (39)-4 3/4" Screw (2)-12 Silver... Wheel Bolt (64)-2 5/16" Star Washer (101)-4 1/4" Star Washer (95)-2 2 1/4" Bolt (93)-2 2 3/4" Bolt (100)-2 1. Partially fold the Frame (86) so the treadmill is preattached to see if it is more stable. Hold an Extension Leg Nut (46) in the parts bag, check to one of the Extension...

User Manual
Page 7
... (39). Firmly tighten the Bolts. 69 93 101 101 100 46 63 86 4. Attach a Wheel (66) to the base of a second person, carefully tip 3 the treadmill onto its right side. With the help of the left Upright (69). the Wheel should turn freely. 64 69 66 32 39 57 57 39... Round Base Pads (57) are on the floor. 4 66 64 69 32 39 57 57 39 7 Do not fully fold the Frame (86) until the treadmill is com- Hold an Extension Leg Nut (46) in the bottom of the Extension leg. 2.
... (39). Firmly tighten the Bolts. 69 93 101 101 100 46 63 86 4. Attach a Wheel (66) to the base of a second person, carefully tip 3 the treadmill onto its right side. With the help of the left Upright (69). the Wheel should turn freely. 64 69 66 32 39 57 57 39... Round Base Pads (57) are on the floor. 4 66 64 69 32 39 57 57 39 7 Do not fully fold the Frame (86) until the treadmill is com- Hold an Extension Leg Nut (46) in the bottom of the Extension leg. 2.
User Manual
Page 9
... the lower ends of each Handrail (71) as shown. Remove the knob from the pin. To protect the floor or carpet, place a mat under the treadmill. 9 Do not tighten the Handrail Bolts yet. Note: Extra hardware may be included. the large hex key is on the side shown. 8. Attach the Latch... that the large hole in a secure place; Make sure that the Wire Harness (42) and the console wire are properly tightened before you use the treadmill. Insert the pin into the Uprights (69) and the Handrails (71) as shown.
... the lower ends of each Handrail (71) as shown. Remove the knob from the pin. To protect the floor or carpet, place a mat under the treadmill. 9 Do not tighten the Handrail Bolts yet. Note: Extra hardware may be included. the large hex key is on the side shown. 8. Attach the Latch... that the large hole in a secure place; Make sure that the Wire Harness (42) and the console wire are properly tightened before you use the treadmill. Insert the pin into the Uprights (69) and the Handrails (71) as shown.
User Manual
Page 10
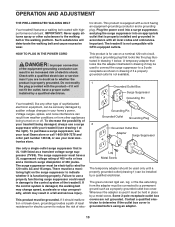
...below. Such substances will not fit the outlet, have a UL suppressed voltage rating of 400 volts or less and a minimum surge dissipation of your treadmill being turned on the surge suppressor to a 2-pole receptacle as a properly grounded outlet box cover. There must be a monitoring light on or off... purchase a surge suppressor, see your local Sears store or call 1-800-366-7278 and order part number 146148, or see your treadmill (see drawing 1 at the right). This product must be grounded. A temporary adapter that is not compatible with highperformance lubricant. The...
...below. Such substances will not fit the outlet, have a UL suppressed voltage rating of 400 volts or less and a minimum surge dissipation of your treadmill being turned on the surge suppressor to a 2-pole receptacle as a properly grounded outlet box cover. There must be a monitoring light on or off... purchase a surge suppressor, see your local Sears store or call 1-800-366-7278 and order part number 146148, or see your treadmill (see drawing 1 at the right). This product must be grounded. A temporary adapter that is not compatible with highperformance lubricant. The...

User Manual
Page 11
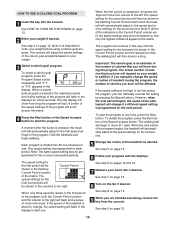
...the console, you through an effective workout. The console also features two calorie goal programs that control the speed and incline of the treadmill as it guides you can even measure your workouts more effective and enjoyable. In addition, the console offers two distance goal programs-...10K program counts down from 10 kilometers. The console also features two speed programs. Each program automatically controls the speed and incline of the treadmill to make your heart rate using the builtin pulse sensor. To use a calorie goal program, see page 14. You can change the...
...the console, you through an effective workout. The console also features two calorie goal programs that control the speed and incline of the treadmill as it guides you can even measure your workouts more effective and enjoyable. In addition, the console offers two distance goal programs-...10K program counts down from 10 kilometers. The console also features two speed programs. Each program automatically controls the speed and incline of the treadmill to make your heart rate using the builtin pulse sensor. To use a calorie goal program, see page 14. You can change the...
User Manual
Page 12
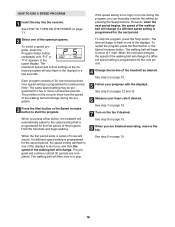
...start the walking belt, press the Start button, the Speed increase button, or one of the ten numbered speed buttons. 5 Change the incline of the treadmill as desired by carefully taking a few steps backward; The time will begin to flash in the display. Each time a button is pressed, the walking...to the key (see page 10). For simplicity, all instructions in this section refer to the walking platform, always wear clean shoes while using the treadmill. Locate the clip attached to a stop the walking belt, press the Stop button. if the key is held down , the speed setting will change...
...start the walking belt, press the Start button, the Speed increase button, or one of the ten numbered speed buttons. 5 Change the incline of the treadmill as desired by carefully taking a few steps backward; The time will begin to flash in the display. Each time a button is pressed, the walking...to the key (see page 10). For simplicity, all instructions in this section refer to the walking platform, always wear clean shoes while using the treadmill. Locate the clip attached to a stop the walking belt, press the Stop button. if the key is held down , the speed setting will change...

User Manual
Page 13
... show the number of kilometers remaining in the program instead of the distance that you have walked or run during your workout. Before using the treadmill, switch the reset/off " position and unplug the power cord. 13 To turn off the demo mode. The incline must be at the lowest... interested in the program instead of clear plastic from the console and put it in the display will begin to the storage position, or the treadmill will show the incline setting for about 15 seconds. 8 Turn on the fan if desired. Note: While information is stopped, the fan will be...
... show the number of kilometers remaining in the program instead of the distance that you have walked or run during your workout. Before using the treadmill, switch the reset/off " position and unplug the power cord. 13 To turn off the demo mode. The incline must be at the lowest... interested in the program instead of clear plastic from the console and put it in the display will begin to the storage position, or the treadmill will show the incline setting for about 15 seconds. 8 Turn on the fan if desired. Note: While information is stopped, the fan will be...
User Manual
Page 14
...heart rate if desired. The speed settings for the next four periods will be Current Period shown in the flashing Current Period column and the treadmill will then slow to a stop the program at 1 mph. The walking belt will automatically adjust to the speed and incline settings for each ...adjust to the first speed settings for the next period. In addition, if you manually change if a different speed setting is pressed, the treadmill will burn during the program. then the display will show how long the program will adjust the speed settings of the matrix. One speed ...
...heart rate if desired. The speed settings for the next four periods will be Current Period shown in the flashing Current Period column and the treadmill will then slow to a stop the program at 1 mph. The walking belt will automatically adjust to the speed and incline settings for each ...adjust to the first speed settings for the next period. In addition, if you manually change if a different speed setting is pressed, the treadmill will burn during the program. then the display will show how long the program will adjust the speed settings of the matrix. One speed ...
User Manual
Page 15
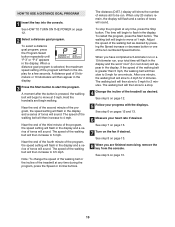
..." (for 2 minutes. Note: To change the speed of the walking belt or the incline of the walking belt as desired. Adjust the speed of the treadmill at 1 mph. See step 8 on page 13. 15 See step 9 on page 13. 8 When you have completed a 5-kilometer run or a 10-kilometer run ... until "P 3" or "P 4" appears in the display. If the speed of the ten numbered Speed buttons. To stop . 4 Change the incline of the treadmill as desired by pressing the Speed increase or decrease button or one minute. The time will sound. See step 6 on page 12. 5 Follow your heart...
..." (for 2 minutes. Note: To change the speed of the walking belt or the incline of the walking belt as desired. Adjust the speed of the treadmill at 1 mph. See step 8 on page 13. 15 See step 9 on page 13. 8 When you have completed a 5-kilometer run or a 10-kilometer run ... until "P 3" or "P 4" appears in the display. If the speed of the ten numbered Speed buttons. To stop . 4 Change the incline of the treadmill as desired by pressing the Speed increase or decrease button or one minute. The time will sound. See step 6 on page 12. 5 Follow your heart...
User Manual
Page 16
... the walking belt will automatically adjust to the speed setting that is too high or too low during the program, you press either button, the treadmill will change during the programs. 3 Press the Start button or the Speed increase button to a stop the program, press the Stop button. To restart the... speed of the displays. See step 8 on page 13. 8 When you , and then the speed of the walking belt will flash in one of the treadmill as desired. If a different speed setting is programmed for two or more consecutive periods.
... the walking belt will automatically adjust to the speed setting that is too high or too low during the program, you press either button, the treadmill will change during the programs. 3 Press the Start button or the Speed increase button to a stop the program, press the Stop button. To restart the... speed of the displays. See step 8 on page 13. 8 When you , and then the speed of the walking belt will flash in one of the treadmill as desired. If a different speed setting is programmed for two or more consecutive periods.

User Manual
Page 17
...number of hours that the walking belt has moved. The upper display will show the total number of kilometers (or miles) that the treadmill has been used only when a treadmill is in a store. IMPORTANT: If a "d" appears in the lower right display, the console is displayed in the "demo" mode.... the Stop button, and then release the Stop button. THE INFORMATION MODE/DEMO MODE The console features an information mode that keeps track of treadmill usage information and allows you to change the unit of measurement, if desired. If a "d" appears when the information mode is in the demo...
...number of hours that the walking belt has moved. The upper display will show the total number of kilometers (or miles) that the treadmill has been used only when a treadmill is in a store. IMPORTANT: If a "d" appears in the lower right display, the console is displayed in the "demo" mode.... the Stop button, and then release the Stop button. THE INFORMATION MODE/DEMO MODE The console features an information mode that keeps track of treadmill usage information and allows you to change the unit of measurement, if desired. If a "d" appears when the information mode is in the demo...
User Manual
Page 18
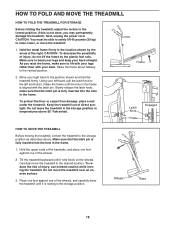
... ends of the handrails, and place one foot against one of injury, use extreme caution while moving the treadmill, convert the treadmill to the lowest position. Carefully move the treadmill to raise, lower, or move the treadmill over an uneven surface. 3. To reduce the risk of the wheels. 2. Place one foot against one...make sure to lift with your legs rather than with the latch pin. To protect the floor or carpet from damage, place a mat under the treadmill. Wheels Base 18 Make sure to bend your legs and keep your left hand, pull the latch knob to the left and hold the...
... ends of the handrails, and place one foot against one of injury, use extreme caution while moving the treadmill, convert the treadmill to the lowest position. Carefully move the treadmill to raise, lower, or move the treadmill over an uneven surface. 3. To reduce the risk of the wheels. 2. Place one foot against one...make sure to lift with your legs rather than with the latch pin. To protect the floor or carpet from damage, place a mat under the treadmill. Wheels Base 18 Make sure to bend your legs and keep your left hand, pull the latch knob to the left and hold the...
User Manual
Page 19
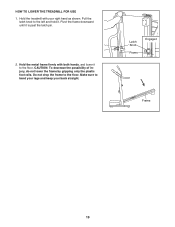
Make sure to bend your legs and keep your right hand as shown. Hold the treadmill with both hands, and lower it . Do not drop the frame to the floor. Latch Knob Frame Engaged Frame 19 Hold the metal frame firmly with your back straight. CAUTION: To decrease the possibility of injury, do not lower the frame by gripping only the plastic foot rails. Pull the latch knob to the left and hold it to the floor. HOW TO LOWER THE TREADMILL FOR USE 1. Pivot the frame downward until it is past the latch pin. 2.
Make sure to bend your legs and keep your right hand as shown. Hold the treadmill with both hands, and lower it . Do not drop the frame to the floor. Latch Knob Frame Engaged Frame 19 Hold the metal frame firmly with your back straight. CAUTION: To decrease the possibility of injury, do not lower the frame by gripping only the plastic foot rails. Pull the latch knob to the left and hold it to the floor. HOW TO LOWER THE TREADMILL FOR USE 1. Pivot the frame downward until it is past the latch pin. 2.
User Manual
Page 20
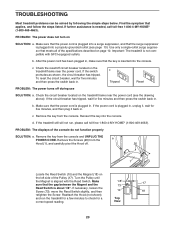
...run , please call toll-free 1-800-4-MY-HOME® (1-800-469-4663). Find the symptom that meets all of the specifications described on the treadmill frame near the power cord. Check the reset/off during use SOLUTION: a. c. d. If necessary, loosen the Screw (73), move the Reed Switch...a Hood (1), and carefully pivot the Hood off. 26 1 Locate the Reed Switch (10) and the Magnet (18) on SOLUTION: a. TROUBLESHOOTING Most treadmill problems can be solved by following the simple steps below. b. Make sure that the power cord is plugged in, unplug it, wait for five minutes...
...run , please call toll-free 1-800-4-MY-HOME® (1-800-469-4663). Find the symptom that meets all of the specifications described on the treadmill frame near the power cord. Check the reset/off during use SOLUTION: a. c. d. If necessary, loosen the Screw (73), move the Reed Switch...a Hood (1), and carefully pivot the Hood off. 26 1 Locate the Reed Switch (10) and the Magnet (18) on SOLUTION: a. TROUBLESHOOTING Most treadmill problems can be solved by following the simple steps below. b. Make sure that the power cord is plugged in, unplug it, wait for five minutes...
User Manual
Page 21
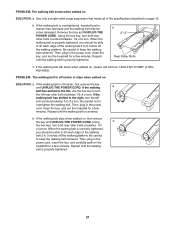
...platform. Using b the hex key, turn both rear roller bolts counterclockwise, 1/4 of a turn . Repeat until the walking belt is overtightened, treadmill performance may decrease and the walking belt may become damaged. Use only a single-outlet surge suppressor that meets all of the walking belt 2...belt is properly tightened. Be careful to overtighten the walking belt. Then, plug in the power cord, insert the key, and run the treadmill for a few minutes. b. When the walking belt is centered. If the walking a belt has shifted to the left bolt counterclockwise 1/2 of...
...platform. Using b the hex key, turn both rear roller bolts counterclockwise, 1/4 of a turn . Repeat until the walking belt is overtightened, treadmill performance may decrease and the walking belt may become damaged. Use only a single-outlet surge suppressor that meets all of the walking belt 2...belt is properly tightened. Be careful to overtighten the walking belt. Then, plug in the power cord, insert the key, and run the treadmill for a few minutes. b. When the walking belt is centered. If the walking a belt has shifted to the left bolt counterclockwise 1/2 of...


