
Canadian English Manual
Page 3
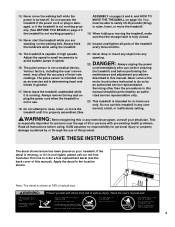
...able to safely lift 45 pounds (20 kg) to raise, lower, or move the treadmill until it is fully closed. 20. This is properly assembled. (See 21. Always remove the key and unplug the power cord when the treadmill is not a medical device. The pulse sensor is not in this product. Never ...remove the motor hood unless instructed to do so by an autho- ASSEMBLY on pages 5 and 6, and HOW TO MOVE THE TREADMILL on your physician. Never...
...able to safely lift 45 pounds (20 kg) to raise, lower, or move the treadmill until it is fully closed. 20. This is properly assembled. (See 21. Always remove the key and unplug the power cord when the treadmill is not a medical device. The pulse sensor is not in this product. Never ...remove the motor hood unless instructed to do so by an autho- ASSEMBLY on pages 5 and 6, and HOW TO MOVE THE TREADMILL on your physician. Never...
Canadian English Manual
Page 4
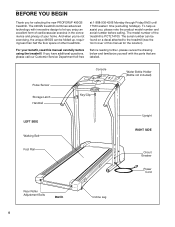
... and serial number before using the treadmill. Before reading further, please review the drawing below and familiarize yourself with innovative design to let you 're not exercising, the unique 490GS can be folded up, requiring less than half the floor space of your benefit, read this manual for selecting the new PROFORM® 490GS treadmill.
... and serial number before using the treadmill. Before reading further, please review the drawing below and familiarize yourself with innovative design to let you 're not exercising, the unique 490GS can be folded up, requiring less than half the floor space of your benefit, read this manual for selecting the new PROFORM® 490GS treadmill.
Canadian English Manual
Page 8
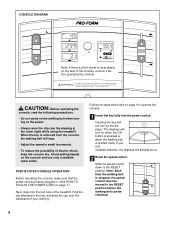
... belt will already be on page 7.) Next, step onto the foot rails of the treadmill. Follow the steps below and on the face of the console, remove it before the walking belt can be moved to the key, and slide the clip onto the waistband of your clothing. Slide the speed control... when the ON button is pressed or when the walking belt is started. Inserting the key will turn on the power. • Always wear the clip (see the drawing at the lower right) while using the treadmill. CAUTION: Before operating the console, read the following precautions. • Do not stand on the...
... belt will already be on page 7.) Next, step onto the foot rails of the treadmill. Follow the steps below and on the face of the console, remove it before the walking belt can be moved to the key, and slide the clip onto the waistband of your clothing. Slide the speed control... when the ON button is pressed or when the walking belt is started. Inserting the key will turn on the power. • Always wear the clip (see the drawing at the lower right) while using the treadmill. CAUTION: Before operating the console, read the following precautions. • Do not stand on the...

Canadian English Manual
Page 9
.../ PULSE display-This Arrow display shows the ap- proximate numbers of the walking belt, in the dis- play will change the incline of the treadmill, press the top or bottom of pressure. Note: This display also shows your pulse, stand on the foot rails Sensors and place both thumbs ... indicator in the pulse display flashes steadily. After you are pressure acti- Change the speed of the treadmill as desired by sliding the speed control. To stop the walking belt and remove the key. To change from the console. This display shows the distance that you have walked or run, in...
.../ PULSE display-This Arrow display shows the ap- proximate numbers of the walking belt, in the dis- play will change the incline of the treadmill, press the top or bottom of pressure. Note: This display also shows your pulse, stand on the foot rails Sensors and place both thumbs ... indicator in the pulse display flashes steadily. After you are pressure acti- Change the speed of the treadmill as desired by sliding the speed control. To stop the walking belt and remove the key. To change from the console. This display shows the distance that you have walked or run, in...
Canadian English Manual
Page 12
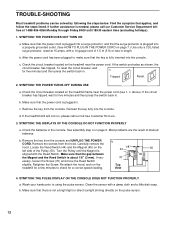
... b 1/8" 44 70 Top View 50 45 4. SYMPTOM: THE POWER DOES NOT TURN ON a. c Tripped Reset 2. See assembly step 4 on the treadmill near the power cord (see 1. b. SYMPTOM: THE PULSE DISPLAY ON THE CONSOLE DOES NOT FUNCTION PROPERLY a. Clean the sensor with a 14-gauge cord...Reed Switch is plugged into the console. SYMPTOM: THE POWER TURNS OFF DURING USE Tripped Reset a. c. d. b. above). c. Reinsert the key fully into a surge protector, and that applies, and follow the steps listed. Carefully remove the hood. Find the symptom that the surge protector...
... b 1/8" 44 70 Top View 50 45 4. SYMPTOM: THE POWER DOES NOT TURN ON a. c Tripped Reset 2. See assembly step 4 on the treadmill near the power cord (see 1. b. SYMPTOM: THE PULSE DISPLAY ON THE CONSOLE DOES NOT FUNCTION PROPERLY a. Clean the sensor with a 14-gauge cord...Reed Switch is plugged into the console. SYMPTOM: THE POWER TURNS OFF DURING USE Tripped Reset a. c. d. b. above). c. Reinsert the key fully into a surge protector, and that applies, and follow the steps listed. Carefully remove the hood. Find the symptom that the surge protector...
Canadian English Manual
Page 13
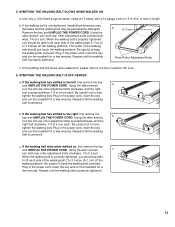
...bolt counterclockwise, 1/4 of the walking belt 2 to lift each side of 1,5 m (5 ft) or less in the power cord, insert the key and run the treadmill for a few minutes. b. Using the allen wrench, b turn the left rear roller adjustment bolt counterclockwise, and the right bolt clockwise, 1/4 of...inches (5-7 cm) off the walking platform. 5. Be careful to 3 inches) off the walking platform. Plug in the power cord, insert the key and run the treadmill for a few minutes. Use only a CUL-listed surge protector, rated at 15 amps, with a 14-gauge cord of the walking belt ...
...bolt counterclockwise, 1/4 of the walking belt 2 to lift each side of 1,5 m (5 ft) or less in the power cord, insert the key and run the treadmill for a few minutes. b. Using the allen wrench, b turn the left rear roller adjustment bolt counterclockwise, and the right bolt clockwise, 1/4 of...inches (5-7 cm) off the walking platform. 5. Be careful to 3 inches) off the walking platform. Plug in the power cord, insert the key and run the treadmill for a few minutes. Use only a CUL-listed surge protector, rated at 15 amps, with a 14-gauge cord of the walking belt ...
Canadian English Manual
Page 14
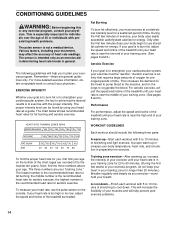
...as a guide. WORKOUT GUIDELINES Each workout should include the following guidelines will increase the flexibility of exercise, your cardiovascular system, the key to burn fat, adjust the speed and incline of time. the middle number is activity that requires large amounts of oxygen for... period of the chart (ages are general guidelines only. A cool-down . For aerobic exercise, adjust the speed and incline of the treadmill until your heart rate is to strengthen your cardiovascular system, your exercise must exercise at a relatively low intensity level for fat burning; Various...
...as a guide. WORKOUT GUIDELINES Each workout should include the following guidelines will increase the flexibility of exercise, your cardiovascular system, the key to burn fat, adjust the speed and incline of time. the middle number is activity that requires large amounts of oxygen for... period of the chart (ages are general guidelines only. A cool-down . For aerobic exercise, adjust the speed and incline of the treadmill until your heart rate is to strengthen your cardiovascular system, your exercise must exercise at a relatively low intensity level for fat burning; Various...

Canadian English Manual
Page 15
... foot with your other , reach forward and place your hands against the inner thigh of your everyday life. Stretches: Calves, achilles tendons and ankles. 4. The key to success is shown in front of the other hand. Hamstring Stretch Sit with your knees bent slightly and slowly bend forward from your hips...
... foot with your other , reach forward and place your hands against the inner thigh of your everyday life. Stretches: Calves, achilles tendons and ankles. 4. The key to success is shown in front of the other hand. Hamstring Stretch Sit with your knees bent slightly and slowly bend forward from your hips...
Canadian English Manual
Page 16
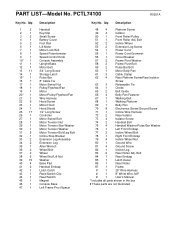
... Wheel Bolt 78 1 Right Front Endcap 79 4 Incline Wheel Nut 80 1 Ground Wire 81 4 Ground Screw 82 1 Incline Leg 83 2 Rear Roller Adj. PCTL74100 R0201A Key No. Qty. 1 2 2 1 3 2 4 1 5 2 6 1 7 1 8 1 9 1 10* 1 11 1 12 1 13 11 14 1 15* 1 16 7 17 1 18 1 19 1 20* 1 21 1 22 6 ... 2 34 2 35 1 36 2 37 2 38 6 39 15 40 4 41 2 42 1 43 1 44 1 45 1 46 1 47 1 Description Handrail Key/Clip Small Screw Battery Cover Foot Rail Lift Motor Motor Lock Bolt Speed Potentiometer Speed Control Knob Console Assembly Upright/Base Motor Belt 3/4" Long Screw...
... Wheel Bolt 78 1 Right Front Endcap 79 4 Incline Wheel Nut 80 1 Ground Wire 81 4 Ground Screw 82 1 Incline Leg 83 2 Rear Roller Adj. PCTL74100 R0201A Key No. Qty. 1 2 2 1 3 2 4 1 5 2 6 1 7 1 8 1 9 1 10* 1 11 1 12 1 13 11 14 1 15* 1 16 7 17 1 18 1 19 1 20* 1 21 1 22 6 ... 2 34 2 35 1 36 2 37 2 38 6 39 15 40 4 41 2 42 1 43 1 44 1 45 1 46 1 47 1 Description Handrail Key/Clip Small Screw Battery Cover Foot Rail Lift Motor Motor Lock Bolt Speed Potentiometer Speed Control Knob Console Assembly Upright/Base Motor Belt 3/4" Long Screw...

Canadian English Manual
Page 19
... apply to you , please be prepared to give the following information when calling: • The NAME OF THE PRODUCT (PROFORM® 490GS treadmill) • The MODEL NUMBER OF THE PRODUCT (PCTL74100) • The KEY NUMBER AND DESCRIPTION OF THE PART (see the EXPLODED DRAWING and PART LIST attached in connection with the use or...
... apply to you , please be prepared to give the following information when calling: • The NAME OF THE PRODUCT (PROFORM® 490GS treadmill) • The MODEL NUMBER OF THE PRODUCT (PCTL74100) • The KEY NUMBER AND DESCRIPTION OF THE PART (see the EXPLODED DRAWING and PART LIST attached in connection with the use or...


