

English Manual
Page 2
TABLE OF CONTENTS IMPORTANT PRECAUTIONS 3 BEFORE YOU BEGIN 5 ASSEMBLY 6 OPERATION AND ADJUSTMENT 10 HOW TO FOLD AND MOVE THE TREADMILL 23 TROUBLESHOOTING 25 CONDITIONING GUIDELINES 27 ORDERING REPLACEMENT PARTS Back Cover LIMITED WARRANTY Back Cover Note: An EXPLODED DRAWING and a PART LIST are attached in the center of this manual. 2
TABLE OF CONTENTS IMPORTANT PRECAUTIONS 3 BEFORE YOU BEGIN 5 ASSEMBLY 6 OPERATION AND ADJUSTMENT 10 HOW TO FOLD AND MOVE THE TREADMILL 23 TROUBLESHOOTING 25 CONDITIONING GUIDELINES 27 ORDERING REPLACEMENT PARTS Back Cover LIMITED WARRANTY Back Cover Note: An EXPLODED DRAWING and a PART LIST are attached in the center of this manual. 2
English Manual
Page 25
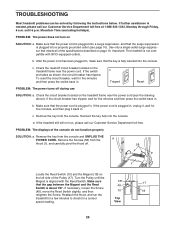
TROUBLESHOOTING Most treadmill problems can be solved by following the instructions below. Important: The treadmill is aligned with GFCI-equipped outlets. b. b. Remove the key from the console and UNPLUG THE POWER CORD. Turn the Pulley until 6 p.m. Top View 25 until... circuit breaker has tripped, wait for five minutes and then press the switch back in . d. PROBLEM: The displays of the specifications described on the treadmill frame near the power cord (see page 10). Remove the key from the console. Make sure that the power cord is plugged into the console...
TROUBLESHOOTING Most treadmill problems can be solved by following the instructions below. Important: The treadmill is aligned with GFCI-equipped outlets. b. b. Remove the key from the console and UNPLUG THE POWER CORD. Turn the Pulley until 6 p.m. Top View 25 until... circuit breaker has tripped, wait for five minutes and then press the switch back in . d. PROBLEM: The displays of the specifications described on the treadmill frame near the power cord (see page 10). Remove the key from the console. Make sure that the power cord is plugged into the console...


