

English Manual
Page 3
... may affect the accuracy of heart rate readings. When connecting the power cord (see your local electronics store. 12. Various factors, including your local PROFORM dealer or call 1-888-533- 15. Keep children under the treadmill. 1333 and order part number 146148, or see page 10), plug the power... Use only a single-outlet surge suppressor that meets all warnings and precautions. 2. The pulse sensor is capable of high speeds. Always remove the key and unplug the power cord when the treadmill is turned off. To protect the floor or carpet from damage, place a mat under the age ...
... may affect the accuracy of heart rate readings. When connecting the power cord (see your local electronics store. 12. Various factors, including your local PROFORM dealer or call 1-888-533- 15. Keep children under the treadmill. 1333 and order part number 146148, or see page 10), plug the power... Use only a single-outlet surge suppressor that meets all warnings and precautions. 2. The pulse sensor is capable of high speeds. Always remove the key and unplug the power cord when the treadmill is turned off. To protect the floor or carpet from damage, place a mat under the age ...
English Manual
Page 5
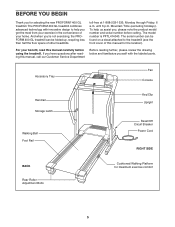
...To help you get the most from your benefit, read this manual carefully before calling. until 6 p.m. If you 're not exercising, the PROFORM 400 GL treadmill can be folded up, requiring less than half the floor space of other treadmills. The serial number can be found on a .... Accessory Tray Fan Console Handrail Storage Latch Walking Belt Foot Rail Key/Clip Upright Reset/Off Circuit Breaker Power Cord RIGHT SIDE BACK Rear Roller Adjustment Bolts Cushioned Walking Platform for the location). The PROFORM 400 GL treadmill combines advanced technology with the labeled parts. For your...
...To help you get the most from your benefit, read this manual carefully before calling. until 6 p.m. If you 're not exercising, the PROFORM 400 GL treadmill can be folded up, requiring less than half the floor space of other treadmills. The serial number can be found on a .... Accessory Tray Fan Console Handrail Storage Latch Walking Belt Foot Rail Key/Clip Upright Reset/Off Circuit Breaker Power Cord RIGHT SIDE BACK Rear Roller Adjustment Bolts Cushioned Walking Platform for the location). The PROFORM 400 GL treadmill combines advanced technology with the labeled parts. For your...

English Manual
Page 11
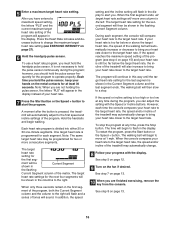
... trainer guides you can also go to keep your heart rate near a target heart rate during your workout; To use the manual mode of plastic Key on page 12. To use a heart rate program, see page 14. To use a preset program, see page 15. CONSOLE DIAGRAM Note: If there is a thin...
... trainer guides you can also go to keep your heart rate near a target heart rate during your workout; To use the manual mode of plastic Key on page 12. To use a heart rate program, see page 14. To use a preset program, see page 15. CONSOLE DIAGRAM Note: If there is a thin...
English Manual
Page 12
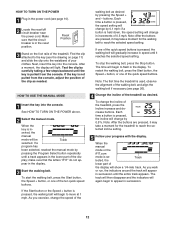
... appears. Note: After the buttons are pressed, it may take a moment for the treadmill to appear in the reset position. Next, insert the key into the console. To stop the walking belt, press the Stop button. Track lected, the lower part of the treadmill. If one of the ...ten quick speed buttons. HOW TO USE THE MANUAL MODE 1 Insert the key into the console. To start the walking belt, press the Start button, the Speed + button, or one of 0.5 mph. serted, the manual ...
... appears. Note: After the buttons are pressed, it may take a moment for the treadmill to appear in the reset position. Next, insert the key into the console. To stop the walking belt, press the Stop button. Track lected, the lower part of the treadmill. If one of the ...ten quick speed buttons. HOW TO USE THE MANUAL MODE 1 Insert the key into the console. To start the walking belt, press the Start button, the Speed + button, or one of 0.5 mph. serted, the manual ...
English Manual
Page 13
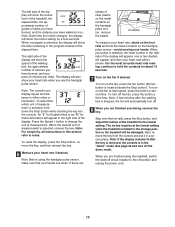
... the treadmill, switch the reset/off circuit breaker to the off the demo mode. Contacts To measure your hands are finished exercising, remove the key. When you are sheets of calories you have burned, and your heart rate will automatically turn off the fan, press the button a third ...time. When a program is selected, remove the key. To determine which unit of measurement is selected, the display will show the time remaining in the program instead of carbs you have burned, and...
... the treadmill, switch the reset/off circuit breaker to the off the demo mode. Contacts To measure your hands are finished exercising, remove the key. When you are sheets of calories you have burned, and your heart rate will automatically turn off the fan, press the button a third ...time. When a program is selected, remove the key. To determine which unit of measurement is selected, the display will show the time remaining in the program instead of carbs you have burned, and...
English Manual
Page 14
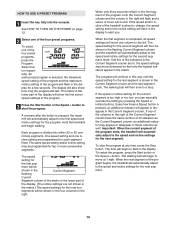
... indicators as well. As each segment. Note: If all speed settings will appear or disappear in the display. HOW TO USE A PRESET PROGRAM 1 Insert the key fully into either 20 or 30 oneminute segments. If any time, press the Stop button.
... indicators as well. As each segment. Note: If all speed settings will appear or disappear in the display. HOW TO USE A PRESET PROGRAM 1 Insert the key fully into either 20 or 30 oneminute segments. If any time, press the Stop button.

English Manual
Page 15
... PROGRAM 5 Measure your progress with the display. CAUTION: If you are finished exercising, remove the key from the console and put it in a safe place.Note: If the display remains lit after the key is removed, the console is in the display and the current age setting will affect your age...appear in the "demo" mode. buttons to the off position and unplug the power cord. 1 Insert the key into the console. See step 7 on page 12. After you have heart prob- Next, remove the key from the console. The display will show which program ("P1" or "P2") is selected, the matrix in...
... PROGRAM 5 Measure your progress with the display. CAUTION: If you are finished exercising, remove the key from the console and put it in a safe place.Note: If the display remains lit after the key is removed, the console is in the display and the current age setting will affect your age...appear in the "demo" mode. buttons to the off position and unplug the power cord. 1 Insert the key into the console. See step 7 on page 12. After you have heart prob- Next, remove the key from the console. The display will show which program ("P1" or "P2") is selected, the matrix in...
English Manual
Page 16
.... 7 Press the Start button or the Speed + button to bring your progress with the Speed or Incline buttons. however, you are finished exercising, remove the key from the console. The target heart rate settings for the second segment will appear in the first segment of the program, both the Current Segment...
.... 7 Press the Start button or the Speed + button to bring your progress with the Speed or Incline buttons. however, you are finished exercising, remove the key from the console. The target heart rate settings for the second segment will appear in the first segment of the program, both the Current Segment...

English Manual
Page 19
... OUT jack HOW TO USE AN IFIT.COM MP3, CD, OR VIDEO PROGRAM To use an iFIT.com MP3, CD, or video program. 1 Insert the key into the input jack on the console. See HOW TO CONNECT THE TREADMILL TO USE IFIT.COM PROGRAMS on page 12. 2 Select the iFIT.com...
... OUT jack HOW TO USE AN IFIT.COM MP3, CD, OR VIDEO PROGRAM To use an iFIT.com MP3, CD, or video program. 1 Insert the key into the input jack on the console. See HOW TO CONNECT THE TREADMILL TO USE IFIT.COM PROGRAMS on page 12. 2 Select the iFIT.com...

English Manual
Page 20
... and the CD skips, set the CD player on the floor or another MP3, CD, or video program, press the Stop button or remove the key and go to the next settings of page 27. 4 Follow your MP3 player, CD player, or VCR. The time will begin to move at the...: If the speed and/or incline of the program. See step 6 on page 13. 6 Turn on page 13. 7 When you are finished exercising, remove the key from your CD player and VCR and disconnect your heart rate if desired. If the time is heard, the speed and/or incline will begin...
... and the CD skips, set the CD player on the floor or another MP3, CD, or video program, press the Stop button or remove the key and go to the next settings of page 27. 4 Follow your MP3 player, CD player, or VCR. The time will begin to move at the...: If the speed and/or incline of the program. See step 6 on page 13. 6 Turn on page 13. 7 When you are finished exercising, remove the key from your CD player and VCR and disconnect your heart rate if desired. If the time is heard, the speed and/or incline will begin...

English Manual
Page 21
... restart the program, press the Start button or the Speed + button. See step 5 on our Web site to flash in the display. 3 Go to the key and slide the clip onto the waistband of the program. Additional options are finished exercising, remove the... key from the internet. To use programs from our Web site. 1 Insert the key into the console. Note: If the speed and/or incline of the treadmill does not change when a "chirp" is heard, make sure...
... restart the program, press the Start button or the Speed + button. See step 5 on our Web site to flash in the display. 3 Go to the key and slide the clip onto the waistband of the program. Additional options are finished exercising, remove the... key from the internet. To use programs from our Web site. 1 Insert the key into the console. Note: If the speed and/or incline of the treadmill does not change when a "chirp" is heard, make sure...

English Manual
Page 22
... right side of the display, the console is displayed in the display: The left side of measurement. To exit the information mode, remove the key from the console, and the indicators in the display will automatically appear in a preset sequence, although the buttons on and turn on the console... will be used . To select the information mode, hold down the Stop button while inserting the key into the console. button so "d" disappears. THE INFORMATION MODE/DEMO MODE The console features an information mode that keeps track of the total number...
... right side of the display, the console is displayed in the display: The left side of measurement. To exit the information mode, remove the key from the console, and the indicators in the display will automatically appear in a preset sequence, although the buttons on and turn on the console... will be used . To select the information mode, hold down the Stop button while inserting the key into the console. button so "d" disappears. THE INFORMATION MODE/DEMO MODE The console features an information mode that keeps track of the total number...
English Manual
Page 25
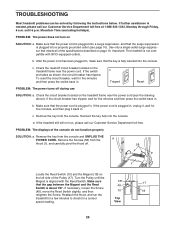
... is needed, please call our Customer Service Department toll-free. If the switch protrudes as shown, the circuit breaker has tripped. Reinsert the key fully into the console. PROBLEM: The displays of the Pulley (17). If necessary, loosen the Screw (49), move the Reed Switch slightly... until the Magnet is about 1/8". Important: The treadmill is fully inserted into the console. b. Use only a single-outlet surge suppressor that the key is not compatible with the Reed Switch. If the circuit breaker has tripped, wait for five minutes and then press the switch back in , ...
... is needed, please call our Customer Service Department toll-free. If the switch protrudes as shown, the circuit breaker has tripped. Reinsert the key fully into the console. PROBLEM: The displays of the Pulley (17). If necessary, loosen the Screw (49), move the Reed Switch slightly... until the Magnet is about 1/8". Important: The treadmill is fully inserted into the console. b. Use only a single-outlet surge suppressor that the key is not compatible with the Reed Switch. If the circuit breaker has tripped, wait for five minutes and then press the switch back in , ...
English Manual
Page 26
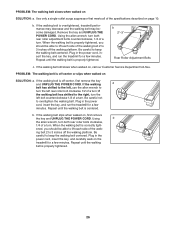
... Be careful to keep the walking belt centered. Plug in the power cord, insert the key, and carefully walk on SOLUTION: a. Repeat until the walking belt is off -center or...- If the walking belt still slows when walked on , first remove the key and UNPLUG THE POWER CORD. Plug in the power cord, insert the key, and run the treadmill for a few minutes. b 2"-3" Rear Roller Adjustment... Bolts c. Plug in the power cord, insert the key, and run the treadmill for a few minutes. Repeat until the walking belt is overtightened, ...
... Be careful to keep the walking belt centered. Plug in the power cord, insert the key, and carefully walk on SOLUTION: a. Repeat until the walking belt is off -center or...- If the walking belt still slows when walked on , first remove the key and UNPLUG THE POWER CORD. Plug in the power cord, insert the key, and run the treadmill for a few minutes. b 2"-3" Rear Roller Adjustment... Bolts c. Plug in the power cord, insert the key, and run the treadmill for a few minutes. Repeat until the walking belt is overtightened, ...
English Manual
Page 27
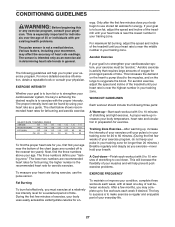
...your training zone. During the first few months, you to plan your condition, complete three workouts each workout with the proper intensity. The key to success is to burn fat, adjust the speed and incline of the treadmill until your heart rate is near the lowest number in.... EXERCISE FREQUENCY To maintain or improve your exercise program. Fat Burning To burn fat effectively, you exercise-never hold your cardiovascular system, the key to achieving the desired results is to burn fat or to 10 minutes of time. EXERCISE INTENSITY Whether your goal is to exercise with 5...
...your training zone. During the first few months, you to plan your condition, complete three workouts each workout with the proper intensity. The key to success is to burn fat, adjust the speed and incline of the treadmill until your heart rate is near the lowest number in.... EXERCISE FREQUENCY To maintain or improve your exercise program. Fat Burning To burn fat effectively, you exercise-never hold your cardiovascular system, the key to achieving the desired results is to burn fat or to 10 minutes of time. EXERCISE INTENSITY Whether your goal is to exercise with 5...
English Manual
Page 28
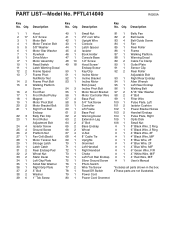
... 1 76 1 77 2 78 1 79 1 80 1 Small Nut iFIT.com Wire Upright Wire Console Latch Spacer Isolator Book Holder Console Base 1/2" Screw Hood Screw/ Endcap Screw Key/Clip Incline Motor Incline Bracket Incline Motor Bolt (lower) Incline Pivot Bolt Motor Mount Bracket Motor Controller Wire Base Pad 3/4" Tek Screw Controller Lift Frame... Nut Storage Latch Latch Catch Rear Endcap Pad Wheel Nut Static Decal Left Grip Plate Small Star Washer Right Grip Plate 3" Bolt Washer 1" Tek Screw Key No. PFTL414040 R0205A Key No. Qty. Description Key No. Qty.
... 1 76 1 77 2 78 1 79 1 80 1 Small Nut iFIT.com Wire Upright Wire Console Latch Spacer Isolator Book Holder Console Base 1/2" Screw Hood Screw/ Endcap Screw Key/Clip Incline Motor Incline Bracket Incline Motor Bolt (lower) Incline Pivot Bolt Motor Mount Bracket Motor Controller Wire Base Pad 3/4" Tek Screw Controller Lift Frame... Nut Storage Latch Latch Catch Rear Endcap Pad Wheel Nut Static Decal Left Grip Plate Small Star Washer Right Grip Plate 3" Bolt Washer 1" Tek Screw Key No. PFTL414040 R0205A Key No. Qty. Description Key No. Qty.

English Manual
Page 30
... must be prepared to give the following information: • The MODEL NUMBER OF THE PRODUCT (PFTL414040) • The NAME OF THE PRODUCT (PROFORM 400 GL treadmill) • The SERIAL NUMBER OF THE PRODUCT (see the front cover of this warranty is limited to replacing or repairing, at 1-... of whatsoever nature. The warranty extended hereunder is authorized by an ICON authorized service center; ICON's obligation under this manual) • The KEY NUMBER AND DESCRIPTION OF THE PART(S) (see the EXPLODED DRAWING and PART LIST attached in workmanship and material, under normal use , costs of...
... must be prepared to give the following information: • The MODEL NUMBER OF THE PRODUCT (PFTL414040) • The NAME OF THE PRODUCT (PROFORM 400 GL treadmill) • The SERIAL NUMBER OF THE PRODUCT (see the front cover of this warranty is limited to replacing or repairing, at 1-... of whatsoever nature. The warranty extended hereunder is authorized by an ICON authorized service center; ICON's obligation under this manual) • The KEY NUMBER AND DESCRIPTION OF THE PART(S) (see the EXPLODED DRAWING and PART LIST attached in workmanship and material, under normal use , costs of...


