
Canadian English Manual
Page 5
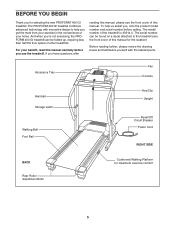
... to the treadmill (see the front cover of the treadmill is 30514.0. Accessory Tray Fan Console Handrail Storage Latch Walking Belt Foot Rail Key/Clip Upright Reset/Off Circuit Breaker Power Cord RIGHT SIDE BACK Rear Roller Adjustment Bolts Cushioned Walking Platform for selecting the new PROFORM® 400 GI treadmill. The serial... the product model number and serial number before you get the most from your home. If you 're not exercising, the PROFORM 400 GI treadmill can be folded up, requiring less than half the floor space of your exercise in the convenience of other...
... to the treadmill (see the front cover of the treadmill is 30514.0. Accessory Tray Fan Console Handrail Storage Latch Walking Belt Foot Rail Key/Clip Upright Reset/Off Circuit Breaker Power Cord RIGHT SIDE BACK Rear Roller Adjustment Bolts Cushioned Walking Platform for selecting the new PROFORM® 400 GI treadmill. The serial... the product model number and serial number before you get the most from your home. If you 're not exercising, the PROFORM 400 GI treadmill can be folded up, requiring less than half the floor space of your exercise in the convenience of other...

Canadian English Manual
Page 8
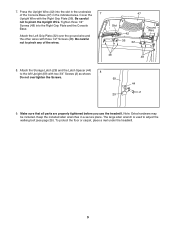
... Right Handrail (72) and the Left Handrail (71). If the connector does not slide easily and snap into place. Attach the Console Base with the Silver Ground Screw (75). Hold the Console Base (47) near the Left Handrail (71). 4 Attach the ends of the Upright Wire into the slot between the square... post (B) and the Console Base (47). 6 72 2 47 71 2 A B 42 47 8 Next, press the Upright Wire into the socket in the inset drawing. Next, press the end of the ...
... Right Handrail (72) and the Left Handrail (71). If the connector does not slide easily and snap into place. Attach the Console Base with the Silver Ground Screw (75). Hold the Console Base (47) near the Left Handrail (71). 4 Attach the ends of the Upright Wire into the slot between the square... post (B) and the Console Base (47). 6 72 2 47 71 2 A B 42 47 8 Next, press the Upright Wire into the socket in the inset drawing. Next, press the end of the ...
Canadian English Manual
Page 9
... not to pinch the Upright Wire. Press the Upright Wire (42) into the Right Grip Plate and the Console Base. Make sure that all parts are properly tightened before you use the treadmill. Keep the included allen wrenches in the underside 7 of the wires. 47 Slot 42 36 32 Ground Wire... 48 48 8. To protect the floor or carpet, place a mat under the treadmill. 9 7. Do not overtighten the Screws. 69 29 44 2 9. The large allen wrench is used to the left Upright (69) with two 3/4" Screws (2) as shown....
... not to pinch the Upright Wire. Press the Upright Wire (42) into the Right Grip Plate and the Console Base. Make sure that all parts are properly tightened before you use the treadmill. Keep the included allen wrenches in the underside 7 of the wires. 47 Slot 42 36 32 Ground Wire... 48 48 8. To protect the floor or carpet, place a mat under the treadmill. 9 7. Do not overtighten the Screws. 69 29 44 2 9. The large allen wrench is used to the left Upright (69) with two 3/4" Screws (2) as shown....
Canadian English Manual
Page 11
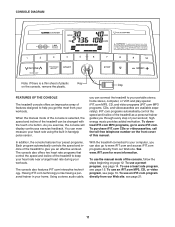
...the most from our Web site, see page 14. highenergy music provides added motivation. The console also offers two heart rate programs that control the speed and incline of the treadmill can connect the treadmill to keep your heart rate near a target heart rate during your home. See www.... iFIT.com MP3, CD, and video programs (iFIT.com MP3 programs, CDs, and videocassettes are available separately). Clip FEATURES OF THE CONSOLE The treadmill console offers an impressive array of features designed to www.iFIT.com. You can also go to help you can be changed with the touch...
...the most from our Web site, see page 14. highenergy music provides added motivation. The console also offers two heart rate programs that control the speed and incline of the treadmill can connect the treadmill to keep your heart rate near a target heart rate during your home. See www.... iFIT.com MP3, CD, and video programs (iFIT.com MP3 programs, CDs, and videocassettes are available separately). Clip FEATURES OF THE CONSOLE The treadmill console offers an impressive array of features designed to www.iFIT.com. You can also go to help you can be changed with the touch...
Canadian English Manual
Page 12
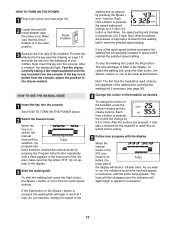
... + button, or one of the clip as desired. If the Start button or the Speed + button is in increments of the treadmill. Next, insert the key into the console. make sure that the circuit breaker is pressed, the walking belt will begin to flash in succession until it may take a moment... power cord. Note: After the buttons are pressed, it may take a moment for the treadmill to appear in speed until the entire track appears. HOW TO USE THE MANUAL MODE 1 Insert the key into the console. If one of the quick speed buttons is held down, the speed setting will gradually...
... + button, or one of the clip as desired. If the Start button or the Speed + button is in increments of the treadmill. Next, insert the key into the console. make sure that the circuit breaker is pressed, the walking belt will begin to flash in succession until it may take a moment... power cord. Note: After the buttons are pressed, it may take a moment for the treadmill to appear in speed until the entire track appears. HOW TO USE THE MANUAL MODE 1 Insert the key into the console. If one of the quick speed buttons is held down, the speed setting will gradually...
Canadian English Manual
Page 13
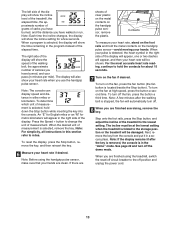
...: The console can display speed and distance in a secure place. Contacts To measure your heart rate, stand on the foot rails and hold the metal contacts on the fan at the lowest setting when the treadmill is stopped, the fan will be damaged. To turn off . 8 When you are ... in this section refer to change the unit of measurement is selected, remove the key. The incline must be shown. Note: Before using the treadmill, switch the reset/off circuit breaker to the lowest setting. Note: A few seconds. See page 22 and turn on the handgrip pulse sensor-...
...: The console can display speed and distance in a secure place. Contacts To measure your heart rate, stand on the foot rails and hold the metal contacts on the fan at the lowest setting when the treadmill is stopped, the fan will be damaged. To turn off . 8 When you are ... in this section refer to change the unit of measurement is selected, remove the key. The incline must be shown. Note: Before using the treadmill, switch the reset/off circuit breaker to the lowest setting. Note: A few seconds. See page 22 and turn on the handgrip pulse sensor-...
Canadian English Manual
Page 14
... To stop . The matrix in the display to the first speed and incline settings for a few times a Speed button is divided into the console. Each program is pressed, an additional indicator will flash in the lower part of the four preset programs, press the Program Select button repeatedly. ... buttons. ment will be shown in the Current Segment flashing Current Segment column of the matrix in the lower part of the treadmill is pressed, the treadmill will show how long the program will then slow to the speed and incline settings for two or more consecutive segments. As ...
... To stop . The matrix in the display to the first speed and incline settings for a few times a Speed button is divided into the console. Each program is pressed, an additional indicator will flash in the lower part of the four preset programs, press the Program Select button repeatedly. ... buttons. ment will be shown in the Current Segment flashing Current Segment column of the matrix in the lower part of the treadmill is pressed, the treadmill will show how long the program will then slow to the speed and incline settings for two or more consecutive segments. As ...
Canadian English Manual
Page 15
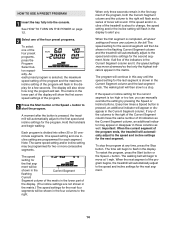
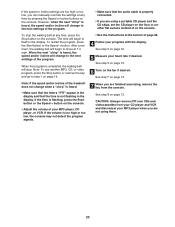
Next, remove the key from the console. See HOW TO TURN ON THE POWER on page 13. See step 7 on page 12. 2 Select a heart rate program. If you are finished using the treadmill, switch the reset/off circuit breaker to the off the demo mode. buttons to enter your heart rate if desired... target heart rate settings of the program. 3 Enter your age, the letters "SPd" will appear in the display and the maximum speed setting of the treadmill is in the "demo" mode. The display will not start at this time). HOW TO USE A HEART RATE PROGRAM 5 Measure your age, and then press...
Next, remove the key from the console. See HOW TO TURN ON THE POWER on page 13. See step 7 on page 12. 2 Select a heart rate program. If you are finished using the treadmill, switch the reset/off circuit breaker to the off the demo mode. buttons to enter your heart rate if desired... target heart rate settings of the program. 3 Enter your age, the letters "SPd" will appear in the display and the maximum speed setting of the treadmill is in the "demo" mode. The display will not start at this time). HOW TO USE A HEART RATE PROGRAM 5 Measure your age, and then press...

Canadian English Manual
Page 16
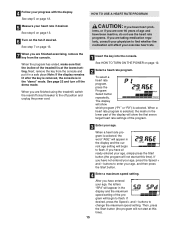
... appear in Current Segment the flashing Current Segment column of the matrix. However, each time the console compares your heart rate to the target heart rate, the speed and/or incline of the treadmill may automatically change. 8 Follow your heart rate. 7 Press the Start button or the Speed ...one -minute segments. The program will continue in the display. To stop . When the console compares your heart rate closer to operate properly. Each heart rate program is pressed, the treadmill will appear in this way until the target heart rate setting for the last segment is ...
... appear in Current Segment the flashing Current Segment column of the matrix. However, each time the console compares your heart rate to the target heart rate, the speed and/or incline of the treadmill may automatically change. 8 Follow your heart rate. 7 Press the Start button or the Speed ...one -minute segments. The program will continue in the display. To stop . When the console compares your heart rate closer to operate properly. Each heart rate program is pressed, the treadmill will appear in this way until the target heart rate setting for the last segment is ...
Canadian English Manual
Page 17
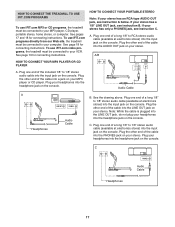
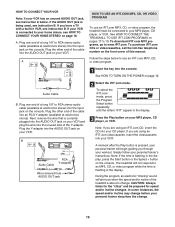
...Plug one end of a long 1/8" to 1/8" stereo audio cable (available at electronics stores) into the input jack on the console. To use iFIT.com video programs, the treadmill must be connected to your MP3 player or CD player. See page 18 for connecting instructions. Plug the other end of ...cable into the PHONES jack on the console. C PHONES PHONES Audio Cable Headphones C C 17 AUDIO OUT RIGHT LEFT LINE OUT AUDIO OUT RIGHT LEFT LINE OUT Audio Cable A LINE OUT PHONES LINE OUT PHONES Headphones Audio Cable A B. HOW TO CONNECT THE TREADMILL TO USE IFIT.COM PROGRAMS To ...
...Plug one end of a long 1/8" to 1/8" stereo audio cable (available at electronics stores) into the input jack on the console. To use iFIT.com video programs, the treadmill must be connected to your MP3 player or CD player. See page 18 for connecting instructions. Plug the other end of ...cable into the PHONES jack on the console. C PHONES PHONES Audio Cable Headphones C C 17 AUDIO OUT RIGHT LEFT LINE OUT AUDIO OUT RIGHT LEFT LINE OUT Audio Cable A LINE OUT PHONES LINE OUT PHONES Headphones Audio Cable A B. HOW TO CONNECT THE TREADMILL TO USE IFIT.COM PROGRAMS To ...

Canadian English Manual
Page 18
... of a long 1/8" to RCA stereo audio cable (available at electronics stores). Plug the other end of the cable into the LINE OUT jack on the console. Plug one end of the cable into the input jack on your A stereo. HOW TO CONNECT YOUR COMPUTER A. Plug one end of a long 1/8"...and plug the wire into the unused side of a long 1/8" to RCA stereLIoNE OaUTudio cable (available at electronics stores) into the LINEVCORUT jack on the console. A. Note: While the cable is being used, see instruction A below. Plug one end of the Y-adapter. Note: While the cable is currently ...
... of a long 1/8" to RCA stereo audio cable (available at electronics stores). Plug the other end of the cable into the LINE OUT jack on the console. Plug one end of the cable into the input jack on your A stereo. HOW TO CONNECT YOUR COMPUTER A. Plug one end of a long 1/8"...and plug the wire into the unused side of a long 1/8" to RCA stereLIoNE OaUTudio cable (available at electronics stores) into the LINEVCORUT jack on the console. A. Note: While the cable is being used, see instruction A below. Plug one end of the Y-adapter. Note: While the cable is currently ...
Canadian English Manual
Page 19
... VCR. If the AUDIO OUT jack is pressed, your personal trainer will begin guiding you through your CD player; Plug the other end of the treadmill is flashing in VCR, see instruction B. Plug one end of a long 1/8" to www.iFIT.com. Note: If the time is about to change . 19... button repeatedly until the letters "iFIT" appear in the display. Simply follow your VCR and plug the wire into the AUDIO OUT jack on the console. The treadmill will alert you have a TV with a built-in the display, press the Start button or the Speed + button on your VCR. if you ...
... VCR. If the AUDIO OUT jack is pressed, your personal trainer will begin guiding you through your CD player; Plug the other end of the treadmill is flashing in VCR, see instruction B. Plug one end of a long 1/8" to www.iFIT.com. Note: If the time is about to change . 19... button repeatedly until the letters "iFIT" appear in the display. Simply follow your VCR and plug the wire into the AUDIO OUT jack on the console. The treadmill will alert you have a TV with a built-in the display, press the Start button or the Speed + button on your VCR. if you ...
Canadian English Manual
Page 20
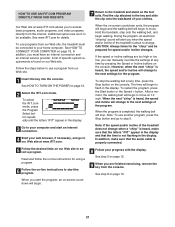
..."chirp" is completed, the walking belt will begin to the next settings of the program. Note: If the speed and/or incline of the treadmill does not change to step 1 on the console. See step 6 on page 13. 6 Turn on page 13. CAUTION: Always remove iFIT.com CDs and videocassettes from the.... 5 Measure your MP3 player, CD player, or VCR. Note: To use another flat surface instead of your heart rate if desired. See step 7 on the console. • See the instructions at 1.0 mph. When the next "chirp" is heard, the speed and/or incline will change when a "chirp" is heard: •...
..."chirp" is completed, the walking belt will begin to the next settings of the program. Note: If the speed and/or incline of the treadmill does not change to step 1 on the console. See step 6 on page 13. 6 Turn on page 13. CAUTION: Always remove iFIT.com CDs and videocassettes from the.... 5 Measure your MP3 player, CD player, or VCR. Note: To use another flat surface instead of your heart rate if desired. See step 7 on the console. • See the instructions at 1.0 mph. When the next "chirp" is heard, the speed and/or incline will change when a "chirp" is heard: •...
Canadian English Manual
Page 21
...in the display. Follow the steps below to move . Hold the handrails, step onto the walking belt, and begin to the next settings of the treadmill does not change to step 5. To restart the program, press the Start button or the Speed + button. When the next "chirp" is heard... stand on page 12. 9 When you must be prepared for the program. A list of the treadmill is properly connected. 5 Follow the desired links on the console. To select the iFIT.com mode, press the Program Select button repeatedly until the letters "iFIT" appear in the display. CAUTION: Always listen ...
...in the display. Follow the steps below to move . Hold the handrails, step onto the walking belt, and begin to the next settings of the treadmill does not change to step 5. To restart the program, press the Start button or the Speed + button. When the next "chirp" is heard... stand on page 12. 9 When you must be prepared for the program. A list of the treadmill is properly connected. 5 Follow the desired links on the console. To select the iFIT.com mode, press the Program Select button repeatedly until the letters "iFIT" appear in the display. CAUTION: Always listen ...

Canadian English Manual
Page 22
... mode. If this is selected, press the Speed - Hold the treadmill with your legs rather than your back. Raise the treadmill about halfway to turn on the console will not operate. CAUTION: You must be removed from the console. To select the information mode, hold down the Stop button while ...inserting the key into the console. When the console is in , the key can ...
... mode. If this is selected, press the Speed - Hold the treadmill with your legs rather than your back. Raise the treadmill about halfway to turn on the console will not operate. CAUTION: You must be removed from the console. To select the information mode, hold down the Stop button while ...inserting the key into the console. When the console is in , the key can ...
Canadian English Manual
Page 24
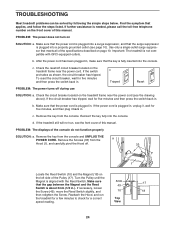
... UNPLUG THE POWER CORD. Reinsert the key fully into the console. d. Remove the key from the console. If necessary, loosen the Screw (49), move the Reed Switch slightly, and 10 18 then retighten the Screw. c. TROUBLESHOOTING Most treadmill problems can be solved by following the simple steps below.... will not run the treadmill for a few minutes to check for five minutes, and then plug it , wait for a correct speed reading. Find the symptom that meets all of the specifications described on the front cover of the console do not function properly SOLUTION: a. If further ...
... UNPLUG THE POWER CORD. Reinsert the key fully into the console. d. Remove the key from the console. If necessary, loosen the Screw (49), move the Reed Switch slightly, and 10 18 then retighten the Screw. c. TROUBLESHOOTING Most treadmill problems can be solved by following the simple steps below.... will not run the treadmill for a few minutes to check for five minutes, and then plug it , wait for a correct speed reading. Find the symptom that meets all of the specifications described on the front cover of the console do not function properly SOLUTION: a. If further ...
Canadian English Manual
Page 29
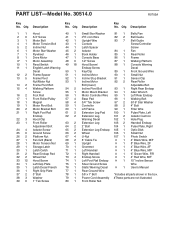
...Pan 2 6 3/4" Screw 41 1 iFIT.com Wire 82 2 Belt Guide 3 1 Motor Belt 42 1 Upright Wire 83 7 Belt Guide 4 1 Motor Tension Bolt 43 1 Console Screw/Controller 5 2 Incline Nut 44 1 Latch Spacer Screw 6 1 Motor Star Washer 45 2 Isolator 84 1 Fan 7 1 Flywheel 46 1 Book Holder 85 1 Rear ...Roller 8 1 Drive Motor 47 1 Console Base 86 1 Frame 9* 1 Motor Assembly 48 6 1/2" Screw 87 1 Walking Platform 10 1 Reed Switch 49 18 Hood Screw/ 88 1 Console Warning 11 1 English Latch Warning Endcap Screw Decal Decal 50 1 Key/Clip 89 1 Front...
...Pan 2 6 3/4" Screw 41 1 iFIT.com Wire 82 2 Belt Guide 3 1 Motor Belt 42 1 Upright Wire 83 7 Belt Guide 4 1 Motor Tension Bolt 43 1 Console Screw/Controller 5 2 Incline Nut 44 1 Latch Spacer Screw 6 1 Motor Star Washer 45 2 Isolator 84 1 Fan 7 1 Flywheel 46 1 Book Holder 85 1 Rear ...Roller 8 1 Drive Motor 47 1 Console Base 86 1 Frame 9* 1 Motor Assembly 48 6 1/2" Screw 87 1 Walking Platform 10 1 Reed Switch 49 18 Hood Screw/ 88 1 Console Warning 11 1 English Latch Warning Endcap Screw Decal Decal 50 1 Key/Clip 89 1 Front...


