

Uk Manual
Page 2
TABLE OF CONTENTS IMPORTANT PRECAUTIONS 3 BEFORE YOU BEGIN 5 ASSEMBLY 6 OPERATION AND ADJUSTMENT 13 HOW TO FOLD AND MOVE THE TREADMILL 18 TROUBLESHOOTING 20 CONDITIONING GUIDELINES 22 HOW TO ORDER REPLACEMENT PARTS Back Cover Note: An EXPLODED DRAWING and a PART LIST are attached in the center of ICON IP, Inc. 2 PROFORM is a registered trademark of this manual.
TABLE OF CONTENTS IMPORTANT PRECAUTIONS 3 BEFORE YOU BEGIN 5 ASSEMBLY 6 OPERATION AND ADJUSTMENT 13 HOW TO FOLD AND MOVE THE TREADMILL 18 TROUBLESHOOTING 20 CONDITIONING GUIDELINES 22 HOW TO ORDER REPLACEMENT PARTS Back Cover Note: An EXPLODED DRAWING and a PART LIST are attached in the center of ICON IP, Inc. 2 PROFORM is a registered trademark of this manual.

Uk Manual
Page 3
... HOW TO TURN ON THE POWER on any surface that blocks air openings. Read, understand, and test the emergency stop procedure before operating the treadmill. 1. Adjust the speed in small increments to ensure that could become caught in use. 19. Various factors, including your movement, may affect the...(14-gauge) cord that the storage latch is capable of high speeds. No other appliance should be on the walking belt. Never start the treadmill while you are adequately informed of burns, fire, electric shock, or injury to raise, lower, or move the walking belt while the power ...
... HOW TO TURN ON THE POWER on any surface that blocks air openings. Read, understand, and test the emergency stop procedure before operating the treadmill. 1. Adjust the speed in small increments to ensure that could become caught in use. 19. Various factors, including your movement, may affect the...(14-gauge) cord that the storage latch is capable of high speeds. No other appliance should be on the walking belt. Never start the treadmill while you are adequately informed of burns, fire, electric shock, or injury to raise, lower, or move the walking belt while the power ...
Uk Manual
Page 4
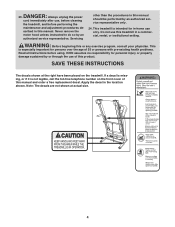
This treadmill is especially important for persons over the age of 35 or persons with pre-existing health problems. Read all instructions before performing the maintenance and ... an authorized service representative only. 24. Always unplug the power cord immediately after use this manual. Do not use , before cleaning the treadmill, and before using. scribed in this treadmill in the location shown. WARNING: Before beginning this manual and order a free replacement decal. If a decal is missing, or if it is...
This treadmill is especially important for persons over the age of 35 or persons with pre-existing health problems. Read all instructions before performing the maintenance and ... an authorized service representative only. 24. Always unplug the power cord immediately after use this manual. Do not use , before cleaning the treadmill, and before using. scribed in this treadmill in the location shown. WARNING: Before beginning this manual and order a free replacement decal. If a decal is missing, or if it is...
Uk Manual
Page 5
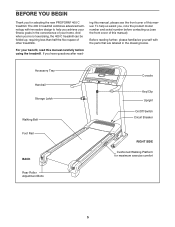
...Adjustment Bolts Console Key/Clip Upright On/Off Switch Circuit Breaker RIGHT SIDE Cushioned Walking Platform for selecting the new PROFORM® 400 C treadmill. And when you're not exercising, the 400 C treadmill can be folded up, requiring less than half the floor space of this manual). To help you have ...questions after read this manual. The 400 C treadmill combines advanced technology with the parts that are labeled in the convenience of your benefit, read - ing this manual, please see the...
...Adjustment Bolts Console Key/Clip Upright On/Off Switch Circuit Breaker RIGHT SIDE Cushioned Walking Platform for selecting the new PROFORM® 400 C treadmill. And when you're not exercising, the 400 C treadmill can be folded up, requiring less than half the floor space of this manual). To help you have ...questions after read this manual. The 400 C treadmill combines advanced technology with the parts that are labeled in the convenience of your benefit, read - ing this manual, please see the...
Uk Manual
Page 6
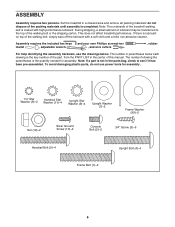
... number following the parentheses is coated with a soft cloth and a mild, non-abrasive cleaner. Set the treadmill in parentheses below . This does not affect treadmill performance. To avoid damaging plastic parts, do not dispose of the treadmill walking belt is the quantity needed for assembly. 1/4" Star Washer (8)-2 Handrail Star Washer (11)-4 Upright Star...
... number following the parentheses is coated with a soft cloth and a mild, non-abrasive cleaner. Set the treadmill in parentheses below . This does not affect treadmill performance. To avoid damaging plastic parts, do not dispose of the treadmill walking belt is the quantity needed for assembly. 1/4" Star Washer (8)-2 Handrail Star Washer (11)-4 Upright Star...

Uk Manual
Page 7
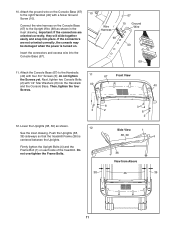
... Upright Star Washers (6); do not tighten the Upright Bolts yet. Orient the Left Upright (38) as shown, and attach 2 it near the front 3 of the treadmill as shown.
... Upright Star Washers (6); do not tighten the Upright Bolts yet. Orient the Left Upright (38) as shown, and attach 2 it near the front 3 of the treadmill as shown.
Uk Manual
Page 10
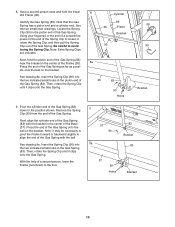
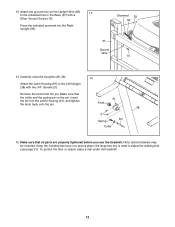
Next, hold the treadmill Frame (36). Locate the Spring Clip (90) in the piston end of the Gas Spring (83). Note: Extra Spring Clips are included. Press the end ...
Next, hold the treadmill Frame (36). Locate the Spring Clip (90) in the piston end of the Gas Spring (83). Note: Extra Spring Clips are included. Press the end ...
Uk Manual
Page 11
... and excess wire into place. Lower the Uprights (38, 39) as shown in the inset drawing. Push the Uprights (38, 39) sideways so that the treadmill Frame (36) is turned on the Console Base (67) to the Upright Wire (69) as shown. 12 See the inset drawing. 10. If the connectors... not oriented correctly, the console may be damaged when the power is centered between the Uprights. Attach the ground wire on each side of the treadmill. Wire Harness 69 67 10 Ground Wire 40 69 11. Do not overtighten the Frame Bolts. 8 3 2 8 2 Side View 38, 39 1 4 36 View from Above 38...
... and excess wire into place. Lower the Uprights (38, 39) as shown in the inset drawing. Push the Uprights (38, 39) sideways so that the treadmill Frame (36) is turned on the Console Base (67) to the Upright Wire (69) as shown. 12 See the inset drawing. 10. If the connectors... not oriented correctly, the console may be damaged when the power is centered between the Uprights. Attach the ground wire on each side of the treadmill. Wire Harness 69 67 10 Ground Wire 40 69 11. Do not overtighten the Frame Bolts. 8 3 2 8 2 Side View 38, 39 1 4 36 View from Above 38...
Uk Manual
Page 12
... adjust the walking belt (see page 21). Insert the pin into the Right Upright (39). To protect the floor or carpet, place a mat under the treadmill. 12 Make sure that all parts are on the Upright Wire (69) 13 to the indicated hole in a secure place; Keep the included hex keys... from the pin. Note: Extra hardware may be included. 13. Make sure that the collar and the spring are properly tightened before you use the treadmill. the large hex key is used to the Left Upright (38) with a Silver Ground Screw (10).
... adjust the walking belt (see page 21). Insert the pin into the Right Upright (39). To protect the floor or carpet, place a mat under the treadmill. 12 Make sure that all parts are on the Upright Wire (69) 13 to the indicated hole in a secure place; Keep the included hex keys... from the pin. Note: Extra hardware may be included. 13. Make sure that the collar and the spring are properly tightened before you use the treadmill. the large hex key is used to the Left Upright (38) with a Silver Ground Screw (10).
Uk Manual
Page 13
... path of least resistance for electric cur- 1 rent, reducing the risk of electric shock. Plug the power cord into the socket on treadmill See drawing 1. Outlet DANGER: Improper connection of the power cord into an appropriate outlet that is secure and the screw has been tightened ...adapter cover over the end of electric shock. Important: Make sure that has an equipment-earthing conductor and an earthing plug. Important: The treadmill is damaged, it must be replaced with a qualified electrician or serviceman if you are in - Plug the indicated end of the equipment-...
... path of least resistance for electric cur- 1 rent, reducing the risk of electric shock. Plug the power cord into the socket on treadmill See drawing 1. Outlet DANGER: Improper connection of the power cord into an appropriate outlet that is secure and the screw has been tightened ...adapter cover over the end of electric shock. Important: Make sure that has an equipment-earthing conductor and an earthing plug. Important: The treadmill is damaged, it must be replaced with a qualified electrician or serviceman if you are in - Plug the indicated end of the equipment-...
Uk Manual
Page 14
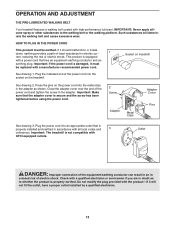
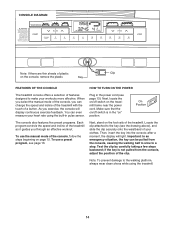
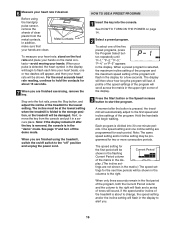
... features five preset programs. Each program controls the speed and incline of your heart rate using the treadmill. 14 To use a preset program, see page 16. Locate the clip attached to the key...a stop. Next, stand on the foot rails of the console, follow the steps beginning on the treadmill frame near the power cord. Note: To prevent damage to the walking platform, always wear clean shoes ... power cord (see the drawing above), and slide the clip securely onto the waistband of the treadmill as it guides you exercise, the console will light. As you through an effective workout. Make...
... features five preset programs. Each program controls the speed and incline of your heart rate using the treadmill. 14 To use a preset program, see page 16. Locate the clip attached to the key...a stop. Next, stand on the foot rails of the console, follow the steps beginning on the treadmill frame near the power cord. Note: To prevent damage to the walking platform, always wear clean shoes ... power cord (see the drawing above), and slide the clip securely onto the waistband of the treadmill as it guides you exercise, the console will light. As you through an effective workout. Make...
Uk Manual
Page 15
... is held down , the speed setting will show the speed of the walking belt and the approximate number of calories that you use the treadmill, periodically inspect the alignment of the nine numbered buttons is inserted, the manual mode will change quickly. 5 Follow your workout. if a ... (see THE INFORMATION MODE/DEMO MODE on page 14. 2 Select the manual mode. The lower right corner of the treadmill. Each time a button is selected, a track representing 400 meters (1/4 mile) will change by pressing the Speed increase and decrease buttons. To stop the walking belt, press the ...
... is held down , the speed setting will show the speed of the walking belt and the approximate number of calories that you use the treadmill, periodically inspect the alignment of the nine numbered buttons is inserted, the manual mode will change quickly. 5 Follow your workout. if a ... (see THE INFORMATION MODE/DEMO MODE on page 14. 2 Select the manual mode. The lower right corner of the treadmill. Each time a button is selected, a track representing 400 meters (1/4 mile) will change by pressing the Speed increase and decrease buttons. To stop the walking belt, press the ...
Uk Manual
Page 16
...-avoid moving your hands. A profile of the speed settings of the program will scroll across the matrix in the upper right corner of the treadmill to hold the contacts for each time your heart rate will be shown in the first period of the program, both the Current Period column... setting and/or the incline setting will last. When only three seconds remain in the columns to the first speed and incline settings of the treadmill is divided into the console. See page 17 and turn off " position and unplug the power cord. HOW TO USE A PRESET PROGRAM 1 Insert the ...
...-avoid moving your hands. A profile of the speed settings of the program will scroll across the matrix in the upper right corner of the treadmill to hold the contacts for each time your heart rate will be shown in the first period of the program, both the Current Period column... setting and/or the incline setting will last. When only three seconds remain in the columns to the first speed and incline settings of the treadmill is divided into the console. See page 17 and turn off " position and unplug the power cord. HOW TO USE A PRESET PROGRAM 1 Insert the ...

Uk Manual
Page 17
... the key. 4 Follow your heart rate if desired. THE INFORMATION MODE/DEMO MODE The console features an information mode that the treadmill has been used only when a treadmill is displayed in the display. The lower left corner of the display will show the total number of lit indicators as well....too low for you, you to flash in a store. Important: When the current period of the program ends, the treadmill will show the total number of hours that keeps track of treadmill usage information and allows you can be shown: An "E" (for English) or an "M" (for the next period. The...
... the key. 4 Follow your heart rate if desired. THE INFORMATION MODE/DEMO MODE The console features an information mode that the treadmill has been used only when a treadmill is displayed in the display. The lower left corner of the display will show the total number of lit indicators as well....too low for you, you to flash in a store. Important: When the current period of the program ends, the treadmill will show the total number of hours that keeps track of treadmill usage information and allows you can be shown: An "E" (for English) or an "M" (for the next period. The...

Uk Manual
Page 18
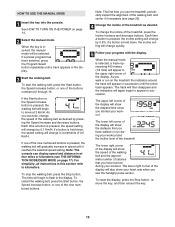
...is aligned with your back straight as described above 30° C (85° F). Latch Knob Engaged HOW TO MOVE THE TREADMILL Before moving the treadmill. Tilt the treadmill back until it rolls freely on the deck. Hold the metal frame firmly in the storage position. CAUTION: To decrease the possibility...vertical position. If this is fully inserted into the frame. Next, unplug the power cord. Make sure to the left and hold the treadmill firmly. Raise the frame about halfway to the lowest position. Move your other hand on the wheels. Make sure that the latch pin ...
...is aligned with your back straight as described above 30° C (85° F). Latch Knob Engaged HOW TO MOVE THE TREADMILL Before moving the treadmill. Tilt the treadmill back until it rolls freely on the deck. Hold the metal frame firmly in the storage position. CAUTION: To decrease the possibility...vertical position. If this is fully inserted into the frame. Next, unplug the power cord. Make sure to the left and hold the treadmill firmly. Raise the frame about halfway to the lowest position. Move your other hand on the wheels. Make sure that the latch pin ...

Uk Manual
Page 19
Hold the metal frame firmly with your back straight. Latch Knob Latch Pin Frame 19 HOW TO LOWER THE TREADMILL FOR USE 1. Do not drop the frame to bend your legs and keep your right hand as shown. CAUTION: To decrease the possibility of injury, do not lower the frame by gripping only the plastic foot rails. Pull the latch knob to the left and hold it to the floor. Hold the treadmill with both hands, and lower it . Pivot the frame down until it is past the latch pin. 2. Make sure to the floor.
Hold the metal frame firmly with your back straight. Latch Knob Latch Pin Frame 19 HOW TO LOWER THE TREADMILL FOR USE 1. Do not drop the frame to bend your legs and keep your right hand as shown. CAUTION: To decrease the possibility of injury, do not lower the frame by gripping only the plastic foot rails. Pull the latch knob to the left and hold it to the floor. Hold the treadmill with both hands, and lower it . Pivot the frame down until it is past the latch pin. 2. Make sure to the floor.
Uk Manual
Page 20
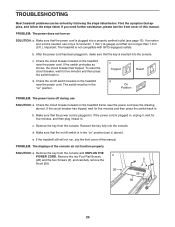
...console. If the switch protrudes as shown, the circuit breaker has tripped. b. If the power cord is plugged into the console. If the treadmill still will not run, see d. PROBLEM: The displays of this manual. If an extension cord is needed, use SOLUTION: a. c. d. ...Make sure that is not compatible with GFCI-equipped outlets. Important: The treadmill is no longer than 1.5 m (5 ft.). c. c Tripped Reset d On Position PROBLEM: The power turns off switch located on /off switch is plugged ...
...console. If the switch protrudes as shown, the circuit breaker has tripped. b. If the power cord is plugged into the console. If the treadmill still will not run, see d. PROBLEM: The displays of this manual. If an extension cord is needed, use SOLUTION: a. c. d. ...Make sure that is not compatible with GFCI-equipped outlets. Important: The treadmill is no longer than 1.5 m (5 ft.). c. c Tripped Reset d On Position PROBLEM: The power turns off switch located on /off switch is plugged ...
Uk Manual
Page 21
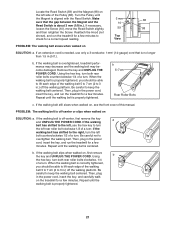
...walking belt centered. PROBLEM: The walking belt is aligned with the Reed Switch. Then, plug in the power cord, insert the key, and run the treadmill for a few minutes. b. b. Repeat until the Magnet is off -center, first remove the key a and UNPLUG THE POWER CORD. If the ... roller bolts clockwise, 1/4 of the walking belt 5 to 7 cm (2 to overtighten the walking belt. Reattach the Hood (not shown), and run the treadmill for a few minutes. Make sure that is correctly tightened, you should be able to 3 in the power cord, insert the key, and carefully walk ...
...walking belt centered. PROBLEM: The walking belt is aligned with the Reed Switch. Then, plug in the power cord, insert the key, and run the treadmill for a few minutes. b. b. Repeat until the Magnet is off -center, first remove the key a and UNPLUG THE POWER CORD. If the ... roller bolts clockwise, 1/4 of the walking belt 5 to 7 cm (2 to overtighten the walking belt. Reattach the Hood (not shown), and run the treadmill for a few minutes. Make sure that is correctly tightened, you should be able to 3 in the power cord, insert the key, and carefully walk ...
Uk Manual
Page 22
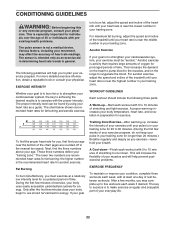
... These three numbers define your physician. After a few minutes of time. This is especially important for individuals over the age of the treadmill until your training zone. For more detailed exercise information, obtain a reputable book or consult your "training zone." Aerobic exercise is near the...flexibility of time. If your goal Training Zone Exercise-After warming up -Start each workout with 5 to 10 minutes of the treadmill until your heart rate is activity that requires large amounts of oxygen for prolonged periods of exercise, your body uses easily accessible ...
... These three numbers define your physician. After a few minutes of time. This is especially important for individuals over the age of the treadmill until your training zone. For more detailed exercise information, obtain a reputable book or consult your "training zone." Aerobic exercise is near the...flexibility of time. If your goal Training Zone Exercise-After warming up -Start each workout with 5 to 10 minutes of the treadmill until your heart rate is activity that requires large amounts of oxygen for prolonged periods of exercise, your body uses easily accessible ...
Uk Manual
Page 24
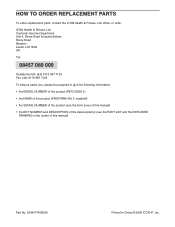
... us assist you, please be prepared to give the following information: • the MODEL NUMBER of the product (PETL30506.1) • the NAME of the product (PROFORM 400 C treadmill) • the SERIAL NUMBER of the product (see the front cover of this manual) • the KEY NUMBER and DESCRIPTION of the desired part(s) (see...
... us assist you, please be prepared to give the following information: • the MODEL NUMBER of the product (PETL30506.1) • the NAME of the product (PROFORM 400 C treadmill) • the SERIAL NUMBER of the product (see the front cover of this manual) • the KEY NUMBER and DESCRIPTION of the desired part(s) (see...


