

Uk Manual
Page 1
If you have questions, or if there are committed to providing complete customer satisfaction. Customer Service Department Unit 4 Revie Road Industrial Estate Revie Road Beeston Leeds, LS118JG UK email: [email protected] CAUTION Read all precautions and instructions in this manual before using this manual for future reference. Model No. USER'S MANUAL As a manufacturer, we are missing or damaged parts, please call: 08457 089 009 or write: ICON Health & Fitness, Ltd. Save this equipment. Serial Number Decal QUESTIONS? PETL30506.1 Serial No.
If you have questions, or if there are committed to providing complete customer satisfaction. Customer Service Department Unit 4 Revie Road Industrial Estate Revie Road Beeston Leeds, LS118JG UK email: [email protected] CAUTION Read all precautions and instructions in this manual before using this manual for future reference. Model No. USER'S MANUAL As a manufacturer, we are missing or damaged parts, please call: 08457 089 009 or write: ICON Health & Fitness, Ltd. Save this equipment. Serial Number Decal QUESTIONS? PETL30506.1 Serial No.

Uk Manual
Page 2
PROFORM is a registered trademark of this manual. TABLE OF CONTENTS IMPORTANT PRECAUTIONS 3 BEFORE YOU BEGIN 5 ASSEMBLY 6 OPERATION AND ADJUSTMENT 13 HOW TO FOLD AND MOVE THE TREADMILL 18 TROUBLESHOOTING 20 CONDITIONING GUIDELINES 22 HOW TO ORDER REPLACEMENT PARTS Back Cover Note: An EXPLODED DRAWING and a PART LIST are attached in the center of ICON IP, Inc. 2
PROFORM is a registered trademark of this manual. TABLE OF CONTENTS IMPORTANT PRECAUTIONS 3 BEFORE YOU BEGIN 5 ASSEMBLY 6 OPERATION AND ADJUSTMENT 13 HOW TO FOLD AND MOVE THE TREADMILL 18 TROUBLESHOOTING 20 CONDITIONING GUIDELINES 22 HOW TO ORDER REPLACEMENT PARTS Back Cover Note: An EXPLODED DRAWING and a PART LIST are attached in the center of ICON IP, Inc. 2
Uk Manual
Page 4
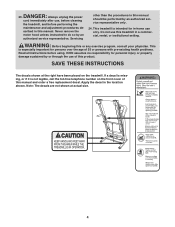
... setting. If a decal is missing, or if it is not legible, call the toll-free telephone number on the treadmill. Apply the decal in this manual and order a free replacement decal. This is intended for personal injury or property damage sustained by an authorized service representative....or any exercise program, consult your physician. SAVE THESE INSTRUCTIONS The decals shown at actual size. 4 DANGER: 23. This treadmill is especially important for persons over the age of this manual. Do not use only. ICON assumes no responsibility for in this product.
... setting. If a decal is missing, or if it is not legible, call the toll-free telephone number on the treadmill. Apply the decal in this manual and order a free replacement decal. This is intended for personal injury or property damage sustained by an authorized service representative....or any exercise program, consult your physician. SAVE THESE INSTRUCTIONS The decals shown at actual size. 4 DANGER: 23. This treadmill is especially important for persons over the age of this manual. Do not use only. ICON assumes no responsibility for in this product.
Uk Manual
Page 5
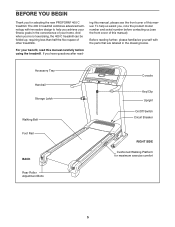
... Upright On/Off Switch Circuit Breaker RIGHT SIDE Cushioned Walking Platform for selecting the new PROFORM® 400 C treadmill. ing this manual, please see the front cover of this manual carefully before contacting us (see the front cover of this manual. Before reading further, please familiarize yourself with innovative design to help us assist you have...
... Upright On/Off Switch Circuit Breaker RIGHT SIDE Cushioned Walking Platform for selecting the new PROFORM® 400 C treadmill. ing this manual, please see the front cover of this manual carefully before contacting us (see the front cover of this manual. Before reading further, please familiarize yourself with innovative design to help us assist you have...
Uk Manual
Page 6
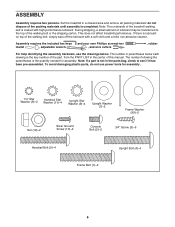
During shipping, a small amount of this manual. The number in the center of lubricant may be transferred to see the drawings below each drawing is completed. Assembly requires the included hex keys ... Bolt (1)-2 Upright Bolt (4)-4 6 The number following the parentheses is not in a cleared area and remove all packing materials; ASSEMBLY Assembly requires two persons. Set the treadmill in the parts bag, check to the top of the walking belt, simply wipe off the lubricant with high-performance lubricant.
During shipping, a small amount of this manual. The number in the center of lubricant may be transferred to see the drawings below each drawing is completed. Assembly requires the included hex keys ... Bolt (1)-2 Upright Bolt (4)-4 6 The number following the parentheses is not in a cleared area and remove all packing materials; ASSEMBLY Assembly requires two persons. Set the treadmill in the parts bag, check to the top of the walking belt, simply wipe off the lubricant with high-performance lubricant.
Uk Manual
Page 14
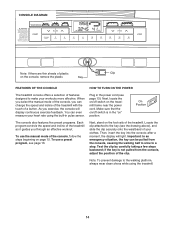
...more effective. Note: To prevent damage to a stop. Plug in pulse sensor. To use the manual mode of the console, you select the manual mode of the console, follow the steps beginning on the treadmill frame near the power cord. Then, insert the key into the console; When you can even... measure your heart rate using the treadmill. 14 You can change the speed and incline of the treadmill with the touch ...
...more effective. Note: To prevent damage to a stop. Plug in pulse sensor. To use the manual mode of the console, you select the manual mode of the console, follow the steps beginning on the treadmill frame near the power cord. Then, insert the key into the console; When you can even... measure your heart rate using the treadmill. 14 You can change the speed and incline of the treadmill with the touch ...
Uk Manual
Page 15
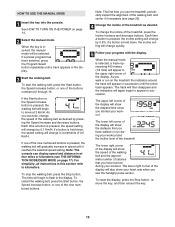
... is inserted, the manual mode will appear in increments of the treadmill, press the Incline increase and decrease buttons. The lower left corner of the display will show your workout. When the key is selected, a track representing 400 meters (1/4 mile) will change in succession until it if necessary (see THE INFORMATION MODE/DEMO...
... is inserted, the manual mode will appear in increments of the treadmill, press the Incline increase and decrease buttons. The lower left corner of the display will show your workout. When the key is selected, a track representing 400 meters (1/4 mile) will change in succession until it if necessary (see THE INFORMATION MODE/DEMO...

Uk Manual
Page 17
... stop . IMPORTANT: If a "d" appears in the display, the console is in the demo mode, the power cord can be plugged in, the key can manually override the setting by pressing the Speed or Incline buttons. When the console is in the "demo" mode. When the first period is pressed, an... the Stop button. The speed setting for the next period. Every few times a Speed button is completed, all five of the program ends, the treadmill will automatically adjust to the speed and incline settings for the second period will begin to be used . Important: When the current period of the...
... stop . IMPORTANT: If a "d" appears in the display, the console is in the demo mode, the power cord can be plugged in, the key can manually override the setting by pressing the Speed or Incline buttons. When the console is in the "demo" mode. When the first period is pressed, an... the Stop button. The speed setting for the next period. Every few times a Speed button is completed, all five of the program ends, the treadmill will automatically adjust to the speed and incline settings for the second period will begin to be used . Important: When the current period of the...
Uk Manual
Page 20
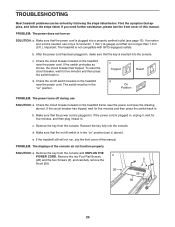
...press the switch back in . b. Make sure that the on/off switch located on SOLUTION: a. If the treadmill still will not run, see the front cover of this manual. b. To reset the circuit breaker, wait for five minutes and then press the switch back in . Make... not function properly SOLUTION: a. c. PROBLEM: The displays of this manual. Check the circuit breaker located on " position (see page 13). Important: The treadmill is plugged in . PROBLEM: The power does not turn on the treadmill near the power cord (see the drawing above ). Reinsert the key...
...press the switch back in . b. Make sure that the on/off switch located on SOLUTION: a. If the treadmill still will not run, see the front cover of this manual. b. To reset the circuit breaker, wait for five minutes and then press the switch back in . Make... not function properly SOLUTION: a. c. PROBLEM: The displays of this manual. Check the circuit breaker located on " position (see page 13). Important: The treadmill is plugged in . PROBLEM: The power does not turn on the treadmill near the power cord (see the drawing above ). Reinsert the key...
Uk Manual
Page 21
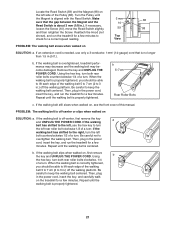
Reattach the Hood (not shown), and run the treadmill for a few minutes to the left bolt counterclockwise 1/2 of this manual. Remove the key and UNPLUG THE POWER CORD. Repeat until the walking belt is no longer than 1.5 m (5 ft.). b. Repeat until the walking belt ...of a turn . If the walking belt is properly tightened, you should be able to overtighten the walking belt. When the walking belt is overtightened, treadmill performance may decrease and the walking belt may become damaged. If necessary, loosen the Screw (10), move the Reed Switch slightly, 59 98 and ...
Reattach the Hood (not shown), and run the treadmill for a few minutes to the left bolt counterclockwise 1/2 of this manual. Remove the key and UNPLUG THE POWER CORD. Repeat until the walking belt is no longer than 1.5 m (5 ft.). b. Repeat until the walking belt ...of a turn . If the walking belt is properly tightened, you should be able to overtighten the walking belt. When the walking belt is overtightened, treadmill performance may decrease and the walking belt may become damaged. If necessary, loosen the Screw (10), move the Reed Switch slightly, 59 98 and ...
Uk Manual
Page 24
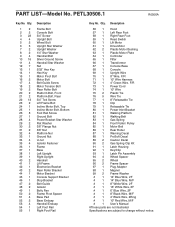
... give the following information: • the MODEL NUMBER of the product (PETL30506.1) • the NAME of the product (PROFORM 400 C treadmill) • the SERIAL NUMBER of the product (see the front cover of this manual) • the KEY NUMBER and DESCRIPTION of the desired part(s) (see the PART LIST and the EXPLODED DRAWING in...
... give the following information: • the MODEL NUMBER of the product (PETL30506.1) • the NAME of the product (PROFORM 400 C treadmill) • the SERIAL NUMBER of the product (see the front cover of this manual) • the KEY NUMBER and DESCRIPTION of the desired part(s) (see the PART LIST and the EXPLODED DRAWING in...

Uk Manual
Page 25
Note: Specifications are subject to change without notice. REMOVE THIS EXPLODED DRAWING AND PART LIST FROM THE MANUAL Save this EXPLODED DRAWING and PART LIST for future reference. For information about ordering replacement parts, see the back cover of the User's Manual. 34
Note: Specifications are subject to change without notice. REMOVE THIS EXPLODED DRAWING AND PART LIST FROM THE MANUAL Save this EXPLODED DRAWING and PART LIST for future reference. For information about ordering replacement parts, see the back cover of the User's Manual. 34
Uk Manual
Page 26
..." Blue Wire, 2F # 1 14" Blue Wire, M/F # 1 8" White Wire, 2F # 1 16" White Wire, 2F # 1 6" Blue Wire, 2F # 1 8" Black Wire, M/F # 1 4" Black Wire, 2Ring # 1 10" Red Wire, M/F # 1 User's Manual #These parts are not illustrated Specifications are subject to change without notice. Qty. 12 22 3 22 44 52 65 72 82 94 10 16 11...
..." Blue Wire, 2F # 1 14" Blue Wire, M/F # 1 8" White Wire, 2F # 1 16" White Wire, 2F # 1 6" Blue Wire, 2F # 1 8" Black Wire, M/F # 1 4" Black Wire, 2Ring # 1 10" Red Wire, M/F # 1 User's Manual #These parts are not illustrated Specifications are subject to change without notice. Qty. 12 22 3 22 44 52 65 72 82 94 10 16 11...


