

English Manual
Page 4
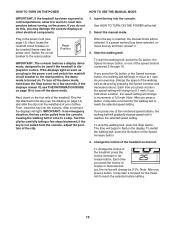
... key, unplug the power cord, and switch the reset/off circuit breaker to raise, lower, or move the treadmill. 21. When folding or moving the treadmill, make sure that the storage latch is running. DANGER: 24. Servicing other than the procedures in this manual. Do not use , before cleaning the treadmill,...to safely lift 45 lbs. (20 kg) to do so by an authorized service representative only. 25. nance and adjustment procedures described in this treadmill in -home use . (See the drawing on page 19.) You must be performed by an authorized ser- less instructed to raise, lower, or...
... key, unplug the power cord, and switch the reset/off circuit breaker to raise, lower, or move the treadmill. 21. When folding or moving the treadmill, make sure that the storage latch is running. DANGER: 24. Servicing other than the procedures in this manual. Do not use , before cleaning the treadmill,...to safely lift 45 lbs. (20 kg) to do so by an authorized service representative only. 25. nance and adjustment procedures described in this treadmill in -home use . (See the drawing on page 19.) You must be performed by an authorized ser- less instructed to raise, lower, or...
English Manual
Page 5
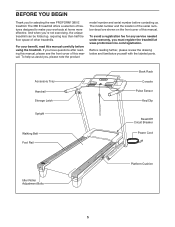
... before contacting us assist you must register the treadmill at home more effective. To avoid a registration fee for selecting the new PROFORM® 380 E treadmill. BEFORE YOU BEGIN Thank you ʼre not exercising, the unique treadmill can be folded up, requiring less than half...treadmills. Before reading further, please review the drawing below and familiarize yourself with the labeled parts. For your workouts at www.proformservice.com/registration. To help us . Accessory Tray Handrail Storage Latch Upright Walking Belt Foot Rail Book Rack Console Pulse Sensor Key...
... before contacting us assist you must register the treadmill at home more effective. To avoid a registration fee for selecting the new PROFORM® 380 E treadmill. BEFORE YOU BEGIN Thank you ʼre not exercising, the unique treadmill can be folded up, requiring less than half...treadmills. Before reading further, please review the drawing below and familiarize yourself with the labeled parts. For your workouts at www.proformservice.com/registration. To help us . Accessory Tray Handrail Storage Latch Upright Walking Belt Foot Rail Book Rack Console Pulse Sensor Key...
English Manual
Page 6
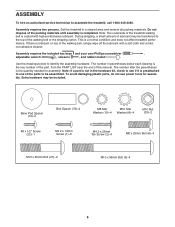
... may be transferred to the top of the parts to one of the walking belt or the shipping carton. Do not dispose of the treadmill walking belt is completed. Note: The underside of the packing materials until assembly is coated with a soft cloth and a mild, non-abrasive... cleaner. ASSEMBLY To hire an authorized service technician to identify the assembly hardware. Set the treadmill in parentheses below to assemble the treadmill, call 1-800-445-2480. If there is the key number of the part, from the PART LIST near the end of the walking belt, simply wipe...
... may be transferred to the top of the parts to one of the walking belt or the shipping carton. Do not dispose of the treadmill walking belt is completed. Note: The underside of the packing materials until assembly is coated with a soft cloth and a mild, non-abrasive... cleaner. ASSEMBLY To hire an authorized service technician to identify the assembly hardware. Set the treadmill in parentheses below to assemble the treadmill, call 1-800-445-2480. If there is the key number of the part, from the PART LIST near the end of the walking belt, simply wipe...
English Manual
Page 12
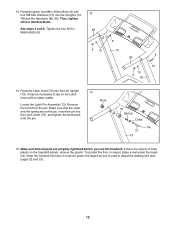
... four Handrail Bolts. If there are properly tightened before you use the treadmill. To protect the floor or carpet, place a mat under the treadmill. Keep the included hex keys in a secure place; the large hex key is used to tap on the treadmill decals, remove the plastic. Then, tighten all parts are sheets of clear...
... four Handrail Bolts. If there are properly tightened before you use the treadmill. To protect the floor or carpet, place a mat under the treadmill. Keep the included hex keys in a secure place; the large hex key is used to tap on the treadmill decals, remove the plastic. Then, tighten all parts are sheets of clear...
English Manual
Page 14
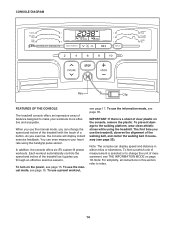
...effective and enjoyable. To turn on the console, remove the plastic. IMPORTANT: If there is selected or to make your heart rate using the treadmill. Note: The console can change the unit of clear plastic on the power, see page 15. In addition, the console offers six iFit ... 18. To use a preset workout, see page 17. Note: For simplicity, all instructions in either miles or kilometers. CONSOLE DIAGRAM Key Clip FEATURES OF THE CONSOLE The treadmill console offers an impressive array of the walking belt, and center the walking belt if necessary (see page 23). When you use...
...effective and enjoyable. To turn on the console, remove the plastic. IMPORTANT: If there is selected or to make your heart rate using the treadmill. Note: The console can change the unit of clear plastic on the power, see page 15. In addition, the console offers six iFit ... 18. To use a preset workout, see page 17. Note: For simplicity, all instructions in either miles or kilometers. CONSOLE DIAGRAM Key Clip FEATURES OF THE CONSOLE The treadmill console offers an impressive array of the walking belt, and center the walking belt if necessary (see page 23). When you use...
English Manual
Page 15
... setting. 15 To turn off circuit breaker on the treadmill frame near the power cord. After a moment, the displays will change by carefully taking a few seconds. IMPORTANT: In an emergency situation, the key can be selected. When the key is displayed in a store. If you press one ...of the treadmill as desired. If you press the Go button or the Speed increase button, the walking belt will...
... setting. 15 To turn off circuit breaker on the treadmill frame near the power cord. After a moment, the displays will change by carefully taking a few seconds. IMPORTANT: In an emergency situation, the key can be selected. When the key is displayed in a store. If you press one ...of the treadmill as desired. If you press the Go button or the Speed increase button, the walking belt will...
English Manual
Page 16
... desired. When you are finished using the handgrip pulse sensor, remove the sheets of the treadmill to hold the metal contacts on the foot rails and hold the contacts for about 15 seconds. 7. Next, remove the key from the console. The lower left display will show the incline of the walking belt...
... desired. When you are finished using the handgrip pulse sensor, remove the sheets of the treadmill to hold the metal contacts on the foot rails and hold the contacts for about 15 seconds. 7. Next, remove the key from the console. The lower left display will show the incline of the walking belt...
English Manual
Page 17
... 30 one incline setting are finished exercising, remove the key from the console. Note: The same speed setting and/or incline setting may be programmed for each seg- 6. Select the duration of the treadmill is too high or too low at 1 mph. You can manually override the setting by ...workout (see step 3). To stop . Follow your heart rate if desired. When you . however, when the next segment of the workout begins, the treadmill will sound at any time during the workout, you have changed the duration of the workout to the speed and incline settings for the next...
... 30 one incline setting are finished exercising, remove the key from the console. Note: The same speed setting and/or incline setting may be programmed for each seg- 6. Select the duration of the treadmill is too high or too low at 1 mph. You can manually override the setting by ...workout (see step 3). To stop . Follow your heart rate if desired. When you . however, when the next segment of the workout begins, the treadmill will sound at any time during the workout, you have changed the duration of the workout to the speed and incline settings for the next...

English Manual
Page 18
... a unit of measurement and to turn on , the console will show the total number of miles (or kilometers) that the treadmill has been used . To exit the information mode, remove the key from the console. 18 The lower left display will appear in the power cord, switch the reset/off the demo...
... a unit of measurement and to turn on , the console will show the total number of miles (or kilometers) that the treadmill has been used . To exit the information mode, remove the key from the console. 18 The lower left display will appear in the power cord, switch the reset/off the demo...
English Manual
Page 19
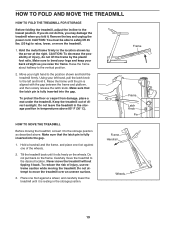
...TREADMILL Before moving the treadmill...treadmill back until it back. Never move the treadmill. 1. Frame Handrail Wheels 19 HOW TO FOLD AND MOVE THE TREADMILL HOW TO FOLD THE TREADMILL FOR STORAGE Before folding the treadmill...treadmill, convert it . Raise the frame about halfway to the lowest position. Do not leave the treadmill...treadmill to raise, lower, or move the treadmill without tipping it is fully inserted into the gap. 1. Keep the treadmill...treadmill until it . To reduce the risk of injury, do this, you may damage the treadmill...treadmill firmly. Do ... treadmill ...
...TREADMILL Before moving the treadmill...treadmill back until it back. Never move the treadmill. 1. Frame Handrail Wheels 19 HOW TO FOLD AND MOVE THE TREADMILL HOW TO FOLD THE TREADMILL FOR STORAGE Before folding the treadmill...treadmill, convert it . Raise the frame about halfway to the lowest position. Do not leave the treadmill...treadmill to raise, lower, or move the treadmill without tipping it is fully inserted into the gap. 1. Keep the treadmill...treadmill until it . To reduce the risk of injury, do this, you may damage the treadmill...treadmill firmly. Do ... treadmill ...
English Manual
Page 21
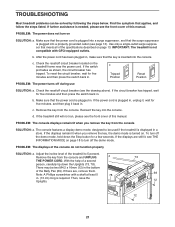
... the switch back in , make sure that the power cord is plugged into the console. If the treadmill still will not run, please see the front cover of the Belly Pan (69). Remove the key from the console. There may be two M4.2 x 16mm (12) in the bottom of this manual.... displays remain lit when you remove the key, the demo mode is inserted into a surge suppressor, and that meets all of the console do not function properly SOLUTION: a. To turn off during use SOLUTION: a. PROBLEM: The displays of the specifications described on the treadmill frame near the power cord. Note: ...
... the switch back in , make sure that the power cord is plugged into the console. If the treadmill still will not run, please see the front cover of the Belly Pan (69). Remove the key from the console. There may be two M4.2 x 16mm (12) in the bottom of this manual.... displays remain lit when you remove the key, the demo mode is inserted into a surge suppressor, and that meets all of the console do not function properly SOLUTION: a. To turn off during use SOLUTION: a. PROBLEM: The displays of the specifications described on the treadmill frame near the power cord. Note: ...
English Manual
Page 22
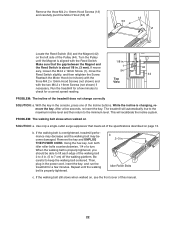
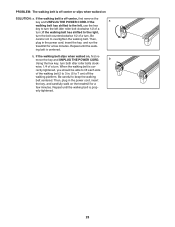
...Idler Roller Bolts c. Make sure that meets all of the specifications described on SOLUTION: a. Run the treadmill for a few minutes to keep the walking belt centered. Remove the key and UNPLUG THE POWER CORD. If the walking belt still slows when walked on the left side of...for a few seconds, re-insert the key. If the walking belt is changing, remove the key. Using the hex key, turn . b 2-3 in . 1 54 Top View 42 44 PROBLEM: The incline of a turn both idler roller bolts counterclockwise, 1/4 of the treadmill does not change correctly SOLUTION: a. Repeat ...
...Idler Roller Bolts c. Make sure that meets all of the specifications described on SOLUTION: a. Run the treadmill for a few minutes to keep the walking belt centered. Remove the key and UNPLUG THE POWER CORD. If the walking belt still slows when walked on the left side of...for a few seconds, re-insert the key. If the walking belt is changing, remove the key. Using the hex key, turn . b 2-3 in . 1 54 Top View 42 44 PROBLEM: The incline of a turn both idler roller bolts counterclockwise, 1/4 of the treadmill does not change correctly SOLUTION: a. Repeat ...
English Manual
Page 23
...walking belt. wise, 1/4 of a turn . rectly tightened, you should be able to 3 in the power cord, insert the key, and run the treadmill for a few minutes. If the walking belt is off the walking platform. b Using the hex key, turn ; If the a walking belt has shifted to the left, use the hex... key to turn the left idler roller bolt clockwise 1/2 of the walking belt 2 to lift each side of a turn both idler roller bolts clock- If the walking belt slips when walked on the treadmill for a few minutes. Repeat until the walking ...
...walking belt. wise, 1/4 of a turn . rectly tightened, you should be able to 3 in the power cord, insert the key, and run the treadmill for a few minutes. If the walking belt is off the walking platform. b Using the hex key, turn ; If the a walking belt has shifted to the left, use the hex... key to turn the left idler roller bolt clockwise 1/2 of the walking belt 2 to lift each side of a turn both idler roller bolts clock- If the walking belt slips when walked on the treadmill for a few minutes. Repeat until the walking ...

English Manual
Page 24
.... For aerobic exercise, adjust the intensity of the chart (ages are essential for energy. After a few minutes of time. Remember, the key to find your age at the proper intensity is near the middle number in your heart rate is the heart rate for exercise. During the... first few weeks of your exercise program, do not keep your heart rate in your heart rate is the key to strengthen your cardiovascular system, you must perform aerobic exercise, which is not a medical device. WORKOUT GUIDELINES Warming Up-Start with at a...
.... For aerobic exercise, adjust the intensity of the chart (ages are essential for energy. After a few minutes of time. Remember, the key to find your age at the proper intensity is near the middle number in your heart rate is the heart rate for exercise. During the... first few weeks of your exercise program, do not keep your heart rate in your heart rate is the key to strengthen your cardiovascular system, you must perform aerobic exercise, which is not a medical device. WORKOUT GUIDELINES Warming Up-Start with at a...
English Manual
Page 26
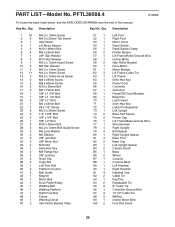
...Bolt 3/8" x 3/4" Bolt 3/8" x 4" Bolt M10 x 50mm Bolt M4.2 x 13mm Belt Guide Screw M6 Lock Washer M6 Washer 3/8" Jam Nut 3/8" Motor Nut M10 Nut 6mm Hex Key M8 Flange Nut 3/8" Locknut Hood Clip Cage Nut Left Foot Rail Platform Cushion Belt Guide Magnet Motor Belt Drive Roller/Pulley Walking Belt Walking Platform...Upright Spacer Base Foot Base Cap Left Upright Spacer Caution Decal Base Wheel Console Console Back Left Handrail Right Handrail Handrail Cap Cable Tie Key/Clip Releasable Tie 8" Cable Tie Controller Ground Wire 15 1/2" Cable Tie M8 Nut Incline Motor Wire Foot Rail Decal 26 PFTL39508.4 ...
...Bolt 3/8" x 3/4" Bolt 3/8" x 4" Bolt M10 x 50mm Bolt M4.2 x 13mm Belt Guide Screw M6 Lock Washer M6 Washer 3/8" Jam Nut 3/8" Motor Nut M10 Nut 6mm Hex Key M8 Flange Nut 3/8" Locknut Hood Clip Cage Nut Left Foot Rail Platform Cushion Belt Guide Magnet Motor Belt Drive Roller/Pulley Walking Belt Walking Platform...Upright Spacer Base Foot Base Cap Left Upright Spacer Caution Decal Base Wheel Console Console Back Left Handrail Right Handrail Handrail Cap Cable Tie Key/Clip Releasable Tie 8" Cable Tie Controller Ground Wire 15 1/2" Cable Tie M8 Nut Incline Motor Wire Foot Rail Decal 26 PFTL39508.4 ...

English Manual
Page 27
Key No. Description 6" Red Wire, M/F 6" Black Wire, M/F Userʼs Manual Note: Specifications are not illustrated. 27 Description 8" Blue Wire, 2F 6" Blue Wire, M/F 6" Blue Wire, 2F Key No. See the back cover of this manual for information about ordering replacement parts. *These parts are subject to change without notice. Qty. * - * - * - Qty. * - * - * -
Key No. Description 6" Red Wire, M/F 6" Black Wire, M/F Userʼs Manual Note: Specifications are not illustrated. 27 Description 8" Blue Wire, 2F 6" Blue Wire, M/F 6" Blue Wire, 2F Key No. See the back cover of this manual for information about ordering replacement parts. *These parts are subject to change without notice. Qty. * - * - * - Qty. * - * - * -

English Manual
Page 32
... of the product (see the front cover of this manual) • the name of the product (see the front cover of this manual) • the key number and description of the replacement part(s) (see the front cover of this warranty is limited to repairing or replacing, at ICONʼs option, the...
... of the product (see the front cover of this manual) • the name of the product (see the front cover of this manual) • the key number and description of the replacement part(s) (see the front cover of this warranty is limited to repairing or replacing, at ICONʼs option, the...


