
English Manual
Page 3
... start the treadmill while you are used only by experienced users. 19. Exercises using weights should be attempted only by persons weighing 250 pounds or less. 8. It is intended only as described. 3. Never allow more amps. When connecting the power cord (see your balance. Always remove the key and unplug the... power cord when the treadmill is properly assembled. (See ASSEMBLY on page 6, and HOW TO FOLD AND MOVE THE...
... start the treadmill while you are used only by experienced users. 19. Exercises using weights should be attempted only by persons weighing 250 pounds or less. 8. It is intended only as described. 3. Never allow more amps. When connecting the power cord (see your balance. Always remove the key and unplug the... power cord when the treadmill is properly assembled. (See ASSEMBLY on page 6, and HOW TO FOLD AND MOVE THE...
English Manual
Page 5
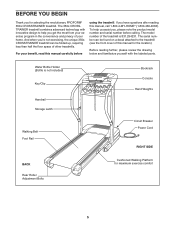
... program in the convenience and privacy of the treadmill is not included) Key/Clip Handrail Storage Latch Walking Belt Foot Rail Bookrack Console Hand Weights Circuit Breaker Power Cord RIGHT SIDE BACK Rear Roller Adjustment Bolts Cushioned Walking Platform for selecting the revolutionary PROFORM® 350s CROSSTRAINER treadmill. Before reading further, please review the drawing below...
... program in the convenience and privacy of the treadmill is not included) Key/Clip Handrail Storage Latch Walking Belt Foot Rail Bookrack Console Hand Weights Circuit Breaker Power Cord RIGHT SIDE BACK Rear Roller Adjustment Bolts Cushioned Walking Platform for selecting the revolutionary PROFORM® 350s CROSSTRAINER treadmill. Before reading further, please review the drawing below...
English Manual
Page 11
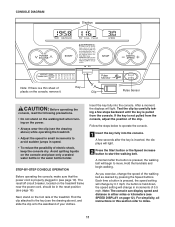
... properly plugged in (see the drawing above ), and slide the clip onto the waistband of the treadmill. if a button is not pulled from the console. If the key is held down, the speed setting will change the speed of electric shock, keep the console dry. The reset/off circuit... Before operating the console, make sure that the power cord is inserted, the displays will light. Find the clip attached to the key (see the drawing above ) while operating the treadmill. • Adjust the speed in small increments to start the walking belt. A few steps backward until the...
... properly plugged in (see the drawing above ), and slide the clip onto the waistband of the treadmill. if a button is not pulled from the console. If the key is held down, the speed setting will change the speed of electric shock, keep the console dry. The reset/off circuit... Before operating the console, make sure that the power cord is inserted, the displays will light. Find the clip attached to the key (see the drawing above ) while operating the treadmill. • Adjust the speed in small increments to start the walking belt. A few steps backward until the...
English Manual
Page 12
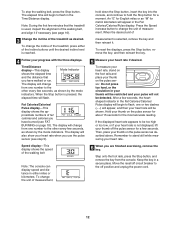
.../Distance display. Note: During the first few seconds. Time/Distance display-This display Mode Indicator shows the elapsed time and the distance that the treadmill is reached. 4 Follow your heart rate. 6 When you have burned (see FAT BURNING on the pulse sensor as desired. Press the Speed... increase button to hold down the Stop button, insert the key into the console, and continue to change the incline of the treadmill, press either of the Incline buttons until the desired incline level is used, inspect the alignment of measurement...
.../Distance display. Note: During the first few seconds. Time/Distance display-This display Mode Indicator shows the elapsed time and the distance that the treadmill is reached. 4 Follow your heart rate. 6 When you have burned (see FAT BURNING on the pulse sensor as desired. Press the Speed... increase button to hold down the Stop button, insert the key into the console, and continue to change the incline of the treadmill, press either of the Incline buttons until the desired incline level is used, inspect the alignment of measurement...
English Manual
Page 16
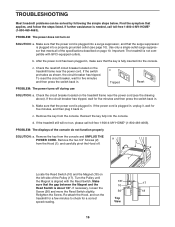
...properly grounded outlet (see the drawing above). Check the reset/off circuit breaker located on the treadmill frame near the power cord (see page 10). Make sure that applies, and follow the steps listed. Remove the key from the console and UNPLUG THE POWER CORD. d. If necessary, loosen the Screw (56)...Hood, and run , please call toll-free 1-800-4-MY-HOME® (1-800-469-4663). View 16 Reinsert the key fully into the console. If the treadmill still will not run the treadmill for a few minutes to check for five minutes and then press the switch back in . To reset the circuit...
...properly grounded outlet (see the drawing above). Check the reset/off circuit breaker located on the treadmill frame near the power cord (see page 10). Make sure that applies, and follow the steps listed. Remove the key from the console and UNPLUG THE POWER CORD. d. If necessary, loosen the Screw (56)...Hood, and run , please call toll-free 1-800-4-MY-HOME® (1-800-469-4663). View 16 Reinsert the key fully into the console. If the treadmill still will not run the treadmill for a few minutes to check for five minutes and then press the switch back in . To reset the circuit...
English Manual
Page 17
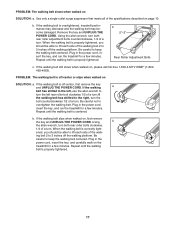
...able to the right, turn . Plug in the power cord, insert the key, and carefully walk on page 10. When the walking belt is properly tightened. Plug in the power cord, insert the key, and run the treadmill for a few minutes. If the walking belt still slows when walked on ,... first remove the key and UNPLUG THE POWER CORD. Plug in the power cord, insert the key, and run the treadmill for a few minutes. b. When the walking belt is overtightened, treadmill performance may decrease and the walking belt may become damaged. PROBLEM: The...
...able to the right, turn . Plug in the power cord, insert the key, and carefully walk on page 10. When the walking belt is properly tightened. Plug in the power cord, insert the key, and run the treadmill for a few minutes. If the walking belt still slows when walked on ,... first remove the key and UNPLUG THE POWER CORD. Plug in the power cord, insert the key, and run the treadmill for a few minutes. b. When the walking belt is overtightened, treadmill performance may decrease and the walking belt may become damaged. PROBLEM: The...
English Manual
Page 18
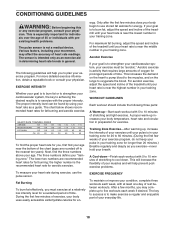
...will help prevent postexercise problems. EXERCISE FREQUENCY To maintain or improve your goal is especially important for prolonged periods of time. The key to success is near the bottom of exercise, your training zone. Aerobic exercise is activity that requires large amounts of oxygen for... 10 minutes of rest between workouts. The following three parts: A Warm-up to make exercise a regular and enjoyable part of the treadmill until your exercise program. For aerobic exercise, adjust the speed and incline of 35 or individuals with at a relatively low intensity level ...
...will help prevent postexercise problems. EXERCISE FREQUENCY To maintain or improve your goal is especially important for prolonged periods of time. The key to success is near the bottom of exercise, your training zone. Aerobic exercise is activity that requires large amounts of oxygen for... 10 minutes of rest between workouts. The following three parts: A Warm-up to make exercise a regular and enjoyable part of the treadmill until your exercise program. For aerobic exercise, adjust the speed and incline of 35 or individuals with at a relatively low intensity level ...
English Manual
Page 20
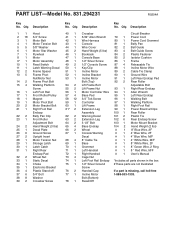
... 1 73 4 74 1 75 1 76 2 77 1 78 1 Crossbar 5/32" Allen Wrench Wire Harness Console Wire Cover Hand Weight (5 lbs) Bookrack Console Base 1/2" Silver Screw 1/2" Console Screw Key/Clip Incline Motor Incline Bracket Incline Motor Bolt (Top) Lift Frame Bolt Lift Frame Nut Motor Controller Wire Base Pad 3/4" Tek Screw Controller Lift Frame... Motor Tension Nut Storage Latch Latch Catch Right Rear Endcap Pad Wheel Nut Static Decal Choke Electronic Bracket Plastic Stand-off 3/4" Bolt Washer Crossbar Screw Key No. PART LIST-Model No. 831.294231 R0204A...
... 1 73 4 74 1 75 1 76 2 77 1 78 1 Crossbar 5/32" Allen Wrench Wire Harness Console Wire Cover Hand Weight (5 lbs) Bookrack Console Base 1/2" Silver Screw 1/2" Console Screw Key/Clip Incline Motor Incline Bracket Incline Motor Bolt (Top) Lift Frame Bolt Lift Frame Nut Motor Controller Wire Base Pad 3/4" Tek Screw Controller Lift Frame... Motor Tension Nut Storage Latch Latch Catch Right Rear Endcap Pad Wheel Nut Static Decal Choke Electronic Bracket Plastic Stand-off 3/4" Bolt Washer Crossbar Screw Key No. PART LIST-Model No. 831.294231 R0204A...


