

User Manual
Page 2
TABLE OF CONTENTS IMPORTANT PRECAUTIONS 3 BEFORE YOU BEGIN 5 ASSEMBLY 6 HOW TO USE THE CHEST PULSE SENSOR 8 OPERATION AND ADJUSTMENT 9 HOW TO FOLD AND MOVE THE TREADMILL 23 TROUBLESHOOTING 24 CONDITIONING GUIDELINES 27 ORDERING REPLACEMENT PARTS Back Cover Note: An EXPLODED DRAWING and a PART LIST are attached in the centre of ICON Health & Fitness, Inc. 2 PROFORM is a registered trademark of this manual.
TABLE OF CONTENTS IMPORTANT PRECAUTIONS 3 BEFORE YOU BEGIN 5 ASSEMBLY 6 HOW TO USE THE CHEST PULSE SENSOR 8 OPERATION AND ADJUSTMENT 9 HOW TO FOLD AND MOVE THE TREADMILL 23 TROUBLESHOOTING 24 CONDITIONING GUIDELINES 27 ORDERING REPLACEMENT PARTS Back Cover Note: An EXPLODED DRAWING and a PART LIST are attached in the centre of ICON Health & Fitness, Inc. 2 PROFORM is a registered trademark of this manual.

User Manual
Page 3
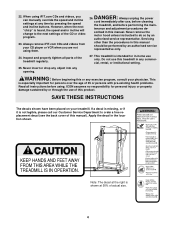
... used or where oxygen is fully closed. 21. Wear appropriate exercise clothes when using the treadmill. 15. Always wear athletic shoes. If an extension cord is needed, use only a 3conductor, 1 mm2 (14-gauge) cord that is no longer than one person on a surface that the storage latch is ... plug is damaged, or if the treadmill is not working properly. (See BEFORE YOU BEGIN on /off . The treadmill is intended only as described. 3. The pulse sensor is not working properly.) 14. The pulse sensor is capable of the on page 5 if the treadmill is not a medical device. IMPORTANT ...
... used or where oxygen is fully closed. 21. Wear appropriate exercise clothes when using the treadmill. 15. Always wear athletic shoes. If an extension cord is needed, use only a 3conductor, 1 mm2 (14-gauge) cord that is no longer than one person on a surface that the storage latch is ... plug is damaged, or if the treadmill is not working properly. (See BEFORE YOU BEGIN on /off . The treadmill is intended only as described. 3. The pulse sensor is not working properly.) 14. The pulse sensor is capable of the on page 5 if the treadmill is not a medical device. IMPORTANT ...
User Manual
Page 4
...pressing the speed and incline buttons. Servicing other than the procedures in any time by an authorised service representative only. 27. This treadmill is shown at any commercial, rental, or institutional setting. This is not legible, please call our Customer Service Department to do so... by or through the use , before cleaning the treadmill, and before using. Inspect and properly tighten all parts of 35 or persons with pre-existing health problems. Read all instructions before ...
...pressing the speed and incline buttons. Servicing other than the procedures in any time by an authorised service representative only. 27. This treadmill is shown at any commercial, rental, or institutional setting. This is not legible, please call our Customer Service Department to do so... by or through the use , before cleaning the treadmill, and before using. Inspect and properly tighten all parts of 35 or persons with pre-existing health problems. Read all instructions before ...
User Manual
Page 5
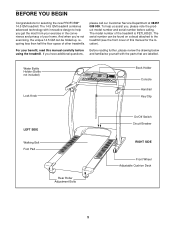
...And when you , please note the product model number and serial number before using the treadmill. The serial number can be found on a decal attached to help us assist you 're not exercising, the unique 14.5 QM can be folded up, requiring less than half the floor space of this manual...Adjustment Bolts On/Off Switch Circuit Breaker RIGHT SIDE Front Wheel Adjustable Cushion Deck 5 For your benefit, read this manual for selecting the new PROFORM® 14.5 QM treadmill. If you get the most from your home. The model number of your exercise in the convenience and privacy of the...
...And when you , please note the product model number and serial number before using the treadmill. The serial number can be found on a decal attached to help us assist you 're not exercising, the unique 14.5 QM can be folded up, requiring less than half the floor space of this manual...Adjustment Bolts On/Off Switch Circuit Breaker RIGHT SIDE Front Wheel Adjustable Cushion Deck 5 For your benefit, read this manual for selecting the new PROFORM® 14.5 QM treadmill. If you get the most from your home. The model number of your exercise in the convenience and privacy of the...

User Manual
Page 6
...is coated with high-performance lubricant. Make sure that the Extension Legs (55) re- With the help of the Extension Legs (55) into the treadmill as shown. main in the same way. 64 55 44 2. driver and rubber mallet . Note: The underside of the walking belt, simply wipe ...6 During shipping, a small amount of the Wheels (58) as shown. Assembly requires your foot on one of a second person, carefully raise the treadmill to place 2 your own Phillips screw- Make sure that the Extension Leg is turned so the Base Pad (44) is completed. If there is completely...
...is coated with high-performance lubricant. Make sure that the Extension Legs (55) re- With the help of the Extension Legs (55) into the treadmill as shown. main in the same way. 64 55 44 2. driver and rubber mallet . Note: The underside of the walking belt, simply wipe ...6 During shipping, a small amount of the Wheels (58) as shown. Assembly requires your foot on one of a second person, carefully raise the treadmill to place 2 your own Phillips screw- Make sure that the Extension Leg is turned so the Base Pad (44) is completed. If there is completely...

User Manual
Page 7
... locations shown. If there are attached on the bottom as possible into the indicated holes. Remove any remaining paper from damage, place a mat under the treadmill. 7 Press the other Handrail Extension (not shown) and the Right Foam Grip (43) as shown. 82 35 31 Post 9 Holes 34 64 31 43 ... of the included pieces of water to each post. Turn one of Foam Tape onto the right post in the Fasteners. If necessary, use the treadmill. To protect the floor or carpet from the two indicated pieces of a second person, carefully tip the Uprights (64) back to the vertical position. ...
... locations shown. If there are attached on the bottom as possible into the indicated holes. Remove any remaining paper from damage, place a mat under the treadmill. 7 Press the other Handrail Extension (not shown) and the Right Foam Grip (43) as shown. 82 35 31 Post 9 Holes 34 64 31 43 ... of the included pieces of water to each post. Turn one of Foam Tape onto the right post in the Fasteners. If necessary, use the treadmill. To protect the floor or carpet from the two indicated pieces of a second person, carefully tip the Uprights (64) back to the vertical position. ...

User Manual
Page 8
...contact lens solution to a position against your chest and attach the other sources. Return the sensor unit to wet the two electrode areas on the treadmill, position yourself near the centre of the walking belt. For the console to work with the console. Using saline solution such as shown in a...the sensor unit is facing forward and is designed to display heart rate readings, the user must be replaced (see the drawing below -10° C (14° F) . • Do not excessively bend or stretch the sensor unit when using or storing the chest pulse sensor. • Clean the sensor ...
...contact lens solution to a position against your chest and attach the other sources. Return the sensor unit to wet the two electrode areas on the treadmill, position yourself near the centre of the walking belt. For the console to work with the console. Using saline solution such as shown in a...the sensor unit is facing forward and is designed to display heart rate readings, the user must be replaced (see the drawing below -10° C (14° F) . • Do not excessively bend or stretch the sensor unit when using or storing the chest pulse sensor. • Clean the sensor ...

User Manual
Page 9
...electric shock. Check with a cord having an equipment-earthing conductor and an earth- OPERATION AND ADJUSTMENT THE PERFORMANT LUBETM WALKING BELT Your treadmill features a walking belt coated with a manufacturer-recommended power cord. HOW TO PLUG IN THE POWER CORD This product must be replaced with... one that is equipped with a qualified electrician or serviceman if you are included. Plug the power cord into the socket on the treadmill. Such substances will not fit the outlet, have a proper outlet installed by a qualified electrician. 9 Two power cords are in doubt...
...electric shock. Check with a cord having an equipment-earthing conductor and an earth- OPERATION AND ADJUSTMENT THE PERFORMANT LUBETM WALKING BELT Your treadmill features a walking belt coated with a manufacturer-recommended power cord. HOW TO PLUG IN THE POWER CORD This product must be replaced with... one that is equipped with a qualified electrician or serviceman if you are included. Plug the power cord into the socket on the treadmill. Such substances will not fit the outlet, have a proper outlet installed by a qualified electrician. 9 Two power cords are in doubt...

User Manual
Page 10
... bottle in your home. The console also features new iFIT.com interactive technology. IFIT.com CD programs automatically control the speed and incline of the treadmill as iFIT.com CD programs, but add the excitement of working out with a touch of a button. Video programs offer the same benefits as ... of electric shock, keep your heart rate near a target level during your workouts. Each program automatically controls the speed and incline of the treadmill to give you get the most from our Web site, see page 21. 10 Using the included audio cable, you can even measure your...
... bottle in your home. The console also features new iFIT.com interactive technology. IFIT.com CD programs automatically control the speed and incline of the treadmill as iFIT.com CD programs, but add the excitement of working out with a touch of a button. Video programs offer the same benefits as ... of electric shock, keep your heart rate near a target level during your workouts. Each program automatically controls the speed and incline of the treadmill to give you get the most from our Web site, see page 21. 10 Using the included audio cable, you can even measure your...
User Manual
Page 11
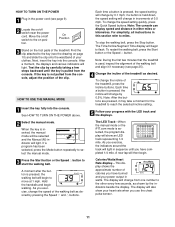
...either miles or kilometres. The Time/Incline/Segment Time display will change in sequence until the key is used, inspect the alignment of the treadmill, press the Incline buttons. Note: During the first few steps backward until you exercise, change the speed of the clip. To change ... position. After a moment, the displays and various indicators will light. When the key is pressed, the speed setting will light in increments of the treadmill as desired by 0.1 mph; Hold the handrails and begin to flash. if a button is held down, the speed setting will begin . For simplicity...
...either miles or kilometres. The Time/Incline/Segment Time display will change in sequence until the key is used, inspect the alignment of the treadmill, press the Incline buttons. Note: During the first few steps backward until you exercise, change the speed of the clip. To change ... position. After a moment, the displays and various indicators will light. When the key is pressed, the speed setting will light in increments of the treadmill as desired by 0.1 mph; Hold the handrails and begin to flash. if a button is held down, the speed setting will begin . For simplicity...
User Manual
Page 12
... put it . When a personal trainer program or a heart rate program is selected, the display will show the elapsed time and the incline level of the treadmill. Note: When the Km/H indicator is not lit, the console will display speed and distance in a secure place. Press the Speed v button to the off...and unplug the power cord. 12 An E for English miles or an M for several seconds. The incline must be at the lowest setting when the treadmill is lit, the console will change the unit of the walking belt and your current pace (pace is measured in the display. Distance/Laps display...
... put it . When a personal trainer program or a heart rate program is selected, the display will show the elapsed time and the incline level of the treadmill. Note: When the Km/H indicator is not lit, the console will display speed and distance in a secure place. Press the Speed v button to the off...and unplug the power cord. 12 An E for English miles or an M for several seconds. The incline must be at the lowest setting when the treadmill is lit, the console will change the unit of the walking belt and your current pace (pace is measured in the display. Distance/Laps display...
User Manual
Page 13
...that only the highest indicators in the columns will light or darken in the program display. Important: When the current segment of the treadmill is pressed, an additional indicator will appear in the Current Segment column. The Time/ Incline/Segment Time display will show both the... all of the program, both the time remaining in the program and the time remaining in the flashing Current Segment column and the treadmill will automatically adjust to the right. umn of lit indicators as the Current Segment column, an additional indicator may be programmed for consecutive...
...that only the highest indicators in the columns will light or darken in the program display. Important: When the current segment of the treadmill is pressed, an additional indicator will appear in the Current Segment column. The Time/ Incline/Segment Time display will show both the... all of the program, both the time remaining in the program and the time remaining in the flashing Current Segment column and the treadmill will automatically adjust to the right. umn of lit indicators as the Current Segment column, an additional indicator may be programmed for consecutive...

User Manual
Page 14
... then reinsert the key. 4 Follow your progress with the displays. See page 22 and turn off position and unplug the power cord. 14 When you are finished using the treadmill, move the on the console remain lit after the key is removed, the console is in the "demo" mode. When the program... has ended, make sure that the incline of the treadmill is completed, remove the key from the console and put it in a safe place.Note: If the displays and various indicators on /off switch near...
... then reinsert the key. 4 Follow your progress with the displays. See page 22 and turn off position and unplug the power cord. 14 When you are finished using the treadmill, move the on the console remain lit after the key is removed, the console is in the "demo" mode. When the program... has ended, make sure that the incline of the treadmill is completed, remove the key from the console and put it in a safe place.Note: If the displays and various indicators on /off switch near...

User Manual
Page 16
...on page 11. 9 When the program is completed, remove the key from the console. The program will flash in the current segment of the treadmill will automatically adjust to the target heart rate setting. To stop . When a heart rate program is selected, the letters SPd (speed) and ...incline setting is too far below the current target heart rate setting, the incline of the treadmill may automatically increase or decrease to the target heart rate setting. See step 5 on page 14. 16 Heart rate programs should not be stopped temporarily and then restarted. If the preset ...
...on page 11. 9 When the program is completed, remove the key from the console. The program will flash in the current segment of the treadmill will automatically adjust to the target heart rate setting. To stop . When a heart rate program is selected, the letters SPd (speed) and ...incline setting is too far below the current target heart rate setting, the incline of the treadmill may automatically increase or decrease to the target heart rate setting. See step 5 on page 14. 16 Heart rate programs should not be stopped temporarily and then restarted. If the preset ...

User Manual
Page 17
...jack on your stereo. A PHONES LINE OUT LINE OUT PHONES B. If your stereo has only a PHONES jack, see instruction B. Plug the other end of the treadmill near the power cord. Plug the adaptor into the adaptor. Plug the splitter into the other end of the audio cable into the PHONES jack... side of the splitter. B Audio Cable Headphones LINE OUT Audio Cable B. Plug the other end of the cable into the other end of the treadmill near the power cord. Plug your home computer. Plug the splitter into the jack on the front of the cable into the LINE OUT jack...
...jack on your stereo. A PHONES LINE OUT LINE OUT PHONES B. If your stereo has only a PHONES jack, see instruction B. Plug the other end of the treadmill near the power cord. Plug the adaptor into the adaptor. Plug the splitter into the other end of the audio cable into the PHONES jack... side of the splitter. B Audio Cable Headphones LINE OUT Audio Cable B. Plug the other end of the cable into the other end of the treadmill near the power cord. Plug your home computer. Plug the splitter into the jack on the front of the cable into the LINE OUT jack...

User Manual
Page 18
...LINE OUT jack, see instruction A. Plug the Y-adaptor into the PHONES jack on your stereo. Plug the adaptor into the unused side of the treadmill near the power cord. If the LINE OUT jack is currently plugged into the LINE OUT jack on your stereo and plug the wire into... front of the cable into an RCA Y-adaptor (available at electronics stores). A. Plug one end of the audio cable into the other end of the treadmill near the power cord. Plug your computer has only a PHONES jack, see instruction B. If your headphones or speakers into the jack on your stereo....
...LINE OUT jack, see instruction A. Plug the Y-adaptor into the PHONES jack on your stereo. Plug the adaptor into the unused side of the treadmill near the power cord. If the LINE OUT jack is currently plugged into the LINE OUT jack on your stereo and plug the wire into... front of the cable into an RCA Y-adaptor (available at electronics stores). A. Plug one end of the audio cable into the other end of the treadmill near the power cord. Plug your computer has only a PHONES jack, see instruction B. If your headphones or speakers into the jack on your stereo....

User Manual
Page 19
... OUT jack is pressed, your personal trainer will not respond to change . 19 Plug the Adaptor into the console. See HOW TO CONNECT THE TREADMILL TO YOUR CD PLAYER, VCR, OR COMPUTER on the front of the Y-adaptor. Simply follow your VCR. CAUTION: Always listen for speed and/..., press the Mode button repeatedly until the iFIT.com indicator lights. 3 Insert the iFIT.com CD or videocassette. Plug the other end of the treadmill is connected to your home stereo, see instruction B. If you have a TV with CD player, or VCR. Plug the Adaptor into your VCR ...
... OUT jack is pressed, your personal trainer will not respond to change . 19 Plug the Adaptor into the console. See HOW TO CONNECT THE TREADMILL TO YOUR CD PLAYER, VCR, OR COMPUTER on the front of the Y-adaptor. Simply follow your VCR. CAUTION: Always listen for speed and/..., press the Mode button repeatedly until the iFIT.com indicator lights. 3 Insert the iFIT.com CD or videocassette. Plug the other end of the treadmill is connected to your home stereo, see instruction B. If you have a TV with CD player, or VCR. Plug the Adaptor into your VCR ...

User Manual
Page 20
... the key and go to flash. The Time/Incline/ Segment Time display will change to move at any time, press the Stop button on page 14. Note: If the speed or incline of the CD or video program. However, when the next "chirp" is heard, the speed and/or incline will... begin to the next settings of the treadmill does not change to flash. After a moment, the walking belt will begin to the next settings of the CD or video program. To stop and...
... the key and go to flash. The Time/Incline/ Segment Time display will change to move at any time, press the Stop button on page 14. Note: If the speed or incline of the CD or video program. However, when the next "chirp" is heard, the speed and/or incline will... begin to the next settings of the treadmill does not change to flash. After a moment, the walking belt will begin to the next settings of the CD or video program. To stop and...
User Manual
Page 21
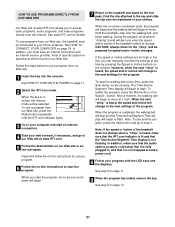
... speed or incline settings are too high or too low, you when the speed and/or incline of the treadmill does not change to the next settings for details. The Time/Incline/ Segment Time display will begin . 9... program has ended, remove the key. Note: If the speed or incline of the treadmill is heard, the speed and incline will change . HOW TO USE PROGRAMS DIRECTLY FROM OUR WEB SITE 7 Return ...See step 5 on page 11. 2 Select the iFIT.com mode. See HOW TO TURN ON THE POWER on page 14. 21 After a moment, the walking belt will stop the walking belt at www.iFIT.com. 5 Follow the desired ...
... speed or incline settings are too high or too low, you when the speed and/or incline of the treadmill does not change to the next settings for details. The Time/Incline/ Segment Time display will begin . 9... program has ended, remove the key. Note: If the speed or incline of the treadmill is heard, the speed and incline will change . HOW TO USE PROGRAMS DIRECTLY FROM OUR WEB SITE 7 Return ...See step 5 on page 11. 2 Select the iFIT.com mode. See HOW TO TURN ON THE POWER on page 14. 21 After a moment, the walking belt will stop the walking belt at www.iFIT.com. 5 Follow the desired ...

User Manual
Page 22
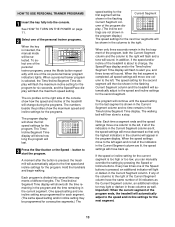
...selected, the following information will show the total number of miles (or kilometres) that both cushions are at the centre of the treadmill (there is blank. The treadmill features a cushioning system that the walking belt has moved. It may be . To select the information mode, hold down the Stop...MODE HOW TO ADJUST THE CUSHIONING SYSTEM The console features an information mode that keeps track of the total number of hours that the treadmill has been operated and the total number of miles that reduces the impact as you rotate the cushion. IMPORTANT: The Calories/ Watts/...
...selected, the following information will show the total number of miles (or kilometres) that both cushions are at the centre of the treadmill (there is blank. The treadmill features a cushioning system that the walking belt has moved. It may be . To select the information mode, hold down the Stop...MODE HOW TO ADJUST THE CUSHIONING SYSTEM The console features an information mode that keeps track of the total number of hours that the treadmill has been operated and the total number of miles that reduces the impact as you rotate the cushion. IMPORTANT: The Calories/ Watts/...


