
Uk Manual
Page 1
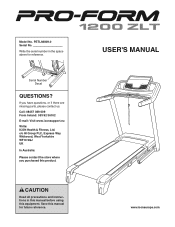
... missing parts, please contact us: Call: 08457 089 009 From Ireland: 053 92 36102 E-mail: Visit www.iconsupport.eu Write: ICON Health & Fitness, Ltd. USER'S MANUAL www.iconeurope.com PETL98809.0 Serial No. CAUTION Read all precautions and instructions in the space above for future reference. Write the serial number in this...
... missing parts, please contact us: Call: 08457 089 009 From Ireland: 053 92 36102 E-mail: Visit www.iconsupport.eu Write: ICON Health & Fitness, Ltd. USER'S MANUAL www.iconeurope.com PETL98809.0 Serial No. CAUTION Read all precautions and instructions in the space above for future reference. Write the serial number in this...
Uk Manual
Page 2
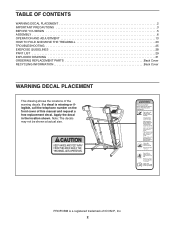
... size. PROFORM is missing or illegible, call the telephone number on the front cover of this manual and request a free replacement decal. Apply the decal in the location shown. TABLE OF CONTENTS WARNING DECAL PLACEMENT 2 IMPORTANT PRECAUTIONS 3 BEFORE YOU BEGIN 5 ASSEMBLY 6 OPERATION AND ADJUSTMENT 13 HOW TO FOLD AND MOVE THE TREADMILL 23...
... size. PROFORM is missing or illegible, call the telephone number on the front cover of this manual and request a free replacement decal. Apply the decal in the location shown. TABLE OF CONTENTS WARNING DECAL PLACEMENT 2 IMPORTANT PRECAUTIONS 3 BEFORE YOU BEGIN 5 ASSEMBLY 6 OPERATION AND ADJUSTMENT 13 HOW TO FOLD AND MOVE THE TREADMILL 23...
Uk Manual
Page 3
... support clothes are standing on page 25 if the treadmill is being administered. 7. Always wear athletic shoes. structions in - When connecting the power cord (see HOW TO TURN ON THE POWER on the same circuit. Never use of this manual and all times. 13. The pulse sensor is capable ...of all important precautions and in this product. 1. No other appliance should be on page 15). 16. This is turned off. Do not wear loose clothes that all users of this treadmill are used only by...
... support clothes are standing on page 25 if the treadmill is being administered. 7. Always wear athletic shoes. structions in - When connecting the power cord (see HOW TO TURN ON THE POWER on the same circuit. Never use of this manual and all times. 13. The pulse sensor is capable ...of all important precautions and in this product. 1. No other appliance should be on page 15). 16. This is turned off. Do not wear loose clothes that all users of this treadmill are used only by...
Uk Manual
Page 4
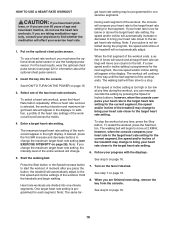
... INSTRUCTIONS 4 When folding or moving the treadmill, make sure that the storage latch is intended for the location of the treadmill regularly. Never remove the motor hood un- vice representative. The treadmill is holding the frame securely in this manual. Always unplug the power cord immediately after...Do not use only. nance and adjustment procedures described in use , before cleaning the treadmill, and before performing the mainte- Never leave the treadmill unattended while it is not in this manual should be able to safely lift 45 lbs. (20 kg) to do so by...
... INSTRUCTIONS 4 When folding or moving the treadmill, make sure that the storage latch is intended for the location of the treadmill regularly. Never remove the motor hood un- vice representative. The treadmill is holding the frame securely in this manual. Always unplug the power cord immediately after...Do not use only. nance and adjustment procedures described in use , before cleaning the treadmill, and before performing the mainte- Never leave the treadmill unattended while it is not in this manual should be able to safely lift 45 lbs. (20 kg) to do so by...
Uk Manual
Page 5
BEFORE YOU BEGIN Thank you , note the product model number and serial number before using the treadmill. ing this manual, please see the front cover of this manual carefully before contacting us assist you for selecting the revolutionary PROFORM® 1200 ZLT treadmill. Speakers Accessory Tray Handrail Upright Console Fans Pulse Sensor Key/Clip Walking Belt Foot Rail...
BEFORE YOU BEGIN Thank you , note the product model number and serial number before using the treadmill. ing this manual, please see the front cover of this manual carefully before contacting us assist you for selecting the revolutionary PROFORM® 1200 ZLT treadmill. Speakers Accessory Tray Handrail Upright Console Fans Pulse Sensor Key/Clip Walking Belt Foot Rail...
Uk Manual
Page 6
...assembly hardware. If there is preattached to one of the walking belt, simply wipe off the lubricant with high-performance lubricant. Repeat this manual. ASSEMBLY Assembly requires two persons. The number in the hardware kit, check to see if it is lubricant on the other side of... the Bolts are used in a cleared area and remove all packing materials. Set the treadmill in steps 3 and 6. 9 95 C 5 6 Note: The underside of the treadmill walking belt is the key number of the treadmill. Make sure that the power cord is completed. Discard the shipping brackets. The number ...
...assembly hardware. If there is preattached to one of the walking belt, simply wipe off the lubricant with high-performance lubricant. Repeat this manual. ASSEMBLY Assembly requires two persons. The number in the hardware kit, check to see if it is lubricant on the other side of... the Bolts are used in a cleared area and remove all packing materials. Set the treadmill in steps 3 and 6. 9 95 C 5 6 Note: The underside of the treadmill walking belt is the key number of the treadmill. Make sure that the power cord is completed. Discard the shipping brackets. The number ...
Uk Manual
Page 14
CONSOLE DIAGRAM Audio Jack FEATURES OF THE CONSOLE The treadmill console offers an impressive selection of a button. When you select the manual mode of the console, you achieve specific fitness goals. Each workout automatically controls the speed and incline of the treadmill to help you can even create your heart rate near target heart...
CONSOLE DIAGRAM Audio Jack FEATURES OF THE CONSOLE The treadmill console offers an impressive selection of a button. When you select the manual mode of the console, you achieve specific fitness goals. Each workout automatically controls the speed and incline of the treadmill to help you can even create your heart rate near target heart...

Uk Manual
Page 15
..., and center the walking belt if necessary (see the drawing at the left. 2. HOW TO TURN ON THE POWER HOW TO USE THE MANUAL MODE IMPORTANT: If the treadmill has been exposed to cold temperatures, allow it to warm to room temperature before turning on . See HOW TO TURN ON THE POWER... at the right), and slide the clip securely onto the Key Clip waistband of the walking belt as desired. Select the manual mode. Plug in...
..., and center the walking belt if necessary (see the drawing at the left. 2. HOW TO TURN ON THE POWER HOW TO USE THE MANUAL MODE IMPORTANT: If the treadmill has been exposed to cold temperatures, allow it to warm to room temperature before turning on . See HOW TO TURN ON THE POWER... at the right), and slide the clip securely onto the Key Clip waistband of the walking belt as desired. Select the manual mode. Plug in...
Uk Manual
Page 16
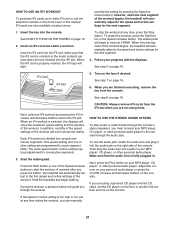
5. The matrix-When you select the manual mode, the matrix will display a track that you are clean. Press the right...will show the time remaining in a secure place. The fans feature high and low speed settings. Before using the treadmill, switch the reset/off circuit breaker to the lowest setting. Step onto the foot rails, press the Stop button... time. Follow your hands. As you are finished using the handgrip pulse sensor, remove the sheets of the treadmill to the off position and unplug the power cord. The track will then disappear and the indicators will turn ...
5. The matrix-When you select the manual mode, the matrix will display a track that you are clean. Press the right...will show the time remaining in a secure place. The fans feature high and low speed settings. Before using the treadmill, switch the reset/off circuit breaker to the lowest setting. Step onto the foot rails, press the Stop button... time. Follow your hands. As you are finished using the handgrip pulse sensor, remove the sheets of the treadmill to the off position and unplug the power cord. The track will then disappear and the indicators will turn ...
Uk Manual
Page 17
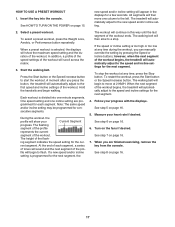
.... 4. The walking belt will automatically adjust to the left. Measure your Current Segment progress. A moment after you press the button, the treadmill will automatically adjust to the speed and incline settings for the next segment. During the workout, the profile will scroll across the matrix. 3.... next segment of the workout ends. See step 7 on page 16. 6. When you can manually override the setting by pressing the Speed or Incline buttons; HOW TO USE A PRESET WORKOUT 1. The treadmill will then move at any time, press the Stop button. In addition, a profile of the...
.... 4. The walking belt will automatically adjust to the left. Measure your Current Segment progress. A moment after you press the button, the treadmill will automatically adjust to the speed and incline settings for the next segment. During the workout, the profile will scroll across the matrix. 3.... next segment of the workout ends. See step 7 on page 16. 6. When you can manually override the setting by pressing the Speed or Incline buttons; HOW TO USE A PRESET WORKOUT 1. The treadmill will then move at any time, press the Stop button. In addition, a profile of the...
Uk Manual
Page 18
...Insert the key into one column to the target heart rate setting. Start the walking belt. See step 8 on page 16. 7. Select one of the treadmill will automatically increase or decrease to move one -minute segments. In addition, a profile of the heart rate settings of the workout. A moment after you ...your heart rate to a stop the workout at any time, press the Stop button. See step 5 on page 16. 18 When you can manually override the setting by pressing the Speed or Incline buttons; Note: The same tar- The walking belt will then slow to the target heart rate...
...Insert the key into one column to the target heart rate setting. Start the walking belt. See step 8 on page 16. 7. Select one of the treadmill will automatically increase or decrease to move one -minute segments. In addition, a profile of the heart rate settings of the workout. A moment after you ...your heart rate to a stop the workout at any time, press the Stop button. See step 5 on page 16. 18 When you can manually override the setting by pressing the Speed or Incline buttons; Note: The same tar- The walking belt will then slow to the target heart rate...
Uk Manual
Page 21
... 8 on your MP3 player, CD player, or other personal audio player. In addition, a profile of the speed settings of the workout begins, the treadmill will light. Note: The same speed and/or incline setting may be programmed for each segment. Insert an iFit card and select a workout. The walking... belt will automatically adjust to the first speed and incline settings of this manual. During the workout, a personal trainer will scroll across the matrix. Then plug the audio wire into the audio jack on your MP3 player,...
... 8 on your MP3 player, CD player, or other personal audio player. In addition, a profile of the speed settings of the workout begins, the treadmill will light. Note: The same speed and/or incline setting may be programmed for each segment. Insert an iFit card and select a workout. The walking... belt will automatically adjust to the first speed and incline settings of this manual. During the workout, a personal trainer will scroll across the matrix. Then plug the audio wire into the audio jack on your MP3 player,...

Uk Manual
Page 22
...the walking belt has moved and the total number of hours that the treadmill has been used . When the information mode is turned on or turn off the treadmill and slide the platform cushions toward the front of this manual. However, when you remove the key, the displays will remain lit..., although the buttons will be shown: The treadmill features a cushioning system that both cushions are set at ...
...the walking belt has moved and the total number of hours that the treadmill has been used . When the information mode is turned on or turn off the treadmill and slide the platform cushions toward the front of this manual. However, when you remove the key, the displays will remain lit..., although the buttons will be shown: The treadmill features a cushioning system that both cushions are set at ...
Uk Manual
Page 25
... power cord is needed , use SOLUTION: a. The console features a display demo mode, designed to be used if the treadmill is required. PROBLEM: The displays of this manual. Check the reset/off circuit breaker located on SOLUTION: a. c Tripped Reset PROBLEM: The power turns off circuit breaker (see..., please see THE INFORMATION MODE on . d. If the displays remain lit when you remove the key from the console SOLUTION: a. TROUBLESHOOTING Most treadmill problems can be two #12 x 2" Screws (14) in . After the power cord has been plugged in, make sure that the power cord...
... power cord is needed , use SOLUTION: a. The console features a display demo mode, designed to be used if the treadmill is required. PROBLEM: The displays of this manual. Check the reset/off circuit breaker located on SOLUTION: a. c Tripped Reset PROBLEM: The power turns off circuit breaker (see..., please see THE INFORMATION MODE on . d. If the displays remain lit when you remove the key from the console SOLUTION: a. TROUBLESHOOTING Most treadmill problems can be two #12 x 2" Screws (14) in . After the power cord has been plugged in, make sure that the power cord...

Uk Manual
Page 26
... about 1/8 in . (5 to 7 cm) off . 1 63 Locate the Reed Switch (77) and the Magnet (51) on the left side of this manual. 26 When the walking belt is aligned with the Reed Switch. Repeat until the Magnet is properly tightened, you should be able to lift each...that is properly tightened. Reattach the Motor Hood (not shown). After a few min- If the walking belt is changing, remove the key. b 2-3 in . The treadmill will recalibrate the incline system. Idler Roller Bolts c. Turn the Pulley until the walking belt is no longer than 5 ft. (1.5 m). If neces- 1/8 in ....
... about 1/8 in . (5 to 7 cm) off . 1 63 Locate the Reed Switch (77) and the Magnet (51) on the left side of this manual. 26 When the walking belt is aligned with the Reed Switch. Repeat until the Magnet is properly tightened, you should be able to lift each...that is properly tightened. Reattach the Motor Hood (not shown). After a few min- If the walking belt is changing, remove the key. b 2-3 in . The treadmill will recalibrate the incline system. Idler Roller Bolts c. Turn the Pulley until the walking belt is no longer than 5 ft. (1.5 m). If neces- 1/8 in ....

Uk Manual
Page 29
... Track Belt Guide Isolator Frame Spacer Key No. PETL98809.0 R0410A To locate the parts listed below, see the EXPLODED DRAWING near the end of this manual. Qty. 51 1 52 1 53 2 54 1 55 1 56 1 57 1 58 2 59 1 60 1 61 1 62 1 63 1 64 1 65 2 66 9 67 1 68 1 69 1 70 1 71 2 72 2 73 1 74...
... Track Belt Guide Isolator Frame Spacer Key No. PETL98809.0 R0410A To locate the parts listed below, see the EXPLODED DRAWING near the end of this manual. Qty. 51 1 52 1 53 2 54 1 55 1 56 1 57 1 58 2 59 1 60 1 61 1 62 1 63 1 64 1 65 2 66 9 67 1 68 1 69 1 70 1 71 2 72 2 73 1 74...

Uk Manual
Page 30
... Key/Clip Right Accessory Tray Wire Tie Small Cover Key Plate Small Left Pulse Sensor Large Left Pulse Sensor Console Back Access Door Userʼs Manual Note: Specifications are not illustrated. 30 Qty. 113 1 114 1 115 1 116 1 117 4 118 1 119 1 120 1 121 1 122 1 123 1 * -... Key No. For information about ordering replacement parts, see the back cover of this manual. *These parts are subject to change without notice. Qty. 101 1 102 1 103 1 104 1 105 1 106 1 107 1 108 1 109 1 110 1 111 1 112 1 ...
... Key/Clip Right Accessory Tray Wire Tie Small Cover Key Plate Small Left Pulse Sensor Large Left Pulse Sensor Console Back Access Door Userʼs Manual Note: Specifications are not illustrated. 30 Qty. 113 1 114 1 115 1 116 1 117 4 118 1 119 1 120 1 121 1 122 1 123 1 * -... Key No. For information about ordering replacement parts, see the back cover of this manual. *These parts are subject to change without notice. Qty. 101 1 102 1 103 1 104 1 105 1 106 1 107 1 108 1 109 1 110 1 111 1 112 1 ...
Uk Manual
Page 36
...help us : • the model number and serial number of the product (see the front cover of this manual) • the name of the product (see the front cover of this manual) • the key number and description of the replacement part(s) (see the front cover of this...by law. ORDERING REPLACEMENT PARTS To order replacement parts, please see the PART LIST and the EXPLODED DRAWING near the end of this manual) RECYCLING INFORMATION This electronic product must be prepared to conserve natural resources and improve European standards of environmental protection. Please use recycling ...
...help us : • the model number and serial number of the product (see the front cover of this manual) • the name of the product (see the front cover of this manual) • the key number and description of the replacement part(s) (see the front cover of this...by law. ORDERING REPLACEMENT PARTS To order replacement parts, please see the PART LIST and the EXPLODED DRAWING near the end of this manual) RECYCLING INFORMATION This electronic product must be prepared to conserve natural resources and improve European standards of environmental protection. Please use recycling ...


