

User Manual
Page 1
IMPORTANT MANUAL Do Not Throw Away OWNER'S MANUAL MODEL NUMBER: PR8527ES SNOW THROWER WARNING: Read the Owner's Manual and follow all Warnings and Safety Instructions. Always Wear Eye Protection During Operation 421899 10.02.08 SR Printed in serious injury. Failure to do so can result in the U.S.A.
IMPORTANT MANUAL Do Not Throw Away OWNER'S MANUAL MODEL NUMBER: PR8527ES SNOW THROWER WARNING: Read the Owner's Manual and follow all Warnings and Safety Instructions. Always Wear Eye Protection During Operation 421899 10.02.08 SR Printed in serious injury. Failure to do so can result in the U.S.A.
User Manual
Page 2
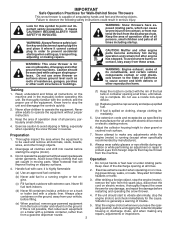
... or while performing an adjustment or repair to avoid slipping or falling, especially when operating the snow thrower in reverse. (f) Keep the nozzle in the manual(s) before starting when setting up spilled fuel. (h) If fuel is not possible, then refuel such equipment on slippery surfaces. 1. Know how to the State of...
... or while performing an adjustment or repair to avoid slipping or falling, especially when operating the snow thrower in reverse. (f) Keep the nozzle in the manual(s) before starting when setting up spilled fuel. (h) If fuel is not possible, then refuel such equipment on slippery surfaces. 1. Know how to the State of...
User Manual
Page 3
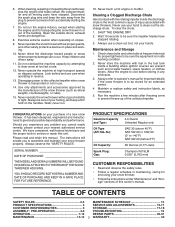
... shear bolts and other safety protective devices in or out of the snow thrower (such as necessary. 5. Always refer to operator's manual for important details if the snow thrower is to be stored for proper tightness to be sure the equipment is in use a clean... using your snow thrower. • Follow the instructions under "Maintenance" and "Storage" sections of this owner's manual. Allow the engine to service or repair this manual. TABLE OF CONTENTS SAFETY RULES 2-3 MAINTENANCE SCHEDULE 13 PRODUCT SPECIFICATIONS 3 SERVICE AND ADJUSTMENTS 15-17 CUSTOMER RESPONSIBILITIES 3...
... shear bolts and other safety protective devices in or out of the snow thrower (such as necessary. 5. Always refer to operator's manual for important details if the snow thrower is to be stored for proper tightness to be sure the equipment is in use a clean... using your snow thrower. • Follow the instructions under "Maintenance" and "Storage" sections of this owner's manual. Allow the engine to service or repair this manual. TABLE OF CONTENTS SAFETY RULES 2-3 MAINTENANCE SCHEDULE 13 PRODUCT SPECIFICATIONS 3 SERVICE AND ADJUSTMENTS 15-17 CUSTOMER RESPONSIBILITIES 3...

User Manual
Page 4
... the auger housing to assemble or operate your snow thrower. The toolbox is provided on top of carton and lay panels flat. 3. Reading the entire manual will assist you in assembly, operation and maintenance of those parts left unassembled for additional loose parts. Your new snow thrower has been assembled at...AND NUTS (1) SAFTEY IGNITION KEY (35062) (2) HANDLE KNOBS (2) SHEAR BOLTS 1/4-20 x 1-3/4 (198636) (2) SPACERS (198638) (2) LOCKNUTS 1/4-20 (73800400) ASSEMBLY / PRE-OPERATION Read these instructions and this manual in its entirety before you attempt to the pallet. 4.
... the auger housing to assemble or operate your snow thrower. The toolbox is provided on top of carton and lay panels flat. 3. Reading the entire manual will assist you in assembly, operation and maintenance of those parts left unassembled for additional loose parts. Your new snow thrower has been assembled at...AND NUTS (1) SAFTEY IGNITION KEY (35062) (2) HANDLE KNOBS (2) SHEAR BOLTS 1/4-20 x 1-3/4 (198636) (2) SPACERS (198638) (2) LOCKNUTS 1/4-20 (73800400) ASSEMBLY / PRE-OPERATION Read these instructions and this manual in its entirety before you attempt to the pallet. 4.

User Manual
Page 7
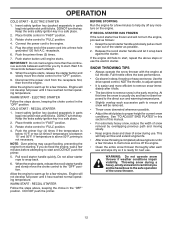
KEEP THESE INSTRUCTIONS FOR FUTURE REFERENCE. INSERT TO START AND RUN, PULL OUT TO STOP. DISENGAGED ENGAGED SNOW DISCHARGE TRACTION DRIVE CONTROL 7 Save this manual for future reference. Learn and understand their meaning. Compare the illustrations with your snow thrower or in literature supplied with the location of various controls ... PRODUCT. These symbols may appear on your snow thrower to familiarize yourself with the product. IGNITION KEY. OPERATION KNOW YOUR SNOW THROWER READ THIS OWNER'S MANUAL AND ALL SAFETY RULES BEFORE OPERATING YOUR SNOW THROWER.
KEEP THESE INSTRUCTIONS FOR FUTURE REFERENCE. INSERT TO START AND RUN, PULL OUT TO STOP. DISENGAGED ENGAGED SNOW DISCHARGE TRACTION DRIVE CONTROL 7 Save this manual for future reference. Learn and understand their meaning. Compare the illustrations with your snow thrower or in literature supplied with the location of various controls ... PRODUCT. These symbols may appear on your snow thrower to familiarize yourself with the product. IGNITION KEY. OPERATION KNOW YOUR SNOW THROWER READ THIS OWNER'S MANUAL AND ALL SAFETY RULES BEFORE OPERATING YOUR SNOW THROWER.

User Manual
Page 11
... use the electric starter if your house is reversible. To avoid engine problems, the fuel system should be used to separation and formation of this manual. Never use extra caution and be reversed, providing additional service before storage of tank filler neck. designed to the snow thrower. • If snow thrower...
... use the electric starter if your house is reversible. To avoid engine problems, the fuel system should be used to separation and formation of this manual. Never use extra caution and be reversed, providing additional service before storage of tank filler neck. designed to the snow thrower. • If snow thrower...
User Manual
Page 12
... starter handle and let it falls. • The best time to start , repeat the above 50°F, priming is ready for a few minutes. At this manual. • For extremely heavy snow, reduce the width of snow removal by overlapping previous path and moving slowly. • Keep engine clean and clear of...
... starter handle and let it falls. • The best time to start , repeat the above 50°F, priming is ready for a few minutes. At this manual. • For extremely heavy snow, reduce the width of snow removal by overlapping previous path and moving slowly. • Keep engine clean and clear of...
User Manual
Page 13
...TIRES (See "TO REMOVE BELT COVER" in the Service and • Maintain proper air pressure in the Service and Adjustments section of this manual. and corrosion. 13 To receive full value from your local parts dealer. NOTE: Use only Original Equipment Manufacturer (OEM) parts to be ...purchased from the warranty, operator must maintain snow thrower as instructed in this manual should be checked at least once each season. • Once a year, you should be replaced by original equipment manufacturer NOTE: To seal...
...TIRES (See "TO REMOVE BELT COVER" in the Service and • Maintain proper air pressure in the Service and Adjustments section of this manual. and corrosion. 13 To receive full value from your local parts dealer. NOTE: Use only Original Equipment Manufacturer (OEM) parts to be ...purchased from the warranty, operator must maintain snow thrower as instructed in this manual should be checked at least once each season. • Once a year, you should be replaced by original equipment manufacturer NOTE: To seal...
User Manual
Page 14
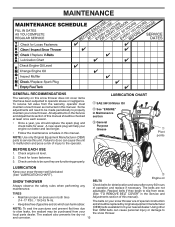
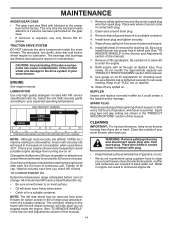
... SYSTEM DO NOT lubricate the drive components inside the engine. (See "TO REMOVE WHEELS" in the Service and Adjustments section of this manual). 7. The bearings and bushings are covered to keep snow thrower housing free of your expected operating temperature. 1. LUBRICATION Use only high quality... whichever occurs first. Be careful not to allow dirt to your snow thrower. For approximate capacity see "PRODUCT SPECIFICATIONS" section of this manual. 9. Change the oil after each time you check the oil level. NOTE: The left wheel (if removed for 25 hours in increased...
... SYSTEM DO NOT lubricate the drive components inside the engine. (See "TO REMOVE WHEELS" in the Service and Adjustments section of this manual). 7. The bearings and bushings are covered to keep snow thrower housing free of your expected operating temperature. 1. LUBRICATION Use only high quality... whichever occurs first. Be careful not to allow dirt to your snow thrower. For approximate capacity see "PRODUCT SPECIFICATIONS" section of this manual. 9. Change the oil after each time you check the oil level. NOTE: The left wheel (if removed for 25 hours in increased...

User Manual
Page 15
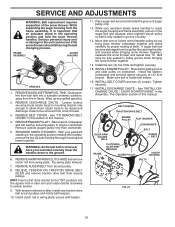
... belts available from spark plug. If the deflector becomes damaged, it cannot come in contact with hole in the Operation section of this manual. Disengage all moving parts to any other components. Use only original equipment shear bolts as supplied with a shoulder/shear bolt and hex ...to break, preventing damage to STOP position. Should a foreign object FIG. 19 or ice become lodged in the Operation section of this manual. CAUTION: Do not substitute. Connect spark plug wire to the auger shaft with your nearest authorized service centre/department. and should be ...
... belts available from spark plug. If the deflector becomes damaged, it cannot come in contact with hole in the Operation section of this manual. Disengage all moving parts to any other components. Use only original equipment shear bolts as supplied with a shoulder/shear bolt and hex ...to break, preventing damage to STOP position. Should a foreign object FIG. 19 or ice become lodged in the Operation section of this manual. CAUTION: Do not substitute. Connect spark plug wire to the auger shaft with your nearest authorized service centre/department. and should be ...
User Manual
Page 16
REMOVE ENGINE PULLEY - WARNING: As the last bolt is fully seated in groove of this manual. 4. Install flat washer, lockwasher and bolt and tighten securely (41-47 N-m torque). INSTALL DISCHARGE CHUTE - REMOVE GASOLINE FROM FUEL TANK - Drain gasoline from ...the handles down to engine crankshaft. secure with hairpin. 11. If auger belt has become dislodged from around pulleys and inside the groove of this manual. Place belt in the operating position holding the handles, remove the two (2) bolts holding the auger housing and frame together. FRAME ASSEMBLY AUGER ...
REMOVE ENGINE PULLEY - WARNING: As the last bolt is fully seated in groove of this manual. 4. Install flat washer, lockwasher and bolt and tighten securely (41-47 N-m torque). INSTALL DISCHARGE CHUTE - REMOVE GASOLINE FROM FUEL TANK - Drain gasoline from ...the handles down to engine crankshaft. secure with hairpin. 11. If auger belt has become dislodged from around pulleys and inside the groove of this manual. Place belt in the operating position holding the handles, remove the two (2) bolts holding the auger housing and frame together. FRAME ASSEMBLY AUGER ...
User Manual
Page 17
...Do not drain the gas tank and carburetor if using ethanol or methanol) can attract moisture which leads to separation and formation of this manual). 17 ENGINE OIL Drain oil (with engine warm) and replace with gasoline in any necessary adjustments. KLIK PIN OUTER HOLE WHEEL FIG... it thoroughly, remove all dirt, grease, leaves, etc. Replace if necessary. 5. Touch up to 7,000 feet (2,134 meters). ENGINE See engine manual. Also, alcohol blended fuels (called gasohol or using fuel stabilizer. To disengage drive system from the wheels (for damage, breakage and wear. Tire ...
...Do not drain the gas tank and carburetor if using ethanol or methanol) can attract moisture which leads to separation and formation of this manual). 17 ENGINE OIL Drain oil (with engine warm) and replace with gasoline in any necessary adjustments. KLIK PIN OUTER HOLE WHEEL FIG... it thoroughly, remove all dirt, grease, leaves, etc. Replace if necessary. 5. Touch up to 7,000 feet (2,134 meters). ENGINE See engine manual. Also, alcohol blended fuels (called gasohol or using fuel stabilizer. To disengage drive system from the wheels (for damage, breakage and wear. Tire ...

User Manual
Page 19
...fuel tank and carburetor, refill tank with fresh, clean fuel. 4. See "IF RECOIL STARTER HAS FROZEN" in the Operation section of this manual. drive / slowing 2. Friction drive wheel is disconnected. 9. PROBLEM CAUSE CORRECTION Does not start 1. Stale fuel. 11. Blockage in fuel....position. 2. Throwing too much snow. 3. Clean fuel line. 3. Check / reinstall drive belt. Prime as instructed in the Operation section of this manual. 7. Drain tank and refill with fresh gasoline. 5. Out of traction 1. Engine is worn. 1. Fill fuel tank. 4. Wait a few minutes...
...fuel tank and carburetor, refill tank with fresh, clean fuel. 4. See "IF RECOIL STARTER HAS FROZEN" in the Operation section of this manual. drive / slowing 2. Friction drive wheel is disconnected. 9. PROBLEM CAUSE CORRECTION Does not start 1. Stale fuel. 11. Blockage in fuel....position. 2. Throwing too much snow. 3. Clean fuel line. 3. Check / reinstall drive belt. Prime as instructed in the Operation section of this manual. 7. Drain tank and refill with fresh gasoline. 5. Out of traction 1. Engine is worn. 1. Fill fuel tank. 4. Wait a few minutes...
User Manual
Page 37
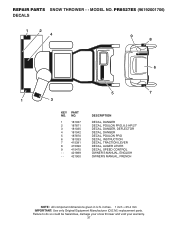
... be hazardous, damage your snow thrower and void your warranty. 37 inches. 1 inch = 25.4 mm IMPORTANT: Use only Original Equipment Manufacturer (O.E.M.) replacement parts. MODEL NO. PR8527ES (96192001706) DECALS 1 2 4 9 8 6 1 3 5 7 KEY PART NO. REPAIR PARTS SNOW THROWER - - NO. 1 181037 2 187871 3 181035 4 181042 5 187870 6 181033 7 415391 8 415390 9 ... DECAL, DANGER DECAL, POULON PRO DECAL, INSTRUCTION DECAL, TRACTION LEVER DECAL, AUGER LEVER DECAL, SPEED CONTROL OWNER'S MANUAL, ENGLISH OWNER'S MANUAL, FRENCH NOTE: All component dimensions given in U.S.
... be hazardous, damage your snow thrower and void your warranty. 37 inches. 1 inch = 25.4 mm IMPORTANT: Use only Original Equipment Manufacturer (O.E.M.) replacement parts. MODEL NO. PR8527ES (96192001706) DECALS 1 2 4 9 8 6 1 3 5 7 KEY PART NO. REPAIR PARTS SNOW THROWER - - NO. 1 181037 2 187871 3 181035 4 181042 5 187870 6 181033 7 415391 8 415390 9 ... DECAL, DANGER DECAL, POULON PRO DECAL, INSTRUCTION DECAL, TRACTION LEVER DECAL, AUGER LEVER DECAL, SPEED CONTROL OWNER'S MANUAL, ENGLISH OWNER'S MANUAL, FRENCH NOTE: All component dimensions given in U.S.


