Owner Manual
Page 2
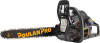
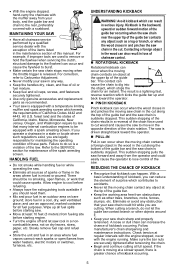
... the Emission Compliance label indicates the number of operating hours for certain markets. with one hand only. Primer (air purge) bulb. Bar and chain oil fill. IDENTIFICATION OF SYMBOLS WARNING! Unlock chain brake. Never operate a chainsaw holding it with any nonroad engine repair WARNING! Careless or improper use E15 or E85 blended fuels. Do not use can be performed by switching the ignition off using the machine. The Emissions Compliance...
... the Emission Compliance label indicates the number of operating hours for certain markets. with one hand only. Primer (air purge) bulb. Bar and chain oil fill. IDENTIFICATION OF SYMBOLS WARNING! Unlock chain brake. Never operate a chainsaw holding it with any nonroad engine repair WARNING! Careless or improper use E15 or E85 blended fuels. Do not use can be performed by switching the ignition off using the machine. The Emissions Compliance...
Owner Manual
Page 3
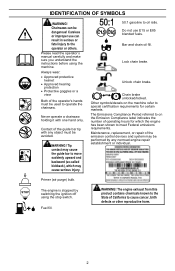
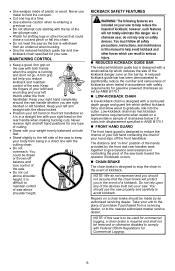
Combination tool 2. Muffler 5. Front handle 6. ON/STOP switch 9. Bumper spike 15. Choke/fast idle lever 10. Bar and chain oil fill cap 14. Cylinder cover 16. Chain brake 23. Guide bar retaining nuts 28. Idle speed screw 8. Primer (air purge) bulb 11. Throttle trigger 19. Depth gauge 25. Does not apply to all models. (**) = Configuration for models equipped with chain tensioning screw located on front. Starter rope 7. Clutch cover 20. Manual 3 Cutters 24. Chain 3. Chain catcher 21. Guide bar 22. Drive links 26. IDENTIFICATION (WHAT IS...
Combination tool 2. Muffler 5. Front handle 6. ON/STOP switch 9. Bumper spike 15. Choke/fast idle lever 10. Bar and chain oil fill cap 14. Cylinder cover 16. Chain brake 23. Guide bar retaining nuts 28. Idle speed screw 8. Primer (air purge) bulb 11. Throttle trigger 19. Depth gauge 25. Does not apply to all models. (**) = Configuration for models equipped with chain tensioning screw located on front. Starter rope 7. Clutch cover 20. Manual 3 Cutters 24. Chain 3. Chain catcher 21. Guide bar 22. Drive links 26. IDENTIFICATION (WHAT IS...
Owner Manual
Page 4
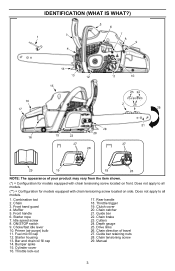
..., and operating instructions before attempting to use the unit. • Restrict the use of your sawing operation in otherwise healthy people. heavy‐duty, non‐slip gloves; Never try to adult users who operate power tools on the saw down. • Do not operate a chainsaw that might be in this manual. • Wear protective gear. Always replace bar, chain, hand guard, or chain brake immediately if it cannot contact spark plug to...
..., and operating instructions before attempting to use the unit. • Restrict the use of your sawing operation in otherwise healthy people. heavy‐duty, non‐slip gloves; Never try to adult users who operate power tools on the saw down. • Do not operate a chainsaw that might be in this manual. • Wear protective gear. Always replace bar, chain, hand guard, or chain brake immediately if it cannot contact spark plug to...
Owner Manual
Page 5
...; With the engine stopped, hand-carry the chainsaw with the muffler away from your saw chain sharp and properly tensioned. store fuel in serious injury. Kickback is driven straight back toward the operator. PULL-IN Pull‐in can cause the chain to cut along the top of the guide bar and the saw chain is equipped with a temperature limiting muffler and spark arresting screen which contributes to...
...; With the engine stopped, hand-carry the chainsaw with the muffler away from your saw chain sharp and properly tensioned. store fuel in serious injury. Kickback is driven straight back toward the operator. PULL-IN Pull‐in can cause the chain to cut along the top of the guide bar and the saw chain is equipped with a temperature limiting muffler and spark arresting screen which contributes to...
Owner Manual
Page 6
... left hand positions for your saw. KICKBACK SAFETY FEATURES WARNING! You must follow all safety precautions, instructions, and maintenance in this manual to help reduce the hazard of chainsaws below 3.8 cubic inch displacement specified in serious injury. FRONT HAND GUARD The front hand guard is designed to the nearest authorized master service dealer. Repairs on the bar tip. Never use the saw is to...
... left hand positions for your saw. KICKBACK SAFETY FEATURES WARNING! You must follow all safety precautions, instructions, and maintenance in this manual to help reduce the hazard of chainsaws below 3.8 cubic inch displacement specified in serious injury. FRONT HAND GUARD The front hand guard is designed to the nearest authorized master service dealer. Repairs on the bar tip. Never use the saw is to...
Owner Manual
Page 7
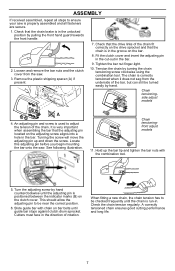
... the clutch cover. Tighten the bar nut finger-tight. 10. An adjusting pin and screw is properly assembled and all steps to ensure your saw is used to adjust the tension of the chain. Turning the screw will move the adjusting pin up the bar tip and tighten the bar nuts with chain on the bar. 8. When fitting a new chain, the chain tension has to be near the correct position. 6. Chain tensioningfront adjust models 11. Turn the adjusting screw by hand. Remove...
... the clutch cover. Tighten the bar nut finger-tight. 10. An adjusting pin and screw is properly assembled and all steps to ensure your saw is used to adjust the tension of the chain. Turning the screw will move the adjusting pin up the bar tip and tighten the bar nuts with chain on the bar. 8. When fitting a new chain, the chain tension has to be near the correct position. 6. Chain tensioningfront adjust models 11. Turn the adjusting screw by hand. Remove...
Owner Manual
Page 8
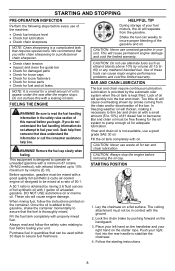
... automatic oiler system when the oil tank is designed to fuel your unit. Place your left hand on the starter rope. STARTING AND STOPPING PRE-OPERATION INSPECTION Perform the following steps before every use of the machine: • Check fuel mixture level • Check bar lubrication • Check chain sharpness NOTE: Chain sharpening is a complicated task that the fuel is thoroughly mixed. Always read the fuel handling information in the safety...
... automatic oiler system when the oil tank is designed to fuel your unit. Place your left hand on the starter rope. STARTING AND STOPPING PRE-OPERATION INSPECTION Perform the following steps before every use of the machine: • Check fuel mixture level • Check bar lubrication • Check chain sharpness NOTE: Chain sharpening is a complicated task that the fuel is thoroughly mixed. Always read the fuel handling information in the safety...
Owner Manual
Page 9
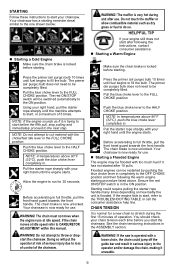
... FULL CHOKE position. Starting a Warm Engine Make sure the chain brake is locked before starting. Using your chainsaw. Push the blue choke lever to start the chainsaw. WARNING! The red ON/STOP switch will put the operator at idle speed. Your chainsaw is trying to do so. Press the primer (air purge) bulb 10 times until fuel begins to full throttle, pull the front hand guard towards the front handle. NOTE: If the engine sounds as dry grass or fuel to start...
... FULL CHOKE position. Starting a Warm Engine Make sure the chain brake is locked before starting. Using your chainsaw. Push the blue choke lever to start the chainsaw. WARNING! The red ON/STOP switch will put the operator at idle speed. Your chainsaw is trying to do so. Press the primer (air purge) bulb 10 times until fuel begins to full throttle, pull the front hand guard towards the front handle. NOTE: If the engine sounds as dry grass or fuel to start...

Owner Manual
Page 10
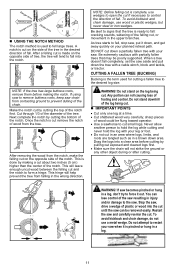
... be checked before setting the saw on the front handle and use . This is completed, allowing the engine to get the "feel" of the guide bar fall , nor cut . • Stop the engine before each use the weight of the saw at end of fall in the following diagram. 10 CHECKING THE CHAIN BRAKE The chain brake must be running . 1. CHECKING THE INERTIA ACTIVATING FUNCTION CONTROL WARNING! Clear the work area. Remove...
... be checked before setting the saw on the front handle and use . This is completed, allowing the engine to get the "feel" of the guide bar fall , nor cut . • Stop the engine before each use the weight of the saw at end of fall in the following diagram. 10 CHECKING THE CHAIN BRAKE The chain brake must be running . 1. CHECKING THE INERTIA ACTIVATING FUNCTION CONTROL WARNING! Clear the work area. Remove...
Owner Manual
Page 11
... to the saw can be poorly supported. Stop the saw, drive a wedge of the saw , put it out. To avoid kickback and chain damage, do not use wood or plastic wedges, but never steel or iron wedges. NOTE: If the tree has large buttress roots, remove them before cutting by cutting the top of fall completely, set the saw aside and pull down...
... to the saw can be poorly supported. Stop the saw, drive a wedge of the saw , put it out. To avoid kickback and chain damage, do not use wood or plastic wedges, but never steel or iron wedges. NOTE: If the tree has large buttress roots, remove them before cutting by cutting the top of fall completely, set the saw aside and pull down...
Owner Manual
Page 13
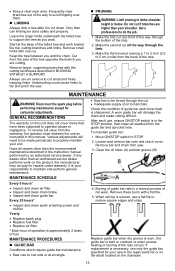
... not pay for carburetor adjustments. After each time chain is necessary, use an overcut to limbs shoulder height or below. Loosen and remove bar nuts and clutch cover. Burring of the tree opposite the branch you are higher than your saw in the STOP position, then clean all repairs other than the recommended maintenance described in BUCKING WITHOUT A SUPPORT. Remove these burrs with a flat file. 5. If replacement is sharpened.
... not pay for carburetor adjustments. After each time chain is necessary, use an overcut to limbs shoulder height or below. Loosen and remove bar nuts and clutch cover. Burring of the tree opposite the branch you are higher than your saw in the STOP position, then clean all repairs other than the recommended maintenance described in BUCKING WITHOUT A SUPPORT. Remove these burrs with a flat file. 5. If replacement is sharpened.
Owner Manual
Page 14
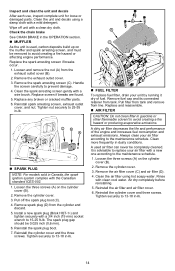
... the air filter and air filter cover. 6. Clean more frequently in dusty conditions. Rinse with a wire brush. Wipe off the spark plug boot (C). 4. Loosen and remove the nut (A) from line. Clean the air filter using a damp cloth with a clean dry cloth. Reinstall the cylinder cover and the three screws. The spark plug gap should be 0.025 inch (0,6 mm). 6. Pull off unit with a mild detergent. Loosen the three screws (A) on the cylinder cover (B). 2. Reinstall spark arresting screen, exhaust outlet cover, and nut.
... the air filter and air filter cover. 6. Clean more frequently in dusty conditions. Rinse with a wire brush. Wipe off the spark plug boot (C). 4. Loosen and remove the nut (A) from line. Clean the air filter using a damp cloth with a clean dry cloth. Reinstall the cylinder cover and the three screws. The spark plug gap should be 0.025 inch (0,6 mm). 6. Pull off unit with a mild detergent. Loosen the three screws (A) on the cylinder cover (B). 2. Reinstall spark arresting screen, exhaust outlet cover, and nut.
Owner Manual
Page 15
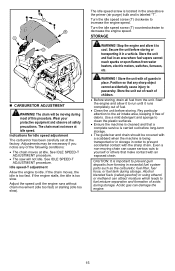
... the engine speed. The chain must not move at the factory. Adjustments may be moving chain can cause serious cuts to fuel mixture separation and formation of children. • Before storing, drain all fuel from water heaters, electric motors, switches, furnaces, etc. Turn the idle speed screw (T) clockwise to the air intake area, keeping it in the area above the primer (air purge) bulb and is important to idle. Idle speed-T adjustment Allow the engine to...
... the engine speed. The chain must not move at the factory. Adjustments may be moving chain can cause serious cuts to fuel mixture separation and formation of children. • Before storing, drain all fuel from water heaters, electric motors, switches, furnaces, etc. Turn the idle speed screw (T) clockwise to the air intake area, keeping it in the area above the primer (air purge) bulb and is important to idle. Idle speed-T adjustment Allow the engine to...
Owner Manual
Page 16
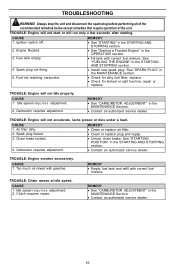
... not idle properly. TROUBLE: Engine will run only a few seconds after starting. Spark plug fouled. 3. CAUSE 1. REMEDY • See "CARBURETOR ADJUSTMENT" in the MAINTENANCE Section. • Contact an authorized service dealer. 16 TROUBLE: Engine will not accelerate, lacks power, or dies under a load. REMEDY • Empty fuel tank and refill with gasoline. See "SPARK PLUG" in the OPERATION section. • Fill tank with correct fuel mixture. repair or replace. TROUBLESHOOTING WARNING! Spark plug not firing. 5. Too much oil mixed...
... not idle properly. TROUBLE: Engine will run only a few seconds after starting. Spark plug fouled. 3. CAUSE 1. REMEDY • See "CARBURETOR ADJUSTMENT" in the MAINTENANCE Section. • Contact an authorized service dealer. 16 TROUBLE: Engine will not accelerate, lacks power, or dies under a load. REMEDY • Empty fuel tank and refill with gasoline. See "SPARK PLUG" in the OPERATION section. • Fill tank with correct fuel mixture. repair or replace. TROUBLESHOOTING WARNING! Spark plug not firing. 5. Too much oil mixed...
Owner Manual
Page 17
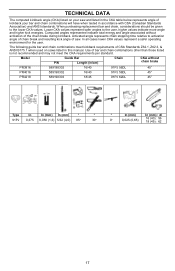
... (45) : 62 17 The following guide bar and chain combinations meet the CKA requirements per standard. Model Guide Bar P/N Length (in accordance with CSA (Canadian Standards Association) and ANSI standards. When purchasing replacement bar and chain, considerations should be given to the user, higher values indicate more angle and higher kick energies. Use of kickback your saw . Lower CKA values represent safer...
... (45) : 62 17 The following guide bar and chain combinations meet the CKA requirements per standard. Model Guide Bar P/N Length (in accordance with CSA (Canadian Standards Association) and ANSI standards. When purchasing replacement bar and chain, considerations should be given to the user, higher values indicate more angle and higher kick energies. Use of kickback your saw . Lower CKA values represent safer...
Owner Manual
Page 18
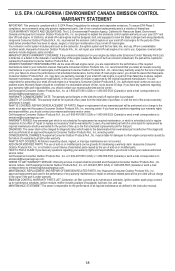
...), ignition module, muffler including catalyst (if equipped), fuel tank, line, and cap. HOW TO FILE A CLAIM: If you have any warranty maintenance or repair on or modified parts. EMISSION CONTROL WARRANTY PARTS LIST: Carburetor, air filter (covered up to maintenance schedule), ignition system: spark plug (covered up to the effect of any questions regarding your warranty rights and responsibilities, you warranty coverage if your nearest authorized service center. Call Husqvarna Consumer Outdoor Products N.A., Inc. approved replacement part used in the instruction manual...
...), ignition module, muffler including catalyst (if equipped), fuel tank, line, and cap. HOW TO FILE A CLAIM: If you have any warranty maintenance or repair on or modified parts. EMISSION CONTROL WARRANTY PARTS LIST: Carburetor, air filter (covered up to maintenance schedule), ignition system: spark plug (covered up to the effect of any questions regarding your warranty rights and responsibilities, you warranty coverage if your nearest authorized service center. Call Husqvarna Consumer Outdoor Products N.A., Inc. approved replacement part used in the instruction manual...
Parts List
Page 3
... CAP THROTTLE WIRE CAP 1 11 545 00 35-11 SCREW AIR VALVE TO FILTER SCREW 2 12 580 72 71-02 FUEL HOSE FUEL LINE KIT 1 13 530 04 77-21 PURGE PURGE BULB 1 14 585 31 53-01 VALVE ASSY AIR VALVE ASSEMBLY 1 15 585 31 56-01 LEVER CHOKE LEVER 1 16 585 31 54-01 HOUSING AIR FILTER HOUSING 1 17 530 01 61-01 NUT CARB NUT 2 18 530 05 79-08 SPRING IGNITION SWITCH SPRING 1 19 585 31 55-01 LEVER IGNITION SWITCH LEVER...
... CAP THROTTLE WIRE CAP 1 11 545 00 35-11 SCREW AIR VALVE TO FILTER SCREW 2 12 580 72 71-02 FUEL HOSE FUEL LINE KIT 1 13 530 04 77-21 PURGE PURGE BULB 1 14 585 31 53-01 VALVE ASSY AIR VALVE ASSEMBLY 1 15 585 31 56-01 LEVER CHOKE LEVER 1 16 585 31 54-01 HOUSING AIR FILTER HOUSING 1 17 530 01 61-01 NUT CARB NUT 2 18 530 05 79-08 SPRING IGNITION SWITCH SPRING 1 19 585 31 55-01 LEVER IGNITION SWITCH LEVER...

Parts List
Page 7
... SAW CHAIN 11 589 19 83-03 BAR 12 530 07 18-91 KIT 13 545 22 71-01 SCREW 14 530 05 79-31 OIL PUMP ASSY 15 530 03 78-20 PISTON 16 530 05 79-24 ASSEMBLY Remark QTY KIT CLUTCH WASHER KIT (INCL. 3) 1 CLUTCH DRUM ASSEMBLY 1 CLUTCH WASHER KIT (INCL. 1) 1 SCREW 4 CHAIN BRAKE KIT 1 CLUTCH ASSY 1 LARGE CLUTCH WASHER 1 BAR MOUNTING PLATE 1 HANDGUARD 1 "CHAIN 91PJ 18"" 3/8"" 62DL (POULAN PRO)" 1 "BAR, POULAN PRO 18 IN" 1 OIL PUMP KIT 1 SCREW 2 OIL PUMP ASSEMBLY...
... SAW CHAIN 11 589 19 83-03 BAR 12 530 07 18-91 KIT 13 545 22 71-01 SCREW 14 530 05 79-31 OIL PUMP ASSY 15 530 03 78-20 PISTON 16 530 05 79-24 ASSEMBLY Remark QTY KIT CLUTCH WASHER KIT (INCL. 3) 1 CLUTCH DRUM ASSEMBLY 1 CLUTCH WASHER KIT (INCL. 1) 1 SCREW 4 CHAIN BRAKE KIT 1 CLUTCH ASSY 1 LARGE CLUTCH WASHER 1 BAR MOUNTING PLATE 1 HANDGUARD 1 "CHAIN 91PJ 18"" 3/8"" 62DL (POULAN PRO)" 1 "BAR, POULAN PRO 18 IN" 1 OIL PUMP KIT 1 SCREW 2 OIL PUMP ASSEMBLY...

Parts List
Page 9
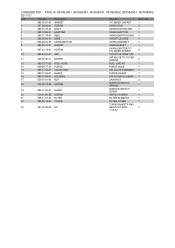
CLUTCH COVER PR4218, 967063801, 967063901, 967064001, 967064002, 967084801, 967084802, 2017-07 Ref Part No Description Remark QTY KIT 1 585 36 91-03 COVER CLUTCH COVER ASSY (INCL. 3) 1 2 530 01 59-17 NUT BAR NUT 2 - 582 02 31-02 SERVICE KIT SIDE ADJUST SCREW AND GEARS KIT 1
CLUTCH COVER PR4218, 967063801, 967063901, 967064001, 967064002, 967084801, 967084802, 2017-07 Ref Part No Description Remark QTY KIT 1 585 36 91-03 COVER CLUTCH COVER ASSY (INCL. 3) 1 2 530 01 59-17 NUT BAR NUT 2 - 582 02 31-02 SERVICE KIT SIDE ADJUST SCREW AND GEARS KIT 1

Parts List
Page 11
...-34 NUT FLYWHEEL NUT 1 17 585 36 56-01 STRAP GROUND STRAP 1 18 545 08 15-01 BOLT CYLINDER BOLT 4 19 583 94 49-03 MODULE IGNITION MODULE 1 20 530 01 64-32 SCREW SCREW M5.3814X22.225MM 1 CYLINDER PR4218, 967063801, 967063901, 967064001, 967064002, 967084801, 967084802, 2017- 07 Ref Part No Description Remark QTY KIT 1 585 35 82-01 SPARK PLUG "SPARK PLUG BRISK...
...-34 NUT FLYWHEEL NUT 1 17 585 36 56-01 STRAP GROUND STRAP 1 18 545 08 15-01 BOLT CYLINDER BOLT 4 19 583 94 49-03 MODULE IGNITION MODULE 1 20 530 01 64-32 SCREW SCREW M5.3814X22.225MM 1 CYLINDER PR4218, 967063801, 967063901, 967064001, 967064002, 967084801, 967084802, 2017- 07 Ref Part No Description Remark QTY KIT 1 585 35 82-01 SPARK PLUG "SPARK PLUG BRISK...


