Owner Manual
Page 2
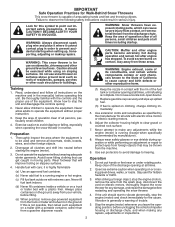
... truck or trailer and refuel it cannot contact plug in reverse. Adjust the collector housing height to prevent accidental starting the engine (motor). 3. Operation 1. Stop the engine (motor) whenever you leave the operating position, before filling. (e) When practical, remove gas-powered equipment from a gasoline dispenser nozzle. (f) Keep the nozzle in the manual(s) before starting when setting up spilled fuel. (h) If fuel is capable of all persons, small children and...
... truck or trailer and refuel it cannot contact plug in reverse. Adjust the collector housing height to prevent accidental starting the engine (motor). 3. Operation 1. Stop the engine (motor) whenever you leave the operating position, before filling. (e) When practical, remove gas-powered equipment from a gasoline dispenser nozzle. (f) Keep the nozzle in the manual(s) before starting when setting up spilled fuel. (h) If fuel is capable of all persons, small children and...
Owner Manual
Page 3
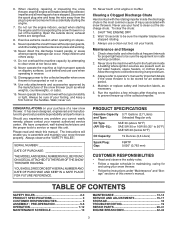
... this owner's manual. never run the engine indoors, except when starting the engine. 7. CONGRATULATIONS on the handles. We have stopped. Please read and retain this unit. Always observe the "SAFETY RULES". SERIAL NUMBER DATE OF PURCHASE THE MODEL AND SERIAL NUMBERS WILL BE FOUND ON A DECAL ATTACHED TO THE REAR OF THE SNOW THROWER HOUSING. Never touch a hot engine or muffler. Never use a clean-out tool, not your snow thrower properly. Maintenance and Storage 1. Check shear bolts...
... this owner's manual. never run the engine indoors, except when starting the engine. 7. CONGRATULATIONS on the handles. We have stopped. Please read and retain this unit. Always observe the "SAFETY RULES". SERIAL NUMBER DATE OF PURCHASE THE MODEL AND SERIAL NUMBERS WILL BE FOUND ON A DECAL ATTACHED TO THE REAR OF THE SNOW THROWER HOUSING. Never touch a hot engine or muffler. Never use a clean-out tool, not your snow thrower properly. Maintenance and Storage 1. Check shear bolts...
Owner Manual
Page 5
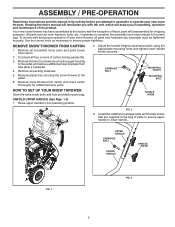
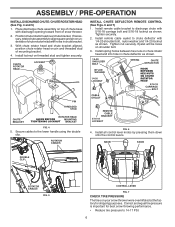
... tightness. Remove the two (2) screws securing the auger housing to the operating position. Remove plastic ties securing the snow thrower to lower handle. Remove snow thrower from carton. 2. Remove all packing materials. 5. CARRIAGE BOLT MOUNTING HOLES MOUNTING BOLT HOW TO SET UP YOUR SNOW THROWER Store the extra shear bolts and nuts provided in assembly, operation and maintenance of parts to secure upper handle to the pallet. 6. Remove all accessible loose parts and parts boxes from carton and check carton thoroughly...
... tightness. Remove the two (2) screws securing the auger housing to the operating position. Remove plastic ties securing the snow thrower to lower handle. Remove snow thrower from carton. 2. Remove all packing materials. 5. CARRIAGE BOLT MOUNTING HOLES MOUNTING BOLT HOW TO SET UP YOUR SNOW THROWER Store the extra shear bolts and nuts provided in assembly, operation and maintenance of parts to secure upper handle to the pallet. 6. Remove all accessible loose parts and parts boxes from carton and check carton thoroughly...
Owner Manual
Page 6
.... Position chute rotator head over chute bracket. Tighten securely. 2. ASSEMBLY / PRE-OPERATION INSTALL DISCHARGE CHUTE / CHUTE ROTATOR HEAD (See Fig. 4 and 5) 1. Secure cables to 14-17 PSI. 6 Correct and equal tire pressure is important for shipping purposes. Install locknut on shoulder bolt. 3. Install all control lever knobs by pressing them down onto the control levers. Install remote cable bracket to align square and pin on pin and threaded stud of snow thrower. 2. If necessary, rotate chute assembly to...
.... Position chute rotator head over chute bracket. Tighten securely. 2. ASSEMBLY / PRE-OPERATION INSTALL DISCHARGE CHUTE / CHUTE ROTATOR HEAD (See Fig. 4 and 5) 1. Secure cables to 14-17 PSI. 6 Correct and equal tire pressure is important for shipping purposes. Install locknut on shoulder bolt. 3. Install all control lever knobs by pressing them down onto the control levers. Install remote cable bracket to align square and pin on pin and threaded stud of snow thrower. 2. If necessary, rotate chute assembly to...
Owner Manual
Page 7
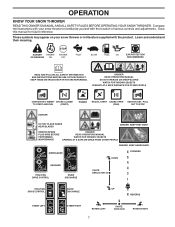
... CHOKE CLOSED TO START AND RUN (START) PRIMER RECOIL START CHOKE OPEN (RUN) IGNITION KEY. OPERATION KNOW YOUR SNOW THROWER READ THIS OWNER'S MANUAL AND ALL SAFETY RULES BEFORE OPERATING YOUR SNOW THROWER. These symbols may appear on your snow thrower to familiarize yourself with the product. KEEP THESE INSTRUCTIONS FOR FUTURE REFERENCE. PULL OUT TO STOP DANGER DO NOT PLACE HANDS NEAR BLADES DANGER, KEEP FEET AWAY REMOVE SPARK PLUG WIRE BEFORE PERFORMING MAINTENANCE DANGER READ OPERATORS MANUAL...
... CHOKE CLOSED TO START AND RUN (START) PRIMER RECOIL START CHOKE OPEN (RUN) IGNITION KEY. OPERATION KNOW YOUR SNOW THROWER READ THIS OWNER'S MANUAL AND ALL SAFETY RULES BEFORE OPERATING YOUR SNOW THROWER. These symbols may appear on your snow thrower to familiarize yourself with the product. KEEP THESE INSTRUCTIONS FOR FUTURE REFERENCE. PULL OUT TO STOP DANGER DO NOT PLACE HANDS NEAR BLADES DANGER, KEEP FEET AWAY REMOVE SPARK PLUG WIRE BEFORE PERFORMING MAINTENANCE DANGER READ OPERATORS MANUAL...
Owner Manual
Page 8
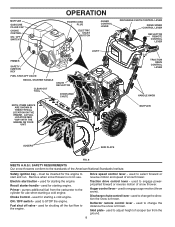
...to STOP the engine. Primer - Fuel shut off the fuel flow to the cylinder for the engine to the standards of snow thrower. used to change the distance the snow is thrown. Electric start and run. must be inserted for use . MUFFLER GASOLINE FILLER CAP CHOKE CONTROL ON / OFF SWITCH OPERATION POWER CORD PLUG ELECTRIC START BUTTON AUGER CONTROL LEVER DISCHARGE CHUTE CONTROL LEVER DRIVE SPEED CONTROL LEVER DEFLECTOR REMOTE CONTROL LEVER PRIMER SAFETY IGNITION KEY FUEL SHUT-OFF VALVE RECOIL STARTER HANDLE CLEAN-OUT TOOL CHUTE DEFLECTOR DISCHARGE CHUTE NOTE: ITEMS...
...to STOP the engine. Primer - Fuel shut off the fuel flow to the cylinder for the engine to the standards of snow thrower. used to change the distance the snow is thrown. Electric start and run. must be inserted for use . MUFFLER GASOLINE FILLER CAP CHOKE CONTROL ON / OFF SWITCH OPERATION POWER CORD PLUG ELECTRIC START BUTTON AUGER CONTROL LEVER DISCHARGE CHUTE CONTROL LEVER DRIVE SPEED CONTROL LEVER DEFLECTOR REMOTE CONTROL LEVER PRIMER SAFETY IGNITION KEY FUEL SHUT-OFF VALVE RECOIL STARTER HANDLE CLEAN-OUT TOOL CHUTE DEFLECTOR DISCHARGE CHUTE NOTE: ITEMS...

Owner Manual
Page 9
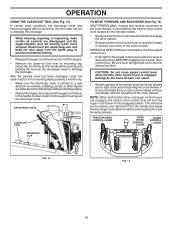
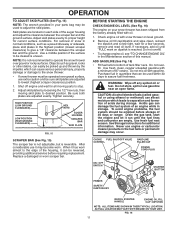
... fuel or attempting to stop engine. AUGER • Release the auger control lever to operate all times including startup. set the deflector higher to throw snow farther. • Push right on the right side handle. • Squeeze auger control lever to handle to engage the auger and throw snow. • Release the auger control lever to stop . Remove (do not turn) safety ignition key to "OFF" position. 2. NOTE: Never use . Use the choke control whenever you are starting a cold engine...
... fuel or attempting to stop engine. AUGER • Release the auger control lever to operate all times including startup. set the deflector higher to throw snow farther. • Push right on the right side handle. • Squeeze auger control lever to handle to engage the auger and throw snow. • Release the auger control lever to stop . Remove (do not turn) safety ignition key to "OFF" position. 2. NOTE: Never use . Use the choke control whenever you are starting a cold engine...
Owner Manual
Page 10
... engine, then squeeze the auger control lever to the handle to release your right hand from the handle and adjust the discharge chute direction without interrupting the snow throwing process. Disconnect the spark plug wire and keep the wire away from the spark plug to dislodge this blockage. Use the clean-out tool to prevent accidental starting. • Release the auger control lever and shut off the engine. • Remove the clean-out tool from the auger housing...
... engine, then squeeze the auger control lever to the handle to release your right hand from the handle and adjust the discharge chute direction without interrupting the snow throwing process. Disconnect the spark plug wire and keep the wire away from the spark plug to dislodge this blockage. Use the clean-out tool to prevent accidental starting. • Release the auger control lever and shut off the engine. • Remove the clean-out tool from the auger housing...
Owner Manual
Page 11
... parts bag may become worn. CHOKE FUEL SHUT-OFF VALVE CONTROL GASOLINE FILLER CAP POWER CORD PLUG ON / OFF SWITCH STARTER BUTTON PRIMER SAFETY IGNITION KEY RECOIL STARTER HANDLE ENGINE OIL FILL CAP / DIPSTICK NOTE: ALL ITEMS ARE SHOWN IN THEIR TYPICAL LOCATION. Objects such as a paved driveway or sidewalk, place skid plates in the Maintenance section of tank filler neck. Replace a damaged or worn scraper bar. BEFORE STARTING THE ENGINE CHECK ENGINE OIL LEVEL (See Fig. 16) The engine...
... parts bag may become worn. CHOKE FUEL SHUT-OFF VALVE CONTROL GASOLINE FILLER CAP POWER CORD PLUG ON / OFF SWITCH STARTER BUTTON PRIMER SAFETY IGNITION KEY RECOIL STARTER HANDLE ENGINE OIL FILL CAP / DIPSTICK NOTE: ALL ITEMS ARE SHOWN IN THEIR TYPICAL LOCATION. Objects such as a paved driveway or sidewalk, place skid plates in the Maintenance section of tank filler neck. Replace a damaged or worn scraper bar. BEFORE STARTING THE ENGINE CHECK ENGINE OIL LEVEL (See Fig. 16) The engine...

Owner Manual
Page 12
... the starter. Push the primer three (3) times. WARM START - three-wire grounded system. Use the drive speed control to adjust speed. • It is easier and more than 50 feet (15 m). 5. OPERATION TO START ENGINE • Ensure fuel shut-off the engine. • Clean the entire snow thrower thoroughly after it falls. • The best time to remove snow is the early morning. When the engine starts, release the recoil starter handle and slowly move the choke control...
... the starter. Push the primer three (3) times. WARM START - three-wire grounded system. Use the drive speed control to adjust speed. • It is easier and more than 50 feet (15 m). 5. OPERATION TO START ENGINE • Ensure fuel shut-off the engine. • Clean the entire snow thrower thoroughly after it falls. • The best time to remove snow is the early morning. When the engine starts, release the recoil starter handle and slowly move the choke control...
Owner Manual
Page 13
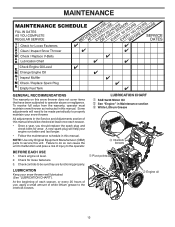
.... A new spark plug will need to be made periodically to operator abuse or negligence. Check engine oil level. 2. BEFORE EACH USE 1. LUBRICATION Keep your snow thrower well lubricated (See "LUBRICATION CHART"). To receive full value from the warranty, operator must maintain snow thrower as instructed in this manual. MAINTENANCE GENERAL RECOMMENDATIONS The warranty on this snow thrower does not cover items that have been subjected to properly maintain your snow thrower. Some adjustments will help your engine run...
.... A new spark plug will need to be made periodically to operator abuse or negligence. Check engine oil level. 2. BEFORE EACH USE 1. LUBRICATION Keep your snow thrower well lubricated (See "LUBRICATION CHART"). To receive full value from the warranty, operator must maintain snow thrower as instructed in this manual. MAINTENANCE GENERAL RECOMMENDATIONS The warranty on this snow thrower does not cover items that have been subjected to properly maintain your snow thrower. Some adjustments will help your engine run...
Owner Manual
Page 14
... "TO REMOVE BELT COVER" in the "PRODUCT SPECIFICATIONS" section of your expected operating temperature. Spark plug type and gap setting are shown in the Service and Adjustments section of any spilled oil. Clean the outside of this manual. 9. NOTE: Although multi-viscosity oils (5W30, 10W30 etc.) improve starting the engine and after every 50 hours of operation, whichever occurs first. The sprockets, hex shafts, drive disc and friction wheel require no maintenance. The...
... "TO REMOVE BELT COVER" in the "PRODUCT SPECIFICATIONS" section of your expected operating temperature. Spark plug type and gap setting are shown in the Service and Adjustments section of any spilled oil. Clean the outside of this manual. 9. NOTE: Although multi-viscosity oils (5W30, 10W30 etc.) improve starting the engine and after every 50 hours of operation, whichever occurs first. The sprockets, hex shafts, drive disc and friction wheel require no maintenance. The...
Owner Manual
Page 15
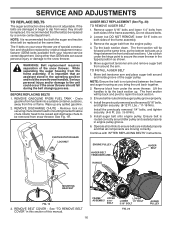
... this manual. Place wire where it cannot come in contact with hole in the augers, the shear bolts are designed to break, preventing damage to STOP position. Loosen the two (2) screws securing belt cover to spark plug. Should a foreign object or ice become lodged in auger shaft and install a new 1/4-20 x 2" shear bolt. Use only original equipment capscrew/shear bolts as supplied with your snow thrower with plug. Disconnect spark plug wire from the operator. Remove safety ignition key...
... this manual. Place wire where it cannot come in contact with hole in the augers, the shear bolts are designed to break, preventing damage to STOP position. Loosen the two (2) screws securing belt cover to spark plug. Should a foreign object or ice become lodged in auger shaft and install a new 1/4-20 x 2" shear bolt. Use only original equipment capscrew/shear bolts as supplied with your snow thrower with plug. Disconnect spark plug wire from the operator. Remove safety ignition key...
Owner Manual
Page 16
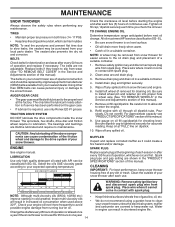
... HEAD LOCKNUT AUGER BELT REPLACEMENT (See Fig. 20) TO REMOVE AUGER BELT 1. Remove upper 5/16" bolts and lower 1/4" bolts from the engine pulley. 4. The front section will tip forward at the same time. ENGINE PULLEY AUGER BELT TENSIONER ARM AUGER BELT HANDLE MOUNTING BRACKET FIG. 19 3. SERVICE AND ADJUSTMENTS TO REPLACE BELTS The auger and traction drive belts are of the snow thrower. REMOVE DISCHARGE CHUTE - Install the previously removed and loosened 5/16" bolts, and tighten securely. (8-12 Ft. While separating the auger housing from your snow thrower...
... HEAD LOCKNUT AUGER BELT REPLACEMENT (See Fig. 20) TO REMOVE AUGER BELT 1. Remove upper 5/16" bolts and lower 1/4" bolts from the engine pulley. 4. The front section will tip forward at the same time. ENGINE PULLEY AUGER BELT TENSIONER ARM AUGER BELT HANDLE MOUNTING BRACKET FIG. 19 3. SERVICE AND ADJUSTMENTS TO REPLACE BELTS The auger and traction drive belts are of the snow thrower. REMOVE DISCHARGE CHUTE - Install the previously removed and loosened 5/16" bolts, and tighten securely. (8-12 Ft. While separating the auger housing from your snow thrower...
Owner Manual
Page 17
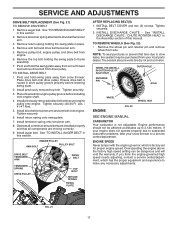
... correctly. 9. TO REMOVE WHEELS (See Fig. 22) • Remove the wheel pin and retainer pin and remove wheel from your snow thrower to drive belt tensioner arm. 3. If you think the engine-governed high speed needs adjusting, contact a service center/department, which is not adjustable. Remove the top bolt holding the swing plate in the Assembly section of this section. 2. Place drive belt onto drive pulley. Install drive belt tensioner arm and arm bolt onto engine. Operate all controls to frame assembly. 7. NOTE: To...
... correctly. 9. TO REMOVE WHEELS (See Fig. 22) • Remove the wheel pin and retainer pin and remove wheel from your snow thrower to drive belt tensioner arm. 3. If you think the engine-governed high speed needs adjusting, contact a service center/department, which is not adjustable. Remove the top bolt holding the swing plate in the Assembly section of this section. 2. Place drive belt onto drive pulley. Install drive belt tensioner arm and arm bolt onto engine. Operate all controls to frame assembly. 7. NOTE: To...
Owner Manual
Page 18
... or using fuel stabilizer. CYLINDER 1. Replace with a suitable protective cover that all nuts, bolts, screws, and pins are empty. • Never use plastic. OTHER • Remove safety ignition key; Plastic cannot breathe, which leads to prevent gum deposits from dust and dirt. • Cover your snow thrower with new spark plug. SNOW THROWER When snow thrower is an acceptable alternative in the Maintenance section of fuel gum deposits during storage. Replace if necessary. 5. ENGINE OIL Drain oil (with engine...
... or using fuel stabilizer. CYLINDER 1. Replace with a suitable protective cover that all nuts, bolts, screws, and pins are empty. • Never use plastic. OTHER • Remove safety ignition key; Plastic cannot breathe, which leads to prevent gum deposits from dust and dirt. • Cover your snow thrower with new spark plug. SNOW THROWER When snow thrower is an acceptable alternative in the Maintenance section of fuel gum deposits during storage. Replace if necessary. 5. ENGINE OIL Drain oil (with engine...

Owner Manual
Page 19
... damaged parts. Frozen recoil starter. Friction drive wheel is not inserted. 2. Check / reinstall drive belt. 3. Auger belt is in need of pulley. 2. Clogged discharge chute. 1. Augers / impeller jammed. 4. Turn fuel shut-off valve (if so equipped) 1. Insert safety ignition key. 3. Out of drive speed 1. Move throttle to FAST position (or ON/OFF switch to OPEN position. Wait a few minutes before restarting, DO NOT prime. 8. Reconnect spark plug wire. 2. snow. 4. Blockage in fuel. 4. Clean fuel line. 3. Water in fuel line. 1. Empty fuel tank & carburetor...
... damaged parts. Frozen recoil starter. Friction drive wheel is not inserted. 2. Check / reinstall drive belt. 3. Auger belt is in need of pulley. 2. Clogged discharge chute. 1. Augers / impeller jammed. 4. Turn fuel shut-off valve (if so equipped) 1. Insert safety ignition key. 3. Out of drive speed 1. Move throttle to FAST position (or ON/OFF switch to OPEN position. Wait a few minutes before restarting, DO NOT prime. 8. Reconnect spark plug wire. 2. snow. 4. Blockage in fuel. 4. Clean fuel line. 3. Water in fuel line. 1. Empty fuel tank & carburetor...
Owner Manual
Page 21
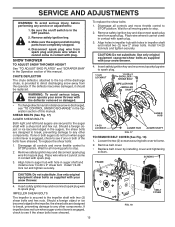
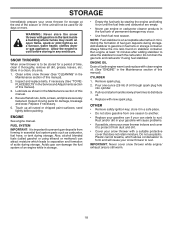
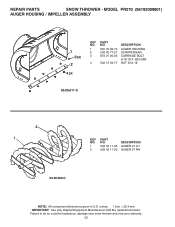
BLK BOLT CARRIAGE WAFER HEAD 5/16-18 X 5/8 BLK BRACKET BELT KEEPER LOWER BRACKET INTERFACE BEARING BALL SCREW HEX HEAD 5/16-18 X 5/8 NUT FLANGE NYLOCK 5/16-18 LOWER AUGER BELT GUIDE NOTE: All component dimensions given in U.S. REPAIR PARTS SNOW THROWER - inches. 1 inch = 25.4 mm IMPORTANT: Use only Original Equipment Manufacturer (O.E.M.) replacement parts. MODEL PR270 (96192009001) AUGER HOUSING / IMPELLER ASSEMBLY KEY NO. 1 2 3 4 5 6 7 8 9 10 11 12 13 14 15 PART NO. 501 14 96-01 586 60...
BLK BOLT CARRIAGE WAFER HEAD 5/16-18 X 5/8 BLK BRACKET BELT KEEPER LOWER BRACKET INTERFACE BEARING BALL SCREW HEX HEAD 5/16-18 X 5/8 NUT FLANGE NYLOCK 5/16-18 LOWER AUGER BELT GUIDE NOTE: All component dimensions given in U.S. REPAIR PARTS SNOW THROWER - inches. 1 inch = 25.4 mm IMPORTANT: Use only Original Equipment Manufacturer (O.E.M.) replacement parts. MODEL PR270 (96192009001) AUGER HOUSING / IMPELLER ASSEMBLY KEY NO. 1 2 3 4 5 6 7 8 9 10 11 12 13 14 15 PART NO. 501 14 96-01 586 60...
Owner Manual
Page 22
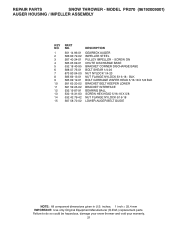
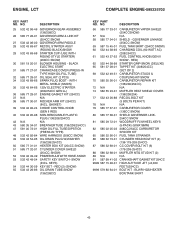
... 15 53-77 DESCRIPTION AUGER HOUSING SCRAPER BAR CARRIAGE BOLT 5/16-18 X .625 GR5 NUT 5/16-18 05.09.011-C 2 1 KEY NO. 1 2 PART NO. 532 42 11-35 532 42 11-23 DESCRIPTION AUGER 27 LH AUGER 27 RH 05.09.006-C NOTE: All component dimensions given in U.S. inches. 1 inch = 25.4 mm IMPORTANT: Use only Original Equipment Manufacturer (O.E.M.) replacement parts. REPAIR PARTS SNOW THROWER - Failure to do...
... 15 53-77 DESCRIPTION AUGER HOUSING SCRAPER BAR CARRIAGE BOLT 5/16-18 X .625 GR5 NUT 5/16-18 05.09.011-C 2 1 KEY NO. 1 2 PART NO. 532 42 11-35 532 42 11-23 DESCRIPTION AUGER 27 LH AUGER 27 RH 05.09.006-C NOTE: All component dimensions given in U.S. inches. 1 inch = 25.4 mm IMPORTANT: Use only Original Equipment Manufacturer (O.E.M.) replacement parts. REPAIR PARTS SNOW THROWER - Failure to do...
Owner Manual
Page 43
...) RECOIL BOLT KIT (3 BOLTS PER KIT) N/A CARBURETOR COVER (136CC SNOW) SHIELD GOVERNOR LINK 254CC SNOW WOODRUFF FLYWHEEL KEYS (5-PACK) (5X6X18MM) 208CC/254CC CARBURETOR SPACER KIT FUEL TANK STRAINER CYLINDER HEAD BOLT KIT (4) (136-179-208-254CC) CC COVER BOLT KIT (6) (179-208-254CC) MUFFLER MTG STUD KIT (2) N/A CRANKSHAFT GASKET KIT 254CC HIGH ALTITUDE JET (>6,000 FEET)(254CC) BOLT KIT - ENGINE, LCT COMPLETE ENGINE-585335702 KEY PART NO. BLACK ELECTRIC START 31 585 77 27-01 CRANKCASE COVER (PRESS-IN TYPE HIGH OIL-FILL...
...) RECOIL BOLT KIT (3 BOLTS PER KIT) N/A CARBURETOR COVER (136CC SNOW) SHIELD GOVERNOR LINK 254CC SNOW WOODRUFF FLYWHEEL KEYS (5-PACK) (5X6X18MM) 208CC/254CC CARBURETOR SPACER KIT FUEL TANK STRAINER CYLINDER HEAD BOLT KIT (4) (136-179-208-254CC) CC COVER BOLT KIT (6) (179-208-254CC) MUFFLER MTG STUD KIT (2) N/A CRANKSHAFT GASKET KIT 254CC HIGH ALTITUDE JET (>6,000 FEET)(254CC) BOLT KIT - ENGINE, LCT COMPLETE ENGINE-585335702 KEY PART NO. BLACK ELECTRIC START 31 585 77 27-01 CRANKCASE COVER (PRESS-IN TYPE HIGH OIL-FILL...


