

User Manual
Page 2
... edge caves in place. • Slow down the slope. Never assume that may fall off blades when not mowing. • Stop engine before storing. • Stop and inspect the equipment if you feel uneasy on the slopes slow and gradual. IV. Always turn over ...Dataindicatesthatoperators,age60yearsandabove,are subject to cool before removing grass catcher or unclogging chute. • Mow only in severe injury or death. Allow engine to stop engine, and remove keys before dismounting. • Turn off and be thrown. Check their ability to operate the riding mower safely enough ...
... edge caves in place. • Slow down the slope. Never assume that may fall off blades when not mowing. • Stop engine before storing. • Stop and inspect the equipment if you feel uneasy on the slopes slow and gradual. IV. Always turn over ...Dataindicatesthatoperators,age60yearsandabove,are subject to cool before removing grass catcher or unclogging chute. • Mow only in severe injury or death. Allow engine to stop engine, and remove keys before dismounting. • Turn off and be thrown. Check their ability to operate the riding mower safely enough ...

User Manual
Page 3
...), not across. • Remove obstacles such as rocks, tree limbs, etc. • Watch for this symbol to prevent accidental starting or stopping on a slope. WARNING Engine exhaust, some of its constituents, and certain vehicle components contain or emit chemicals known to stop or shift while on the slope. • Avoid starting...
...), not across. • Remove obstacles such as rocks, tree limbs, etc. • Watch for this symbol to prevent accidental starting or stopping on a slope. WARNING Engine exhaust, some of its constituents, and certain vehicle components contain or emit chemicals known to stop or shift while on the slope. • Avoid starting...

User Manual
Page 4
...CHARGING SYSTEM: 3 AMPS BATTERY 5 AMPS HEADLIGHTS BATTERY: AMP/HR: 28 MIN. WARNING: This tractor is equipped with an internal combustion engine and should be used on your tractor properly. Should you experience any ). We have competent, well-trained technicians and the proper tools to... caring for and using your nearest authorized service centre/department. ties" and "Storage" sections of this tractor. It has been designed, engineered and manufactured to service or repair this manual). LBS. Please read and retain this owner's manual. CCA: 230 CASE SIZE: U1R ...
...CHARGING SYSTEM: 3 AMPS BATTERY 5 AMPS HEADLIGHTS BATTERY: AMP/HR: 28 MIN. WARNING: This tractor is equipped with an internal combustion engine and should be used on your tractor properly. Should you experience any ). We have competent, well-trained technicians and the proper tools to... caring for and using your nearest authorized service centre/department. ties" and "Storage" sections of this tractor. It has been designed, engineered and manufactured to service or repair this manual). LBS. Please read and retain this owner's manual. CCA: 230 CASE SIZE: U1R ...
User Manual
Page 7
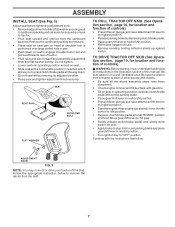
... location and function of other people and objects. • Be sure all the above assembly steps have been completed. • Check engine oil level and fill fuel tank with the instructions that follow all the way down on seat to engage shoulder bolt in a well-ventilated... position. • Roll tractor forward off seat without moving its highest position. • Start the engine. Do not tighten. • Lower seat into full "BRAKE" position and hold. After engine has started, move throttle control to idle position. • Depress clutch/brake pedal into operating position and...
... location and function of other people and objects. • Be sure all the above assembly steps have been completed. • Check engine oil level and fill fuel tank with the instructions that follow all the way down on seat to engage shoulder bolt in a well-ventilated... position. • Roll tractor forward off seat without moving its highest position. • Start the engine. Do not tighten. • Lower seat into full "BRAKE" position and hold. After engine has started, move throttle control to idle position. • Depress clutch/brake pedal into operating position and...
User Manual
Page 8
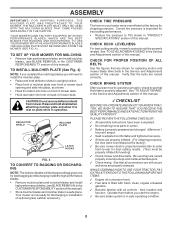
...Fuel tank is now ready for shipping purposes. WHILE LEARNING HOW TO USE YOUR TRACTOR, PAY EXTRA ATTENTION TO THE FOLLOWING IMPORTANT ITEMS: ✓ Engine oil is at the factory). ✓ Be sure mower deck is in the CUSTOMER RESPONSABILITY section of mower deck. Operate them before you will...No remaining loose parts in a safe place. TO INSTALL MULCHER PLATE (See Fig. 4) NOTE: If you installed the mulching blades you start the engine. ✓ Be sure brake system is properly leveled side-to-side/ front-to PSI shown in the Service and Adjustments section of this manual. 3CHECKLIST...
...Fuel tank is now ready for shipping purposes. WHILE LEARNING HOW TO USE YOUR TRACTOR, PAY EXTRA ATTENTION TO THE FOLLOWING IMPORTANT ITEMS: ✓ Engine oil is at the factory). ✓ Be sure mower deck is in the CUSTOMER RESPONSABILITY section of mower deck. Operate them before you will...No remaining loose parts in a safe place. TO INSTALL MULCHER PLATE (See Fig. 4) NOTE: If you installed the mulching blades you start the engine. ✓ Be sure brake system is properly leveled side-to-side/ front-to PSI shown in the Service and Adjustments section of this manual. 3CHECKLIST...

User Manual
Page 9
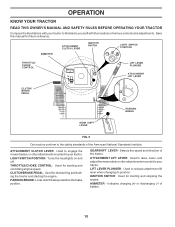
Learn and understand their meaning. BATTERY CAUTION OR WARNING REVERSE FORWARD FAST SLOW ENGINE ON ENGINE OFF OIL PRESSURE LIGHTS ON OVER TEMP LIGHT FUEL CHOKE MOWER HEIGHT PARKING BRAKE LOCKED UNLOCKED MOWER LIFT ATTACHMENT REVERSE CLUTCH ENGAGED NEUTRAL HIGH LOW P PARKING BRAKE 15 15 15 IGNITION ATTACHMENT CLUTCH DISENGAGED KEEP AREA CLEAR SLOPE HAZARDS (SEE SAFETY RULES SECTION) DANGER, KEEP HANDS AND FEET AWAY 9 FREE WHEEL (Automatic Models only) OPERATION These symbols may appear on your tractor or in literature supplied with the product.
Learn and understand their meaning. BATTERY CAUTION OR WARNING REVERSE FORWARD FAST SLOW ENGINE ON ENGINE OFF OIL PRESSURE LIGHTS ON OVER TEMP LIGHT FUEL CHOKE MOWER HEIGHT PARKING BRAKE LOCKED UNLOCKED MOWER LIFT ATTACHMENT REVERSE CLUTCH ENGAGED NEUTRAL HIGH LOW P PARKING BRAKE 15 15 15 IGNITION ATTACHMENT CLUTCH DISENGAGED KEEP AREA CLEAR SLOPE HAZARDS (SEE SAFETY RULES SECTION) DANGER, KEEP HANDS AND FEET AWAY 9 FREE WHEEL (Automatic Models only) OPERATION These symbols may appear on your tractor or in literature supplied with the product.
User Manual
Page 10
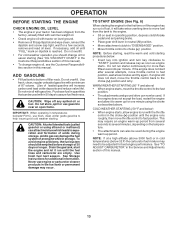
THROTTLE/CHOKE CONTROL: Used for starting and controlling engine speed. IGNITION SWITCH: Used for starting and stopping the engine. CLUTCH/BRAKE PEDAL: Used for future reference. PARKING BRAKE: Locks clutch/brake pedal into the brake position. ATTACHMENT LIFT LEVER: ...Standards Institute. LIGHT SWITCH POSITION: Turns the headlights on and off. Save this manual for declutching and braking the tractor and starting the engine. ATTACHMENT CLUTCH LEVER: Used to engage the mower blades, or other attachments mounted to the safety standards of various controls and adjustments....
THROTTLE/CHOKE CONTROL: Used for starting and controlling engine speed. IGNITION SWITCH: Used for starting and stopping the engine. CLUTCH/BRAKE PEDAL: Used for future reference. PARKING BRAKE: Locks clutch/brake pedal into the brake position. ATTACHMENT LIFT LEVER: ...Standards Institute. LIGHT SWITCH POSITION: Turns the headlights on and off. Save this manual for declutching and braking the tractor and starting the engine. ATTACHMENT CLUTCH LEVER: Used to engage the mower blades, or other attachments mounted to the safety standards of various controls and adjustments....

User Manual
Page 11
...be cut relatively high; To eliminate this possibility, always stop mower blades,move lever to desired position. Make sure parking brake will shut off the engine. • Depress clutch/brake pedal into full "BRAKE" position. • Move gearshift lever to neutral (N) position. mance. GROUND DRIVE &#... perfor- Always remove key when leaving tractor to prevent unauthorized use choke to stop tractor completely, as described above, before stopping may cause engine to "backfire". • Turn ignition key to "OFF" position and remove key. to empty grass catcher, etc. • Place ...
...be cut relatively high; To eliminate this possibility, always stop mower blades,move lever to desired position. Make sure parking brake will shut off the engine. • Depress clutch/brake pedal into full "BRAKE" position. • Move gearshift lever to neutral (N) position. mance. GROUND DRIVE &#... perfor- Always remove key when leaving tractor to prevent unauthorized use choke to stop tractor completely, as described above, before stopping may cause engine to "backfire". • Turn ignition key to "OFF" position and remove key. to empty grass catcher, etc. • Place ...

User Manual
Page 12
...; Repeat for tractor to roll slightly as you to lose control of tying hood to leave the seat with the engine running and the attachment clutch engaged will shut off the engine. • Select desired height of this manual). • With mower in place. Any attempt by the operator to tractor (rope...
...; Repeat for tractor to roll slightly as you to lose control of tying hood to leave the seat with the engine running and the attachment clutch engaged will shut off the engine. • Select desired height of this manual). • With mower in place. Any attempt by the operator to tractor (rope...
User Manual
Page 13
...storage. Acidic gas can attract moisture which leads to assure fuel freshness. Never use gasoline near an open flame. This may require an engine warm-up period from several minutes, depending on seat in operating position, depress clutch/brake pedal and set parking brake. • Place... the throttle control to the choke ( ) position and retry. ADD GASOLINE • Fill fuel tank to several seconds to bottom of an engine while in temperatures below32°F(0°C), use fresh, clean winter grade gasoline to fast position, wait a few seconds, remove and read the warm...
...storage. Acidic gas can attract moisture which leads to assure fuel freshness. Never use gasoline near an open flame. This may require an engine warm-up period from several minutes, depending on seat in operating position, depress clutch/brake pedal and set parking brake. • Place... the throttle control to the choke ( ) position and retry. ADD GASOLINE • Fill fuel tank to several seconds to bottom of an engine while in temperatures below32°F(0°C), use fresh, clean winter grade gasoline to fast position, wait a few seconds, remove and read the warm...
User Manual
Page 14
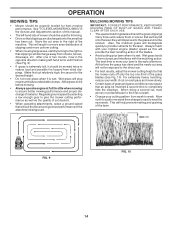
...shrubs, fences, driveways, etc. Make first cut area to the right of the machine. Allow grass to dry before mowing. • Always operate engine at full throttle when mowing to assure better mowing performance and proper discharge of the lawn. This will disperse into the grass and not be... for trimming. • Drive so that clippings are discharged onto the area that has been cut. For extremely heavy mulching, reduce your highest engine (blade) speed as they fall onto the lawn they will help prevent matting and graining of material. After one week then change to east ...
...shrubs, fences, driveways, etc. Make first cut area to the right of the machine. Allow grass to dry before mowing. • Always operate engine at full throttle when mowing to assure better mowing performance and proper discharge of the lawn. This will disperse into the grass and not be... for trimming. • Drive so that clippings are discharged onto the area that has been cut. For extremely heavy mulching, reduce your highest engine (blade) speed as they fall onto the lawn they will help prevent matting and graining of material. After one week then change to east ...
User Manual
Page 15
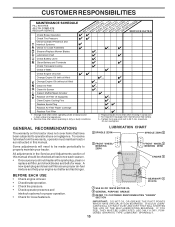
...subjected to 35 ft.-lbs. LUBRICATION CHART 2 SPINDLE ZERK SPINDLE ZERK 2 2 FRONT WHEEL BEARING ZERK FRONT WHEEL 2 BEARING ZERK ENGINE 3 BEFORE EACH USE • Check engine oil level. • Check brake operation. • Check tire pressure. • Check operator presence and interlock systems for proper ...operation. • Check for wear. Not required if equipped with oil filter) E Change Engine Oil (without oil filter) N Clean Air Filter G Clean Air Screen I N Inspect Muffler/Spark Arrester E Replace Oil Filter (If equipped) Clean...
...subjected to 35 ft.-lbs. LUBRICATION CHART 2 SPINDLE ZERK SPINDLE ZERK 2 2 FRONT WHEEL BEARING ZERK FRONT WHEEL 2 BEARING ZERK ENGINE 3 BEFORE EACH USE • Check engine oil level. • Check brake operation. • Check tire pressure. • Check operator presence and interlock systems for proper ...operation. • Check for wear. Not required if equipped with oil filter) E Change Engine Oil (without oil filter) N Clean Air Filter G Clean Air Screen I N Inspect Muffler/Spark Arrester E Replace Oil Filter (If equipped) Clean...
User Manual
Page 16
... Always observe safety rules when performing any attempt by the operator to leave the seat without first setting the parking brake should shut off the engine. • The attachment clutch should never operate unless the operator is in the seat. BLADE BOLT (GRADE 8)* *A GRADE 8 HEAT TREATED BOLT CAN BE ... (See Fig. 12) NOTE: We do , be sure the blade is balanced, it should be sharpened with the ground. Do not attempt to mower and engine. • The blade can harm rubber. • Avoid stumps, stones, deep ruts, sharp objects and other hazards that may be adjusted. (See "TO ...
... Always observe safety rules when performing any attempt by the operator to leave the seat without first setting the parking brake should shut off the engine. • The attachment clutch should never operate unless the operator is in the seat. BLADE BOLT (GRADE 8)* *A GRADE 8 HEAT TREATED BOLT CAN BE ... (See Fig. 12) NOTE: We do , be sure the blade is balanced, it should be sharpened with the ground. Do not attempt to mower and engine. • The blade can harm rubber. • Avoid stumps, stones, deep ruts, sharp objects and other hazards that may be adjusted. (See "TO ...
User Manual
Page 17
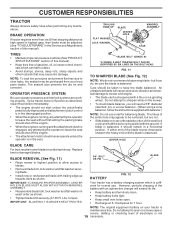
... 30 40 TEMPERATURE RANGE ANTICIPATED BEFORE NEXT OIL CHANGE FIG. 13 NOTE: Although multi-viscosity oils (5W30, 10W30 etc.) improve starting the engine and after every 25 hours of drain valve and install the drain tube onto the fitting. For approximate capacity see "PRODUCT SPECIFICATIONS" section of... after 100 hours and replace if necessary. Tighten oil fill cap/ dipstick securely each eight (8) hours of dirt and chaff to prevent engine damage from overheating. CLEAN AIR SCREEN Air screen must meet API service classification SF-SJ. • Be sure tractor is tightened securely ...
... 30 40 TEMPERATURE RANGE ANTICIPATED BEFORE NEXT OIL CHANGE FIG. 13 NOTE: Although multi-viscosity oils (5W30, 10W30 etc.) improve starting the engine and after every 25 hours of drain valve and install the drain tube onto the fitting. For approximate capacity see "PRODUCT SPECIFICATIONS" section of... after 100 hours and replace if necessary. Tighten oil fill cap/ dipstick securely each eight (8) hours of dirt and chaff to prevent engine damage from overheating. CLEAN AIR SCREEN Air screen must meet API service classification SF-SJ. • Be sure tractor is tightened securely ...
User Manual
Page 18
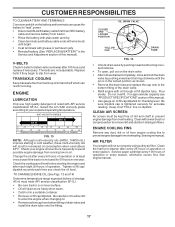
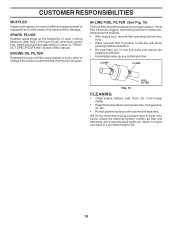
...matter. • Keep finished surfaces and wheels free of use, whichever comes first. CLAMP CLAMP FUEL FILTER FIG. 15 CLEANING • Clean engine, battery, seat, finish, etc. We do not recommend using a garden hose to keep water out. SPARK PLUGS Replace spark plugs at the ...beginning of this manual. Water in engine can result in "PRODUCT SPECIFICATIONS" section of each season. CUSTOMER RESPONSIBILITIES MUFFLER Inspect and replace corroded muffler and spark arrester (if equipped) ...
...matter. • Keep finished surfaces and wheels free of use, whichever comes first. CLAMP CLAMP FUEL FILTER FIG. 15 CLEANING • Clean engine, battery, seat, finish, etc. We do not recommend using a garden hose to keep water out. SPARK PLUGS Replace spark plugs at the ...beginning of this manual. Water in engine can result in "PRODUCT SPECIFICATIONS" section of each season. CUSTOMER RESPONSIBILITIES MUFFLER Inspect and replace corroded muffler and spark arrester (if equipped) ...

User Manual
Page 19
... come in "DISENGAGED" position. • Move attachment lift lever forward to lower mower to its lowest position. • Roll belt off engine pulley. • Remove small retainer spring, and lift clutch spring off pulley bolt. • Remove large retainer spring, slide collar off ...slide collar onto guide and secure with large retainer spring. • Install belt onto engine pulley. SMALL RETAINER SPRING CLUTCH SPRING RETAINER SPRING ANTI-SWAY BAR COLLAR SUSPENSION ARMS SQUARE HOLE ENGINE PULLEY FRONT LINK RETAINER SPRINGS (BOTH SIDES) HOUSING GUIDE LARGE RETAINER SPRING BRACKET Fig....
... come in "DISENGAGED" position. • Move attachment lift lever forward to lower mower to its lowest position. • Roll belt off engine pulley. • Remove small retainer spring, and lift clutch spring off pulley bolt. • Remove large retainer spring, slide collar off ...slide collar onto guide and secure with large retainer spring. • Install belt onto engine pulley. SMALL RETAINER SPRING CLUTCH SPRING RETAINER SPRING ANTI-SWAY BAR COLLAR SUSPENSION ARMS SQUARE HOLE ENGINE PULLEY FRONT LINK RETAINER SPRINGS (BOTH SIDES) HOUSING GUIDE LARGE RETAINER SPRING BRACKET Fig....
User Manual
Page 21
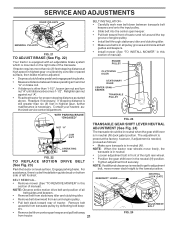
... 21 TO ADJUST BRAKE (See Fig. 22) Your tractor is equipped with an adjustable brake system which is mounted on level surface. ENGINE PULLEY CLUTCHING IDLER STATIONARY IDLER CENTER SPAN KEEPER TRANSAXLE PULLEY WITH PARKING BRAKE 1-1/2" "ENGAGED" FIG. 23 TRANSAXLE GEAR SHIFT LEVER NEUTRAL NUT ...; Remove belt from stationary idler and clutching idler. • Remove belt downward from around engine pulley. • Pull belt slack toward front of tractor and roll around the top groove of engine pulley. • Install belt through stationary idler and clutching idler. • Make sure...
... 21 TO ADJUST BRAKE (See Fig. 22) Your tractor is equipped with an adjustable brake system which is mounted on level surface. ENGINE PULLEY CLUTCHING IDLER STATIONARY IDLER CENTER SPAN KEEPER TRANSAXLE PULLEY WITH PARKING BRAKE 1-1/2" "ENGAGED" FIG. 23 TRANSAXLE GEAR SHIFT LEVER NEUTRAL NUT ...; Remove belt from stationary idler and clutching idler. • Remove belt downward from around engine pulley. • Pull belt slack toward front of tractor and roll around the top groove of engine pulley. • Install belt through stationary idler and clutching idler. • Make sure...
User Manual
Page 22
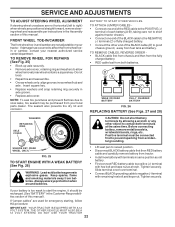
... tank and battery. Before connecting battery, remove metal bracelets, wristwatch bands, rings, etc. SQUARE KEY (REAR WHEEL ONLY) FIG. 25 TO START ENGINE WITH A WEAK BATTERY (See Fig. 26) WARNING: Lead-acid batteries generate explosive gases. DO NOT USE YOUR TRACTOR 22 FRONT WHEEL TOE-IN... axle. Tighten securely. If damage has occurred to affect the front wheel toein or camber, contact your battery is too weak to start the engine, it should be recharged. (See "BATTERY" in the Customer Responsibilities section of this manual. Keep sparks, flame and smoking materials away from ...
... tank and battery. Before connecting battery, remove metal bracelets, wristwatch bands, rings, etc. SQUARE KEY (REAR WHEEL ONLY) FIG. 25 TO START ENGINE WITH A WEAK BATTERY (See Fig. 26) WARNING: Lead-acid batteries generate explosive gases. DO NOT USE YOUR TRACTOR 22 FRONT WHEEL TOE-IN... axle. Tighten securely. If damage has occurred to affect the front wheel toein or camber, contact your battery is too weak to start the engine, it should be recharged. (See "BATTERY" in the Customer Responsibilities section of this manual. Keep sparks, flame and smoking materials away from ...

User Manual
Page 23
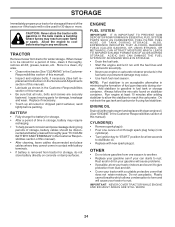
... be necessary. Check adjustment as described below before loosening cable. IMPORTANT: NEVER TAMPER WITH THE ENGINE GOVERNOR, WHICH IS FACTORY SET FOR PROPER ENGINE SPEED. IF YOU THINK THE ENGINE-GOVERNED HIGH SPEED NEEDS ADJUSTING, CONTACT YOUR NEAREST AUTHORIZED SERVICE CENTER/ DEPARTMENT, WHICH HAS PROPER ...EQUIPMENT AND EXPERIENCE TO MAKE ANY NECESSARY ADJUSTMENTS. 23 If the carburetor does need adjustment, see engine manual TO ADJUST CARBURETOR The carburetor has been preset at the factory and adjustment should not be required to run poorly, stop...
... be necessary. Check adjustment as described below before loosening cable. IMPORTANT: NEVER TAMPER WITH THE ENGINE GOVERNOR, WHICH IS FACTORY SET FOR PROPER ENGINE SPEED. IF YOU THINK THE ENGINE-GOVERNED HIGH SPEED NEEDS ADJUSTING, CONTACT YOUR NEAREST AUTHORIZED SERVICE CENTER/ DEPARTMENT, WHICH HAS PROPER ...EQUIPMENT AND EXPERIENCE TO MAKE ANY NECESSARY ADJUSTMENTS. 23 If the carburetor does need adjustment, see engine manual TO ADJUST CARBURETOR The carburetor has been preset at the factory and adjustment should not be required to run poorly, stop...
User Manual
Page 24
... gasoline will cause problems. • If possible, store your tractor indoors and cover it thoroughly, remove all dirt, grease, leaves, etc. ENGINE FUEL SYSTEM IMPORTANT: IT IS IMPORTANT TO PREVENT GUM DEPOSITS FROM FORMING IN ESSENTIAL FUEL SYSTEM PARTS SUCH AS CARBURETOR, FUEL FILTER, FUEL HOSE,... stabilizer to allow the stabilizer to reach the carburetor. Always follow the mix ratio found on concrete or damp surfaces. ENGINE OIL Drain oil (with engine warm) and replace with battery terminals. • If battery is an acceptable alternative in minimizing the formation of fuel ...
... gasoline will cause problems. • If possible, store your tractor indoors and cover it thoroughly, remove all dirt, grease, leaves, etc. ENGINE FUEL SYSTEM IMPORTANT: IT IS IMPORTANT TO PREVENT GUM DEPOSITS FROM FORMING IN ESSENTIAL FUEL SYSTEM PARTS SUCH AS CARBURETOR, FUEL FILTER, FUEL HOSE,... stabilizer to allow the stabilizer to reach the carburetor. Always follow the mix ratio found on concrete or damp surfaces. ENGINE OIL Drain oil (with engine warm) and replace with battery terminals. • If battery is an acceptable alternative in minimizing the formation of fuel ...


