

Owner Manual
Page 3
... before using this product. Beware of electric shock hazard Do not reach hands or feet under mower deck. SYMBOL V A Hz W min no NAME Volts Amperes Hertz Watts Minutes Alternating Current Direct Current No Load Speed DESIGNATION/EXPLANATION Voltage Current Frequency (cycles per second) Power Time Type of current Type or a characteristic of slopes, never up and down. Safety Alert...
... before using this product. Beware of electric shock hazard Do not reach hands or feet under mower deck. SYMBOL V A Hz W min no NAME Volts Amperes Hertz Watts Minutes Alternating Current Direct Current No Load Speed DESIGNATION/EXPLANATION Voltage Current Frequency (cycles per second) Power Time Type of current Type or a characteristic of slopes, never up and down. Safety Alert...

Owner Manual
Page 4
... in minor or moderate injury. (Without Safety Alert Symbol) Indicates a situation that may result in property damage. PRODUCT SPECIFICATIONS TYPE BATTERY CHARGING TIME MOTOR NO-LOAD SPEED DECK MATERIAL BLADES HEIGHT ADJUSTMENTS 2-IN-1 UNIT WEIGHT (WITHOUT BATTERY) UNIT WEIGHT (WITH BATTERY) Cordless, Battery Powered 40V Lithium-Ion (1) 2Ah (1) 4Ah 2Ah: 60 Minutes, 4Ah: 120 Minutes Brushed Up to explain the levels of risk associated with this product. Indicates...
... in minor or moderate injury. (Without Safety Alert Symbol) Indicates a situation that may result in property damage. PRODUCT SPECIFICATIONS TYPE BATTERY CHARGING TIME MOTOR NO-LOAD SPEED DECK MATERIAL BLADES HEIGHT ADJUSTMENTS 2-IN-1 UNIT WEIGHT (WITHOUT BATTERY) UNIT WEIGHT (WITH BATTERY) Cordless, Battery Powered 40V Lithium-Ion (1) 2Ah (1) 4Ah 2Ah: 60 Minutes, 4Ah: 120 Minutes Brushed Up to explain the levels of risk associated with this product. Indicates...
Owner Manual
Page 5
... power equipment, carelessness or error on the part of protective gloves and safety footwear is intended. DANGER: This mower was built to be provided on the mower and in serious injury. WARNING: Basic safety precautions should always be followed when using electric lawn mowers, in this mower should be operated according to comply with built-in GFCI protection are printed in moving parts. Remove all instructions...
... power equipment, carelessness or error on the part of protective gloves and safety footwear is intended. DANGER: This mower was built to be provided on the mower and in serious injury. WARNING: Basic safety precautions should always be followed when using electric lawn mowers, in this mower should be operated according to comply with built-in GFCI protection are printed in moving parts. Remove all instructions...

Owner Manual
Page 6
... blade has stopped rotating. • Never operate mower without a proper trail shield, discharge cover, grass catcher, switch control, or other than 104°F. Keep cutting edges sharp and clean for best performance. • If lawn mower strikes a foreign object follow these steps: • Stop lawn mower, release the switch. • Remove the battery. • Inspect for damage. • Repair any damage before restarting and operating the lawn mower. • Do not charge lawn mower...
... blade has stopped rotating. • Never operate mower without a proper trail shield, discharge cover, grass catcher, switch control, or other than 104°F. Keep cutting edges sharp and clean for best performance. • If lawn mower strikes a foreign object follow these steps: • Stop lawn mower, release the switch. • Remove the battery. • Inspect for damage. • Repair any damage before restarting and operating the lawn mower. • Do not charge lawn mower...
Owner Manual
Page 7
... remove battery pack before storing the device. Do not disconnect the charger from the outlet by the manufacturer to these chemicals are assembling parts, making adjustments, cleaning, or when not in use. Some examples of electric shock, use brake fluids, gasoline, petroleum-based products, or any solvents to rain. Your risk of extreme heat or cold. Do not charge the battery...
... remove battery pack before storing the device. Do not disconnect the charger from the outlet by the manufacturer to these chemicals are assembling parts, making adjustments, cleaning, or when not in use. Some examples of electric shock, use brake fluids, gasoline, petroleum-based products, or any solvents to rain. Your risk of extreme heat or cold. Do not charge the battery...
Owner Manual
Page 8
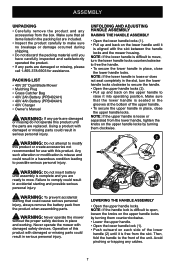
... any parts are replaced. NOTE: If the lower handle is difficult to secure the handle. • Open the upper handle locks (2). • Pull up and back on each side of the unit. PACKING LIST • 40V 20" Dual Blade Mower • Mulching Plug • Grass Catcher Bag • 40V 2Ah Battery (PPB402AH) • 40V 4Ah Battery (PPB404AH) • 40V Charger • Owner's Manual WARNING: If any cables. 7 Never operate the mower...
... any parts are replaced. NOTE: If the lower handle is difficult to secure the handle. • Open the upper handle locks (2). • Pull up and back on each side of the unit. PACKING LIST • 40V 20" Dual Blade Mower • Mulching Plug • Grass Catcher Bag • 40V 2Ah Battery (PPB402AH) • 40V 4Ah Battery (PPB404AH) • 40V Charger • Owner's Manual WARNING: If any cables. 7 Never operate the mower...
Owner Manual
Page 9
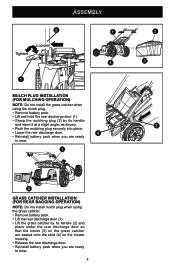
...; Push the mulching plug securely into place. • Lower the rear discharge door. 4 • Reinstall battery pack when you are ready to mow. 1 2 3 3 2 GRASS CATCHER INSTALLATION (FOR REAR BAGGING OPERATION) NOTE: Do not install mulch plug when using the grass catcher. • Remove battery pack. • Lift the rear discharge door (1). • Lift the grass catcher by its handle (2) and place under the rear discharge door so that the hooks (3) on the grass catcher are seated onto the slots (4) on the mower housing...
...; Push the mulching plug securely into place. • Lower the rear discharge door. 4 • Reinstall battery pack when you are ready to mow. 1 2 3 3 2 GRASS CATCHER INSTALLATION (FOR REAR BAGGING OPERATION) NOTE: Do not install mulch plug when using the grass catcher. • Remove battery pack. • Lift the rear discharge door (1). • Lift the grass catcher by its handle (2) and place under the rear discharge door so that the hooks (3) on the grass catcher are seated onto the slots (4) on the mower housing...

Owner Manual
Page 10
... the top of the battery pack snaps in the mower's battery port. • Push down into battery compartment until the battery clicks into place. • Lower the battery door. • When installing the 40V 2Ah Battery, follow the instructions above. Removing battery pack will be a gap between the battery and battery compartment. ASSEMBLY BATTERY INSTALLATION WARNING: Always remove battery pack from the mower. 3 2 1 9 There will prevent accidental starting that could cause the...
... the top of the battery pack snaps in the mower's battery port. • Push down into battery compartment until the battery clicks into place. • Lower the battery door. • When installing the 40V 2Ah Battery, follow the instructions above. Removing battery pack will be a gap between the battery and battery compartment. ASSEMBLY BATTERY INSTALLATION WARNING: Always remove battery pack from the mower. 3 2 1 9 There will prevent accidental starting that could cause the...
Owner Manual
Page 11
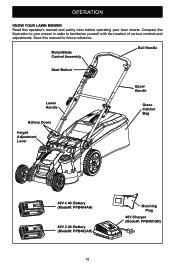
OPERATION KNOW YOUR LAWN MOWER Read this manual for future reference. Compare the illustration to familiarize yourself with the location of various controls and adjustments. Save this operator's manual and safety rules before operating your mower in order to your lawn mower. Motor/Blade Control Assembly Bail Handle Start Button Lower Handle Battery Doors Height Adjustment Lever Upper Handle Grass Catcher Bag 40V 4 Ah Battery (Model#: PPB404AH) 40V 2 Ah Battery (Model#: PPB402AH) 10 Mulching Plug 40V Charger (Model#: PPB40CGR)
OPERATION KNOW YOUR LAWN MOWER Read this manual for future reference. Compare the illustration to familiarize yourself with the location of various controls and adjustments. Save this operator's manual and safety rules before operating your mower in order to your lawn mower. Motor/Blade Control Assembly Bail Handle Start Button Lower Handle Battery Doors Height Adjustment Lever Upper Handle Grass Catcher Bag 40V 4 Ah Battery (Model#: PPB404AH) 40V 2 Ah Battery (Model#: PPB402AH) 10 Mulching Plug 40V Charger (Model#: PPB40CGR)
Owner Manual
Page 12
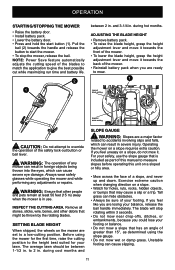
... safety, use . NOTE: Power Save feature automatically adjusts the cutting speed of the blades to match the application to measure slopes before operating this manual to give the best possible cut while maximizing run time and battery life. 2 between 1-1/2 in. WARNING: The operation of the mower. • Reinstall battery pack when you could lose your lawn. INSPECT THE CUTTING AREA. Before using the slope gauge. • Do not mow...
... safety, use . NOTE: Power Save feature automatically adjusts the cutting speed of the blades to match the application to measure slopes before operating this manual to give the best possible cut while maximizing run time and battery life. 2 between 1-1/2 in. WARNING: The operation of the mower. • Reinstall battery pack when you could lose your lawn. INSPECT THE CUTTING AREA. Before using the slope gauge. • Do not mow...

Owner Manual
Page 13
... grass height to a maximum of 3 1/4" (8.3 cm). • Walk at a steady pace. In order to prevent electric shock, do not operate the mower in damp or wet conditions. • Do not mow in the Maintenance section. • Verify that the lawn is free of stones, sticks, wires, and other debris that might be thrown by the rotating blade. • Release the bail handle to turn...
... grass height to a maximum of 3 1/4" (8.3 cm). • Walk at a steady pace. In order to prevent electric shock, do not operate the mower in damp or wet conditions. • Do not mow in the Maintenance section. • Verify that the lawn is free of stones, sticks, wires, and other debris that might be thrown by the rotating blade. • Release the bail handle to turn...
Owner Manual
Page 14
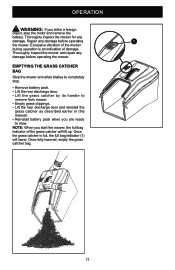
... the grass catcher by its handle to remove from mower. • Empty grass clippings. • Lift the rear discharge door and reinstall the grass catcher as described earlier in this manual. • Reinstall battery pack when you start the mower, the full bag indicator of the mower during operation is full, the full bag indicator (1) will lift up. Thoroughly inspect the mower and repair any damage before operating 1 the mower. Repair any damage...
... the grass catcher by its handle to remove from mower. • Empty grass clippings. • Lift the rear discharge door and reinstall the grass catcher as described earlier in this manual. • Reinstall battery pack when you start the mower, the full bag indicator of the mower during operation is full, the full bag indicator (1) will lift up. Thoroughly inspect the mower and repair any damage before operating 1 the mower. Repair any damage...

Owner Manual
Page 15
... dispose of electric shock, do not expose the mower to ensure the bolt is 30-35NM. When seated properly, the blade should be flat against the motor assembly (3). ALWAYS remove battery when servicing or transporting the mower. The underside of mower) using a 15 mm wrench or socket (not provided). • Remove the blade nut, spacer, blade insulator, and blade. • Make certain the motor assembly is properly tightened. MAINTENANCE BLADE REPLACEMENT WARNING: Always...
... dispose of electric shock, do not expose the mower to ensure the bolt is 30-35NM. When seated properly, the blade should be flat against the motor assembly (3). ALWAYS remove battery when servicing or transporting the mower. The underside of mower) using a 15 mm wrench or socket (not provided). • Remove the blade nut, spacer, blade insulator, and blade. • Make certain the motor assembly is properly tightened. MAINTENANCE BLADE REPLACEMENT WARNING: Always...
Owner Manual
Page 16
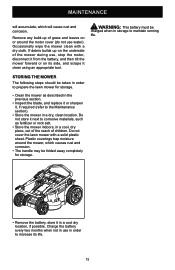
... the blade, and replace it or sharpen it, if required (refer to prepare the lawn mower for storage. • Remove the battery, store it clean using an appropriate tool. Remove any build-up on its life. 15 STORING THE MOWER The following steps should be taken in order to the Maintenance section). • Store the mower in a dry, clean location. Charge the battery every...
... the blade, and replace it or sharpen it, if required (refer to prepare the lawn mower for storage. • Remove the battery, store it clean using an appropriate tool. Remove any build-up on its life. 15 STORING THE MOWER The following steps should be taken in order to the Maintenance section). • Store the mower in a dry, clean location. Charge the battery every...
Owner Manual
Page 17
... operating the mower. • The grass catcher components, discharge cover, and trail shield are cracked or broken. Wrap the blades or wear gloves, and use , store the mower indoors in safe working condition. • Never tamper with care. WARNING: Always remove the battery when servicing or transporting the mower. 16 Check them regularly for proper tightness frequently. Remove the battery when making any adjustments or when any parts...
... operating the mower. • The grass catcher components, discharge cover, and trail shield are cracked or broken. Wrap the blades or wear gloves, and use , store the mower indoors in safe working condition. • Never tamper with care. WARNING: Always remove the battery when servicing or transporting the mower. 16 Check them regularly for proper tightness frequently. Remove the battery when making any adjustments or when any parts...

Owner Manual
Page 18
... not use it with heavyduty adhesive tape. • Do not attempt to open the battery pack. • If a leak develops, the electrolytes that is certified for information and specific instructions. Follow these instructions in this mower's battery pack contain the following toxic and corrosive material: LITHIUM-ION. Before disposing of the battery pack. • Do not attempt to remove...
... not use it with heavyduty adhesive tape. • Do not attempt to open the battery pack. • If a leak develops, the electrolytes that is certified for information and specific instructions. Follow these instructions in this mower's battery pack contain the following toxic and corrosive material: LITHIUM-ION. Before disposing of the battery pack. • Do not attempt to remove...

Owner Manual
Page 19
... grass catcher bag. Stop the motor, and inspect for jams. The battery is not fully seated. The mower speeds up and slows down while in thick grass. Move the wheels to push. Power Save None, this is defective. Replace the switch (call the toll free helpline (1-855-378-6903) This is unbalanced. The switch is normal. TROUBLESHOOTING TABLE PROBLEM POSSIBLE CAUSE The battery is missing. or replace battery. The mulching plug is not charged...
... grass catcher bag. Stop the motor, and inspect for jams. The battery is not fully seated. The mower speeds up and slows down while in thick grass. Move the wheels to push. Power Save None, this is defective. Replace the switch (call the toll free helpline (1-855-378-6903) This is unbalanced. The switch is normal. TROUBLESHOOTING TABLE PROBLEM POSSIBLE CAUSE The battery is missing. or replace battery. The mulching plug is not charged...

Owner Manual
Page 21
... 311061539 31102486 311031539 311041539 31108486 34126486 33904486 33317486 3290506 34141486 3221237 34127486-1 3330490-1 3290305 3220511D 32204113D 34128486 311071539 PARTS LIST Description Upper Handle Assembly Lower Handle 40V 4Ah Battery 40V 2Ah Battery Charger 10" Rear Wheel 7" Front Wheel Motor Cover Assembly Reverse Blade Blade Rear Bag Rear Cover Torsion Spring for Rear Cover Rear Cover Rod Retaining Ring 8 Mulching Plug Lock Nut M4 Rear Shield Wire Clip Washer Bolt M4x12.5 Screw ST4.2*20-C Rear Baffle Cam Lock Assembly Qty 1 1 1 1 1 2 2 1 1 1 1 1 1 1 2 1 2 1 2 4 2 4 1 2 20
... 311061539 31102486 311031539 311041539 31108486 34126486 33904486 33317486 3290506 34141486 3221237 34127486-1 3330490-1 3290305 3220511D 32204113D 34128486 311071539 PARTS LIST Description Upper Handle Assembly Lower Handle 40V 4Ah Battery 40V 2Ah Battery Charger 10" Rear Wheel 7" Front Wheel Motor Cover Assembly Reverse Blade Blade Rear Bag Rear Cover Torsion Spring for Rear Cover Rear Cover Rod Retaining Ring 8 Mulching Plug Lock Nut M4 Rear Shield Wire Clip Washer Bolt M4x12.5 Screw ST4.2*20-C Rear Baffle Cam Lock Assembly Qty 1 1 1 1 1 2 2 1 1 1 1 1 1 1 2 1 2 1 2 4 2 4 1 2 20
Owner Manual
Page 22
.... Therefore, POULAN PRO reserves the right to change, modify, or discontinue models, designs, specifications, and accessories of all parts found to be valid. Battery carries a two (2) year warranty against defects in materials, parts, or workmanship. This warranty does not cover predelivery setup, or normal adjustments explained in the owners manual supplied with proof of purchase, for a period of the authorized dealer from normal use, and normal...
.... Therefore, POULAN PRO reserves the right to change, modify, or discontinue models, designs, specifications, and accessories of all parts found to be valid. Battery carries a two (2) year warranty against defects in materials, parts, or workmanship. This warranty does not cover predelivery setup, or normal adjustments explained in the owners manual supplied with proof of purchase, for a period of the authorized dealer from normal use, and normal...


