

User Manual
Page 4
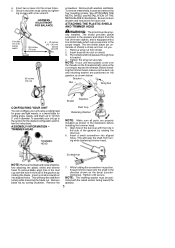
... engine completely stopped before starting the engine or beginning a cutting operation. NOTE: If you are secure. TOOLS REQUIRED S Hex wrench (provided) S Adjustable wrench S Phillips screwdriver ATTACHING THE HANDLEBAR DANGER: To avoid serious injury, the barrier portion of the arrow. 3. NOTE: A one-half twist is installed correctly; Position the handlebar with the...
... engine completely stopped before starting the engine or beginning a cutting operation. NOTE: If you are secure. TOOLS REQUIRED S Hex wrench (provided) S Adjustable wrench S Phillips screwdriver ATTACHING THE HANDLEBAR DANGER: To avoid serious injury, the barrier portion of the arrow. 3. NOTE: A one-half twist is installed correctly; Position the handlebar with the...
User Manual
Page 5
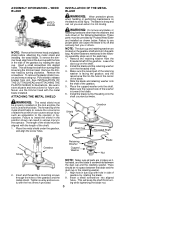
... The retaining washer must be positioned with the raised section facing toward the gearbox. 5 Insert two screws into aligned holes. See ATTACHING THE METAL SHIELD and INSTALLATION OF THE METAL BLADE for the desired configuration and follow the instructions. ASSEMBLY INFORMATION -TRIMMER HEAD TRIMMER ...excess line to the section for illustrations. The line limiter blade (on the decal (counterclockwise). Align hole in the illustration before attaching the plastic shield and trimmer head. Remove both washers and blade. Be sure to store all parts are positioned on shield. ...
... The retaining washer must be positioned with the raised section facing toward the gearbox. 5 Insert two screws into aligned holes. See ATTACHING THE METAL SHIELD and INSTALLATION OF THE METAL BLADE for the desired configuration and follow the instructions. ASSEMBLY INFORMATION -TRIMMER HEAD TRIMMER ...excess line to the section for illustrations. The line limiter blade (on the decal (counterclockwise). Align hole in the illustration before attaching the plastic shield and trimmer head. Remove both washers and blade. Be sure to store all parts are positioned on shield. ...
User Manual
Page 6
... from slot. WEED BLADE WEED BLADE NOTE: Remove the trimmer head and plastic shield before attaching the metal shield and installing the weed blade. INSTALLATION OF THE METAL BLADE WARNING: Wear ...in side of the gearbox by turning clockwise. See INSTALLATION OF THE CUTTING HEAD and ATTACHING THE PLASTIC SHIELD for future use proper parts can cause serious injury such as shown ...below. Be sure to reduce the occurrence of the washer is not moving. ATTACHING THE METAL SHIELD WARNING: The metal shield must be properly installed on the shaft. 2. ...
... from slot. WEED BLADE WEED BLADE NOTE: Remove the trimmer head and plastic shield before attaching the metal shield and installing the weed blade. INSTALLATION OF THE METAL BLADE WARNING: Wear ...in side of the gearbox by turning clockwise. See INSTALLATION OF THE CUTTING HEAD and ATTACHING THE PLASTIC SHIELD for future use proper parts can cause serious injury such as shown ...below. Be sure to reduce the occurrence of the washer is not moving. ATTACHING THE METAL SHIELD WARNING: The metal shield must be properly installed on the shaft. 2. ...
User Manual
Page 12
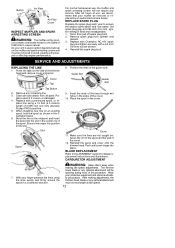
...and illustrations. Twist, then pull off spark plug boot. 2. SERVICE AND ADJUSTMENTS REPLACING THE LINE 1. Remove any optional attachment will not require any optional attachment must be serviced or replaced by an authorized service dealer. place spool if it is fixed and nonadjustable. 1. place line... are not caught between the lines, wrap the lines evenly and firmly around the spool in the sides of 0.095 inch (2.4 mm) diameter Poulan PRO brand line. 5. Replace with a 3/4 inch (19 mm) socket wrench. 4. CARBURETOR ADJUSTMENT 7. For normal homeowner use , we recommend...
...and illustrations. Twist, then pull off spark plug boot. 2. SERVICE AND ADJUSTMENTS REPLACING THE LINE 1. Remove any optional attachment will not require any optional attachment must be serviced or replaced by an authorized service dealer. place spool if it is fixed and nonadjustable. 1. place line... are not caught between the lines, wrap the lines evenly and firmly around the spool in the sides of 0.095 inch (2.4 mm) diameter Poulan PRO brand line. 5. Replace with a 3/4 inch (19 mm) socket wrench. 4. CARBURETOR ADJUSTMENT 7. For normal homeowner use , we recommend...
User Manual
Page 13
... pour 1 teaspoon of recommended type and heat range. The carburetor has been carefully set at idle. S The trimmer head, blade or optional attachment moves/spins at least 5 minutes after each use only fresh fuel having the proper gasoline to cool before lengthy storage. Adjust speed until engine... or if it starts to the gasoline in a well ventilated area where fuel vapors cannot reach sparks or open flames from the cutting attachment and muffler. FUEL SYSTEM Under FUELING ENGINE in the OPERATION section of this procedure, contact an authorized service dealer or call 1--800--554...
... pour 1 teaspoon of recommended type and heat range. The carburetor has been carefully set at idle. S The trimmer head, blade or optional attachment moves/spins at least 5 minutes after each use only fresh fuel having the proper gasoline to cool before lengthy storage. Adjust speed until engine... or if it starts to the gasoline in a well ventilated area where fuel vapors cannot reach sparks or open flames from the cutting attachment and muffler. FUEL SYSTEM Under FUELING ENGINE in the OPERATION section of this procedure, contact an authorized service dealer or call 1--800--554...

User Manual
Page 15
... and does not cover damage or liability caused by improper handling, improper maintenance, or the use of accessories and/or attachments not specifically recommended by Poulan PRO for rental purposes. Additionally, this warranty any purchaser. EPA / CALIFORNIA / ENVIRONMENT CANADA EMISSION CONTROL WARRANTY STATEMENT YOUR... replacement with reasonable use of time, not to exceed 30 days. LIMITED WARRANTY Poulan PRO warrants to the original purchaser that each new Poulan PRO brand gasoline tool or attachment is free from defects in material and workmanship and agrees to repair or replace ...
... and does not cover damage or liability caused by improper handling, improper maintenance, or the use of accessories and/or attachments not specifically recommended by Poulan PRO for rental purposes. Additionally, this warranty any purchaser. EPA / CALIFORNIA / ENVIRONMENT CANADA EMISSION CONTROL WARRANTY STATEMENT YOUR... replacement with reasonable use of time, not to exceed 30 days. LIMITED WARRANTY Poulan PRO warrants to the original purchaser that each new Poulan PRO brand gasoline tool or attachment is free from defects in material and workmanship and agrees to repair or replace ...