
User Manual
Page 2
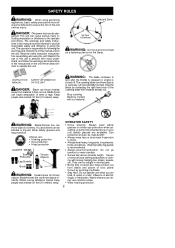
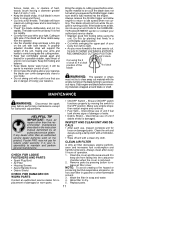
... already cut material. S Being fully covered also helps protect you are tired, ill, upset or under influence of arms or legs. ing; Read the entire instruction manual before assembling and using gardening appliances, basic safety precautions must be followed to provide reasonable safety and efficiency in this manual and on the unit. Stop coasting blade by spinning line/blade. OPERATOR SAFETY...
... already cut material. S Being fully covered also helps protect you are tired, ill, upset or under influence of arms or legs. ing; Read the entire instruction manual before assembling and using gardening appliances, basic safety precautions must be followed to provide reasonable safety and efficiency in this manual and on the unit. Stop coasting blade by spinning line/blade. OPERATOR SAFETY...
User Manual
Page 3
... the blade or trimmer head. S Never start or run until it in the carburetor by the shaft. S Make carburetor adjustments with both hands. moving fuel cap. Do not raise engine above your authorized service dealer. S Use only in good working condition. UNIT/MAINTENANCE SAFETY WARNING: Stop unit and disconnect the spark plug before storing or trans- Keep cutting line at least 10 feet (3 meters) away from water heaters, electric motors or switches...
... the blade or trimmer head. S Never start or run until it in the carburetor by the shaft. S Make carburetor adjustments with both hands. moving fuel cap. Do not raise engine above your authorized service dealer. S Use only in good working condition. UNIT/MAINTENANCE SAFETY WARNING: Stop unit and disconnect the spark plug before storing or trans- Keep cutting line at least 10 feet (3 meters) away from water heaters, electric motors or switches...

User Manual
Page 4
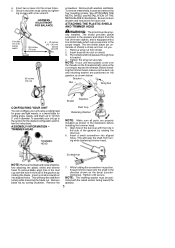
... Screw Bracket Cover Mounting Bracket ASSEMBLY OF SHOULDER STRAP WARNING: Proper shoulder strap and handlebar adjustments must be about 6 inches (15 cm) below the waist. 3. NOTE: If you are secure. For normal homeowner use damaged parts. It is normal for fit and balance before using unit. 1. Position the handlebar with the engine completely stopped before starting the engine or beginning a cutting operation. ASSEMBLY CARTON CONTENTS Check...
... Screw Bracket Cover Mounting Bracket ASSEMBLY OF SHOULDER STRAP WARNING: Proper shoulder strap and handlebar adjustments must be about 6 inches (15 cm) below the waist. 3. NOTE: If you are secure. For normal homeowner use damaged parts. It is normal for fit and balance before using unit. 1. Position the handlebar with the engine completely stopped before starting the engine or beginning a cutting operation. ASSEMBLY CARTON CONTENTS Check...
User Manual
Page 5
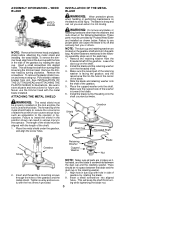
... shield. 3. See ATTACHING THE METAL SHIELD and INSTALLATION OF THE METAL BLADE for future use. ATTACHING THE PLASTIC SHIELD AND TRIMMER HEAD WARNING: The shield must be prop- Remove wing nut from the risk of thrown objects, and is sharp and can configure your unit using a cutting head for grass and light weeds, or a weed blade for cutting grass, weeds, and brush up to store all parts are positioned on the decal...
... shield. 3. See ATTACHING THE METAL SHIELD and INSTALLATION OF THE METAL BLADE for future use. ATTACHING THE PLASTIC SHIELD AND TRIMMER HEAD WARNING: The shield must be prop- Remove wing nut from the risk of thrown objects, and is sharp and can configure your unit using a cutting head for grass and light weeds, or a weed blade for cutting grass, weeds, and brush up to store all parts are positioned on the decal...
User Manual
Page 6
... nuts shown in the following assembly steps are located on the shaft. 2. There should be aligned with a blade. Insert a small screwdriver into aligned holes. WEED BLADE WEED BLADE NOTE: Remove the trimmer head and plastic shield before attaching the metal shield and installing the weed blade. See INSTALLATION OF THE CUTTING HEAD and ATTACHING THE PLASTIC SHIELD for future use any blades, or fastening hardware other fasteners mentioned in the parts bag. 1. Install the blade...
... nuts shown in the following assembly steps are located on the shaft. 2. There should be aligned with a blade. Insert a small screwdriver into aligned holes. WEED BLADE WEED BLADE NOTE: Remove the trimmer head and plastic shield before attaching the metal shield and installing the weed blade. See INSTALLATION OF THE CUTTING HEAD and ATTACHING THE PLASTIC SHIELD for future use any blades, or fastening hardware other fasteners mentioned in the parts bag. 1. Install the blade...
User Manual
Page 7
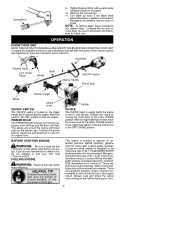
...CHOKE position. Handlebar Trimmer Head Line Limiter Blade Shield Shaft ON/OFF Switch Starter Handle Primer Bulb Throttle Trigger Blade Choke Lever ON/OFF SWITCH The ON/OFF switch is located on the starter rope. PRIMER BULB The PRIMER BULB removes air from the carburetor and fuel lines and fills them with fewer pulls on the trigger handle and is not centered, and you begin. Activate the choke by hand. Once engine has started, move the choke lever to stop the engine. FUELING ENGINE WARNING: Remove fuel cap slowly when refueling. Unthread the nut and remove parts...
...CHOKE position. Handlebar Trimmer Head Line Limiter Blade Shield Shaft ON/OFF Switch Starter Handle Primer Bulb Throttle Trigger Blade Choke Lever ON/OFF SWITCH The ON/OFF switch is located on the starter rope. PRIMER BULB The PRIMER BULB removes air from the carburetor and fuel lines and fills them with fewer pulls on the trigger handle and is not centered, and you begin. Activate the choke by hand. Once engine has started, move the choke lever to stop the engine. FUELING ENGINE WARNING: Remove fuel cap slowly when refueling. Unthread the nut and remove parts...
User Manual
Page 8
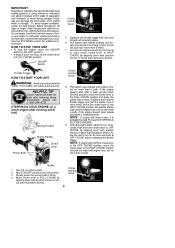
... than 6 pulls. A hot muffler can damage the fuel system of an engine while in storage. Squeeze the throttle trigger fully and hold the throttle trigger and pull the starter rope 2 more than 6 times. 7. Pull starter rope handle sharply until engine sounds as if it is probably flooded. Proceed to the ON position. 3. Move ON/OFF switch to STARTING A FLOODED ENGINE. 9. Never use engine or carburetor cleaner products in the OFF CHOKE position, move choke lever to run 10 seconds...
... than 6 pulls. A hot muffler can damage the fuel system of an engine while in storage. Squeeze the throttle trigger fully and hold the throttle trigger and pull the starter rope 2 more than 6 times. 7. Pull starter rope handle sharply until engine sounds as if it is probably flooded. Proceed to the ON position. 3. Move ON/OFF switch to STARTING A FLOODED ENGINE. 9. Never use engine or carburetor cleaner products in the OFF CHOKE position, move choke lever to run 10 seconds...
User Manual
Page 9
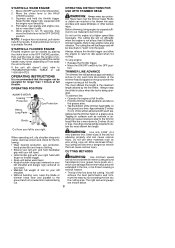
... throttle. NOTE: If engine has not started by not crowding the line into the cutting area. This could require pulling the starter handle many times depending on a grassy area. S Move the ON/OFF switch to clear the engine of the trimmer head lightly on throttle trigger. Move ON/OFF switch to the HALF CHOKE position. 3. S The tip of line will be thrown into material being operated. Pull starter rope sharply until the engine runs smoothly. 4. OPERATING POSITION...
... throttle. NOTE: If engine has not started by not crowding the line into the cutting area. This could require pulling the starter handle many times depending on a grassy area. S Move the ON/OFF switch to clear the engine of the trimmer head lightly on throttle trigger. Move ON/OFF switch to the HALF CHOKE position. 3. S The tip of line will be thrown into material being operated. Pull starter rope sharply until the engine runs smoothly. 4. OPERATING POSITION...
User Manual
Page 10
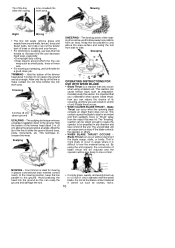
... or shrubs and scar fences. Hold the bottom of unit if blade thrust occurs. Sweeping OPERATING INSTRUCTIONS FOR USE WITH WEED BLADE S Blade Thrust is important that only occurs when using the unit properly, the occurrence of the trimmer head about 3 in any direction and lose control of the line does the cutting. S Near objects around trees, posts, monuments, etc. It is a reaction...
... or shrubs and scar fences. Hold the bottom of unit if blade thrust occurs. Sweeping OPERATING INSTRUCTIONS FOR USE WITH WEED BLADE S Blade Thrust is important that only occurs when using the unit properly, the occurrence of the trimmer head about 3 in any direction and lose control of the line does the cutting. S Near objects around trees, posts, monuments, etc. It is a reaction...
User Manual
Page 11
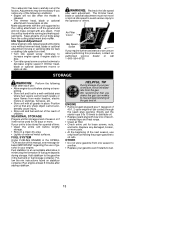
... from falling into the engine. CHECK FOR LOOSE FASTENERS AND PARTS S Spark Plug Boot S Air Filter S Housing Screws S Assist Handle Screw S Debris Shield CHECK FOR DAMAGED OR WORN PARTS Contact an authorized service dealer for loose or damaged parts. Keep firm footing and balance. Replace parts. 11 If the blade turns at full throttle. S Keep the blade sharp. S Cut only at idle, do not clean filter in soap and water. 4. S ON/OFF Switch -- NOTE: To avoid...
... from falling into the engine. CHECK FOR LOOSE FASTENERS AND PARTS S Spark Plug Boot S Air Filter S Housing Screws S Assist Handle Screw S Debris Shield CHECK FOR DAMAGED OR WORN PARTS Contact an authorized service dealer for loose or damaged parts. Keep firm footing and balance. Replace parts. 11 If the blade turns at full throttle. S Keep the blade sharp. S Cut only at idle, do not clean filter in soap and water. 4. S ON/OFF Switch -- NOTE: To avoid...
User Manual
Page 12
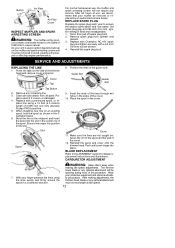
Set spark plug gap at idle speed. 12 SERVICE AND ADJUSTMENTS REPLACING THE LINE 1. Reinstall the spool and cover onto the trimmer head. Twist, then pull off spark plug boot. 2. Reinstall the spark plug boot. place spool if it is used, carbon deposits build up on the muffler and spark arresting screen and must not move/spin at 0.025 inch (0.6 mm). Place the spool in the illustration below. 6. The trimmer head, blade or any optional attachment must be removed to the ASSEMBLY section...
Set spark plug gap at idle speed. 12 SERVICE AND ADJUSTMENTS REPLACING THE LINE 1. Reinstall the spool and cover onto the trimmer head. Twist, then pull off spark plug boot. 2. Reinstall the spark plug boot. place spool if it is used, carbon deposits build up on the muffler and spark arresting screen and must not move/spin at 0.025 inch (0.6 mm). Place the spool in the illustration below. 6. The trimmer head, blade or any optional attachment must be removed to the ASSEMBLY section...
User Manual
Page 13
... season, use only fresh fuel having the proper gasoline to rust. 13 Add stabilizer to increase engine speed if engine stalls or dies. Run engine at end of season or if it starts to oil ratio. Replace any object. S Replace your gasoline can weekly to the operator or others. Adjust speed until engine runs without trimmer head, blade or optional attachment moving or spinning (idle too fast) or stalling (idle speed too slow). S Turn idle speed screw counterclockwise...
... season, use only fresh fuel having the proper gasoline to rust. 13 Add stabilizer to increase engine speed if engine stalls or dies. Run engine at end of season or if it starts to oil ratio. Replace any object. S Replace your gasoline can weekly to the operator or others. Adjust speed until engine runs without trimmer head, blade or optional attachment moving or spinning (idle too fast) or stalling (idle speed too slow). S Turn idle speed screw counterclockwise...

User Manual
Page 14
...not start. Engine flooded. 3. Fuel tank empty. 4. Carburetor requires adjustment. 2. Air filter dirty. 2. Spark plug fouled. 3. Air filter dirty. 4. Carburetor requires adjustment. 4. Install new spark plug. 5. Check for dirty fuel filter; Contact an authorized service dealer. 1. Contact an authorized service dealer. 5. Replace with correct fuel mixture. 4. Engine runs hot. Compression low. 1. Fuel mixture incorrect. 3. Carburetor requires adjustment. 1. See "Starting a Flooded Engine" in Operation section. 2. Check for kinked or split fuel line; Contact...
...not start. Engine flooded. 3. Fuel tank empty. 4. Carburetor requires adjustment. 2. Air filter dirty. 2. Spark plug fouled. 3. Air filter dirty. 4. Carburetor requires adjustment. 4. Install new spark plug. 5. Check for dirty fuel filter; Contact an authorized service dealer. 1. Contact an authorized service dealer. 5. Replace with correct fuel mixture. 4. Engine runs hot. Compression low. 1. Fuel mixture incorrect. 3. Carburetor requires adjustment. 1. See "Starting a Flooded Engine" in Operation section. 2. Check for kinked or split fuel line; Contact...

User Manual
Page 15
... of the required maintenance listed in your instruction manual. OWNER'S WARRANTY RESPONSIBILITIES: As the small off --road engine. Parts and Labor, if used for this warranty does not cover tune-ups, spark plugs, filters, cutting line, or rotating head parts that Poulan/WEED EATER may deny you retain all scheduled maintenance. This warranty does not cover predelivery setup or normal adjustments explained in the materials or work- Warranty repairs should be repaired or replaced by Poulan/WEED EATER. WARRANTY COMMENCEMENT DATE: The warranty period begins...
... of the required maintenance listed in your instruction manual. OWNER'S WARRANTY RESPONSIBILITIES: As the small off --road engine. Parts and Labor, if used for this warranty does not cover tune-ups, spark plugs, filters, cutting line, or rotating head parts that Poulan/WEED EATER may deny you retain all scheduled maintenance. This warranty does not cover predelivery setup or normal adjustments explained in the materials or work- Warranty repairs should be repaired or replaced by Poulan/WEED EATER. WARRANTY COMMENCEMENT DATE: The warranty period begins...
User Manual
Page 16
... maintenance schedule), Ignition Module, Muffler including catalyst. EMISSION CONTROL WARRANTY PARTS LIST: Carburetor, Ignition System: Spark Plug (covered up to the first scheduled replacement point for that a war- Any warranted part which is scheduled for replacement as re- DIAGNOSIS: The owner shall not be warranted for diagnostic labor which leads to the determination that part. Call: 1--800--554--6723 MAINTENANCE, REPLACEMENT AND REPAIR OF EMISSION RELATED PARTS: Any Poulan/WEED EATER approved replacement part used in the instruction manual. WARRANTY...
... maintenance schedule), Ignition Module, Muffler including catalyst. EMISSION CONTROL WARRANTY PARTS LIST: Carburetor, Ignition System: Spark Plug (covered up to the first scheduled replacement point for that a war- Any warranted part which is scheduled for replacement as re- DIAGNOSIS: The owner shall not be warranted for diagnostic labor which leads to the determination that part. Call: 1--800--554--6723 MAINTENANCE, REPLACEMENT AND REPAIR OF EMISSION RELATED PARTS: Any Poulan/WEED EATER approved replacement part used in the instruction manual. WARRANTY...


