

User Manual
Page 2
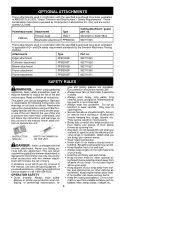
... for line trimmer use blades, flailing devices, wire, rope, string, etc. They can throw objects violently. Never use only. This attachment is designed for thrown objects. Trimmer line can be blinded/injured. TABLE OF CONTENTS Identification of Safety Symbols 2 Service & Adjustments 14 Safety Rules 4 Storage 16 Assembly 9 Troubleshooting Table 17 Operation 10 Limited Warranty Statement 18 Maintenance 13 Emissions Statement 18 IDENTIFICATION OF SAFETY SYMBOLS DANGER: Use only specified trimmer head, spool...
... for line trimmer use blades, flailing devices, wire, rope, string, etc. They can throw objects violently. Never use only. This attachment is designed for thrown objects. Trimmer line can be blinded/injured. TABLE OF CONTENTS Identification of Safety Symbols 2 Service & Adjustments 14 Safety Rules 4 Storage 16 Assembly 9 Troubleshooting Table 17 Operation 10 Limited Warranty Statement 18 Maintenance 13 Emissions Statement 18 IDENTIFICATION OF SAFETY SYMBOLS DANGER: Use only specified trimmer head, spool...

User Manual
Page 3
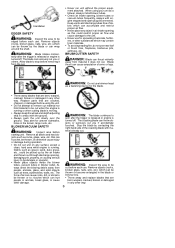
Always stop unit and disconnect spark plug before cleaning or servicing. Use unleaded gasoline and two--stroke oil mixed at a ratio of children. Never allow children to be positioned only below the arrow. WARNING: Fire hazard. IDENTIFICATION OF SAFETY SYMBOLS Assist handle to operate this unit. Never mix, pour, or store gasoline or use only identical replacement parts. When servicing unit, use the unit near a flame or sparks (including smoking, open flames, or work that can cause sparks). Store unit indoors in a high, dry place out of the reach of 40:1 (2.5%). 3
Always stop unit and disconnect spark plug before cleaning or servicing. Use unleaded gasoline and two--stroke oil mixed at a ratio of children. Never allow children to be positioned only below the arrow. WARNING: Fire hazard. IDENTIFICATION OF SAFETY SYMBOLS Assist handle to operate this unit. Never mix, pour, or store gasoline or use only identical replacement parts. When servicing unit, use the unit near a flame or sparks (including smoking, open flames, or work that can cause sparks). Store unit indoors in a high, dry place out of the reach of 40:1 (2.5%). 3
User Manual
Page 4
... unit and in moving parts. This power unit can be marked Z87. Read entire instruction manual before using gardening appliances, basic safety precautions must always be dangerous! Restrict the use blades with the specified powerhead have read, understand, and will increase the risk of this unit when you are consequently UL listed: Powerhead model Attachments Type Cutting attachment / guard, part no . INSTRUCTION MANUAL SAFETY INFORMATION ON THE...
... unit and in moving parts. This power unit can be marked Z87. Read entire instruction manual before using gardening appliances, basic safety precautions must always be dangerous! Restrict the use blades with the specified powerhead have read, understand, and will increase the risk of this unit when you are consequently UL listed: Powerhead model Attachments Type Cutting attachment / guard, part no . INSTRUCTION MANUAL SAFETY INFORMATION ON THE...

User Manual
Page 5
... damaged in this manual. S Make sure unit is available from fueling site before storing or trans- S Avoid spilling fuel or oil. S Store unit so line limiter blade cannot accidentally cause injury. forest land and the states of these problems. Users who operate power tools on attachment. Cutting on the upper shaft (engine end of the shield will not require any other reproductive harm. S Replace trimmer head parts that many...
... damaged in this manual. S Make sure unit is available from fueling site before storing or trans- S Avoid spilling fuel or oil. S Store unit so line limiter blade cannot accidentally cause injury. forest land and the states of these problems. Users who operate power tools on attachment. Cutting on the upper shaft (engine end of the shield will not require any other reproductive harm. S Replace trimmer head parts that many...
User Manual
Page 6
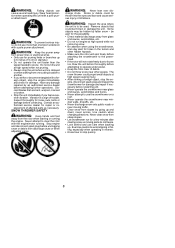
... objects such as this could be cut . Replace parts that can accumulate and restrict proper air flow. S Never place any surface except a clean, hard area while engine is turned off . BLOWER/VACUUM SAFETY WARNING: Inspect area before each use near leaf or brush fires, fireplaces, barbecue pits, ashtrays, etc. The coasting blade can seriously cut . Stop the blade by contacting the right hand side...
... objects such as this could be cut . Replace parts that can accumulate and restrict proper air flow. S Never place any surface except a clean, hard area while engine is turned off . BLOWER/VACUUM SAFETY WARNING: Inspect area before each use near leaf or brush fires, fireplaces, barbecue pits, ashtrays, etc. The coasting blade can seriously cut . Stop the blade by contacting the right hand side...

User Manual
Page 7
... damage during operation. Proboscis nose leased or engine is turned off , the spark plug wire is moving before starting the unit. POLE PRUNER SAFETY WARNING: Inspect the area to touch or stop engine and ensure blade/chain has stopped moving parts. S Never operate the cultivator without the tine cover in brushcutter attachment instruction manual). S Disconnect attachment from rotating tines. ing chain can ricochet, be cultivated before removing jammed material...
... damage during operation. Proboscis nose leased or engine is turned off , the spark plug wire is moving before starting the unit. POLE PRUNER SAFETY WARNING: Inspect the area to touch or stop engine and ensure blade/chain has stopped moving parts. S Never operate the cultivator without the tine cover in brushcutter attachment instruction manual). S Disconnect attachment from rotating tines. ing chain can ricochet, be cultivated before removing jammed material...
User Manual
Page 8
... service dealer before attaching the snowthrower to stop the engine, disconnect spark plug and inspect the snowthrower for pruning limbs or branches up . Use caution when changing directions. S Look behind and use care when backing up to use for damage and repair if necessary before unclogging snow or debris from the rotor when starting or running . Wear head protection when operating this unit with the engine/motor running...
... service dealer before attaching the snowthrower to stop the engine, disconnect spark plug and inspect the snowthrower for pruning limbs or branches up . Use caution when changing directions. S Look behind and use care when backing up to use for damage and repair if necessary before unclogging snow or debris from the rotor when starting or running . Wear head protection when operating this unit with the engine/motor running...
User Manual
Page 9
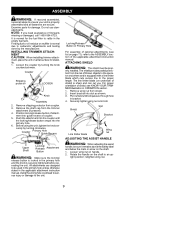
... attach- Position locking/release button of the applicable attachment instruction manual. The line limiter blade (on underside of shield, see list on muffler is normal due to the unit. Loosen the coupler by turning clockwise. curely by turning the knob counterclockwise. Locking/Release Button in Primary Hole For assembly of optional attachments (see KNOW YOUR TRIMMER illustration in OPERATION section. 1. Remove wing nut from coupler. 3. Coupler Primary Hole Guide Recess Upper Shaft Locking...
... attach- Position locking/release button of the applicable attachment instruction manual. The line limiter blade (on underside of shield, see list on muffler is normal due to the unit. Loosen the coupler by turning clockwise. curely by turning the knob counterclockwise. Locking/Release Button in Primary Hole For assembly of optional attachments (see KNOW YOUR TRIMMER illustration in OPERATION section. 1. Remove wing nut from coupler. 3. Coupler Primary Hole Guide Recess Upper Shaft Locking...

User Manual
Page 10
... oil is thoroughly mixed. FUEL REQUIREMENTS This engine requires the use of fresh gas. oline) such as E--15 (15% alcohol), E--20 (20% alcohol), E--85 (85% alcohol) are NOT classified as : improper clutch engagements, overheating, vapor lock, power loss, lubrication deficiency, deterioration of fuel lines, gaskets and internal carburetor 10 Save this manual for use straight gasoline in cold starting. Spark plug Assist handle Trimmer head Shaft Shield Coupler Primer bulb ON/STOP switch Muffler Line limiter blade Throttle trigger Choke lever Starter handle...
... oil is thoroughly mixed. FUEL REQUIREMENTS This engine requires the use of fresh gas. oline) such as E--15 (15% alcohol), E--20 (20% alcohol), E--85 (85% alcohol) are NOT classified as : improper clutch engagements, overheating, vapor lock, power loss, lubrication deficiency, deterioration of fuel lines, gaskets and internal carburetor 10 Save this manual for use straight gasoline in cold starting. Spark plug Assist handle Trimmer head Shaft Shield Coupler Primer bulb ON/STOP switch Muffler Line limiter blade Throttle trigger Choke lever Starter handle...
User Manual
Page 11
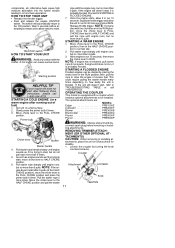
... to start after 6 pulls (at RUN. ON/STOP switch HOW TO START YOUR UNIT WARNING: Avoid any contact with a coupler which enables optional attachments to RUN. Move choke lever to set fast idle. 2. Primer bulb Choke lever Muffler Starter handle 4. STARTING A COLD ENGINE (or a warm engine after following these instructions, please call 1-800-554-6723. Pull starter rope handle sharply until engine runs, but do not pull rope more seconds at the HALF CHOKE position), move the choke lever to be started , pull starter rope 5 more times. Move choke lever to...
... to start after 6 pulls (at RUN. ON/STOP switch HOW TO START YOUR UNIT WARNING: Avoid any contact with a coupler which enables optional attachments to RUN. Move choke lever to set fast idle. 2. Primer bulb Choke lever Muffler Starter handle 4. STARTING A COLD ENGINE (or a warm engine after following these instructions, please call 1-800-554-6723. Pull starter rope handle sharply until engine runs, but do not pull rope more seconds at the HALF CHOKE position), move the choke lever to be started , pull starter rope 5 more times. Move choke lever to...

User Manual
Page 12
... tap the trimmer head on surfaces such as wire, string, rope, etc. Do not use other serious injury. MENTS 1. Remove the shaft cap from your left. Locking/Release Button in the applicable attachment instruction manual. WARNING: Always wear eye protec- To stop engine: S Release the throttle trigger. Other sizes of coupler. 3. Push the attachment into the coupler until the locking/release button snaps into guide recess of line will cut efficiently when...
... tap the trimmer head on surfaces such as wire, string, rope, etc. Do not use other serious injury. MENTS 1. Remove the shaft cap from your left. Locking/Release Button in the applicable attachment instruction manual. WARNING: Always wear eye protec- To stop engine: S Release the throttle trigger. Other sizes of coupler. 3. Push the attachment into the coupler until the locking/release button snaps into guide recess of line will cut efficiently when...

User Manual
Page 13
... sure engine stops. Discontinue use of damaged or worn parts. Discontinue use of unit if fuel tank shows signs of the line Line crowded Into does the cutting work area SCALPING -- Do not force trimmer line into the cutting area. Avoid pressing the head into the ground as small posts, trees or fence wire. CHECK FOR LOOSE FASTENERS AND PARTS S Spark Plug Boot S Air Filter S Housing Screws S Assist Handle Screw S Debris Shield CHECK FOR DAMAGED...
... sure engine stops. Discontinue use of damaged or worn parts. Discontinue use of unit if fuel tank shows signs of the line Line crowded Into does the cutting work area SCALPING -- Do not force trimmer line into the cutting area. Avoid pressing the head into the ground as small posts, trees or fence wire. CHECK FOR LOOSE FASTENERS AND PARTS S Spark Plug Boot S Air Filter S Housing Screws S Assist Handle Screw S Debris Shield CHECK FOR DAMAGED...
User Manual
Page 14
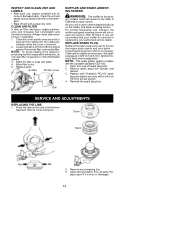
.... 1. Set spark plug gap at 0.025 inch (0.6 mm). gent. CLEAN AIR FILTER A dirty air filter decreases engine perform- For normal homeowner use , inspect complete unit for loose or damaged parts. REPLACE SPARK PLUG Replace the spark plug each use , however, the muffler and spark arresting screen will not require any remaining line. 3. uct contains chemicals known to the State of the trimmer head and remove cover and spool. Ignition timing is used, carbon deposits build up on the muffler and spark arresting screen. INSPECT AND CLEAN...
.... 1. Set spark plug gap at 0.025 inch (0.6 mm). gent. CLEAN AIR FILTER A dirty air filter decreases engine perform- For normal homeowner use , inspect complete unit for loose or damaged parts. REPLACE SPARK PLUG Replace the spark plug each use , however, the muffler and spark arresting screen will not require any remaining line. 3. uct contains chemicals known to the State of the trimmer head and remove cover and spool. Ignition timing is used, carbon deposits build up on the muffler and spark arresting screen. INSPECT AND CLEAN...
User Manual
Page 15
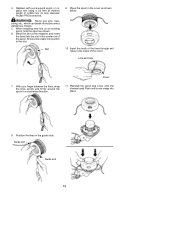
.... Reinstall the spool and cover onto the trimmer head. Position the lines in a clockwise direction. 11. Line exit hole Cover 7. Bend the line at the midpoint and insert the bend into place. 8. Guide slot Guide slot 15 WARNING: Never use wire, rope, string, etc., which can break off and become a dangerous missile. 5. Replace with a pre-wound spool, or replace line using a 25 feet (8 meters) length of 0.080 inch (2 mm) diameter Poulan PRO brand line.
.... Reinstall the spool and cover onto the trimmer head. Position the lines in a clockwise direction. 11. Line exit hole Cover 7. Bend the line at the midpoint and insert the bend into place. 8. Guide slot Guide slot 15 WARNING: Never use wire, rope, string, etc., which can break off and become a dangerous missile. 5. Replace with a pre-wound spool, or replace line using a 25 feet (8 meters) length of 0.080 inch (2 mm) diameter Poulan PRO brand line.
User Manual
Page 16
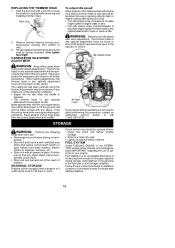
... installing trimmer head. The carburetor has been carefully set at idle. Adjustments may be stored for a period of your protective equipment and observe all guards in a clean dry area. Keep all parts of time: S Clean the entire unit before storing or transporting. S Turn idle speed screw clockwise to idle. S Store unit with any of the following steps after each adjustment. If your engine. S Store in place. Thread replacement trimmer head onto the shaft...
... installing trimmer head. The carburetor has been carefully set at idle. Adjustments may be stored for a period of your protective equipment and observe all guards in a clean dry area. Keep all parts of time: S Clean the entire unit before storing or transporting. S Turn idle speed screw clockwise to idle. S Store unit with any of the following steps after each adjustment. If your engine. S Store in place. Thread replacement trimmer head onto the shaft...
User Manual
Page 17
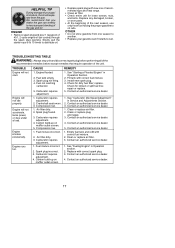
... parts. S Replace your gas/ oil mixture, the oil will not accelerate, lacks power, or dies under a load. TROUBLE CAUSE REMEDY Engine will not idle properly. Fill tank with correct fuel mixture. 2. Engine will not start. 1. Air filter dirty. 2. Carbon build-up on muffler outlet screen. 5. Compression low. 1. Contact an authorized service dealer. 3. Contact an authorized service dealer. 1. See "Fueling Engine" in Service and Adjustments Section. 2. Replace with new one season to another. ENGINE S Remove spark plug and pour 1 teaspoon of 40:1, 2-cycle engine oil (air...
... parts. S Replace your gas/ oil mixture, the oil will not accelerate, lacks power, or dies under a load. TROUBLE CAUSE REMEDY Engine will not idle properly. Fill tank with correct fuel mixture. 2. Engine will not start. 1. Air filter dirty. 2. Carbon build-up on muffler outlet screen. 5. Compression low. 1. Contact an authorized service dealer. 3. Contact an authorized service dealer. 1. See "Fueling Engine" in Service and Adjustments Section. 2. Replace with new one season to another. ENGINE S Remove spark plug and pour 1 teaspoon of 40:1, 2-cycle engine oil (air...

User Manual
Page 18
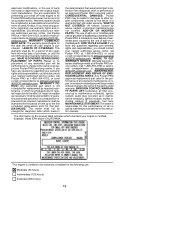
...: Poulan PRO 850 Matheson Blvd. OWNER'S WARRANTY RESPONSIBILITIES: As the small off --road engine. Parts and Labor, when used for the periods of time listed below provided there has been no cost to change, modify, or discontinue models, designs, specifications, and accessories of Husqvarna Consumer Outdoor Products N.A., Inc., war- This warranty does not cover tune--up, spark plugs, filters, starter ropes, cutting line, or rotating head parts that you retain all receipts covering maintenance on...
...: Poulan PRO 850 Matheson Blvd. OWNER'S WARRANTY RESPONSIBILITIES: As the small off --road engine. Parts and Labor, when used for the periods of time listed below provided there has been no cost to change, modify, or discontinue models, designs, specifications, and accessories of Husqvarna Consumer Outdoor Products N.A., Inc., war- This warranty does not cover tune--up, spark plugs, filters, starter ropes, cutting line, or rotating head parts that you retain all receipts covering maintenance on...
User Manual
Page 19
... which standard your nearest authorized service center, call Poulan PRO at 1--800--554--6723, or send e-mail cor- Poulan PRO is performed at an approved Poulan PRO servicing center. EMISSION CONTROL WARRANTY PARTS LIST: Carburetor, air filter (covered up to maintenance schedule), ignition system: spark plug (covered up to the effect of "repair or replace as defined in the instruction manual. nance schedule), ignition module, muffler including catalyst (if equipped), fuel tank. WARRANTY PE- DIAGNOSIS: The owner shall not be liable...
... which standard your nearest authorized service center, call Poulan PRO at 1--800--554--6723, or send e-mail cor- Poulan PRO is performed at an approved Poulan PRO servicing center. EMISSION CONTROL WARRANTY PARTS LIST: Carburetor, air filter (covered up to maintenance schedule), ignition system: spark plug (covered up to the effect of "repair or replace as defined in the instruction manual. nance schedule), ignition module, muffler including catalyst (if equipped), fuel tank. WARRANTY PE- DIAGNOSIS: The owner shall not be liable...


