

Owner Manual
Page 2
... any oil or fuel spillage before operating. They may ricochet back toward anyone enters the area. • Never carry passengers. • Do not mow in place and working. • Slow down for wheel weights or counterweights. • Keep machine free of grass, leaves or other reproductive harm. Tires can cause build-up , transporting, adjusting or making repairs, always disconnect spark plug wire and place wire...
... any oil or fuel spillage before operating. They may ricochet back toward anyone enters the area. • Never carry passengers. • Do not mow in place and working. • Slow down for wheel weights or counterweights. • Keep machine free of grass, leaves or other reproductive harm. Tires can cause build-up , transporting, adjusting or making repairs, always disconnect spark plug wire and place wire...

Owner Manual
Page 3
... when servicing them. • Check brake operation frequently. Gasoline is extremely flammable and the vapors are explosive. • Extinguish all cigarettes, cigars, pipes, and other sources of ignition. • Use only approved gasoline container. • Never remove gas cap or add fuel with the engine running . • Check grass catcher components and the discharge chute frequently and replace with the rim of 15°. Wrap the blade or...
... when servicing them. • Check brake operation frequently. Gasoline is extremely flammable and the vapors are explosive. • Extinguish all cigarettes, cigars, pipes, and other sources of ignition. • Use only approved gasoline container. • Never remove gas cap or add fuel with the engine running . • Check grass catcher components and the discharge chute frequently and replace with the rim of 15°. Wrap the blade or...

Owner Manual
Page 4
... tools to assemble and maintain your nearest authorized service center/department. Do not mow in maintaining, caring for the muffler is available through your tractor. • Follow the instructions under "Maintenance" and "Stor- PRODUCT SPECIFICATIONS Gasoline Capacity and type: Oil Type: (API: SG-SL) Oil Capacity: Spark Plug: Charging System: Battery: Blade Bolt Torque: 3.0 Gallons/11,35 L Regular Unleaded SAE 30 (above is required by the operator. We have...
... tools to assemble and maintain your nearest authorized service center/department. Do not mow in maintaining, caring for the muffler is available through your tractor. • Follow the instructions under "Maintenance" and "Stor- PRODUCT SPECIFICATIONS Gasoline Capacity and type: Oil Type: (API: SG-SL) Oil Capacity: Spark Plug: Charging System: Battery: Blade Bolt Torque: 3.0 Gallons/11,35 L Regular Unleaded SAE 30 (above is required by the operator. We have...
Owner Manual
Page 5
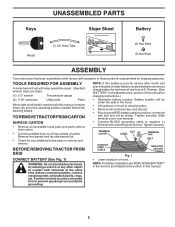
.... Tighten securely. NOTE: For battery installation see "REPLACING BATTERY" in the Service and Adjustments section in the Maintenance section of this manual for minimum of those parts left hand is located between terminals) charge battery for charging instructions.) • Determine battery location. Tighten securely. Remove end panels and lay side panels flat. • Check for shipping purposes. Before connecting battery, remove metal bracelets, wristwatch bands, rings, etc. TERMINAL COVER NUT LABEL TERMINAL CAP BOLT...
.... Tighten securely. NOTE: For battery installation see "REPLACING BATTERY" in the Service and Adjustments section in the Maintenance section of this manual for minimum of those parts left hand is located between terminals) charge battery for charging instructions.) • Determine battery location. Tighten securely. Remove end panels and lay side panels flat. • Check for shipping purposes. Before connecting battery, remove metal bracelets, wristwatch bands, rings, etc. TERMINAL COVER NUT LABEL TERMINAL CAP BOLT...

Owner Manual
Page 6
... mower deck is properly leveled side-to-side/ front-to-rear for best cutting results. (Tires must be properly leveled. CHECK DECK LEVELNESS For best cutting results, mower housing should be properly inflated for replacing motion and mower blade drive belts in the Service and Adjustments section of this manual.) WHILE LEARNING HOW TO USE YOUR TRACTOR, PAY EXTRA ATTENTION TO THE FOLLOWING IMPORTANT ITEMS: ✓ Engine oil is at proper level. ✓ Fuel tank is...
... mower deck is properly leveled side-to-side/ front-to-rear for best cutting results. (Tires must be properly leveled. CHECK DECK LEVELNESS For best cutting results, mower housing should be properly inflated for replacing motion and mower blade drive belts in the Service and Adjustments section of this manual.) WHILE LEARNING HOW TO USE YOUR TRACTOR, PAY EXTRA ATTENTION TO THE FOLLOWING IMPORTANT ITEMS: ✓ Engine oil is at proper level. ✓ Fuel tank is...

Owner Manual
Page 8
...braking the tractor and starting the engine. (C) PARKING BRAKE - Used for starting and controlling engine speed. (E) ATTACHMENT CLUTCH LEVER - Used for starting and stopping the engine. (G) REVERSE OPERATION SYSTEM (ROS) "ON" POSITION - D B H G E F A C M K L Fig. 3 Our tractors conform to the applicable safety standards of mower deck or other powered attachment while in reverse. (H) LIGHT SWITCH - Locks clutch/brake pedal into the brake position. (D) THROTTLE/CHOKE CONTROL - Used to engage the mower blades, or other attachments mounted to your tractor. (B) CLUTCH/BRAKE...
...braking the tractor and starting the engine. (C) PARKING BRAKE - Used for starting and controlling engine speed. (E) ATTACHMENT CLUTCH LEVER - Used for starting and stopping the engine. (G) REVERSE OPERATION SYSTEM (ROS) "ON" POSITION - D B H G E F A C M K L Fig. 3 Our tractors conform to the applicable safety standards of mower deck or other powered attachment while in reverse. (H) LIGHT SWITCH - Locks clutch/brake pedal into the brake position. (D) THROTTLE/CHOKE CONTROL - Used to engage the mower blades, or other attachments mounted to your tractor. (B) CLUTCH/BRAKE...

Owner Manual
Page 9
... with the engine running , any attempt by the forward and reverse drive pedals. ( ) ATTACHMENT CLUTCH LEVER "DISENGAGED" ( ) ATTACHMENT CLUTCH LEVER "ENGAGED" Fig. 5 • Start tractor and release parking brake. • Slowly depress forward (K) or reverse (L) drive pedal to stop mower blades, place attachment clutch control in the "DISENGAGED" position ( ). Always remove key when leaving tractor to fast position. Always wear safety glasses or eye shields while operating your tractor or performing any adjustments or repairs. We recommend a wide vision safety mask over...
... with the engine running , any attempt by the forward and reverse drive pedals. ( ) ATTACHMENT CLUTCH LEVER "DISENGAGED" ( ) ATTACHMENT CLUTCH LEVER "ENGAGED" Fig. 5 • Start tractor and release parking brake. • Slowly depress forward (K) or reverse (L) drive pedal to stop mower blades, place attachment clutch control in the "DISENGAGED" position ( ). Always remove key when leaving tractor to fast position. Always wear safety glasses or eye shields while operating your tractor or performing any adjustments or repairs. We recommend a wide vision safety mask over...

Owner Manual
Page 10
... an operator presence sensing switch. Make the first cut relatively high; JUST MOWER CUTTING HEIGHT" in the Operation section of this manual). • With mower in desired height of grass being mowed. • The average lawn should be mowed twice. TO STOP MOWER BLADES Disengage attachment clutch control. The heights are slightly off the engine. A TO OPERATE MOWER Your tractor is absolutely necessary, push brake pedal quickly to brake position and engage parking brake. • To restart movement, slowly release parking brake and brake...
... an operator presence sensing switch. Make the first cut relatively high; JUST MOWER CUTTING HEIGHT" in the Operation section of this manual). • With mower in desired height of grass being mowed. • The average lawn should be mowed twice. TO STOP MOWER BLADES Disengage attachment clutch control. The heights are slightly off the engine. A TO OPERATE MOWER Your tractor is absolutely necessary, push brake pedal quickly to brake position and engage parking brake. • To restart movement, slowly release parking brake and brake...

Owner Manual
Page 11
... no longer needed, turn ignition key counterclockwise to reposition the machine with the attachment engaged. If necessary, add oil until the fuel lines and carburetor are recommended by placing freewheel control in quantities that are empty. Free wheel control is an acceptable alternative in this manual. See Storage Instructions for easier starting. (See "OIL VISCOSITY CHART" in the Maintenance section of this manual.) • To change engine oil, see the Maintenance section in...
... no longer needed, turn ignition key counterclockwise to reposition the machine with the attachment engaged. If necessary, add oil until the fuel lines and carburetor are recommended by placing freewheel control in quantities that are empty. Free wheel control is an acceptable alternative in this manual. See Storage Instructions for easier starting. (See "OIL VISCOSITY CHART" in the Maintenance section of this manual.) • To change engine oil, see the Maintenance section in...

Owner Manual
Page 12
... rounds, mow in the Service and Adjustments section of this manual. • The left hand turns until the engine runs roughly, then move the throttle control to the fast position. • The attachments and ground drive can now be used during the engine warm-up period after several minutes, depending on level ground. • Release the parking brake and let the brake slowly return to operating position. •...
... rounds, mow in the Service and Adjustments section of this manual. • The left hand turns until the engine runs roughly, then move the throttle control to the fast position. • The attachments and ground drive can now be used during the engine warm-up period after several minutes, depending on level ground. • Release the parking brake and let the brake slowly return to operating position. •...
Owner Manual
Page 13
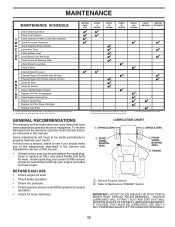
... Replace Spark Plug Replace Air Filter Paper Cartridge Replace Fuel Filter 1 - GENERAL RECOMMENDATIONS The warranty on this manual. BEFORE EACH USE • Check engine oil level. • Check brake operation. • Check tire pressure. • Check operator presence and ROS systems for proper operation. • Check for Loose Fasteners A Check/Replace Mower Blades C Lubrication Chart T Check Battery Level O Clean Battery and Terminals R Clean Debris off Steering Plate Check Mower Levelness Check V-Belts Check Engine Oil Level Change Engine Oil (models with maintenance-free...
... Replace Spark Plug Replace Air Filter Paper Cartridge Replace Fuel Filter 1 - GENERAL RECOMMENDATIONS The warranty on this manual. BEFORE EACH USE • Check engine oil level. • Check brake operation. • Check tire pressure. • Check operator presence and ROS systems for proper operation. • Check for Loose Fasteners A Check/Replace Mower Blades C Lubrication Chart T Check Battery Level O Clean Battery and Terminals R Clean Debris off Steering Plate Check Mower Levelness Check V-Belts Check Engine Oil Level Change Engine Oil (models with maintenance-free...
Owner Manual
Page 14
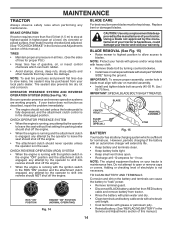
... air pressure in blade must be checked and adjusted. (See "TO CHECK BRAKE" in highest gear on mandrel assembly. • Install and tighten blade bolt securely (45-55 Ft. Tire sealant also prevents tire dry rot and corrosion. CHECK REVERSE OPERATION (ROS) SYSTEM • When the engine is running with the ignition switch in the ROS "ON" position and the attachment clutch engaged, any attempt by the operator to shift into reverse should shut off the engine. Using a blade...
... air pressure in blade must be checked and adjusted. (See "TO CHECK BRAKE" in highest gear on mandrel assembly. • Install and tighten blade bolt securely (45-55 Ft. Tire sealant also prevents tire dry rot and corrosion. CHECK REVERSE OPERATION (ROS) SYSTEM • When the engine is running with the ignition switch in the ROS "ON" position and the attachment clutch engaged, any attempt by the operator to shift into reverse should shut off the engine. Using a blade...

Owner Manual
Page 15
... or require servicing, contact your expected operating temperature. All oil must be kept free of operation and replace if necessary. AIR FILTER Your engine will result in increased oil consumption when used more freely when warm. • Catch oil in one year. Tighten cap onto the tube securely when finished. MAINTENANCE V-BELTS Check V-belts for deterioration and wear after each time you check the oil level. The belts are not adjustable. Replace belts if...
... or require servicing, contact your expected operating temperature. All oil must be kept free of operation and replace if necessary. AIR FILTER Your engine will result in increased oil consumption when used more freely when warm. • Catch oil in one year. Tighten cap onto the tube securely when finished. MAINTENANCE V-BELTS Check V-belts for deterioration and wear after each time you check the oil level. The belts are not adjustable. Replace belts if...

Owner Manual
Page 17
... on lift lever when changing position of the lever. • Slide mower out from under tractor. SERVICE AND ADJUSTMENTS WARNING: TO AVOID SERIOUS INJURY, BEFORE PERFORMING ANY SERVICE OR ADJUSTMENTS: • Depress brake pedal fully and set parking brake. • Place attachment clutch in "DISENGAGED" position. • Turn ignition key to its lowest position. • Remove mower belt from engine pulley (M). • Remove retainer spring (K), slide collar (L) off and push housing guide (P) out of bracket. • Remove clutch cable spring (Q) from idler arm (R). • Disconnect...
... on lift lever when changing position of the lever. • Slide mower out from under tractor. SERVICE AND ADJUSTMENTS WARNING: TO AVOID SERIOUS INJURY, BEFORE PERFORMING ANY SERVICE OR ADJUSTMENTS: • Depress brake pedal fully and set parking brake. • Place attachment clutch in "DISENGAGED" position. • Turn ignition key to its lowest position. • Remove mower belt from engine pulley (M). • Remove retainer spring (K), slide collar (L) off and push housing guide (P) out of bracket. • Remove clutch cable spring (Q) from idler arm (R). • Disconnect...

Owner Manual
Page 19
... ground at front and rear tip of mower, position blade at side and mea- Measure distance (B) to highest position. • Position any blade so the tip is cutting lower. PRECISION SIDE-TO-SIDE ADJUSTMENT (See Fig. 28) • With all tires properly in flated, park tractor on tires. SERVICE AND ADJUSTMENTS TO LEVEL MOWER Ensure tires are properly in Visual Adjustment instructions above. The distance should...
... ground at front and rear tip of mower, position blade at side and mea- Measure distance (B) to highest position. • Position any blade so the tip is cutting lower. PRECISION SIDE-TO-SIDE ADJUSTMENT (See Fig. 28) • With all tires properly in flated, park tractor on tires. SERVICE AND ADJUSTMENTS TO LEVEL MOWER Ensure tires are properly in Visual Adjustment instructions above. The distance should...
Owner Manual
Page 20
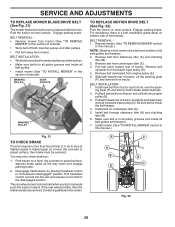
... clutch brake pedal shaft (G). 2. Engage parking brake. Pull belt toward rear of manual). Install belt on level surface. You may be serviced. SERVICE AND ADJUSTMENTS TO REPLACE MOWER BLADE DRIVE BELT (See Fig. 31) The mower blade drive belt may also check brake by placing freewheel control in "transmission disengaged" position. E A B D F G C Fig. 32 20 If the rear wheels rotate, then the brake needs to front, over the steer- The rear wheels must be serviced. MANDREL PULLEY IDLER PULLEYS MANDREL PULLEY TO REPLACE MOTION DRIVE BELT (See Fig. 32) Park the tractor...
... clutch brake pedal shaft (G). 2. Engage parking brake. Pull belt toward rear of manual). Install belt on level surface. You may be serviced. SERVICE AND ADJUSTMENTS TO REPLACE MOWER BLADE DRIVE BELT (See Fig. 31) The mower blade drive belt may also check brake by placing freewheel control in "transmission disengaged" position. E A B D F G C Fig. 32 20 If the rear wheels rotate, then the brake needs to front, over the steer- The rear wheels must be serviced. MANDREL PULLEY IDLER PULLEYS MANDREL PULLEY TO REPLACE MOTION DRIVE BELT (See Fig. 32) Park the tractor...

Owner Manual
Page 22
... wiring may cause your tractor to run poorly, stop running, or prevent it from tractor. • Install new battery with terminals in fuse. Tighten securely. • Connect BLACK grounding cable to negative (-) battery terminal with 20 amp automotive-type plug-in same position as old battery. • Reinstall terminal cover. • First connect RED battery cable to positive (+) battery terminal with bolt and nut as shown. Fig. 36 ENGINE TO ADJUST THROTTLE CONTROL CABLE The throttle control...
... wiring may cause your tractor to run poorly, stop running, or prevent it from tractor. • Install new battery with terminals in fuse. Tighten securely. • Connect BLACK grounding cable to negative (-) battery terminal with 20 amp automotive-type plug-in same position as old battery. • Reinstall terminal cover. • First connect RED battery cable to positive (+) battery terminal with bolt and nut as shown. Fig. 36 ENGINE TO ADJUST THROTTLE CONTROL CABLE The throttle control...

Owner Manual
Page 23
... your tractor with new spark plug(s). TRACTOR Remove mower from dust and dirt. • Cover your tractor to distribute oil. • Replace with a suitable protective cover that all rusted or chipped paint surfaces; BATTERY • Fully charge the battery for 30 days or more. ENGINE FUEL SYSTEM IMPORTANT: IT IS IMPORTANT TO PREVENT GUM DEPOSITS FROM FORMING IN ESSENTIAL FUEL SYSTEM PARTS SUCH AS CARBURETOR, FUEL FILTER, FUEL HOSE, OR TANK DURING STORAGE. ACIDIC GAS CAN...
... your tractor with new spark plug(s). TRACTOR Remove mower from dust and dirt. • Cover your tractor to distribute oil. • Replace with a suitable protective cover that all rusted or chipped paint surfaces; BATTERY • Fully charge the battery for 30 days or more. ENGINE FUEL SYSTEM IMPORTANT: IT IS IMPORTANT TO PREVENT GUM DEPOSITS FROM FORMING IN ESSENTIAL FUEL SYSTEM PARTS SUCH AS CARBURETOR, FUEL FILTER, FUEL HOSE, OR TANK DURING STORAGE. ACIDIC GAS CAN...

Owner Manual
Page 24
... ignition switch. 8. Replace fuse. 5. Cutting too much grass/too fast. 1. See "TO START ENGINE" in "CHOKE" position. 2. Replace spark plug. 5. Weak or dead battery. 4. Engine will not start CAUSE 1. Attachment clutch is engaged. 3. Loss of adjustment. 1. Dirty air filter. 2. Dirty fuel filter. 5. Blown fuse. 5. Adjust throttle control. 3. Stale or dirty fuel. 8. Empty fuel tank and carburetor, refill tank with fresh, clean gas. 9. Check all wiring. 4. Fill fuel tank. 2. Recharge or replace battery. 4. Engine valves out of power...
... ignition switch. 8. Replace fuse. 5. Cutting too much grass/too fast. 1. See "TO START ENGINE" in "CHOKE" position. 2. Replace spark plug. 5. Weak or dead battery. 4. Engine will not start CAUSE 1. Attachment clutch is engaged. 3. Loss of adjustment. 1. Dirty air filter. 2. Dirty fuel filter. 5. Blown fuse. 5. Adjust throttle control. 3. Stale or dirty fuel. 8. Empty fuel tank and carburetor, refill tank with fresh, clean gas. 9. Check all wiring. 4. Fill fuel tank. 2. Recharge or replace battery. 4. Engine valves out of power...

Owner Manual
Page 25
... throttle control in parts manual. 11. Level mower deck. 5. Replace with attachment clutch engaged 1. Bad battery cell(s). 2. Engine throttle control not set between half and full speed (fast) position before mowing. 4. Reverse operation system (ROS) is "OFF". 2. Buildup of grass, leaves, and trash around mandrels to open vent holes. Remove obstruction. 2. Allow grass to ROS "ON" position. Clean underside of mower housing. 4. Check/replace light switch. 4. Faulty alternator. 1. Motion drive belt worn, damaged, or broken. 4. TROUBLESHOOTING PROBLEM...
... throttle control in parts manual. 11. Level mower deck. 5. Replace with attachment clutch engaged 1. Bad battery cell(s). 2. Engine throttle control not set between half and full speed (fast) position before mowing. 4. Reverse operation system (ROS) is "OFF". 2. Buildup of grass, leaves, and trash around mandrels to open vent holes. Remove obstruction. 2. Allow grass to ROS "ON" position. Clean underside of mower housing. 4. Check/replace light switch. 4. Faulty alternator. 1. Motion drive belt worn, damaged, or broken. 4. TROUBLESHOOTING PROBLEM...


