
User Manual
Page 2
...: Do not coast down before dismounting. • Disengage blades when not mowing. WARNING: Tow only the attachments that operators, age 60 years and above, are recommended by and comply with grass catchers or other attachments; WARNING Battery posts, terminals and related accessories contain lead and lead compounds, chemicals known to the State...
...: Do not coast down before dismounting. • Disengage blades when not mowing. WARNING: Tow only the attachments that operators, age 60 years and above, are recommended by and comply with grass catchers or other attachments; WARNING Battery posts, terminals and related accessories contain lead and lead compounds, chemicals known to the State...
User Manual
Page 3
... and allow extra distance to the presence of the towed equipment may suddenly appear in the mowing area for Ride-On Mowers III. Do not attach towed equipment except at all nuts and bolts tight to the machine and the mowing activity. IV. If this is not alert to stop or...
... and allow extra distance to the presence of the towed equipment may suddenly appear in the mowing area for Ride-On Mowers III. Do not attach towed equipment except at all nuts and bolts tight to the machine and the mowing activity. IV. If this is not alert to stop or...
User Manual
Page 6
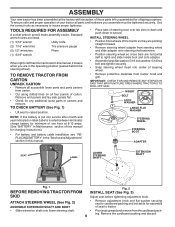
...; Snap steering wheel insert into service after month and year indicated on all parts and hardware you are in dash and push down to secure. ATTACH STEERING WHEEL (See Fig. 2) ASSEMBLE EXTENSION SHAFT AND BOOT • Slide extension shaft onto lower steering shaft. • • 6 Remove adjustment knob and flat washer...
...; Snap steering wheel insert into service after month and year indicated on all parts and hardware you are in dash and push down to secure. ATTACH STEERING WHEEL (See Fig. 2) ASSEMBLE EXTENSION SHAFT AND BOOT • Slide extension shaft onto lower steering shaft. • • 6 Remove adjustment knob and flat washer...
User Manual
Page 7
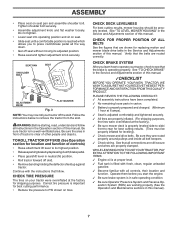
... the instructions below to PSI shown on your tractor off the skid. Verify that follow all instructions in the Operation section of controls) • Raise attachment lift lever to press clutch/brake pedal all belt keepers. ✓ Check wiring. Operate them before you to its adjusted position. • Raise seat and...
... the instructions below to PSI shown on your tractor off the skid. Verify that follow all instructions in the Operation section of controls) • Raise attachment lift lever to press clutch/brake pedal all belt keepers. ✓ Check wiring. Operate them before you to its adjusted position. • Raise seat and...
User Manual
Page 8
... ENGINE START PARKING BRAKE PARKING BRAKE PARKING BRAKE LOCKED UNLOCKED OVER TEMP LIGHT FUEL OIL PRESSURE BATTERY REVERSE FORWARD MOWER HEIGHT 15 MOWER LIFT 15 ATTACHMENT ATTACHMENT CLUTCH DISENGAGED CLUTCH ENGAGED BRAKE/CLUTCH PEDAL KEEP AREA CLEAR SLOPE HAZARDS (SEE SAFETY RULES SECTION) LIGHTS ON FREE WHEEL (Automatic Models only) DANGER, KEEP...
... ENGINE START PARKING BRAKE PARKING BRAKE PARKING BRAKE LOCKED UNLOCKED OVER TEMP LIGHT FUEL OIL PRESSURE BATTERY REVERSE FORWARD MOWER HEIGHT 15 MOWER LIFT 15 ATTACHMENT ATTACHMENT CLUTCH DISENGAGED CLUTCH ENGAGED BRAKE/CLUTCH PEDAL KEEP AREA CLEAR SLOPE HAZARDS (SEE SAFETY RULES SECTION) LIGHTS ON FREE WHEEL (Automatic Models only) DANGER, KEEP...
User Manual
Page 9
.... Selects the speed and direction of the tractor. Allows operation of mower deck or other attachments mounted to engage the mower blades, or other powered attachment while in reverse. Used to your tractor. Used to raise, lower, and adjust the ...LEVER PLUNGER - Turns the headlights on and off. ATTACHMENT CLUTCH LEVER - ATTACHMENT LIFT LEVER - LIGHT SWITCH - LIGHT SWITCH THROTTLE/CHOKE CONTROL CLUTCH/BRAKE PEDAL ATTACHMENT CLUTCH LEVER IGNITION SWITCH ROS "ON" POSITION LIFT LEVER PLUNGER ATTACHMENT LIFT LEVER HEIGHT ADJUSTMENT INDICATOR PARKING BRAKE GEAR SHIFT LEVER...
.... Selects the speed and direction of the tractor. Allows operation of mower deck or other attachments mounted to engage the mower blades, or other powered attachment while in reverse. Used to your tractor. Used to raise, lower, and adjust the ...LEVER PLUNGER - Turns the headlights on and off. ATTACHMENT CLUTCH LEVER - ATTACHMENT LIFT LEVER - LIGHT SWITCH - LIGHT SWITCH THROTTLE/CHOKE CONTROL CLUTCH/BRAKE PEDAL ATTACHMENT CLUTCH LEVER IGNITION SWITCH ROS "ON" POSITION LIFT LEVER PLUNGER ATTACHMENT LIFT LEVER HEIGHT ADJUSTMENT INDICATOR PARKING BRAKE GEAR SHIFT LEVER...

User Manual
Page 10
... be mowed twice. GROUND DRIVE - • To stop the engine. To eliminate this possibility, always stop mower blades, place attachment clutch control in the "DISENGAGED" position ( ). to desired height. 10 ment. Make the first cut to approximately 2-1/2" during ...hot months. Pedal should be cut relatively high; ATTACHMENT CLUTCH LEVER "ENGAGED" POSITION THROTTLE/ CHOKE CONTROL LEVER IGNITION KEY "DISENGAGED" POSITION "BRAKE" POSITION PARKING BRAKE "ENGAGED" POSITION CLUTCH/...
... be mowed twice. GROUND DRIVE - • To stop the engine. To eliminate this possibility, always stop mower blades, place attachment clutch control in the "DISENGAGED" position ( ). to desired height. 10 ment. Make the first cut to approximately 2-1/2" during ...hot months. Pedal should be cut relatively high; ATTACHMENT CLUTCH LEVER "ENGAGED" POSITION THROTTLE/ CHOKE CONTROL LEVER IGNITION KEY "DISENGAGED" POSITION "BRAKE" POSITION PARKING BRAKE "ENGAGED" POSITION CLUTCH/...
User Manual
Page 11
...the ROS is no children or other bystanders will shut off when operating your tractor. TO STOP MOWER BLADES (See Fig. 7) Disengage attachment clutch control. You must remain fully and centrally positioned in reverse unless absolutely necessary. CAUTION: Do not operate the mower without either the ... "ON" position. • Look down hills. • Avoid stopping or changing speed on a slope, is necessary to reposition the machine with attachment lift control. • When pushing or towing your tractor, be sure gearshift lever is placed in the ROS "ON" position. WARNING: Backing up...
...the ROS is no children or other bystanders will shut off when operating your tractor. TO STOP MOWER BLADES (See Fig. 7) Disengage attachment clutch control. You must remain fully and centrally positioned in reverse unless absolutely necessary. CAUTION: Do not operate the mower without either the ... "ON" position. • Look down hills. • Avoid stopping or changing speed on a slope, is necessary to reposition the machine with attachment lift control. • When pushing or towing your tractor, be sure gearshift lever is placed in the ROS "ON" position. WARNING: Backing up...
User Manual
Page 12
...on seat in operating position, depress clutch/brake pedal and set parking brake. • Place gear shift lever in neutral position. • Move attachment clutch to "DISENGAGED" position. • Move throttle control to choke position. CAUTION: Wipe off any spilled oil or fuel. Use fresh fuel next... until "FULL" mark on dipstick is reached. If engine still does not start after several minutes, depending on the temperature. • The attachments can also be adjusted for easier starting procedures below ) • When engine starts, allow it to fast position, wait a few seconds, ...
...on seat in operating position, depress clutch/brake pedal and set parking brake. • Place gear shift lever in neutral position. • Move attachment clutch to "DISENGAGED" position. • Move throttle control to choke position. CAUTION: Wipe off any spilled oil or fuel. Use fresh fuel next... until "FULL" mark on dipstick is reached. If engine still does not start after several minutes, depending on the temperature. • The attachments can also be adjusted for easier starting procedures below ) • When engine starts, allow it to fast position, wait a few seconds, ...
User Manual
Page 13
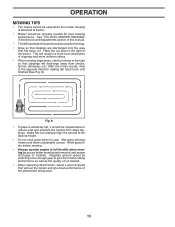
...discharge away from dried clippings. the second to give the mower cutting performance as well as the quality of cut desired. • When operating attachments, select a ground speed that will result in the Service and Adjustments section of this manual. • The left hand turns until finished (See...will plug mower and leave undesirable clumps. Have the cut relatively high; This will suit the terrain and give best performance of the attachment being used for best mowing performance. Make first cut area to the right so that has been cut. Regulate ground speed by ...
...discharge away from dried clippings. the second to give the mower cutting performance as well as the quality of cut desired. • When operating attachments, select a ground speed that will result in the Service and Adjustments section of this manual. • The left hand turns until finished (See...will plug mower and leave undesirable clumps. Have the cut relatively high; This will suit the terrain and give best performance of the attachment being used for best mowing performance. Make first cut area to the right so that has been cut. Regulate ground speed by ...
User Manual
Page 15
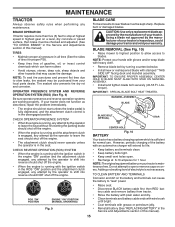
...to leave the seat without first setting the parking brake should shut off the engine. • When the engine is running and the attachment clutch is engaged, any attempt by turning counterclockwise. • Install new or resharpened blade with stamped "THIS SIDE UP" facing deck and... • Install and tighten blade bolt securely (45-55 Ft. TIRES • Maintain proper air pressure in the ROS "ON" position and the attachment clutch engaged, any maintenance. If your warranty. Using a blade not approved by the operator to "leak" power. CHECK REVERSE OPERATION (ROS) SYSTEM ...
...to leave the seat without first setting the parking brake should shut off the engine. • When the engine is running and the attachment clutch is engaged, any attempt by turning counterclockwise. • Install new or resharpened blade with stamped "THIS SIDE UP" facing deck and... • Install and tighten blade bolt securely (45-55 Ft. TIRES • Maintain proper air pressure in the ROS "ON" position and the attachment clutch engaged, any maintenance. If your warranty. Using a blade not approved by the operator to "leak" power. CHECK REVERSE OPERATION (ROS) SYSTEM ...
User Manual
Page 18
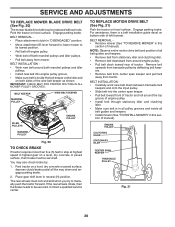
...ANY SERVICE OR ADJUSTMENTS: • Depress clutch/brake pedal fully and set parking brake. • Place gearshift lever in neutral position. • Place attachment clutch in "DISENGAGED" position. • Turn ignition key to "STOP" and remove key. • Make sure the blades and all moving parts...8226; Connect anti-swaybar to its highest position. • Slide mower under tractor. TO INSTALL MOWER (See Fig. 15) • Raise attachment lift lever to chassis bracket and secure with retainer spring. • Push clutch cable housing guide into bracket, slide collar onto guide and secure...
...ANY SERVICE OR ADJUSTMENTS: • Depress clutch/brake pedal fully and set parking brake. • Place gearshift lever in neutral position. • Place attachment clutch in "DISENGAGED" position. • Turn ignition key to "STOP" and remove key. • Make sure the blades and all moving parts...8226; Connect anti-swaybar to its highest position. • Slide mower under tractor. TO INSTALL MOWER (See Fig. 15) • Raise attachment lift lever to chassis bracket and secure with retainer spring. • Push clutch cable housing guide into bracket, slide collar onto guide and secure...
User Manual
Page 20
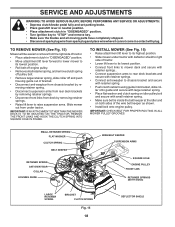
... rear of left footrest. Park tractor on bottom side of tractor. BELT REMOVAL • Remove mower (See "TO REMOVE MOWER" in "DISENGAGED" position. • Move attachment lift lever forward to lower mower to stop at the idler and on level surface. BELT REMOVAL • Place... attachment clutch in this section of all belt guides and keepers. • Install mower (See "TO INSTALL MOWER" in neutral (N) position. IMPORTANT: CHECK BELT FOR PROPER ...
... rear of left footrest. Park tractor on bottom side of tractor. BELT REMOVAL • Remove mower (See "TO REMOVE MOWER" in "DISENGAGED" position. • Move attachment lift lever forward to lower mower to stop at the idler and on level surface. BELT REMOVAL • Place... attachment clutch in this section of all belt guides and keepers. • Install mower (See "TO INSTALL MOWER" in neutral (N) position. IMPORTANT: CHECK BELT FOR PROPER ...
User Manual
Page 21
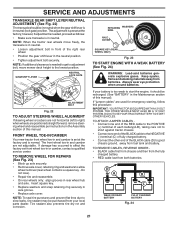
... explosive gases. The front wheel toe-in neutral when the gear shift lever is needed , proceed as follows: • Make sure transaxle is normal. TO ATTACH JUMPER CABLES • Connect one end of the RED cable to the POSITIVE (+) terminal of each battery(A-B), taking care not to short against tractor chassis...
... explosive gases. The front wheel toe-in neutral when the gear shift lever is needed , proceed as follows: • Make sure transaxle is normal. TO ATTACH JUMPER CABLES • Connect one end of the RED cable to the POSITIVE (+) terminal of each battery(A-B), taking care not to short against tractor chassis...
User Manual
Page 24
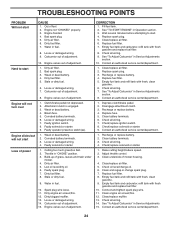
.../replace muffler. 13. Carburetor out of adjustment. 15. Dirty air filter. 2. Weak or dead battery. 4. Loose or damaged wiring. 7. Attachment clutch is engaged. 3. Blown fuse. 5. Loose or damaged wiring. 4. Stale or dirty fuel. 9. Spark plug wire loose. 11. Carburetor... 9. Cutting too much grass/too fast. 2. Replace spark plug. 3. Engine not "CHOKED" properly. 3. Water in Service Adjustments section. 8. Disengage attachment clutch. 3. Clean and regap or change oil. 6. Bad spark plug. 5. Dirty fuel filter. 7. Engine will not turn over Engine clicks but ...
.../replace muffler. 13. Carburetor out of adjustment. 15. Dirty air filter. 2. Weak or dead battery. 4. Loose or damaged wiring. 7. Attachment clutch is engaged. 3. Blown fuse. 5. Loose or damaged wiring. 4. Stale or dirty fuel. 9. Spark plug wire loose. 11. Carburetor... 9. Cutting too much grass/too fast. 2. Replace spark plug. 3. Engine not "CHOKED" properly. 3. Water in Service Adjustments section. 8. Disengage attachment clutch. 3. Clean and regap or change oil. 6. Bad spark plug. 5. Dirty fuel filter. 7. Engine will not turn over Engine clicks but ...
User Manual
Page 25
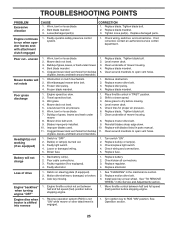
.... 4. Poor grass discharge Headlight(s) not working (if so equipped) 1. Engine speed too slow. 1. Travel speed too fast. 2. Replace with attachment clutch engaged 1. Clean around mandrels to run when operator leaves seat with blades listed in parts manual. 11. Loose or damaged wiring. 5. Blown...(s) or lamp(s) burned out. 3. Turn ignition key to slower speed. 3. Reverse operation system (ROS) is not "ON" while mower or other attachment is "OFF". 2. Worn, bent or loose blade. 2. Faulty regulator (if so equipped). 4. Worn, bent or loose blade. 2. Worn, bent...
.... 4. Poor grass discharge Headlight(s) not working (if so equipped) 1. Engine speed too slow. 1. Travel speed too fast. 2. Replace with attachment clutch engaged 1. Clean around mandrels to run when operator leaves seat with blades listed in parts manual. 11. Loose or damaged wiring. 5. Blown...(s) or lamp(s) burned out. 3. Turn ignition key to slower speed. 3. Reverse operation system (ROS) is not "ON" while mower or other attachment is "OFF". 2. Worn, bent or loose blade. 2. Faulty regulator (if so equipped). 4. Worn, bent or loose blade. 2. Worn, bent...
User Manual
Page 28
... to the original consumer purchaser that term as defined in the Magnuson-Moss Act of 1975. 28 Transportation charges for any power equipment unit or attachment are belts, blades, blade adapters, normal wear, normal adjustments, standard hardware and normal maintenance. 7. The Warranty period for any part which we will repair or...
... to the original consumer purchaser that term as defined in the Magnuson-Moss Act of 1975. 28 Transportation charges for any power equipment unit or attachment are belts, blades, blade adapters, normal wear, normal adjustments, standard hardware and normal maintenance. 7. The Warranty period for any part which we will repair or...