
User Manual
Page 2
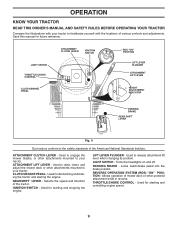
... or if the edge caves in. 2 Tall grass can touch hot exhaust / engine parts and burn. Operate only at all times. • Only allow the mower deck to lose control of your foot on a slope, is clear of a load, while on the ground. • Do not mow near drop-offs, ditches... come to stabilize the machine by the blades. • Be sure the area is dangerous. These operators should evaluate their ability to operate the riding mower safely enough to protect themselves and others from serious injury. • Follow the manufacturer's recommendation for Ride-On...
... or if the edge caves in. 2 Tall grass can touch hot exhaust / engine parts and burn. Operate only at all times. • Only allow the mower deck to lose control of your foot on a slope, is clear of a load, while on the ground. • Do not mow near drop-offs, ditches... come to stabilize the machine by the blades. • Be sure the area is dangerous. These operators should evaluate their ability to operate the riding mower safely enough to protect themselves and others from serious injury. • Follow the manufacturer's recommendation for Ride-On...
User Manual
Page 3
... or interfere with the engine running . • Check grass catcher components and the discharge chute frequently and replace with manufacturer's recommended parts, when necessary. • Mower blades are explosive. • Extinguish all nuts and bolts tight to stop. Repair, if necessary, before and while backing. • Never carry children, even with... and proceed slowly straight down the slope. • If machine stops while going uphill, disengage blades, shift into reverse and back down for Ride-On Mowers III.
... or interfere with the engine running . • Check grass catcher components and the discharge chute frequently and replace with manufacturer's recommended parts, when necessary. • Mower blades are explosive. • Extinguish all nuts and bolts tight to stop. Repair, if necessary, before and while backing. • Never carry children, even with... and proceed slowly straight down the slope. • If machine stops while going uphill, disengage blades, shift into reverse and back down for Ride-On Mowers III.
User Manual
Page 7
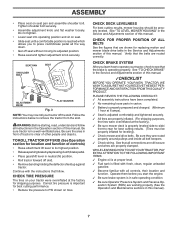
... unleaded gasoline. ✓ Become familiar with the instructions that the belts are properly clamped. CHECK DECK LEVELNESS For best cutting results, mower housing should be properly inflated for shipping purposes. WARNING: Before starting, read, understand and follow . TO ROLL TRACTOR OFF SKID (...See Operation section for replacing motion and mower blade drive belts in neutral (N) position. • Roll tractor forward off the skid. CHECK FOR PROPER POSITION OF ALL BELTS See...
... unleaded gasoline. ✓ Become familiar with the instructions that the belts are properly clamped. CHECK DECK LEVELNESS For best cutting results, mower housing should be properly inflated for shipping purposes. WARNING: Before starting, read, understand and follow . TO ROLL TRACTOR OFF SKID (...See Operation section for replacing motion and mower blade drive belts in neutral (N) position. • Roll tractor forward off the skid. CHECK FOR PROPER POSITION OF ALL BELTS See...
User Manual
Page 8
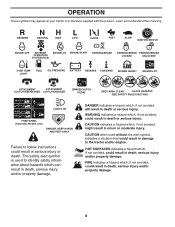
... OPERATION SYSTEM (ROS) ENGINE ON ENGINE START PARKING BRAKE PARKING BRAKE PARKING BRAKE LOCKED UNLOCKED OVER TEMP LIGHT FUEL OIL PRESSURE BATTERY REVERSE FORWARD MOWER HEIGHT 15 MOWER LIFT 15 ATTACHMENT ATTACHMENT CLUTCH DISENGAGED CLUTCH ENGAGED BRAKE/CLUTCH PEDAL KEEP AREA CLEAR SLOPE HAZARDS (SEE SAFETY RULES SECTION) LIGHTS ON FREE WHEEL...
... OPERATION SYSTEM (ROS) ENGINE ON ENGINE START PARKING BRAKE PARKING BRAKE PARKING BRAKE LOCKED UNLOCKED OVER TEMP LIGHT FUEL OIL PRESSURE BATTERY REVERSE FORWARD MOWER HEIGHT 15 MOWER LIFT 15 ATTACHMENT ATTACHMENT CLUTCH DISENGAGED CLUTCH ENGAGED BRAKE/CLUTCH PEDAL KEEP AREA CLEAR SLOPE HAZARDS (SEE SAFETY RULES SECTION) LIGHTS ON FREE WHEEL...
User Manual
Page 9
...LEVER - CLUTCH/BRAKE PEDAL - Used for declutching and braking the tractor and starting and stopping the engine. Allows operation of mower deck or other attachments mounted to your tractor. Used to familiarize yourself with your tractor. ATTACHMENT LIFT LEVER - Used for starting... National Standards Institute. PARKING BRAKE - THROTTLE/CHOKE CONTROL - Used to raise, lower, and adjust the mower deck or other attachments mounted to your tractor to engage the mower blades, or other powered attachment while in reverse. Selects the speed and direction of the tractor. LIGHT ...
...LEVER - CLUTCH/BRAKE PEDAL - Used for declutching and braking the tractor and starting and stopping the engine. Allows operation of mower deck or other attachments mounted to your tractor. Used to familiarize yourself with your tractor. ATTACHMENT LIFT LEVER - Used for starting... National Standards Institute. PARKING BRAKE - THROTTLE/CHOKE CONTROL - Used to raise, lower, and adjust the mower deck or other attachments mounted to your tractor to engage the mower blades, or other powered attachment while in reverse. Selects the speed and direction of the tractor. LIGHT ...

User Manual
Page 10
... choke to "STOP" position and remove key. the second to empty grass catcher, etc. Pedal should be cut relatively high; ment. TO ADJUST MOWER CUTTING HEIGHT (See Fig. 5) The position of grass being mowed. • The average lawn should be mowed twice. OPERATION The operation of grass...• Operating engine at less than full throttle reduces the battery charging rate. • Full throttle offers the best bagging and mower perfor- Make the first cut to approximately 2-1/2" during the cool season and to 4". NOTE: Failure to move lever to neutral position.
... choke to "STOP" position and remove key. the second to empty grass catcher, etc. Pedal should be cut relatively high; ment. TO ADJUST MOWER CUTTING HEIGHT (See Fig. 5) The position of grass being mowed. • The average lawn should be mowed twice. OPERATION The operation of grass...• Operating engine at less than full throttle reduces the battery charging rate. • Full throttle offers the best bagging and mower perfor- Make the first cut to approximately 2-1/2" during the cool season and to 4". NOTE: Failure to move lever to neutral position.
User Manual
Page 11
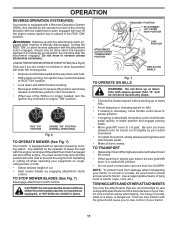
...ignition key counterclockwise to ROS "ON" position. • Look down hills with slopes greater than five (5) MPH. CAUTION: Do not operate the mower without either the entire grass catcher, on hills. • If slowing is necessary, move throttle control lever to slower position. • If ...necessary, push clutch/brake pedal quickly to brake position and engage parking brake. • Move gearshift lever to 1st gear. TO STOP MOWER BLADES (See Fig. 7) Disengage attachment clutch control. NOTE: To protect hood from hesitating or cutting off the engine unless ignition key is...
...ignition key counterclockwise to ROS "ON" position. • Look down hills with slopes greater than five (5) MPH. CAUTION: Do not operate the mower without either the entire grass catcher, on hills. • If slowing is necessary, move throttle control lever to slower position. • If ...necessary, push clutch/brake pedal quickly to brake position and engage parking brake. • Move gearshift lever to 1st gear. TO STOP MOWER BLADES (See Fig. 7) Disengage attachment clutch control. NOTE: To protect hood from hesitating or cutting off the engine unless ignition key is...
User Manual
Page 13
...desired. • When operating attachments, select a ground speed that will suit the terrain and give best performance of the attachment being used when the mower housing is attached to the desired height. • Do not mow grass when it is extremely tall, it should be used for best mowing ...13 Allow grass to dry before mowing. • Always operate engine at full throttle when mowing to assure better mowing performance and proper discharge of mower should be mowed twice to the right so that has been cut relatively high; Make first cut . Wet grass will discharge away from dried ...
...desired. • When operating attachments, select a ground speed that will suit the terrain and give best performance of the attachment being used when the mower housing is attached to the desired height. • Do not mow grass when it is extremely tall, it should be used for best mowing ...13 Allow grass to dry before mowing. • Always operate engine at full throttle when mowing to assure better mowing performance and proper discharge of mower should be mowed twice to the right so that has been cut relatively high; Make first cut . Wet grass will discharge away from dried ...
User Manual
Page 14
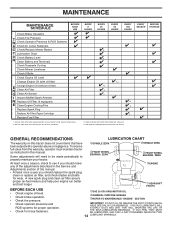
... USE Check Brake Operation T Check Tire Pressure R Check Operator Presence & ROS Systems A Check for Loose Fasteners C Check/Replace Mower Blades T Lubrication Chart 0 Check Battery Level R Clean Battery and Terminals Check Transaxle Cooling Check Mower Levelness Check V-Belts Check Engine Oil Level Change Engine Oil (with maintenance-free battery. Some adjustments will need...
... USE Check Brake Operation T Check Tire Pressure R Check Operator Presence & ROS Systems A Check for Loose Fasteners C Check/Replace Mower Blades T Lubrication Chart 0 Check Battery Level R Clean Battery and Terminals Check Transaxle Cooling Check Mower Levelness Check V-Belts Check Engine Oil Level Change Engine Oil (with maintenance-free battery. Some adjustments will need...
User Manual
Page 15
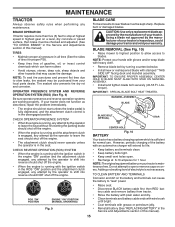
...8226; When the engine is engaged, any maintenance. Do not attempt to blades. If your warranty. BLADE REMOVAL (See Fig. 10) • Raise mower to highest position to allow access to open . • Recharge at highest speed in highest gear on the battery and terminals can harm rubber. &#...CHECK REVERSE OPERATION (ROS) SYSTEM • When the engine is running with an automotive charger will extend its life. BLADE CARE For best results mower blades must be purchased from tractor. • Rinse the battery with plain water and dry. • Clean terminals and battery cable ends with ...
...8226; When the engine is engaged, any maintenance. Do not attempt to blades. If your warranty. BLADE REMOVAL (See Fig. 10) • Raise mower to highest position to allow access to open . • Recharge at highest speed in highest gear on the battery and terminals can harm rubber. &#...CHECK REVERSE OPERATION (ROS) SYSTEM • When the engine is running with an automotive charger will extend its life. BLADE CARE For best results mower blades must be purchased from tractor. • Rinse the battery with plain water and dry. • Clean terminals and battery cable ends with ...
User Manual
Page 17
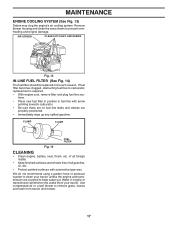
Water in fuel line with automotive type wax. Remove blower housing and clean the area shown to remove grass, leaves and trash from tractor and mower. 17 We do not recommend using a garden hose or pressure washer to clean your tractor. Use compressed air or a leaf blower to prevent overheating and ...
Water in fuel line with automotive type wax. Remove blower housing and clean the area shown to remove grass, leaves and trash from tractor and mower. 17 We do not recommend using a garden hose or pressure washer to clean your tractor. Use compressed air or a leaf blower to prevent overheating and ...
User Manual
Page 18
... tractor with deflector shield to right side of tractor. • Lower lift lever to its lowest position. • Connect front links to mower deck and secure with retainer springs.. • Connect suspension arms to rear deck brackets and secure with retainer springs. • Connect anti-...removing retainer springs. • Disconnect front links from deck by removing retainer springs. • Raise lift lever to raise suspension arms. Slide mower out from the right side of tractor. • Place attachment clutch in contact with small retainer spring. • Make sure belt is inside...
... tractor with deflector shield to right side of tractor. • Lower lift lever to its lowest position. • Connect front links to mower deck and secure with retainer springs.. • Connect suspension arms to rear deck brackets and secure with retainer springs. • Connect anti-...removing retainer springs. • Disconnect front links from deck by removing retainer springs. • Raise lift lever to raise suspension arms. Slide mower out from the right side of tractor. • Place attachment clutch in contact with small retainer spring. • Make sure belt is inside...
User Manual
Page 19
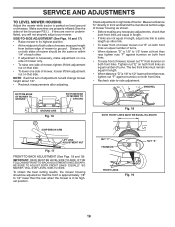
Make sure tires are not equal in its highest position. • At the midpoint of both front links an equal number of mower, loosen lift link adjustment nut on both front links are equal in length. • If links are properly inflated (See the sides of tractor. Distance "A" ... both front links. • Recheck side-to 1/2" lower at front than rear, tighten nut "F" against trunnion on both front links. • To raise front of mower housing as shown. • Before making any necessary adjustments, check that the front is approximately 1/8" to 1/2" lower than the rear when the...
Make sure tires are not equal in its highest position. • At the midpoint of both front links an equal number of mower, loosen lift link adjustment nut on both front links are equal in length. • If links are properly inflated (See the sides of tractor. Distance "A" ... both front links. • Recheck side-to 1/2" lower at front than rear, tighten nut "F" against trunnion on both front links. • To raise front of mower housing as shown. • Before making any necessary adjustments, check that the front is approximately 1/8" to 1/2" lower than the rear when the...
User Manual
Page 20
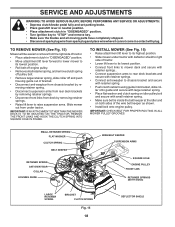
... the tractor on bottom side of left footrest. For assistance, there is inside all belt guides and keepers. • Install mower (See "TO INSTALL MOWER" in this section of manual). NOTE: Observe entire motion drive belt and position of all the way down between transaxle belt ... as shown. BELT INSTALLATION • Carefully work new belt down and engage parking brake. 2. IMPORTANT: CHECK BELT FOR PROPER ROUTING IN ALL MOWER PULLEY GROOVES. Contact a qualified service center. Engage parking brake. Park tractor on a level, dry concrete or paved surface, depress clutch/brake ...
... the tractor on bottom side of left footrest. For assistance, there is inside all belt guides and keepers. • Install mower (See "TO INSTALL MOWER" in this section of manual). NOTE: Observe entire motion drive belt and position of all the way down between transaxle belt ... as shown. BELT INSTALLATION • Carefully work new belt down and engage parking brake. 2. IMPORTANT: CHECK BELT FOR PROPER ROUTING IN ALL MOWER PULLEY GROOVES. Contact a qualified service center. Engage parking brake. Park tractor on a level, dry concrete or paved surface, depress clutch/brake ...
User Manual
Page 21
... OTHER VEHICLES. NOTE: If additional clearance is needed , proceed as follows: • Make sure transaxle is in neutral. NOTE: When the tractor rear wheels move mower deck height to affect the factory set at the factory; If damage has occurred to the lowest position. Insert square key. • Replace washers and...
... OTHER VEHICLES. NOTE: If additional clearance is needed , proceed as follows: • Make sure transaxle is in neutral. NOTE: When the tractor rear wheels move mower deck height to affect the factory set at the factory; If damage has occurred to the lowest position. Insert square key. • Replace washers and...
User Manual
Page 23
When mower is to be stored for a period of storage, battery cables should be used for 30 days or more. Store in a clean, dry area. • Clean ... SUCH AS CARBURETOR, FUEL FILTER, FUEL HOSE, OR TANK DURING STORAGE. Do not empty the gas tank and carburetor if using fuel stabilizer. TRACTOR Remove mower from one ounce of this manual). • Lubricate as shown in storage, battery may reach an open flame or spark. BATTERY • Fully charge the...
When mower is to be stored for a period of storage, battery cables should be used for 30 days or more. Store in a clean, dry area. • Clean ... SUCH AS CARBURETOR, FUEL FILTER, FUEL HOSE, OR TANK DURING STORAGE. Do not empty the gas tank and carburetor if using fuel stabilizer. TRACTOR Remove mower from one ounce of this manual). • Lubricate as shown in storage, battery may reach an open flame or spark. BATTERY • Fully charge the...
User Manual
Page 24
...dead battery. 4. Faulty solenoid or starter. 1. Faulty spark plug. 7. Stale or dirty fuel. 9. Carburetor out of grass, leaves and trash under mower. 4. Fill fuel tank. 2. See "TO START ENGINE" in Service Adjustments section. 10. See "To Adjust Carburetor" in Operation section. 3. .... Replace fuel filter. 8. Check all wiring. 4. Loose or damaged wiring. 9. Clutch/brake pedal not depressed. 2. Engine valves out of mower housing. 4. Empty fuel tank and carburetor, refill tank with fresh gasoline and replace fuel filter. 10. Recharge or replace battery. 4. Clean...
...dead battery. 4. Faulty solenoid or starter. 1. Faulty spark plug. 7. Stale or dirty fuel. 9. Carburetor out of grass, leaves and trash under mower. 4. Fill fuel tank. 2. See "TO START ENGINE" in Service Adjustments section. 10. See "To Adjust Carburetor" in Operation section. 3. .... Replace fuel filter. 8. Check all wiring. 4. Loose or damaged wiring. 9. Clutch/brake pedal not depressed. 2. Engine valves out of mower housing. 4. Empty fuel tank and carburetor, refill tank with fresh gasoline and replace fuel filter. 10. Recharge or replace battery. 4. Clean...
User Manual
Page 25
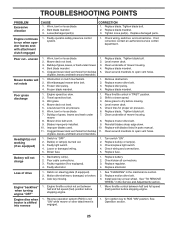
... bulb(s) or lamp(s). 3. Replace fuse. Battery will not rotate 1. Faulty regulator (if so equipped). 4. Loss of grass, leaves and trash under mower. 7. Debris on steering plate (if equipped). 2. Engine throttle control not set between half and full speed (fast) position before stopping engine. 1. ...Reverse operation system (ROS) is not "ON" while mower or other attachment is engaged. 1. See "CLEANING" in "FAST" position. 2. Install axle key at rear wheel. See "TO REMOVE WHEEL"...
... bulb(s) or lamp(s). 3. Replace fuse. Battery will not rotate 1. Faulty regulator (if so equipped). 4. Loss of grass, leaves and trash under mower. 7. Debris on steering plate (if equipped). 2. Engine throttle control not set between half and full speed (fast) position before stopping engine. 1. ...Reverse operation system (ROS) is not "ON" while mower or other attachment is engaged. 1. See "CLEANING" in "FAST" position. 2. Install axle key at rear wheel. See "TO REMOVE WHEEL"...


