
User Manual
Page 2
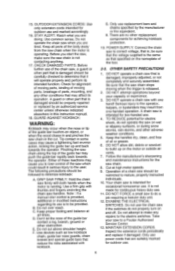
... 7 BAR / CHAIN MAINTENANCE 17 7-1. Assembly Requirements 3-3. Chain and Bar Lubrication 4-4. Felling 5-2. Bucking Using a Sawhorse 6 BAR / CHAIN MAINTENANCE 15 6-1. More About Kickback 2-6. Limbing 5-3. General Identification 1-2. Filling Oil Tank 3-6. To Stop Saw 4-3. Safety Features 1-3 Glossary 1-4. Specificatioin 2 SAFETY PRECAUTIONS 5 2-1. General Safety Precautions for Your Saw Model 4 OPERATING INSTRUCTIONS 11 4-1. Selecting the Proper Extension Cord...
... 7 BAR / CHAIN MAINTENANCE 17 7-1. Assembly Requirements 3-3. Chain and Bar Lubrication 4-4. Felling 5-2. Bucking Using a Sawhorse 6 BAR / CHAIN MAINTENANCE 15 6-1. More About Kickback 2-6. Limbing 5-3. General Identification 1-2. Filling Oil Tank 3-6. To Stop Saw 4-3. Safety Features 1-3 Glossary 1-4. Specificatioin 2 SAFETY PRECAUTIONS 5 2-1. General Safety Precautions for Your Saw Model 4 OPERATING INSTRUCTIONS 11 4-1. Selecting the Proper Extension Cord...
User Manual
Page 3
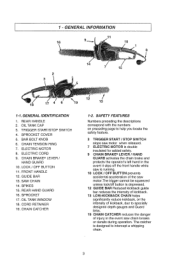
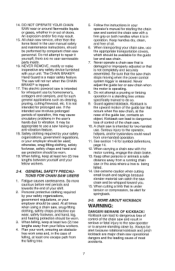
OIL TANK WINDOW 18. 1- ELECTRIC CORD 9. SAW CHAIN 14. SPROCKET 17. SAFETY FEATURES Numbers preceding the descriptions correspond with the numbers on preceding page to help ... is designed to specially designed depth gauges and Guard links. 19 CHAIN CATCHER reduces the danger of the saw chain breaks or derails during operation. OIL TANK CAP 3. GUIDE BAR 13. CHAIN CATCHER 1-2. REAR HANDLE 2. CHAIN BRAKEvo LEVER / HAND GUARD 10. REAR HAND GUARD 16. The catcher is depressed. 12 GUIDE...
OIL TANK WINDOW 18. 1- ELECTRIC CORD 9. SAW CHAIN 14. SPROCKET 17. SAFETY FEATURES Numbers preceding the descriptions correspond with the numbers on preceding page to help ... is designed to specially designed depth gauges and Guard links. 19 CHAIN CATCHER reduces the danger of the saw chain breaks or derails during operation. OIL TANK CAP 3. GUIDE BAR 13. CHAIN CATCHER 1-2. REAR HANDLE 2. CHAIN BRAKEvo LEVER / HAND GUARD 10. REAR HAND GUARD 16. The catcher is depressed. 12 GUIDE...
User Manual
Page 4
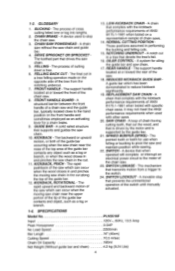
... guide bar and saw and maintain position while sawing. 22. Input Peak Horsepower No Load Speed Bar Length Cutting Speed Chain Oil Capacity Net Weight (Without guide bar and chain) 4 PLN3516F 120V-, 60Hz, 13.5 Amp 3.5HP 5500/min 16" (40cm) 10.5 m/sec 180m1 4.2 kg (9.24 Lbs) CHAIN BRAKE - A solid railed structure that...
... guide bar and saw and maintain position while sawing. 22. Input Peak Horsepower No Load Speed Bar Length Cutting Speed Chain Oil Capacity Net Weight (Without guide bar and chain) 4 PLN3516F 120V-, 60Hz, 13.5 Amp 3.5HP 5500/min 16" (40cm) 10.5 m/sec 180m1 4.2 kg (9.24 Lbs) CHAIN BRAKE - A solid railed structure that...
User Manual
Page 5
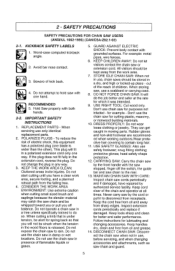
... kar 5. head safety chaps protection. 12. CARRYING SAW: Carry the chain saw by the front handle with one hand. Keep the cord free from oil and away from oil and grease. 14. When servicing use safety footwear; POLARIZED PLUGS - Do not change the plug in moving parts. Don't use , before servicing, and...
... kar 5. head safety chaps protection. 12. CARRYING SAW: Carry the chain saw by the front handle with one hand. Keep the cord free from oil and away from oil and grease. 14. When servicing use safety footwear; POLARIZED PLUGS - Do not change the plug in moving parts. Don't use , before servicing, and...
User Manual
Page 6
... . Keep all times. Either of the body away from one hand! Use a firm grip with one -handed operation. C. Don't let the nose of oil or grease. 6. F. There are doing. POWER SUPPLY: Connect the chain saw to correct voltage, that is, be restricted to build up and back towards... saw that it will operate properly and perform its use power cords that is not made for electric shock, do not operate the saw to a Poulan Authorized Service Center. 13. Keep the handles dry, clean, and free of the guide bar contact a log, branch, ground or other adverse weather conditions...
... . Keep all times. Either of the body away from one hand! Use a firm grip with one -handed operation. C. Don't let the nose of oil or grease. 6. F. There are doing. POWER SUPPLY: Connect the chain saw to correct voltage, that is, be restricted to build up and back towards... saw that it will operate properly and perform its use power cords that is not made for electric shock, do not operate the saw to a Poulan Authorized Service Center. 13. Keep the handles dry, clean, and free of the guide bar contact a log, branch, ground or other adverse weather conditions...
User Manual
Page 7
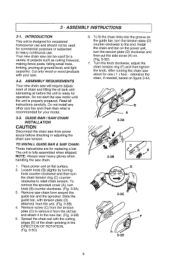
... trained to anyone standing close by your safety organizations, government regulations, or your shift. 2. Be more cautious before rest periods and towards the end of oil. 6.
... trained to anyone standing close by your safety organizations, government regulations, or your shift. 2. Be more cautious before rest periods and towards the end of oil. 6.
User Manual
Page 9
... unit is ready for commercial purposes or subjected to the end. Spread the chain out with the cutting edges (E) of chain and filling the oil tank with lubricating oil before checking or adjusting the chain saw about for replacing a bar. Turn the knob clockwise, adjust the chain tension ring (F) and then tighten...
... unit is ready for commercial purposes or subjected to the end. Spread the chain out with the cutting edges (E) of chain and filling the oil tank with lubricating oil before checking or adjusting the chain saw about for replacing a bar. Turn the knob clockwise, adjust the chain tension ring (F) and then tighten...
User Manual
Page 10
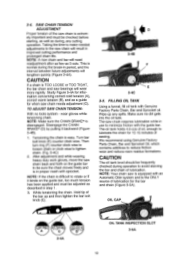
...up and then tighten the bar bolt knob (E). 3-4B 3-4C 3-5. NOTE: Your chain saw is equipped with the guide bar. OIL CAP o c A 3-4A OIL TANK INSPECTION SLOT 3-5A 10 Taking the time to make needed adjustments to minimize friction with an Automatic Oiler system and is difficult to... will need readjustment after as few as a guide for 12-15 minutes of sawing. We recommend using Genuine Factory Parts Chain, Bar and Sprocket Oil, which contains additives to tighten chain. (Fig. 3-4C) 2. wear gloves while tensioning chain. Disengage the CHAIN BRAKER- (D) by pulling it ...
...up and then tighten the bar bolt knob (E). 3-4B 3-4C 3-5. NOTE: Your chain saw is equipped with the guide bar. OIL CAP o c A 3-4A OIL TANK INSPECTION SLOT 3-5A 10 Taking the time to make needed adjustments to minimize friction with an Automatic Oiler system and is difficult to... will need readjustment after as few as a guide for 12-15 minutes of sawing. We recommend using Genuine Factory Parts Chain, Bar and Sprocket Oil, which contains additives to tighten chain. (Fig. 3-4C) 2. wear gloves while tensioning chain. Disengage the CHAIN BRAKER- (D) by pulling it ...
User Manual
Page 12
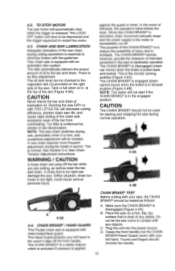
...can jump off the front handle. NOTE: The motor will automatically stop when the trigger is carelessly operated. CHAIN BRAKE® I HAND GUARD This Poulan chain saw is applied CHAIN BRAKE® TEST Before cutting with your saw is released. The CHAIN BRAKE® is a safety feature which is ...slot (A) provided on a firm, flat, dry surface that is new, and occasional adjustment will have to reduce the possibility of any objects. The oil tank level can damage the saw DRY or with your left hand. Running the saw . NOTE: The saw chain stretches during use, particularly when it...
...can jump off the front handle. NOTE: The motor will automatically stop when the trigger is carelessly operated. CHAIN BRAKE® I HAND GUARD This Poulan chain saw is applied CHAIN BRAKE® TEST Before cutting with your saw is released. The CHAIN BRAKE® is a safety feature which is ...slot (A) provided on a firm, flat, dry surface that is new, and occasional adjustment will have to reduce the possibility of any objects. The oil tank level can damage the saw DRY or with your left hand. Running the saw . NOTE: The saw chain stretches during use, particularly when it...
User Manual
Page 16
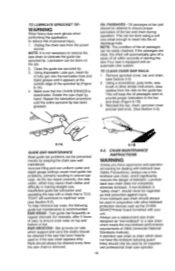
... the low-kickback performance requirements of ANSI (American National Standards Institute). A standard saw chain appears dirty. This will keep the oil passages open to provide proper lubrication to ensure proper lubrication of the bar and chain during operation. Reinstall the bar, chain, ... the CHAIN BRAKEVHand Guard furnished with kickback (see Section 3.3) 2. Using disposable Lube gun, insert tip of lube gun into the oil discharge hole. Turn guide bar frequently at regular intervals (for dealing with your unit. TO LUBRICATE SPROCKET TIP: WARNING Wear heavy...
... the low-kickback performance requirements of ANSI (American National Standards Institute). A standard saw chain appears dirty. This will keep the oil passages open to provide proper lubrication to ensure proper lubrication of the bar and chain during operation. Reinstall the bar, chain, ... the CHAIN BRAKEVHand Guard furnished with kickback (see Section 3.3) 2. Using disposable Lube gun, insert tip of lube gun into the oil discharge hole. Turn guide bar frequently at regular intervals (for dealing with your unit. TO LUBRICATE SPROCKET TIP: WARNING Wear heavy...
User Manual
Page 17
...cleaned, or maintenance is normal. A double insulated appliance is working properly. Clean with Genuine Factory Parts Chain, Bar and Sprocket Oil. Sharpen as five (5) cuts. The CHAIN BRAKE'S/Hand Guard and low-kickback saw dry or with lifetime lubricated bearings. 17 ...the interval between future adjustments will become worn, resulting in this double insulated appliance, 2 systems of insulation, instead of lubricating oil. PREVENTIVE MAINTENANCE WARNING© SERVICING A DOUBLE INSULATED APPLIANCE In this manual, you will need readjustment after each use to ensure...
...cleaned, or maintenance is normal. A double insulated appliance is working properly. Clean with Genuine Factory Parts Chain, Bar and Sprocket Oil. Sharpen as five (5) cuts. The CHAIN BRAKE'S/Hand Guard and low-kickback saw dry or with lifetime lubricated bearings. 17 ...the interval between future adjustments will become worn, resulting in this double insulated appliance, 2 systems of insulation, instead of lubricating oil. PREVENTIVE MAINTENANCE WARNING© SERVICING A DOUBLE INSULATED APPLIANCE In this manual, you will need readjustment after each use to ensure...
Parts List
Page 1
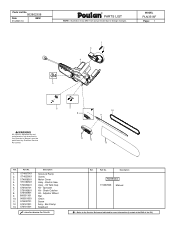
... 7. 576180801 8. 576180901 9. 966051301 10. 966051603 11. 574630701 12. 576181301 13. 576181501 Description Screw (2 Pack) Screw Motor Cover Assy - Oil Tank Cap Kit - Description Not Shown 115367826 Manual = Refer to design changes. Part No. Bar Clamp Scabbard = New Part Number For This... IPL Ref. MODEL PLN3516F Page: 1 1 3 2 4 5 WARNING All repairs, adjustments and maintenance not described in the Operator's Manual must be performed by Qualified...
... 7. 576180801 8. 576180901 9. 966051301 10. 966051603 11. 574630701 12. 576181301 13. 576181501 Description Screw (2 Pack) Screw Motor Cover Assy - Oil Tank Cap Kit - Description Not Shown 115367826 Manual = Refer to design changes. Part No. Bar Clamp Scabbard = New Part Number For This... IPL Ref. MODEL PLN3516F Page: 1 1 3 2 4 5 WARNING All repairs, adjustments and maintenance not described in the Operator's Manual must be performed by Qualified...


