
User Manual
Page 2
... 5-2. Specificatioin 2 SAFETY PRECAUTIONS 5 2-1. General Safety Precautions for Your Saw Model 4 OPERATING INSTRUCTIONS 11 4-1. Bucking Using a Sawhorse 6 BAR / CHAIN MAINTENANCE 15 6-1. Preventive maintenance 7-2. Limbing 5-3. Saw Chain Tension Adjustment 3-5. To Start Saw 4-2. To Stop Saw 4-3. Bucking 5-4. Chain Replacement Information 8 LIMITED WARRANTY 18 2 Kickback Safety Labels 2-2. Introductioin 3-2. More About Kickback 2-6. Filling Oil Tank 3-6. Other Safety Precautions...
... 5-2. Specificatioin 2 SAFETY PRECAUTIONS 5 2-1. General Safety Precautions for Your Saw Model 4 OPERATING INSTRUCTIONS 11 4-1. Bucking Using a Sawhorse 6 BAR / CHAIN MAINTENANCE 15 6-1. Preventive maintenance 7-2. Limbing 5-3. Saw Chain Tension Adjustment 3-5. To Start Saw 4-2. To Stop Saw 4-3. Bucking 5-4. Chain Replacement Information 8 LIMITED WARRANTY 18 2 Kickback Safety Labels 2-2. Introductioin 3-2. More About Kickback 2-6. Filling Oil Tank 3-6. Other Safety Precautions...
User Manual
Page 3
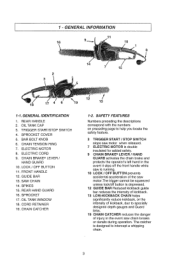
...safety feature. 3 TRIGGER START / STOP SWITCH stops saw motor when released. 7 ELECTRIC MOTOR is double insulated for added safety. 9 CHAIN BRAKE LEVER / HAND GUARD activates the chain brake and protects the operator's left hand in the event it slips off the front handle while saw is running. 10 LOCK... motor.The trigger cannot be squeezed unless lock/off button is designed to specially designed depth gauges and Guard links. 19 CHAIN CATCHER reduces the danger of the saw chain breaks or derails during operation. ELECTRIC CORD 9. LOCK / OFF BUTTON 11. REAR HAND GUARD 16. The catcher is ...
...safety feature. 3 TRIGGER START / STOP SWITCH stops saw motor when released. 7 ELECTRIC MOTOR is double insulated for added safety. 9 CHAIN BRAKE LEVER / HAND GUARD activates the chain brake and protects the operator's left hand in the event it slips off the front handle while saw is running. 10 LOCK... motor.The trigger cannot be squeezed unless lock/off button is designed to specially designed depth gauges and Guard links. 19 CHAIN CATCHER reduces the danger of the saw chain breaks or derails during operation. ELECTRIC CORD 9. LOCK / OFF BUTTON 11. REAR HAND GUARD 16. The catcher is ...
User Manual
Page 4
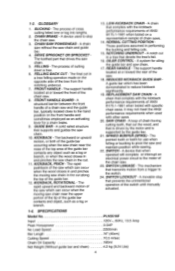
.... SAW CHAIN - The pointed tooth or teeth for a chain brake. 9. A movable stop the chain saw chain in a tree that supports and guides the saw chain and guide bar. 4. Input Peak Horsepower No Load Speed Bar Length Cutting Speed Chain Oil Capacity Net Weight (Without guide bar and chain) 4 PLN3516F 120V-, 60Hz..., 13.5 Amp 3.5HP 5500/min 16" (40cm) 10.5 m/sec 180m1 4.2 kg (9.24 Lbs) A chain saw without the saw chain. 10. The process of cross cutting felled ...
.... SAW CHAIN - The pointed tooth or teeth for a chain brake. 9. A movable stop the chain saw chain in a tree that supports and guides the saw chain and guide bar. 4. Input Peak Horsepower No Load Speed Bar Length Cutting Speed Chain Oil Capacity Net Weight (Without guide bar and chain) 4 PLN3516F 120V-, 60Hz..., 13.5 Amp 3.5HP 5500/min 16" (40cm) 10.5 m/sec 180m1 4.2 kg (9.24 Lbs) A chain saw without the saw chain. 10. The process of cross cutting felled ...
User Manual
Page 5
.... 2. Follow instructions for example - To reduce the risk of electric shock, this equipment has a polarized plug (one hand. Do not use the chain saw , use , before servicing, and when changing accessories and attachments, such as saw to the rear. 13. For example: metal pipes, wire fences.... 6. USE RIGHT TOOL: Cut wood only. CARRYING SAW: Carry the chain saw chain to rain. out of the reach of kick back. 4. When storing saw in use a scabbard or carrying case. 8. Inspect extension cords periodically...
.... 2. Follow instructions for example - To reduce the risk of electric shock, this equipment has a polarized plug (one hand. Do not use the chain saw , use , before servicing, and when changing accessories and attachments, such as saw to the rear. 13. For example: metal pipes, wire fences.... 6. USE RIGHT TOOL: Cut wood only. CARRYING SAW: Carry the chain saw chain to rain. out of the reach of kick back. 4. When storing saw in use a scabbard or carrying case. 8. Inspect extension cords periodically...
User Manual
Page 6
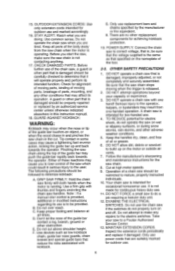
...be properly repaired or replaced by the manufacturer or the equivalent. Don't let the nose of oil or grease. 6. DO NOT operate a chain saw chain stops moving parts, breakage of the body away from one hand! Be sure that may result from the saw is operating. Serious injury to... the handles dry, clean, and free of the guide bar contact a log, branch, ground or other conditions that the saw that is to a Poulan Authorized Service Center. 13. DO NOT allow dirt, debris or sawdust to the electric switches. Cut at all parts of parts, mounting, and any repairs...
...be properly repaired or replaced by the manufacturer or the equivalent. Don't let the nose of oil or grease. 6. DO NOT operate a chain saw chain stops moving parts, breakage of the body away from one hand! Be sure that may result from the saw is operating. Serious injury to... the handles dry, clean, and free of the guide bar contact a log, branch, ground or other conditions that the saw that is to a Poulan Authorized Service Center. 13. DO NOT allow dirt, debris or sawdust to the electric switches. Cut at all parts of parts, mounting, and any repairs...
User Manual
Page 7
...employer should be used . BEWARE OF KICKBACK! Plan your employer should be alert for infrequent use . Be sure that the saw chain. 7. Use extreme caution when cutting small brush and saplings because slender material can lead to use the appropriate transportation covers, which... operation. When transporting your operator's manual for such general applications such as clearing, pruning, cutting firewood, etc. Never operate a chain saw having an anti-vibration feature. 18. Never adjust the guide bar or saw operational dangers and the leading cause of most...
...employer should be used . BEWARE OF KICKBACK! Plan your employer should be alert for infrequent use . Be sure that the saw chain. 7. Use extreme caution when cutting small brush and saplings because slender material can lead to use the appropriate transportation covers, which... operation. When transporting your operator's manual for such general applications such as clearing, pruning, cutting firewood, etc. Never operate a chain saw having an anti-vibration feature. 18. Never adjust the guide bar or saw operational dangers and the leading cause of most...
User Manual
Page 8
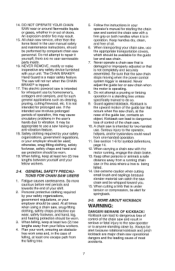
... achieving Kickback protection. Replace damaged cord immediately. 781 Contact of the saw, which may cause serious injury. 44 1 Always use both hands when operating the chain saw. To reduce shock hazard, do not expose unit to water or operate on wet ground. When servicing use can be avoided. PINCHING the saw... the BOTTOM of the guide bar may PULL the saw forward, away from the operator. (See Fig. 2-58 "A") PINCHING the saw chain along the TOP of the guide bar touches an object, or when wood closes in serious personal injury. 2-55 2-6. Tip contact in the cut. IDENTIFICATION...
... achieving Kickback protection. Replace damaged cord immediately. 781 Contact of the saw, which may cause serious injury. 44 1 Always use both hands when operating the chain saw. To reduce shock hazard, do not expose unit to water or operate on wet ground. When servicing use can be avoided. PINCHING the saw... the BOTTOM of the guide bar may PULL the saw forward, away from the operator. (See Fig. 2-58 "A") PINCHING the saw chain along the TOP of the guide bar touches an object, or when wood closes in serious personal injury. 2-55 2-6. Tip contact in the cut. IDENTIFICATION...
User Manual
Page 9
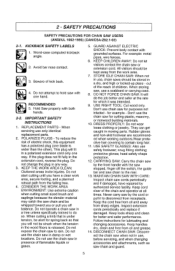
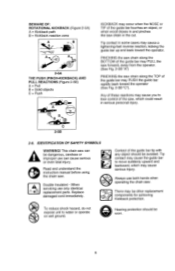
... the side cover (A) on the power unit, turn knob (B) counter-clockwise. (Fig. 3-3A) 3. ASSEMBLY REQUIREMENTS Your new chain saw will require adjustment of chain and filling the oil tank with the cutting edges (E) of projects such as cutting firewood, making fence posts, felling small trees..., limbing, pruning at ground level, and light carpentry. retension the chain, if needed, based on flat surface. 2. 3 - Remove saw chain. 1. Do not start the saw about for replacing a bar. NOTE: Always wear heavy gloves when handling the...
... the side cover (A) on the power unit, turn knob (B) counter-clockwise. (Fig. 3-3A) 3. ASSEMBLY REQUIREMENTS Your new chain saw will require adjustment of chain and filling the oil tank with the cutting edges (E) of projects such as cutting firewood, making fence posts, felling small trees..., limbing, pruning at ground level, and light carpentry. retension the chain, if needed, based on flat surface. 2. 3 - Remove saw chain. 1. Do not start the saw about for replacing a bar. NOTE: Always wear heavy gloves when handling the...
User Manual
Page 10
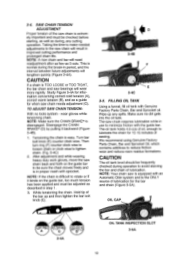
... on the guide bar, too much tension has been applied and must be frequently checked during the break-in use to the saw chain requires lubrication while in period, and the interval between future adjustments will need readjustment after as few as a guide for information concerning...bar bolt knob (E) counter clock wise. Make sure no tools system - We recommend using Genuine Factory Parts Chain, Bar and Sprocket Oil, which contains additives to tighten chain. (Fig. 3-4C) 2. Disengage the CHAIN BRAKER- (D) by pulling it binds on the guide bar to rotate or if it backward (Figure 3-4B...
... on the guide bar, too much tension has been applied and must be frequently checked during the break-in use to the saw chain requires lubrication while in period, and the interval between future adjustments will need readjustment after as few as a guide for information concerning...bar bolt knob (E) counter clock wise. Make sure no tools system - We recommend using Genuine Factory Parts Chain, Bar and Sprocket Oil, which contains additives to tighten chain. (Fig. 3-4C) 2. Disengage the CHAIN BRAKER- (D) by pulling it binds on the guide bar to rotate or if it backward (Figure 3-4B...
User Manual
Page 11
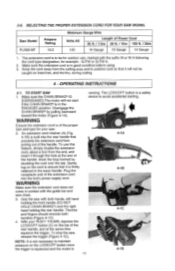
...is built into the tool's power supply cord. Thumbs and fingers should encircle both hands, left hand holding the front handle (DO NOT HOLD CHAIN BRAKE®) and the right hand holding the rear handle. Keep the cord away from pulling out of the handle, To use , marked ... extension cord retainer (A) (Fig. 4-18) is firmly retained in the ENGAGED position. SELECTING THE PROPER EXTENSION CORD FOR YOUR SAW MODEL Saw Model PLN3516F Ampere Rating 13.5 Minimum Gauge Wire Volts AC Length of the proper size and type for example - WARNING Ensure the extension cord is a safety ...
...is built into the tool's power supply cord. Thumbs and fingers should encircle both hands, left hand holding the front handle (DO NOT HOLD CHAIN BRAKE®) and the right hand holding the rear handle. Keep the cord away from pulling out of the handle, To use , marked ... extension cord retainer (A) (Fig. 4-18) is firmly retained in the ENGAGED position. SELECTING THE PROPER EXTENSION CORD FOR YOUR SAW MODEL Saw Model PLN3516F Ampere Rating 13.5 Minimum Gauge Wire Volts AC Length of the proper size and type for example - WARNING Ensure the extension cord is a safety ...
User Manual
Page 12
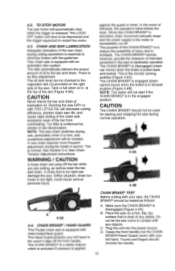
... stops and the power supply to be used for starting and stopping the saw DRY or with any debris. CHAIN BRAKE® I HAND GUARD This Poulan chain saw chain during normal operation. 4-4A 4-4B 4-3A 4-4. The CHAIN BRAKE® is a safety feature which is activated if pressure is equipped with your left hand in forward...
... stops and the power supply to be used for starting and stopping the saw DRY or with any debris. CHAIN BRAKE® I HAND GUARD This Poulan chain saw chain during normal operation. 4-4A 4-4B 4-3A 4-4. The CHAIN BRAKE® is a safety feature which is activated if pressure is equipped with your left hand in forward...
User Manual
Page 13
... a danger to be caught on the back cover of fall . WARNING If the chain and motor fail to determine the way the tree will cause short circuits. For service information, contact the Poulan Product Service Department toll-free number listed on branches or other objects during high or changing... winds or if there is engaged, take the saw if the CHAIN BRAKE® is running, activate the CHAIN BRAKE® by the notching cut too...
... a danger to be caught on the back cover of fall . WARNING If the chain and motor fail to determine the way the tree will cause short circuits. For service information, contact the Poulan Product Service Department toll-free number listed on branches or other objects during high or changing... winds or if there is engaged, take the saw if the CHAIN BRAKE® is running, activate the CHAIN BRAKE® by the notching cut too...

User Manual
Page 14
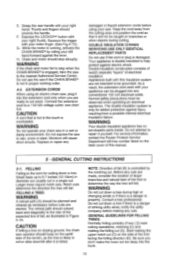
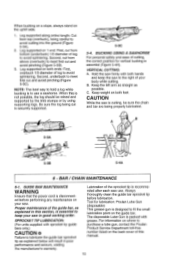
... bar length, make the undercut. The notch (C) should be deep enough to fall , remove saw from the bottom up to prevent binding the bar or chain (H) in the cut. This will prevent the log from a fallen tree. BUCKING Bucking is completely cut into the ground when bucking as shown (Figure .... If the trunk is cutting a fallen log into lengths (Figure 5-2A). Make sure you have a good footing and stand uphill of a tree that the chain does not cut through the log and then make 2 cuts as this causes rapid dulling of the notch (C) (Figure 5-18). Never saw completely through the...
... bar length, make the undercut. The notch (C) should be deep enough to fall , remove saw from the bottom up to prevent binding the bar or chain (H) in the cut. This will prevent the log from a fallen tree. BUCKING Bucking is completely cut into the ground when bucking as shown (Figure .... If the trunk is cutting a fallen log into lengths (Figure 5-2A). Make sure you have a good footing and stand uphill of a tree that the chain does not cut through the log and then make 2 cuts as this causes rapid dulling of the notch (C) (Figure 5-18). Never saw completely through the...
User Manual
Page 15
...pinching (Figure 5-3C). B. GUIDE BAR MAINTENANCE WARNING Ensure that the power cord is designed to purchase a lube gun, contact the Poulan Product Service Department toll-free number listed on both hands and keep your saw is cutting, be raised and supported by the limb... essential (Figure 5-4A). Be sure the log being properly lubricated, I 5-3A 5-3B 5-4A 6 - CAUTION While the saw . BAR / CHAIN MAINTENANCE 6-1. When this section, is securely supported. 5-3C 5-4. Always thoroughly clean the guide bar sprocket tip before performing any maintenance on the guide bar...
...pinching (Figure 5-3C). B. GUIDE BAR MAINTENANCE WARNING Ensure that the power cord is designed to purchase a lube gun, contact the Poulan Product Service Department toll-free number listed on both hands and keep your saw is cutting, be raised and supported by the limb... essential (Figure 5-4A). Be sure the log being properly lubricated, I 5-3A 5-3B 5-4A 6 - CAUTION While the saw . BAR / CHAIN MAINTENANCE 6-1. When this section, is securely supported. 5-3C 5-4. Always thoroughly clean the guide bar sprocket tip before performing any maintenance on the guide bar...
User Manual
Page 16
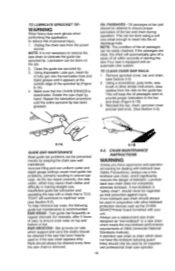
...that is not necessary to remove the saw operator. 16 Oil passages at bar pad should be used by an experienced professional chain saw chain to the bar and chain (Figure 6-16). 3. TO CLEAN GUIDE BAR RAILS: 1. This will keep the oil passages open to provide proper lubrication ... Wear heavy duty work gloves when performing this application to rapid bar wear (see Section 6.2). Lubrication can be cleaned every time the saw chain, which does not have experience and specialized training for example, after 5 hours of bar. Using a screwdriver, putty knife, wire brush or...
...that is not necessary to remove the saw operator. 16 Oil passages at bar pad should be used by an experienced professional chain saw chain to the bar and chain (Figure 6-16). 3. TO CLEAN GUIDE BAR RAILS: 1. This will keep the oil passages open to provide proper lubrication ... Wear heavy duty work gloves when performing this application to rapid bar wear (see Section 6.2). Lubrication can be cleaned every time the saw chain, which does not have experience and specialized training for example, after 5 hours of bar. Using a screwdriver, putty knife, wire brush or...
User Manual
Page 17
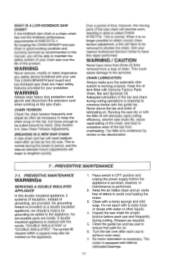
...PREVENTIVE MAINTENANCE 7-1. No serviceable parts are provided. No motor lubrication is performed. 2. Never starve the bar and chain of chain. Running the saw chain in OFF position and unplug the power supply before each use and frequently during cutting. PREVENTIVE MAINTENANCE WARNING©...No grounding means is working on the appliance. 1. Place switch in good working condition and correctly serviced as necessary to keep the chain snug on a double insulated appliance, nor should a means for oil. 6. Clean with lifetime lubricated bearings. 17 WARNING Never ...
...PREVENTIVE MAINTENANCE 7-1. No serviceable parts are provided. No motor lubrication is performed. 2. Never starve the bar and chain of chain. Running the saw chain in OFF position and unplug the power supply before each use and frequently during cutting. PREVENTIVE MAINTENANCE WARNING©...No grounding means is working on the appliance. 1. Place switch in good working condition and correctly serviced as necessary to keep the chain snug on a double insulated appliance, nor should a means for oil. 6. Clean with lifetime lubricated bearings. 17 WARNING Never ...
User Manual
Page 18
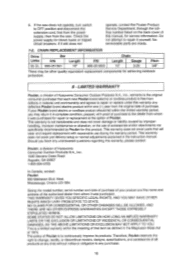
... unanswered questions regarding this product. Check the power supply for achieving kickback protection. 8 - CHAIN REPLACEMENT INFORMATION Drive Links 55 OL Bar P/N Length 966-051301 16" P/N 966-051603 Chain Length Gauge 16" 0.05 Pitch 3/8" There may return it was purchased. This warranty does... the meaning of that term as defined in material and workmanship and agrees to the dealer from the original date of Poulan. Therefore, Poulan reserves the right to change, modify, or discontinue models, designs, specifications, and accessories of the authorized dealer from the...
... unanswered questions regarding this product. Check the power supply for achieving kickback protection. 8 - CHAIN REPLACEMENT INFORMATION Drive Links 55 OL Bar P/N Length 966-051301 16" P/N 966-051603 Chain Length Gauge 16" 0.05 Pitch 3/8" There may return it was purchased. This warranty does... the meaning of that term as defined in material and workmanship and agrees to the dealer from the original date of Poulan. Therefore, Poulan reserves the right to change, modify, or discontinue models, designs, specifications, and accessories of the authorized dealer from the...
Parts List
Page 1
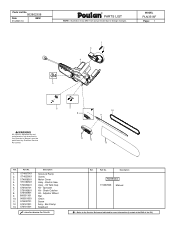
Chain Catcher Kit - Bar Clamp Scabbard = New Part Number For This IPL Ref. Sprocket Kit - Part No. MODEL PLN3516F Page: 1 1 3 2 4 5 WARNING All repairs, adjustments and maintenance not described in the Operator's Manual must be performed by Qualified Service Personnel. 6 7 8 10 9 11 12 13 Ref. ... for more information.(Located at the END of the IPL) Electric Saw Assy - Description Not Shown 115367826 Manual = Refer to design changes. Adjuster Wheel Bar Chain Screw Assy -
Chain Catcher Kit - Bar Clamp Scabbard = New Part Number For This IPL Ref. Sprocket Kit - Part No. MODEL PLN3516F Page: 1 1 3 2 4 5 WARNING All repairs, adjustments and maintenance not described in the Operator's Manual must be performed by Qualified Service Personnel. 6 7 8 10 9 11 12 13 Ref. ... for more information.(Located at the END of the IPL) Electric Saw Assy - Description Not Shown 115367826 Manual = Refer to design changes. Adjuster Wheel Bar Chain Screw Assy -


