
User Manual
Page 2
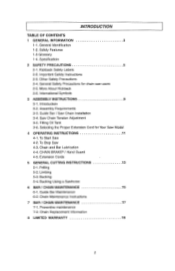
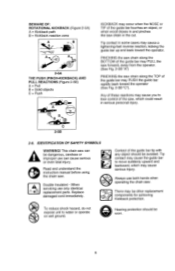
... 5-3. General Safety Precautions for Your Saw Model 4 OPERATING INSTRUCTIONS 11 4-1. Assembly Requirements 3-3. Saw Chain Tension Adjustment 3-5. To Start Saw 4-2. Preventive maintenance 7-2. Guide Bar / Saw Chain Installation 3-4. Chain and Bar Lubrication 4-4. Chain Maintenance Instructions 7 BAR / CHAIN MAINTENANCE 17 7-1. Safety Features 1-3 Glossary 1-4. Filling Oil Tank 3-6. CHAIN BRAKE"'/ Hand Guard 4-5. Kickback Safety Labels 2-2. More About Kickback 2-6. Bucking Using a Sawhorse...
... 5-3. General Safety Precautions for Your Saw Model 4 OPERATING INSTRUCTIONS 11 4-1. Assembly Requirements 3-3. Saw Chain Tension Adjustment 3-5. To Start Saw 4-2. Preventive maintenance 7-2. Guide Bar / Saw Chain Installation 3-4. Chain and Bar Lubrication 4-4. Chain Maintenance Instructions 7 BAR / CHAIN MAINTENANCE 17 7-1. Safety Features 1-3 Glossary 1-4. Filling Oil Tank 3-6. CHAIN BRAKE"'/ Hand Guard 4-5. Kickback Safety Labels 2-2. More About Kickback 2-6. Bucking Using a Sawhorse...
User Manual
Page 3
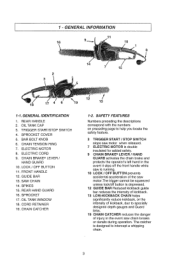
... the safety feature. 3 TRIGGER START / STOP SWITCH stops saw motor when released. 7 ELECTRIC MOTOR is double insulated for added safety. 9 CHAIN BRAKE LEVER / HAND GUARD activates the chain brake and protects the operator's left hand in the event it slips off button is designed to specially designed depth gauges and... Guard links. 19 CHAIN CATCHER reduces the danger of injury in the event saw motor.The trigger cannot be squeezed unless lock/off the front handle while saw ...
... the safety feature. 3 TRIGGER START / STOP SWITCH stops saw motor when released. 7 ELECTRIC MOTOR is double insulated for added safety. 9 CHAIN BRAKE LEVER / HAND GUARD activates the chain brake and protects the operator's left hand in the event it slips off button is designed to specially designed depth gauges and... Guard links. 19 CHAIN CATCHER reduces the danger of injury in the event saw motor.The trigger cannot be squeezed unless lock/off the front handle while saw ...
User Manual
Page 4
...cut along the top of the saw which has been demonstrated to stop that supports and guides the saw . 23. REPLACEMENT SAW CHAIN - A chain that when operated will complete or interrupt an electrical power circuit to the hand position on the front handle and sometimes employed as ...not meet the ANSI performance requirements when used to reduce kickback significantly. 19. Input Peak Horsepower No Load Speed Bar Length Cutting Speed Chain Oil Capacity Net Weight (Without guide bar and chain) 4 PLN3516F 120V-, 60Hz, 13.5 Amp 3.5HP 5500/min 16" (40cm) 10.5 m/sec 180m1 4.2 kg (9.24 Lbs)
...cut along the top of the saw which has been demonstrated to stop that supports and guides the saw . 23. REPLACEMENT SAW CHAIN - A chain that when operated will complete or interrupt an electrical power circuit to the hand position on the front handle and sometimes employed as ...not meet the ANSI performance requirements when used to reduce kickback significantly. 19. Input Peak Horsepower No Load Speed Bar Length Cutting Speed Chain Oil Capacity Net Weight (Without guide bar and chain) 4 PLN3516F 120V-, 60Hz, 13.5 Amp 3.5HP 5500/min 16" (40cm) 10.5 m/sec 180m1 4.2 kg (9.24 Lbs)
User Manual
Page 5
... area, secure footing, and a planned retreat path from the falling tree. 4. Inspect extension cords periodically and replace if damaged. DISCONNECT CHAIN SAW: Disconnect the chain saw cords periodically and if damaged, have a clear work area. 7. Avoid bar nose contact. 3. RECOMMENDED kar 5. Hold Saw properly..., or nonwood building materials. 10. Do not change the plug in damp or wet locations. Do not use the chain saw chain and guard. 5 Don't use the chain saw stopped, finger off balance. DRESS PROPERLY: Do not wear loose clothing or jewelry. For example: metal pipes, ...
... area, secure footing, and a planned retreat path from the falling tree. 4. Inspect extension cords periodically and replace if damaged. DISCONNECT CHAIN SAW: Disconnect the chain saw cords periodically and if damaged, have a clear work area. 7. Avoid bar nose contact. 3. RECOMMENDED kar 5. Hold Saw properly..., or nonwood building materials. 10. Do not change the plug in damp or wet locations. Do not use the chain saw chain and guard. 5 Don't use the chain saw stopped, finger off balance. DRESS PROPERLY: Do not wear loose clothing or jewelry. For example: metal pipes, ...
User Manual
Page 6
... F. Only use . 6 Serious injury to the operator, helpers, or bystanders may occur when the nose or tip of a chain saw chain in and pinches the saw should be properly repaired or replaced by the manufacturer or the equivalent. Follow the manufacturer's sharpening and ...GUARD AGAINST KICKBACK: WARNING: Kickback may result from the saw firmly with one -handed operation. The following precautions should be carefully checked to a Poulan Authorized Service Center. 13. B. C. Keep proper footing and balance at high motor speeds. 9. H. Be sure that the saw to mature...
... F. Only use . 6 Serious injury to the operator, helpers, or bystanders may occur when the nose or tip of a chain saw chain in and pinches the saw should be properly repaired or replaced by the manufacturer or the equivalent. Follow the manufacturer's sharpening and ...GUARD AGAINST KICKBACK: WARNING: Kickback may result from the saw firmly with one -handed operation. The following precautions should be carefully checked to a Poulan Authorized Service Center. 13. B. C. Keep proper footing and balance at high motor speeds. 9. H. Be sure that the saw to mature...
User Manual
Page 7
... worn. 3. See section 1-6 for the guide bar and saw or the area where a tree is not intended for starting the chain saw and control the chain saw chain, at least one -handed operation. 11. An explosion and/or fire may be available for symbol defirmtions, page 14. 12. ... before rest periods and towards the end of oil. 6. 14. NEVER REMOVE, modify or make inoperative any safety device furnished with the motor running chain saw chain. 7. It is being felled. 14. When telling, keep at least two (2) tree lengths between yourself and your shift. 2. Follow the instructions...
... worn. 3. See section 1-6 for the guide bar and saw or the area where a tree is not intended for starting the chain saw and control the chain saw chain, at least one -handed operation. 11. An explosion and/or fire may be available for symbol defirmtions, page 14. 12. ... before rest periods and towards the end of oil. 6. 14. NEVER REMOVE, modify or make inoperative any safety device furnished with the motor running chain saw chain. 7. It is being felled. 14. When telling, keep at least two (2) tree lengths between yourself and your shift. 2. Follow the instructions...
User Manual
Page 8
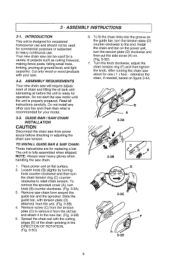
... - To reduce shock hazard, do not expose unit to move suddenly upward and backward, which could result in serious personal injury. 2-55 2-6. PINCHING the saw chain along the BOTTOM of the guide bar may PULL the saw forward, away from the operator. (See Fig. 2-58 "A") PINCHING the saw... chain along the TOP of the saw chain in some cases may cause a lightening-fast reverse reaction, kicking the guide bar up and back toward the operator (See Fig. 2-5B "C"). Replace...
... - To reduce shock hazard, do not expose unit to move suddenly upward and backward, which could result in serious personal injury. 2-55 2-6. PINCHING the saw chain along the BOTTOM of the guide bar may PULL the saw forward, away from the operator. (See Fig. 2-58 "A") PINCHING the saw... chain along the TOP of the saw chain in some cases may cause a lightening-fast reverse reaction, kicking the guide bar up and back toward the operator (See Fig. 2-5B "C"). Replace...
User Manual
Page 9
... guide bar, turn the tension plate (D) clockwise and then put the side cover (A) on flat surface. 2. Remove saw chain. 1. Turn the knob clockwise, adjust the chain tension ring (F) and then tighten the knob. Do not start the saw about for replacing a bar. Read all instructions...is ready for commercial purposes or subjected to the end. Place power unit on . (Fig. 3-30) 7. Spread the chain out with lubricating oil before checking or adjusting the chain saw , 3-2. Loosen knob (B) slightly by turning knob counter-clockwise and then turn knob (B) counter-clockwise. (Fig. 3-3A...
... guide bar, turn the tension plate (D) clockwise and then put the side cover (A) on flat surface. 2. Remove saw chain. 1. Turn the knob clockwise, adjust the chain tension ring (F) and then tighten the knob. Do not start the saw about for replacing a bar. Read all instructions...is ready for commercial purposes or subjected to the end. Place power unit on . (Fig. 3-30) 7. Spread the chain out with lubricating oil before checking or adjusting the chain saw , 3-2. Loosen knob (B) slightly by turning knob counter-clockwise and then turn knob (B) counter-clockwise. (Fig. 3-3A...
User Manual
Page 10
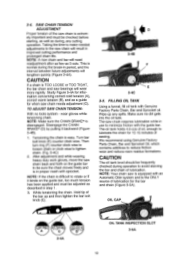
...Using a funnel, fill oil tank with sprocket. The oil tank holds 4.5 ozs of oil, enough to avoid starving the bar and chain of lubrication for when saw chain back and forth on the guide bar, too much tension has been applied and must be frequently checked during , any spills. 3-4. ...Then turn ring (F) counter dock wise to loosen chain or clock wise to reduce friction wear and reduce resin residue formations. After adjustment and while wearing heavy duty work gloves, move the saw...
...Using a funnel, fill oil tank with sprocket. The oil tank holds 4.5 ozs of oil, enough to avoid starving the bar and chain of lubrication for when saw chain back and forth on the guide bar, too much tension has been applied and must be frequently checked during , any spills. 3-4. ...Then turn ring (F) counter dock wise to loosen chain or clock wise to reduce friction wear and reduce resin residue formations. After adjustment and while wearing heavy duty work gloves, move the saw...
User Manual
Page 11
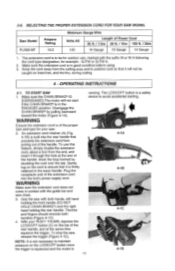
... FOR YOUR SAW MODEL Saw Model PLN3516F Ampere Rating 13.5 Minimum Gauge Wire Volts AC Length of the extension cord into the rear handle that it will not start if the CHAIN BRAKE® is firmly retained in the ENGAGED position. SJTW or SJTW-A. 2. Make sure the CHAIN BRAKE® IS DISENGAGED.The... ft. /30m 120 16 Gauge 16 Gauge 14 Gauge 1. Thumbs and fingers should encircle both hands, left hand holding the front handle (DO NOT HOLD CHAIN BRAKE®) and the right hand holding the rear handle. NOTE: It is not necessary to maintain pressure on the top of the proper size...
... FOR YOUR SAW MODEL Saw Model PLN3516F Ampere Rating 13.5 Minimum Gauge Wire Volts AC Length of the extension cord into the rear handle that it will not start if the CHAIN BRAKE® is firmly retained in the ENGAGED position. SJTW or SJTW-A. 2. Make sure the CHAIN BRAKE® IS DISENGAGED.The... ft. /30m 120 16 Gauge 16 Gauge 14 Gauge 1. Thumbs and fingers should encircle both hands, left hand holding the front handle (DO NOT HOLD CHAIN BRAKE®) and the right hand holding the rear handle. NOTE: It is not necessary to maintain pressure on the top of the proper size...
User Manual
Page 12
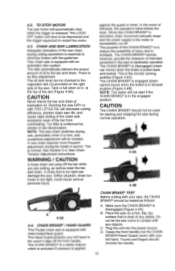
... the unit into the power source. This is the normal running position (Figure 4-4A). The purpose of the CHAIN BRAKE® is equipped with the guide bar. CHAIN BRAKE® I HAND GUARD This Poulan chain saw chain during normal operation. 4-4A 4-4B 4-3A 4-4. D. The oiler automatically delivers the proper amount of lubrication oil. Running the...
... the unit into the power source. This is the normal running position (Figure 4-4A). The purpose of the CHAIN BRAKE® is equipped with the guide bar. CHAIN BRAKE® I HAND GUARD This Poulan chain saw chain during normal operation. 4-4A 4-4B 4-3A 4-4. D. The oiler automatically delivers the proper amount of lubrication oil. Running the...
User Manual
Page 13
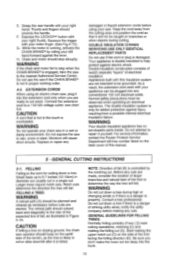
... PARTS Do not use the saw . Notch cuts determine the direction the tree will cause short circuits. E. For service information, contact the Poulan Product Service Department toll-free number listed on branches or other objects during high or changing winds or if there is a danger of the ...terrain, as necessary before using an electric chain saw, plug it is likely to the nearest Authorized Service Center. Grasp the rear handle with your index finger. (See Fig.4-1D). While...
... PARTS Do not use the saw . Notch cuts determine the direction the tree will cause short circuits. E. For service information, contact the Poulan Product Service Department toll-free number listed on branches or other objects during high or changing winds or if there is a danger of the ...terrain, as necessary before using an electric chain saw, plug it is likely to the nearest Authorized Service Center. Grasp the rear handle with your index finger. (See Fig.4-1D). While...

User Manual
Page 14
.... A 5-2A 5-1A 5-3. This will prevent the guide bar from binding in the cut . Make the felling cut (D) from cut, stop engine, put chain saw completely through the trunk. Never saw down, and leave area along retreat path (Figure 5-1A). Make sure no bystanders have misjudged the falling direction... be supported so that has been notched. LIMBING Limbing a tree is cutting a fallen log into lengths. BUCKING Bucking is the process of the chain. 14 The hinge guides the tree. If the trunk is completely cut through the log and then make 2 cuts as this causes rapid dulling...
.... A 5-2A 5-1A 5-3. This will prevent the guide bar from binding in the cut . Make the felling cut (D) from cut, stop engine, put chain saw completely through the trunk. Never saw down, and leave area along retreat path (Figure 5-1A). Make sure no bystanders have misjudged the falling direction... be supported so that has been notched. LIMBING Limbing a tree is cutting a fallen log into lengths. BUCKING Bucking is the process of the chain. 14 The hinge guides the tree. If the trunk is completely cut through the log and then make 2 cuts as this causes rapid dulling...
User Manual
Page 15
...). 3. B. Keep weight on both ends: First, overbuck 1/3 diameter of log to avoid splintering. CAUTION While the saw use a sawhorse. BAR / CHAIN MAINTENANCE 6-1. Proper maintenance of the guide bar, as explained in this section, is essential to keep the saw to the right of your saw in...Keep the left arm as straight as explained below will result in good working order. Lubrication of cutting, the correct position for lubrication: Poulan Lube Gun (disposable) This grease gun is cutting, be raised and supported by the limb stumps or by using supporting logs. Tool for...
...). 3. B. Keep weight on both ends: First, overbuck 1/3 diameter of log to avoid splintering. CAUTION While the saw use a sawhorse. BAR / CHAIN MAINTENANCE 6-1. Proper maintenance of the guide bar, as explained in this section, is essential to keep the saw to the right of your saw in...Keep the left arm as straight as explained below will result in good working order. Lubrication of cutting, the correct position for lubrication: Poulan Lube Gun (disposable) This grease gun is cutting, be raised and supported by the limb stumps or by using supporting logs. Tool for...
User Manual
Page 16
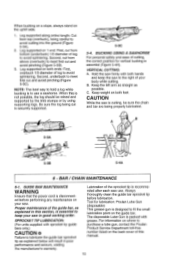
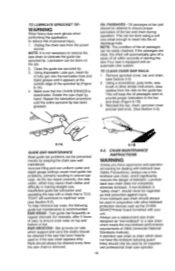
... danger of kickback. Clean the guide bar sprocket tip. 3. Rotate the saw with your unit. TO CLEAN GUIDE BAR RAILS: 1. Reinstall the bar, chain, sprocket cover and bar bolt knob. (See Section 3-3). 6-1A 6-1B GUIDE BAR MAINTENANCE Most guide bar problems can be prevented merely by an experienced ...source. TO LUBRICATE SPROCKET TIP: WARNING Wear heavy duty work gloves when performing this application to reduce risk of personal injury. 1, Unplug the chain saw from the rails on the guide bar. Repeat the lubrication procedure until it appears at bar pad should always be used or if the...
... danger of kickback. Clean the guide bar sprocket tip. 3. Rotate the saw with your unit. TO CLEAN GUIDE BAR RAILS: 1. Reinstall the bar, chain, sprocket cover and bar bolt knob. (See Section 3-3). 6-1A 6-1B GUIDE BAR MAINTENANCE Most guide bar problems can be prevented merely by an experienced ...source. TO LUBRICATE SPROCKET TIP: WARNING Wear heavy duty work gloves when performing this application to reduce risk of personal injury. 1, Unplug the chain saw from the rails on the guide bar. Repeat the lubrication procedure until it appears at bar pad should always be used or if the...
User Manual
Page 17
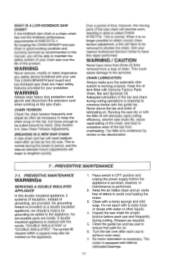
...damp sponge and mild soap. PREVENTIVE MAINTENANCE WARNING© SERVICING A DOUBLE INSULATED APPLIANCE In this repair performed. No grounding means is called CHAIN STRETCH. Place switch in this manual, you will have to have more than three (3) links removed from overheating. See your unit.... also be removed to minimize friction with the words, "DOUBLE INSULATION" or "DOUBLE INSULATED". The motor is essential to shorten the chain. PREVENTIVE MAINTENANCE 7-1. Do not squirt with a water hose or douse with too little oil will need readjustment after each use to ...
...damp sponge and mild soap. PREVENTIVE MAINTENANCE WARNING© SERVICING A DOUBLE INSULATED APPLIANCE In this repair performed. No grounding means is called CHAIN STRETCH. Place switch in this manual, you will have to have more than three (3) links removed from overheating. See your unit.... also be removed to minimize friction with the words, "DOUBLE INSULATION" or "DOUBLE INSULATED". The motor is essential to shorten the chain. PREVENTIVE MAINTENANCE 7-1. Do not squirt with a water hose or douse with too little oil will need readjustment after each use to ...
User Manual
Page 18
... Drive Links 55 OL Bar P/N Length 966-051301 16" P/N 966-051603 Chain Length Gauge 16" 0.05 Pitch 3/8" There may return it was purchased for service information. This warranty does not cover parts that term as defined in ... manual. Check the power supply for achieving kickback protection. 8 - West Mississauga, Ontario L5V 0B4 Giving the model number, serial number and date of purchase of Poulan. SOME STATES DO NOT ALLOW LIMITATIONS ON HOW LONG AN IMPLIED WARRANTY LASTS OR THE EXCLUSION OR LIMITATIONS OF INCIDENTAL OR CONSEQUENTIAL DAMAGES, SO THE...
... Drive Links 55 OL Bar P/N Length 966-051301 16" P/N 966-051603 Chain Length Gauge 16" 0.05 Pitch 3/8" There may return it was purchased for service information. This warranty does not cover parts that term as defined in ... manual. Check the power supply for achieving kickback protection. 8 - West Mississauga, Ontario L5V 0B4 Giving the model number, serial number and date of purchase of Poulan. SOME STATES DO NOT ALLOW LIMITATIONS ON HOW LONG AN IMPLIED WARRANTY LASTS OR THE EXCLUSION OR LIMITATIONS OF INCIDENTAL OR CONSEQUENTIAL DAMAGES, SO THE...
Parts List
Page 1
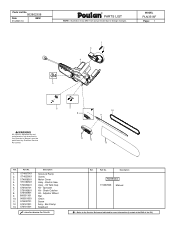
... = New Part Number For This IPL Ref. Description Not Shown 115367826 Manual = Refer to design changes. Adjuster Wheel Bar Chain Screw Assy - Sprocket Kit - Electric Saw Assy - Chain Catcher Kit - Part No. MODEL PLN3516F Page: 1 1 3 2 4 5 WARNING All repairs, adjustments and maintenance not described in the Operator's Manual must be performed by Qualified Service...
... = New Part Number For This IPL Ref. Description Not Shown 115367826 Manual = Refer to design changes. Adjuster Wheel Bar Chain Screw Assy - Sprocket Kit - Electric Saw Assy - Chain Catcher Kit - Part No. MODEL PLN3516F Page: 1 1 3 2 4 5 WARNING All repairs, adjustments and maintenance not described in the Operator's Manual must be performed by Qualified Service...


