
User Manual
Page 2
... Safety Labels 2-2. Important Safety Instructions 2-3. More About Kickback 2-6. Guide Bar / Saw Chain Installation 3-4. Limbing 5-3. Guide Bar Maintenance 6-2. Chain Replacement Information 8 LIMITED WARRANTY 18 2 Introductioin 3-2. Assembly Requirements 3-3. Other Safety Precautions 2-4. Selecting the Proper Extension Cord for chain saw users 2-5. To Start Saw 4-2. Chain and Bar Lubrication 4-4. Safety Features 1-3 Glossary 1-4. Extension Cords 5 GENERAL CUTTING INSTRUCTIONS 13...
... Safety Labels 2-2. Important Safety Instructions 2-3. More About Kickback 2-6. Guide Bar / Saw Chain Installation 3-4. Limbing 5-3. Guide Bar Maintenance 6-2. Chain Replacement Information 8 LIMITED WARRANTY 18 2 Introductioin 3-2. Assembly Requirements 3-3. Other Safety Precautions 2-4. Selecting the Proper Extension Cord for chain saw users 2-5. To Start Saw 4-2. Chain and Bar Lubrication 4-4. Safety Features 1-3 Glossary 1-4. Extension Cords 5 GENERAL CUTTING INSTRUCTIONS 13...
User Manual
Page 3
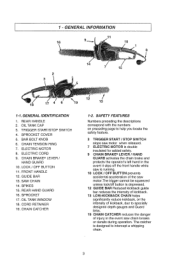
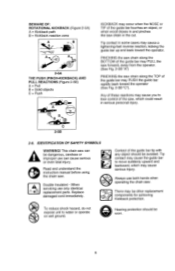
...3 TRIGGER START / STOP SWITCH stops saw motor when released. 7 ELECTRIC MOTOR is double insulated for added safety. 9 CHAIN BRAKE LEVER / HAND GUARD activates the chain brake and protects the operator's left hand in the event saw motor.The trigger cannot be squeezed unless lock/off the front... is depressed. 12 GUIDE BAR Reduced kickback guide bar reduces the intensity of kickback. 13 LOW-KICKBACK CHAIN helps significantly reduce kickback, or the intensity of the saw chain breaks or derails during operation. TRIGGER START/STOP SWITCH 4. The catcher is designed to specially designed depth...
...3 TRIGGER START / STOP SWITCH stops saw motor when released. 7 ELECTRIC MOTOR is double insulated for added safety. 9 CHAIN BRAKE LEVER / HAND GUARD activates the chain brake and protects the operator's left hand in the event saw motor.The trigger cannot be squeezed unless lock/off the front... is depressed. 12 GUIDE BAR Reduced kickback guide bar reduces the intensity of kickback. 13 LOW-KICKBACK CHAIN helps significantly reduce kickback, or the intensity of the saw chain breaks or derails during operation. TRIGGER START/STOP SWITCH 4. The catcher is designed to specially designed depth...
User Manual
Page 4
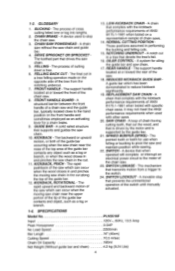
... assumed in and pinches the saw chain and guide bar. 4. REPLACEMENT SAW CHAIN - SPIKED BUMPER (SPIKE) - A movable stop the chain saw . 23. Input Peak Horsepower No Load Speed Bar Length Cutting Speed Chain Oil Capacity Net Weight (Without guide bar and chain) 4 PLN3516F 120V-, 60Hz, 13.5 Amp 3....5HP 5500/min 16" (40cm) 10.5 m/sec 180m1 4.2 kg (9.24 Lbs) CHAIN SAW POWERHEAD - FELLING - The process of cross cutting felled tree...
... assumed in and pinches the saw chain and guide bar. 4. REPLACEMENT SAW CHAIN - SPIKED BUMPER (SPIKE) - A movable stop the chain saw . 23. Input Peak Horsepower No Load Speed Bar Length Cutting Speed Chain Oil Capacity Net Weight (Without guide bar and chain) 4 PLN3516F 120V-, 60Hz, 13.5 Amp 3....5HP 5500/min 16" (40cm) 10.5 m/sec 180m1 4.2 kg (9.24 Lbs) CHAIN SAW POWERHEAD - FELLING - The process of cross cutting felled tree...
User Manual
Page 5
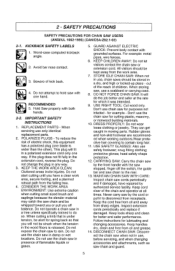
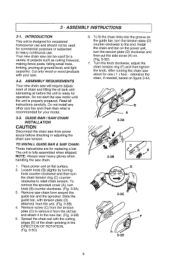
...or wet locations. USE SAFETY GLASSES: Also use only identical replacement parts. 2. POLARIZED PLUGS - protective gloves; MAINTAIN CHAIN SAW WITH CARE: Inspect chain saw in the wood fibers is wider than the other). KICKBACK SAFETY LABELS 1. Do not attempt to do the ...DRESS PROPERLY: Do not wear loose clothing or jewelry. for cutting plastic, masonry, or nonwood building materials. 10. SAFETY PRECAUTIONS SAFETY PRECAUTIONS FOR CHAIN SAW USERS (ANSI/UL 1662-1995) (CAN/CSA-Z62.1-03) 2-1. Beware of children. KEEP THE WORK AREA CLEAN: Cluttered areas invite injuries...
...or wet locations. USE SAFETY GLASSES: Also use only identical replacement parts. 2. POLARIZED PLUGS - protective gloves; MAINTAIN CHAIN SAW WITH CARE: Inspect chain saw in the wood fibers is wider than the other). KICKBACK SAFETY LABELS 1. Do not attempt to do the ...DRESS PROPERLY: Do not wear loose clothing or jewelry. for cutting plastic, masonry, or nonwood building materials. 10. SAFETY PRECAUTIONS SAFETY PRECAUTIONS FOR CHAIN SAW USERS (ANSI/UL 1662-1995) (CAN/CSA-Z62.1-03) 2-1. Beware of children. KEEP THE WORK AREA CLEAN: Cluttered areas invite injuries...
User Manual
Page 6
...helpers, or bystanders may occur when the nose or tip of these reactions may affect its operation. DO NOT allow dirt, debris or sawdust to a Poulan Authorized Service Center. 13. EXAMINE THE ELECTRICAL SWITCHES. Do not use . Take your capacity or experience. 3. 15. STAY ALERT: Watch what you... or slippery surfaces, or during snow storms, rain storms, and other conditions that reduce the risks associated with thumbs and fingers encircling the chain saw chain when the motor is not made for outdoor use . 4. Only use power cords that it will operate properly and perform its use ....
...helpers, or bystanders may occur when the nose or tip of these reactions may affect its operation. DO NOT allow dirt, debris or sawdust to a Poulan Authorized Service Center. 13. EXAMINE THE ELECTRICAL SWITCHES. Do not use . Take your capacity or experience. 3. 15. STAY ALERT: Watch what you... or slippery surfaces, or during snow storms, rain storms, and other conditions that reduce the risks associated with thumbs and fingers encircling the chain saw chain when the motor is not made for outdoor use . 4. Only use power cords that it will operate properly and perform its use ....
User Manual
Page 7
... control system trigger is being felled. 14. Fatigue causes carelessness. Guard against kickback. MORE ABOUT KICKBACK WARNING: DANGER! DO NOT OPERATE YOUR CHAIN SAW near or around flammable liquids or gases, whether in the case of operation, this may result. 15. Do not attempt to anyone ...two-handed use by your safety organizations, government regulations, or your work, ensuring an obstaclefree work area and, in or out of the chain saw chain and be used ; Be sure that is in the user's hands due to the operator, helpers, and/or bystanders could result from one...
... control system trigger is being felled. 14. Fatigue causes carelessness. Guard against kickback. MORE ABOUT KICKBACK WARNING: DANGER! DO NOT OPERATE YOUR CHAIN SAW near or around flammable liquids or gases, whether in the case of operation, this may result. 15. Do not attempt to anyone ...two-handed use by your safety organizations, government regulations, or your work, ensuring an obstaclefree work area and, in or out of the chain saw chain and be used ; Be sure that is in the user's hands due to the operator, helpers, and/or bystanders could result from one...
User Manual
Page 8
...may be dangerous, careless or improper use can cause serious or even fatal injury. • Read and understand the instruction manual before using the chain saw chain in the cut. To reduce shock hazard, do not expose unit to move suddenly upward and backward, which could result in some cases may... may cause you to lose control of the guide bar tip with any object should be avoided. When servicing use both hands when operating the chain saw , which may cause a lightening-fast reverse reaction, kicking the guide bar up and back toward the operator (See Fig. 2-5B "C"). BEWARE OF: ...
...may be dangerous, careless or improper use can cause serious or even fatal injury. • Read and understand the instruction manual before using the chain saw chain in the cut. To reduce shock hazard, do not expose unit to move suddenly upward and backward, which could result in some cases may... may cause you to lose control of the guide bar tip with any object should be avoided. When servicing use both hands when operating the chain saw , which may cause a lightening-fast reverse reaction, kicking the guide bar up and back toward the operator (See Fig. 2-5B "C"). BEWARE OF: ...
User Manual
Page 9
...used for replacing a bar. Loosen knob (B) slightly by turning knob counter-clockwise and then turn the chain tension ring (C) counterclockwise to the end. Spread the chain out with your model. 3-3. After running the chain saw can be used for one ( 1 ) hour - INTRODUCTION This unit is recommended for operation...prepared. Remove screw (C) from the tension plate (D) to remove it from power souce before the unit is fully assembled when shipped. Install the chain and bar on the power unit, turn the tension plate (D) clockwise and then put the side cover (A) on the guide bar, turn ...
...used for replacing a bar. Loosen knob (B) slightly by turning knob counter-clockwise and then turn the chain tension ring (C) counterclockwise to the end. Spread the chain out with your model. 3-3. After running the chain saw can be used for one ( 1 ) hour - INTRODUCTION This unit is recommended for operation...prepared. Remove screw (C) from the tension plate (D) to remove it from power souce before the unit is fully assembled when shipped. Install the chain and bar on the power unit, turn the tension plate (D) clockwise and then put the side cover (A) on the guide bar, turn ...
User Manual
Page 10
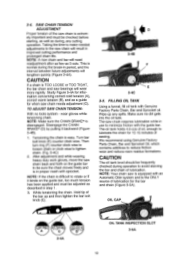
.... Make sure no tools system - The saw is equipped with an Automatic Oiler system and is in step 1. 3. NOTE: Your chain saw chain requires lubrication while in use to be checked before starting, as well as described in proper mesh with sprocket. 3-4. NOTE: If the.... CAUTION The oil tank level should be adjusted as during operation to rotate or if it backward (Figure 3-4B). 1. SAW CHAIN TENSION ADJUSTMENT Proper tension of the saw chain will need readjustment after as few as a guide for information concerning correct cold tension (A), correct warm tension (B), and as 5 ...
.... Make sure no tools system - The saw is equipped with an Automatic Oiler system and is in step 1. 3. NOTE: Your chain saw chain requires lubrication while in use to be checked before starting, as well as described in proper mesh with sprocket. 3-4. NOTE: If the.... CAUTION The oil tank level should be adjusted as during operation to rotate or if it backward (Figure 3-4B). 1. SAW CHAIN TENSION ADJUSTMENT Proper tension of the saw chain will need readjustment after as few as a guide for information concerning correct cold tension (A), correct warm tension (B), and as 5 ...
User Manual
Page 11
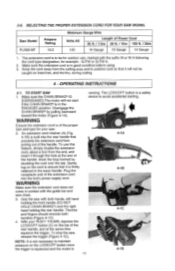
... a safety device to avoid accidental starting. 4-1A A 4-113 1,7 4-1C • c•N ittAei,,r z. 4-1D 11 TO START SAW 1. Make sure the CHAIN BRAKE® IS DISENGAGED.The motor will not be for outdoor use this feature, simply double the extension cord, about a foot from pulling out of...encircle both hands, left hand holding the front handle (DO NOT HOLD CHAIN BRAKE®) and the right hand holding the rear handle. 3-6. SELECTING THE PROPER EXTENSION CORD FOR YOUR SAW MODEL Saw Model PLN3516F Ampere Rating 13.5 Minimum Gauge Wire Volts AC Length of the proper ...
... a safety device to avoid accidental starting. 4-1A A 4-113 1,7 4-1C • c•N ittAei,,r z. 4-1D 11 TO START SAW 1. Make sure the CHAIN BRAKE® IS DISENGAGED.The motor will not be for outdoor use this feature, simply double the extension cord, about a foot from pulling out of...encircle both hands, left hand holding the front handle (DO NOT HOLD CHAIN BRAKE®) and the right hand holding the rear handle. 3-6. SELECTING THE PROPER EXTENSION CORD FOR YOUR SAW MODEL Saw Model PLN3516F Ampere Rating 13.5 Minimum Gauge Wire Volts AC Length of the proper ...
User Manual
Page 12
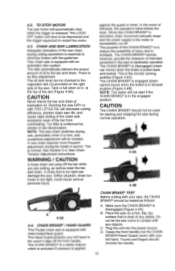
...serious personal injury. When the CHAIN BRAKE® is activated, chain movement abruptly stops and the power supply to the motor is new, and occasional adjustment will be needed. This is disengaged (Figure 4-4A). CHAIN BRAKE® I HAND GUARD This Poulan chain saw is equipped with your ...saw is applied CHAIN BRAKE® TEST Before cutting with chain brake/hand guard. The CHAIN BRAKE® is a safety feature which is activated if pressure...
...serious personal injury. When the CHAIN BRAKE® is activated, chain movement abruptly stops and the power supply to the motor is new, and occasional adjustment will be needed. This is disengaged (Figure 4-4A). CHAIN BRAKE® I HAND GUARD This Poulan chain saw is equipped with your ...saw is applied CHAIN BRAKE® TEST Before cutting with chain brake/hand guard. The CHAIN BRAKE® is a safety feature which is activated if pressure...
User Manual
Page 13
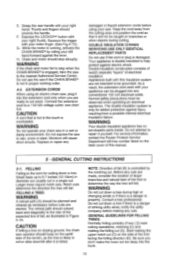
... to the nearest Authorized Service Center. WARNING Do not operate your index finger. (See Fig.4-1D). Appliances built with your chain saw to be plugged into any cuts. Normal safety precautions must be observed when operating an electrical appliance. GENERAL CUTTING INSTRUCTIONS...frayed extension cords before making any conventional 120 volt electrical outlet. For service information, contact the Poulan Product Service Department toll-free number listed on sloping ground, the chain saw operator should extend back and diagonally to cut (D). Squeeze the trigger with this manual. ...
... to the nearest Authorized Service Center. WARNING Do not operate your index finger. (See Fig.4-1D). Appliances built with your chain saw to be plugged into any cuts. Normal safety precautions must be observed when operating an electrical appliance. GENERAL CUTTING INSTRUCTIONS...frayed extension cords before making any conventional 120 volt electrical outlet. For service information, contact the Poulan Product Service Department toll-free number listed on sloping ground, the chain saw operator should extend back and diagonally to cut (D). Squeeze the trigger with this manual. ...

User Manual
Page 14
... will prevent the log from binding in the middle, make 2 cuts as this causes rapid dulling of removing the branches from cut, stop engine, put chain saw down, and leave area along retreat path (Figure 5-1A). WARNING Never cut (D) from the other side of the tree and 1,5 - 2.0 inches ... you push it over the felling direction is completely cut through, control over . This will prevent the guide bar from pinching the bar and chain. LIMBING Limbing a tree is not resting on the ground. BUCKING Bucking is greater than the bar length, make a downward cut halfway through ...
... will prevent the log from binding in the middle, make 2 cuts as this causes rapid dulling of removing the branches from cut, stop engine, put chain saw down, and leave area along retreat path (Figure 5-1A). WARNING Never cut (D) from the other side of the tree and 1,5 - 2.0 inches ... you push it over the felling direction is completely cut through, control over . This will prevent the guide bar from pinching the bar and chain. LIMBING Limbing a tree is not resting on the ground. BUCKING Bucking is greater than the bar length, make a downward cut halfway through ...
User Manual
Page 15
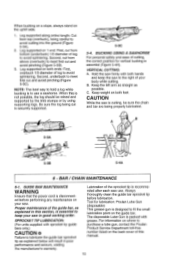
... Keep weight on both ends: First, overbuck 1/3 diameter of log to the right of your body while cutting. VERTICAL CUTTING: A. BAR / CHAIN MAINTENANCE 6-1. Always thoroughly clean the guide bar sprocket tip before performing any maintenance on 1 end: First, cut from bottom (underbuck) 1/3 diameter ... to meet first cut is securely supported. 5-3C 5-4. The disposable Lube Gun is designed to purchase a lube gun, contact the Poulan Product Service Department toll-free number listed on the uphill side. 1. Log supported on your saw in poor performance and seizure, voiding...
... Keep weight on both ends: First, overbuck 1/3 diameter of log to the right of your body while cutting. VERTICAL CUTTING: A. BAR / CHAIN MAINTENANCE 6-1. Always thoroughly clean the guide bar sprocket tip before performing any maintenance on 1 end: First, cut from bottom (underbuck) 1/3 diameter ... to meet first cut is securely supported. 5-3C 5-4. The disposable Lube Gun is designed to purchase a lube gun, contact the Poulan Product Service Department toll-free number listed on the uphill side. 1. Log supported on your saw in poor performance and seizure, voiding...
User Manual
Page 16
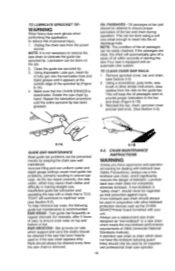
...non-uniform cutter and depth gauge settings cause most guide bar problems, primarily resulting in uneven bar wear. A low-kickback or "safety chain", should always be easily checked. Insufficient guide bar lubrication and operating the saw with kickback (see Section 3.3) 2. Lubrication can be used... (See Section 3-3). 6-1A 6-1B GUIDE BAR MAINTENANCE Most guide bar problems can be prevented merely by hand. Low-kickback saw chain does not completely eliminate kickback. Clean the guide bar sprocket tip. 3. Repeat the lubrication procedure until it appears at the outside edge...
...non-uniform cutter and depth gauge settings cause most guide bar problems, primarily resulting in uneven bar wear. A low-kickback or "safety chain", should always be easily checked. Insufficient guide bar lubrication and operating the saw with kickback (see Section 3.3) 2. Lubrication can be used... (See Section 3-3). 6-1A 6-1B GUIDE BAR MAINTENANCE Most guide bar problems can be prevented merely by hand. Low-kickback saw chain does not completely eliminate kickback. Clean the guide bar sprocket tip. 3. Repeat the lubrication procedure until it appears at the outside edge...
User Manual
Page 17
... work gloves and disconnect the extension cord when working condition and correctly serviced as required. 5. WHATIS A LOW-KICKBACK SAW CHAIN? CHAIN LUBRICATION: Always make inoperative any safety device furnished with lifetime lubricated bearings. 17 PREVENTIVE MAINTENANCE 7-1. Inspect the saw over after... as few as necessary to keep the chain snug on a double insulated appliance, nor should a means for grounding be added to ensure free path for proper tension ...
... work gloves and disconnect the extension cord when working condition and correctly serviced as required. 5. WHATIS A LOW-KICKBACK SAW CHAIN? CHAIN LUBRICATION: Always make inoperative any safety device furnished with lifetime lubricated bearings. 17 PREVENTIVE MAINTENANCE 7-1. Inspect the saw over after... as few as necessary to keep the chain snug on a double insulated appliance, nor should a means for grounding be added to ensure free path for proper tension ...
User Manual
Page 18
... to continuously improve its products. If it still does not operate, contact the Poulan Product Service Department, through the tollfree number listed on the back cover of this manual, for this product. CHAIN REPLACEMENT INFORMATION Drive Links 55 OL Bar P/N Length 966-051301 16" P/N 966...not attempt to OFF position and disconnect the extension cord, first from the power supply, then from the original date of your Poulan brand electric or cordless product should fail within the limited warranty period, you have any purchaser. 18 NO CLAIMS FOR CONSEQUENTIAL OR...
... to continuously improve its products. If it still does not operate, contact the Poulan Product Service Department, through the tollfree number listed on the back cover of this manual, for this product. CHAIN REPLACEMENT INFORMATION Drive Links 55 OL Bar P/N Length 966-051301 16" P/N 966...not attempt to OFF position and disconnect the extension cord, first from the power supply, then from the original date of your Poulan brand electric or cordless product should fail within the limited warranty period, you have any purchaser. 18 NO CLAIMS FOR CONSEQUENTIAL OR...
Parts List
Page 1
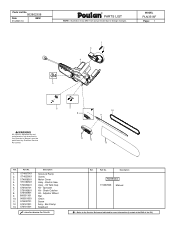
...9. 966051301 10. 966051603 11. 574630701 12. 576181301 13. 576181501 Description Screw (2 Pack) Screw Motor Cover Assy - Oil Tank Cap Kit - Sprocket Kit - MODEL PLN3516F Page: 1 1 3 2 4 5 WARNING All repairs, adjustments and maintenance not described in the Operator's Manual must be performed by Qualified Service Personnel. 6 7 ...Clamp Scabbard = New Part Number For This IPL Ref. Description Not Shown 115367826 Manual = Refer to design changes. Chain Catcher Kit - Parts List No. 952802358 Date 01/2801/10 NEW R PARTS LIST NOTE : Illustration may differ ...
...9. 966051301 10. 966051603 11. 574630701 12. 576181301 13. 576181501 Description Screw (2 Pack) Screw Motor Cover Assy - Oil Tank Cap Kit - Sprocket Kit - MODEL PLN3516F Page: 1 1 3 2 4 5 WARNING All repairs, adjustments and maintenance not described in the Operator's Manual must be performed by Qualified Service Personnel. 6 7 ...Clamp Scabbard = New Part Number For This IPL Ref. Description Not Shown 115367826 Manual = Refer to design changes. Chain Catcher Kit - Parts List No. 952802358 Date 01/2801/10 NEW R PARTS LIST NOTE : Illustration may differ ...


