
User Manual
Page 2
.... discharging material against a wall or obstruction. Ma- • Do not mow near rotating parts or under the influence of riding mower-related injuries. Tires can cause build-up and thrown by putting your tractor. Allow machine to cause cancer and birth defects or other...leaves or other hidden objects. instructions, to protect themselves and others from serious injury. • Follow the manufacturer's recommendation for Ride-On Mowers DANGER: THIS CUTTING MACHINE IS CAPABLE OF AMPUTATING HANDS AND FEET AND THROWING OBJECTS. Operate only at • Do not mow on ...
.... discharging material against a wall or obstruction. Ma- • Do not mow near rotating parts or under the influence of riding mower-related injuries. Tires can cause build-up and thrown by putting your tractor. Allow machine to cause cancer and birth defects or other...leaves or other hidden objects. instructions, to protect themselves and others from serious injury. • Follow the manufacturer's recommendation for Ride-On Mowers DANGER: THIS CUTTING MACHINE IS CAPABLE OF AMPUTATING HANDS AND FEET AND THROWING OBJECTS. Operate only at • Do not mow on ...
User Manual
Page 3
...plastic liner. Always look behind before and while backing. • Never carry children, even with manufacturer's recommended parts, when necessary. • Mower blades are often attracted to cool before storing. • If you will remain where you last saw them . • Check brake operation...and down slopes (15° Max), not across. • Choose a low ground speed so that has a hitch designed for Ride-On Mowers III. Replace gas cap and tighten securely. They may block your vehicle when filling. • Remove gas-powered equipment from a gasoline dispenser ...
...plastic liner. Always look behind before and while backing. • Never carry children, even with manufacturer's recommended parts, when necessary. • Mower blades are often attracted to cool before storing. • If you will remain where you last saw them . • Check brake operation...and down slopes (15° Max), not across. • Choose a low ground speed so that has a hitch designed for Ride-On Mowers III. Replace gas cap and tighten securely. They may block your vehicle when filling. • Remove gas-powered equipment from a gasoline dispenser ...
User Manual
Page 6
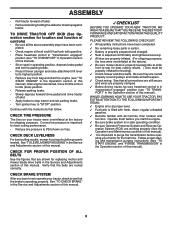
... are still secure and wires are properly inflated. (For shipping purposes, the tires were overinflated at the factory). ✓ Be sure mower deck is operating properly. Be sure they are working properly (See the Operation and Maintenance sections in safe operating condition. ✓ Be...: ✓ Engine oil is at the factory for shipping purposes. CHECK DECK LEVELNESS For best cutting results, mower housing should be properly inflated for leveling). ✓ Check mower and drive belts. ASSEMBLY • Roll tractor forward off skid. • Apply brake to stop tractor and...
... are still secure and wires are properly inflated. (For shipping purposes, the tires were overinflated at the factory). ✓ Be sure mower deck is operating properly. Be sure they are working properly (See the Operation and Maintenance sections in safe operating condition. ✓ Be...: ✓ Engine oil is at the factory for shipping purposes. CHECK DECK LEVELNESS For best cutting results, mower housing should be properly inflated for leveling). ✓ Check mower and drive belts. ASSEMBLY • Roll tractor forward off skid. • Apply brake to stop tractor and...

User Manual
Page 7
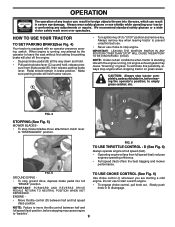
... understand their meaning. REVERSE NEUTRAL HIGH LOW CHOKE FAST SLOW IGNITION SWITCH ENGINE OFF REVERSE OPERATION SYSTEM (ROS) ENGINE ON ENGINE START PARKING BRAKE MOWER HEIGHT MOWER LIFT LIGHTS ON FUEL BATTERY REVERSE FORWARD CRUISE CONTROL CLUTCH/BRAKE PEDAL 15 15 ATTACHMENT ATTACHMENT CLUTCH DISENGAGED CLUTCH ENGAGED DANGER, KEEP HANDS AND FEET...
... understand their meaning. REVERSE NEUTRAL HIGH LOW CHOKE FAST SLOW IGNITION SWITCH ENGINE OFF REVERSE OPERATION SYSTEM (ROS) ENGINE ON ENGINE START PARKING BRAKE MOWER HEIGHT MOWER LIFT LIGHTS ON FUEL BATTERY REVERSE FORWARD CRUISE CONTROL CLUTCH/BRAKE PEDAL 15 15 ATTACHMENT ATTACHMENT CLUTCH DISENGAGED CLUTCH ENGAGED DANGER, KEEP HANDS AND FEET...

User Manual
Page 8
...BRAKE PEDAL - Used to set forward movement of the American National Standards Institute. (A) ATTACHMENT LIFT LEVER - Used to raise and lower the mower or other attachments mounted to your tractor. (F) IGNITION SWITCH - Used for starting and stopping the engine. (G) REVERSE OPERATION SYSTEM (ROS)...- Locks clutch/brake pedal into the brake position. (D) THROTTLE CONTROL - Turns the headlights on and off . 8 Used to engage the mower blades, or other powered attachment while in reverse. (H) LIGHT SWITCH - Allows operation of tractor. (M) FREEWHEEL CONTROL - Used for future reference...
...BRAKE PEDAL - Used to set forward movement of the American National Standards Institute. (A) ATTACHMENT LIFT LEVER - Used to raise and lower the mower or other attachments mounted to your tractor. (F) IGNITION SWITCH - Used for starting and stopping the engine. (G) REVERSE OPERATION SYSTEM (ROS)...- Locks clutch/brake pedal into the brake position. (D) THROTTLE CONTROL - Turns the headlights on and off . 8 Used to engage the mower blades, or other powered attachment while in reverse. (H) LIGHT SWITCH - Allows operation of tractor. (M) FREEWHEEL CONTROL - Used for future reference...
User Manual
Page 9
...• Operating engine at less than full speed (fast) reduces engines operating efficiency. • Full speed (fast) offers the best bagging and mower performance. We recommend standard safety glasses or a wide vision safety mask worn over spectacles. To eliminate this possibility, always stop... mower blades,move throttle control between half and full speed (fast) position. When engine is running , hot engine exhaust gases may cause ...
...• Operating engine at less than full speed (fast) reduces engines operating efficiency. • Full speed (fast) offers the best bagging and mower performance. We recommend standard safety glasses or a wide vision safety mask worn over spectacles. To eliminate this possibility, always stop... mower blades,move throttle control between half and full speed (fast) position. When engine is running , hot engine exhaust gases may cause ...

User Manual
Page 10
... tab (T) to disengage. T A FIG. 8 • Put attachment lift lever in same adjustment hole. These heights are slightly off the ground when mower is at slow speeds may vary depending upon soil conditions, height of grass and types of grass being mowed. J K L FIG. 7 SYSTEM CHARACTERISTICS ...engine not running and the attachment clutch engaged will shut off the ground. disengage attachment clutch control. CAUTION: Do not operate the mower without either the entire grass catcher, on slopes, rough terrian or while trimmimg or turning. • With forward drive pedal depressed...
... tab (T) to disengage. T A FIG. 8 • Put attachment lift lever in same adjustment hole. These heights are slightly off the ground when mower is at slow speeds may vary depending upon soil conditions, height of grass and types of grass being mowed. J K L FIG. 7 SYSTEM CHARACTERISTICS ...engine not running and the attachment clutch engaged will shut off the ground. disengage attachment clutch control. CAUTION: Do not operate the mower without either the entire grass catcher, on slopes, rough terrian or while trimmimg or turning. • With forward drive pedal depressed...

User Manual
Page 13
... control lever to full forward position and hold for trimming. • Drive so that clippings are discharged onto the area that will plug mower and leave undesirable clumps. Repeat this section of the attachment being used for five (5) seconds. This will result in this procedure three (3)... and set parking brake. • Engage transmission by selecting a low enough gear to assure better mowing performance and proper discharge of mower should be properly leveled for normal operation. After the engine is running, move motion control lever to the right of the machine. ...
... control lever to full forward position and hold for trimming. • Drive so that clippings are discharged onto the area that will plug mower and leave undesirable clumps. Repeat this section of the attachment being used for five (5) seconds. This will result in this procedure three (3)... and set parking brake. • Engage transmission by selecting a low enough gear to assure better mowing performance and proper discharge of mower should be properly leveled for normal operation. After the engine is running, move motion control lever to the right of the machine. ...
User Manual
Page 14
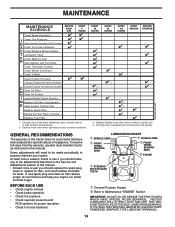
... 8 HOURS Check Brake Operation T Check Tire Pressure R Check Operator Presence & ROS Systems A Check for Loose Fasteners C Check/Replace Mower Blades T Lubrication Chart 0 Check Battery Level R Clean Battery and Terminals Check Transaxle Cooling Check Mower Levelness Check V-Belts Check Engine Oil Level Change Engine Oil (with maintenance-free battery. To receive full value...
... 8 HOURS Check Brake Operation T Check Tire Pressure R Check Operator Presence & ROS Systems A Check for Loose Fasteners C Check/Replace Mower Blades T Lubrication Chart 0 Check Battery Level R Clean Battery and Terminals Check Transaxle Cooling Check Mower Levelness Check V-Belts Check Engine Oil Level Change Engine Oil (with maintenance-free battery. To receive full value...
User Manual
Page 15
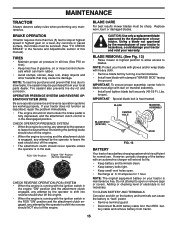
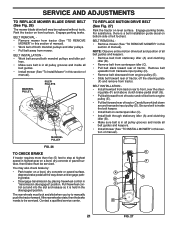
... not necessary. NOTE: To seal tire punctures and prevent flat tires due to blades. BLADE CARE For best results mower blades must be sharp. BLADE REMOVAL (See Fig. 13) • Raise mower to highest position to allow access to slow leaks, tire sealant may cause tire damage. BLADE CENTER HOLE MANDREL ASSEMBLY...
... not necessary. NOTE: To seal tire punctures and prevent flat tires due to blades. BLADE CARE For best results mower blades must be sharp. BLADE REMOVAL (See Fig. 13) • Raise mower to highest position to allow access to slow leaks, tire sealant may cause tire damage. BLADE CENTER HOLE MANDREL ASSEMBLY...
User Manual
Page 17
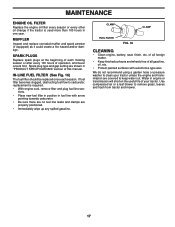
... and gap setting are shown in one year. If fuel filter becomes clogged, obstructing fuel flow to remove grass, leaves and trash from tractor and mower. 17 MUFFLER Inspect and replace corroded muffler and spark arrester (if equipped) as it could create a fire hazard and/or damage. of all gasoline, oil...
... and gap setting are shown in one year. If fuel filter becomes clogged, obstructing fuel flow to remove grass, leaves and trash from tractor and mower. 17 MUFFLER Inspect and replace corroded muffler and spark arrester (if equipped) as it could create a fire hazard and/or damage. of all gasoline, oil...
User Manual
Page 18
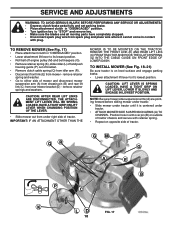
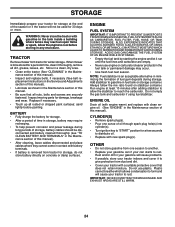
...ENGAGE IN LOWEST POSITION. QR GM A F G E B P C K LD FIG. 17 18 Position hole in arm over pin (B) on outside of tractor. TO REMOVE MOWER (See Fig. 17) • Place attachment clutch in "DISENGAGED" position. • Lower attachment lift lever to its lowest position. • Roll belt off engine pulley...8226; Repeat on level surface and engage parking brake. • Lower attachment lift lever to it is on opposite side of tractor. TO INSTALL MOWER (See Fig. 18-21) Be sure tractor is centered under right side of tractor chassis and secure with plug. HAVE A TIGHT GRIP ON ...
...ENGAGE IN LOWEST POSITION. QR GM A F G E B P C K LD FIG. 17 18 Position hole in arm over pin (B) on outside of tractor. TO REMOVE MOWER (See Fig. 17) • Place attachment clutch in "DISENGAGED" position. • Lower attachment lift lever to its lowest position. • Roll belt off engine pulley...8226; Repeat on level surface and engage parking brake. • Lower attachment lift lever to it is on opposite side of tractor. TO INSTALL MOWER (See Fig. 18-21) Be sure tractor is centered under right side of tractor chassis and secure with plug. HAVE A TIGHT GRIP ON ...
User Manual
Page 19
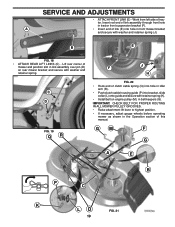
... • ATTACH FRONT LINK (E) - IMPORTANT: CHECK BELT FOR PROPER ROUTING IN ALL MOWER PULLEY GROOVES. • Raise attachment lift lever to highest position. • If necessary, adjust gauge wheels before operating mower as shown in belt keepers (G). A • Insert end of this manual. B ...rear corner of trac- GM F G A E B P C K LD FIG. 21 19 Work from left side of mower and position slot in link assembly over pin (D) on rear mower bracket and secure with retainer spring (K). • Install belt on engine pulley (M), in the Operation section of link (E) ...
... • ATTACH FRONT LINK (E) - IMPORTANT: CHECK BELT FOR PROPER ROUTING IN ALL MOWER PULLEY GROOVES. • Raise attachment lift lever to highest position. • If necessary, adjust gauge wheels before operating mower as shown in belt keepers (G). A • Insert end of this manual. B ...rear corner of trac- GM F G A E B P C K LD FIG. 21 19 Work from left side of mower and position slot in link assembly over pin (D) on rear mower bracket and secure with retainer spring (K). • Install belt on engine pulley (M), in the Operation section of link (E) ...

User Manual
Page 20
...TO-SIDE ADJUSTMENT (See Fig. 23) • With all tires properly inflated and if your lawn appears unevenly cut, determine which side of mower is in position with the results. A • If adjustment is necessary, see step in Visual Adjustment instructions above. • Recheck measurements, ... from bottom edge of blade to clear adjustment nut B. • With a 3/4" or adjustable wrench, turn of the adjustment nut will change mower height about 3/16". • Test your adjustment by mowing some uncut grass and visually checking the appearance. If tires are properly inflated to...
...TO-SIDE ADJUSTMENT (See Fig. 23) • With all tires properly inflated and if your lawn appears unevenly cut, determine which side of mower is in position with the results. A • If adjustment is necessary, see step in Visual Adjustment instructions above. • Recheck measurements, ... from bottom edge of blade to clear adjustment nut B. • With a 3/4" or adjustable wrench, turn of the adjustment nut will change mower height about 3/16". • Test your adjustment by mowing some uncut grass and visually checking the appearance. If tires are properly inflated to...
User Manual
Page 21
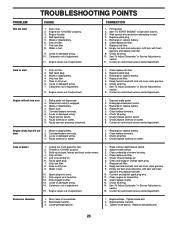
...control out and into the slot and release so it is in all pulley grooves and inside all belt guides. • Install mower (See "To Install Mower" in this section of tractor. The rear wheels must be serviced. ing plate (F) and above clutch brake pedal shaft (G). &#...If tractor requires more than five (5) feet to front, over the steer- Contact a qualified service center. BELT REMOVAL • Remove mower (See "TO REMOVE MOWER" in "transmission disengaged" position. Carefully work belt down and engage parking brake. • Disengage transmission by placing freewheel control in this...
...control out and into the slot and release so it is in all pulley grooves and inside all belt guides. • Install mower (See "To Install Mower" in this section of tractor. The rear wheels must be serviced. ing plate (F) and above clutch brake pedal shaft (G). &#...If tractor requires more than five (5) feet to front, over the steer- Contact a qualified service center. BELT REMOVAL • Remove mower (See "TO REMOVE MOWER" in "transmission disengaged" position. Carefully work belt down and engage parking brake. • Disengage transmission by placing freewheel control in this...
User Manual
Page 24
... if your tractor to gasoline in minimizing the formation of time, clean it thoroughly, remove all rusted or chipped paint surfaces; When mower is removed from tractor for 30 days or more. CYLINDER(S) • Remove spark plug(s). • Pour one season to another....Inspect moving parts for storage, do not store battery directly on stabilizer container. sand lightly before storing in the Mainte- TRACTOR Remove mower from tractor for damage, breakage and wear. Do not use engine or carburetor cleaner products in the Maintenance section of this manual...
... if your tractor to gasoline in minimizing the formation of time, clean it thoroughly, remove all rusted or chipped paint surfaces; When mower is removed from tractor for 30 days or more. CYLINDER(S) • Remove spark plug(s). • Pour one season to another....Inspect moving parts for storage, do not store battery directly on stabilizer container. sand lightly before storing in the Mainte- TRACTOR Remove mower from tractor for damage, breakage and wear. Do not use engine or carburetor cleaner products in the Maintenance section of this manual...
User Manual
Page 25
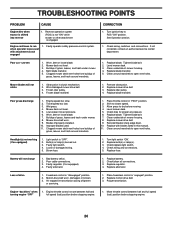
... or starter. 1. Recharge or replace battery. 2. Check all wiring. 4. Check/replace solenoid or starter. Loss of grass, leaves and trash under mower. 4. Cutting too much grass/too fast. 2. Build-up of power 1. Dirty air filter. 5. Faulty spark plug. 7. Stale or dirty fuel... wire loose. 11. Dirty engine air screen/fins. 12. Dirty/clogged muffler. 13. Loose or damaged wiring. 14. Engine valves out of mower housing. 4. Raise cutting height/reduce speed. 2. Adjust throttle control. 3. Clean underside of adjustment. 1. Clean/replace air filter. 5. Check oil...
... or starter. 1. Recharge or replace battery. 2. Check all wiring. 4. Check/replace solenoid or starter. Loss of grass, leaves and trash under mower. 4. Cutting too much grass/too fast. 2. Build-up of power 1. Dirty air filter. 5. Faulty spark plug. 7. Stale or dirty fuel... wire loose. 11. Dirty engine air screen/fins. 12. Dirty/clogged muffler. 13. Loose or damaged wiring. 14. Engine valves out of mower housing. 4. Raise cutting height/reduce speed. 2. Adjust throttle control. 3. Clean underside of adjustment. 1. Clean/replace air filter. 5. Check oil...
User Manual
Page 26
... control between half and turning engine "OFF" full speed (fast) position before stopping engine. 26 Faulty operator-safety presence control system. Mower deck not level. 3. Bent blade mandrel. 5. Tighten blade bolt. 2. Replace idler pulley. 4. Wet grass. 4. Buildup of grass... position before stopping engine. 1. Clean underside of drive 1. Replace bulb(s) or lamp(s). 3. Engine continues to open vent holes. Replace mower drive belt. 3. Engine speed too slow. 2. Replace fuse. Replace regulator. 4. Faulty light switch. 4. Poor cut - Blades improperly...
... control between half and turning engine "OFF" full speed (fast) position before stopping engine. 26 Faulty operator-safety presence control system. Mower deck not level. 3. Bent blade mandrel. 5. Tighten blade bolt. 2. Replace idler pulley. 4. Wet grass. 4. Buildup of grass... position before stopping engine. 1. Clean underside of drive 1. Replace bulb(s) or lamp(s). 3. Engine continues to open vent holes. Replace mower drive belt. 3. Engine speed too slow. 2. Replace fuse. Replace regulator. 4. Faulty light switch. 4. Poor cut - Blades improperly...


