

User Manual
Page 2
... stop engine, and remove keys before operat- Always turn off engine and wait for all parts to come to a complete stop before cleaning the machine, removing the grass catcher, or unclogging the discharge guard. • Operate machine only in fluence of alcohol or drugs. • Watch for wheel weights or counterweights. • Keep machine free of objects such as rocks, toys, wire, etc...
... stop engine, and remove keys before operat- Always turn off engine and wait for all parts to come to a complete stop before cleaning the machine, removing the grass catcher, or unclogging the discharge guard. • Operate machine only in fluence of alcohol or drugs. • Watch for wheel weights or counterweights. • Keep machine free of objects such as rocks, toys, wire, etc...
User Manual
Page 3
... in the mowing area for small children. • Mow up . Replace gas cap and tighten securely. Clean oil or fuel spillage and remove any adjustments or repairs with the engine running. • Check grass catcher components and the discharge guard frequently and replace with manufacturer's recommended parts, when necessary. • Mower blades are explosive. • Extinguish all times until fueling is extremely flammable and the vapors are sharp. Children who...
... in the mowing area for small children. • Mow up . Replace gas cap and tighten securely. Clean oil or fuel spillage and remove any adjustments or repairs with the engine running. • Check grass catcher components and the discharge guard frequently and replace with manufacturer's recommended parts, when necessary. • Mower blades are explosive. • Extinguish all times until fueling is extremely flammable and the vapors are sharp. Children who...
User Manual
Page 4
... 32°F) Oil Capacity: W/ Filter: 4.0 Pints W/O Filter: 3.75 Pints Spark Plug: (Gap: .040") Champion QC12YC Ground Speed (MPH): Forward: Reverse: 0 - 5.5 0 - 2.4 Charging System: 16 AMPS @ 3600 RPM Battery: AMP/HR: MIN. Please read and retain this owner's manual. TABLE OF CONTENTS SAFETY RULES 2-3 PRODUCT SPECIFICATIONS 4 CUSTOMER RESPONSIBILITIES 4 ASSEMBLY 6-8 OPERATION 9-15 MAINTENANCE SCHEDULE 16 MAINTENANCE 16-19 SERVICE AND ADJUSTMENTS 20-24 STORAGE 25 TROUBLESHOOTING 26-27 WARRANTY 28 4 If a spark arrester is used, it...
... 32°F) Oil Capacity: W/ Filter: 4.0 Pints W/O Filter: 3.75 Pints Spark Plug: (Gap: .040") Champion QC12YC Ground Speed (MPH): Forward: Reverse: 0 - 5.5 0 - 2.4 Charging System: 16 AMPS @ 3600 RPM Battery: AMP/HR: MIN. Please read and retain this owner's manual. TABLE OF CONTENTS SAFETY RULES 2-3 PRODUCT SPECIFICATIONS 4 CUSTOMER RESPONSIBILITIES 4 ASSEMBLY 6-8 OPERATION 9-15 MAINTENANCE SCHEDULE 16 MAINTENANCE 16-19 SERVICE AND ADJUSTMENTS 20-24 STORAGE 25 TROUBLESHOOTING 26-27 WARRANTY 28 4 If a spark arrester is used, it...

User Manual
Page 5
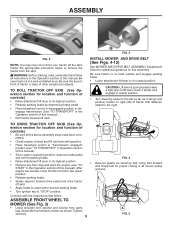
... position. ADJUST SEAT (See Fig. 2) • Sit in Maintenance section of this manual for minimum of carton. Washers (1) Front Link Assembly (2) Rear Lift Link Assemblies (1) Shoulder Bolt (1) Oil Drain Tube For Future Use Keys (2) Keys (1) Locknut 3/8-16 Slope Sheet ASSEMBLY Your new tractor has been assembled at the factory with exception of view, when you to press charge battery for charging instructions). 5 • Release lever to raised position. Remove...
... position. ADJUST SEAT (See Fig. 2) • Sit in Maintenance section of this manual for minimum of carton. Washers (1) Front Link Assembly (2) Rear Lift Link Assemblies (1) Shoulder Bolt (1) Oil Drain Tube For Future Use Keys (2) Keys (1) Locknut 3/8-16 Slope Sheet ASSEMBLY Your new tractor has been assembled at the factory with exception of view, when you to press charge battery for charging instructions). 5 • Release lever to raised position. Remove...
User Manual
Page 6
... assembly steps have been completed. • Check engine oil level and fill fuel tank with gasoline. • Place freewheel control in "transmission engaged" position (see "TO START" in disengaged position to dis- After engine has started, move throttle control to idle (slow) position. • Release parking brake. • Slowly depress forward drive pedal and drive tractor off skid. • Apply brake to stop tractor and set the parking brake. • Raise attachment lift lever to its highest position...
... assembly steps have been completed. • Check engine oil level and fill fuel tank with gasoline. • Place freewheel control in "transmission engaged" position (see "TO START" in disengaged position to dis- After engine has started, move throttle control to idle (slow) position. • Release parking brake. • Slowly depress forward drive pedal and drive tractor off skid. • Apply brake to stop tractor and set the parking brake. • Raise attachment lift lever to its highest position...
User Manual
Page 8
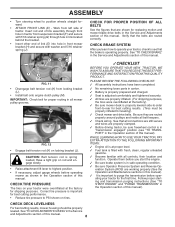
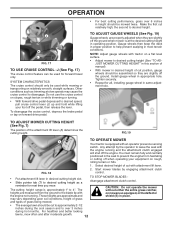
..., adjust gauge wheels before operating your tractor were overinflated at proper level. ✓ Fuel tank is operating properly. See"TO LEVEL MOWER HOUSING"in the Service and Adjustments section of this manual). Work from locking bracket (L). • Install belt onto engine clutch pulley (M). CHECK TIRE PRESSURE The tires on tires. See "TO CHECK BRAKE" in the Service and Adjustments section of this manual). ✓ It is in "transmission engaged" position (see that all connections are still secure and wires...
..., adjust gauge wheels before operating your tractor were overinflated at proper level. ✓ Fuel tank is operating properly. See"TO LEVEL MOWER HOUSING"in the Service and Adjustments section of this manual). Work from locking bracket (L). • Install belt onto engine clutch pulley (M). CHECK TIRE PRESSURE The tires on tires. See "TO CHECK BRAKE" in the Service and Adjustments section of this manual). ✓ It is in "transmission engaged" position (see that all connections are still secure and wires...
User Manual
Page 12
... looking lawns, mow often and after moderate growth. 12 NOTE: Adjust gauge wheels with an operator presence sensing switch. Start mower blades by the operator to over 6 inches in appropriate hole. Other conditions such as a reminder for next time you mow. Tighten securely. • Repeat for forward travel only. Any attempt by engaging attachment clutch control. • Put attachment lift lever in desired height of cut with the engine running...
... looking lawns, mow often and after moderate growth. 12 NOTE: Adjust gauge wheels with an operator presence sensing switch. Start mower blades by the operator to over 6 inches in appropriate hole. Other conditions such as a reminder for next time you mow. Tighten securely. • Repeat for forward travel only. Any attempt by engaging attachment clutch control. • Put attachment lift lever in desired height of cut with the engine running...
User Manual
Page 14
... wipe clean, reinsert the dipstick and screw cap tight, wait for a few seconds and then continue to push the control in slowly. • The attachments and ground drive can attract moisture which may occur. WARM WEATHER STARTING (50° F and above 3000 feet) or in the transmission engaged position. Drain the gas tank, start , pull the choke control out and retry. OPERATION BEFORE STARTING THE ENGINE CHECK ENGINE OIL LEVEL The engine in your tractor.
... wipe clean, reinsert the dipstick and screw cap tight, wait for a few seconds and then continue to push the control in slowly. • The attachments and ground drive can attract moisture which may occur. WARM WEATHER STARTING (50° F and above 3000 feet) or in the transmission engaged position. Drain the gas tank, start , pull the choke control out and retry. OPERATION BEFORE STARTING THE ENGINE CHECK ENGINE OIL LEVEL The engine in your tractor.
User Manual
Page 15
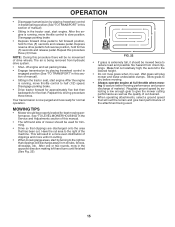
See "TO LEVEL MOWER HOUSING" in the Service and Adjustments section of this manual. • The left hand turns until finished (See Fig. 22). Have the cut relatively high; off engine and set parking brake. • Engage transmission by placing freewheel control in engaged position (See "TO TRANSPORT" in this section of manual). • Sitting in the tractor seat, start engine. Your transmission is being used. 15 Make first cut area...
See "TO LEVEL MOWER HOUSING" in the Service and Adjustments section of this manual. • The left hand turns until finished (See Fig. 22). Have the cut relatively high; off engine and set parking brake. • Engage transmission by placing freewheel control in engaged position (See "TO TRANSPORT" in this section of manual). • Sitting in the tractor seat, start engine. Your transmission is being used. 15 Make first cut area...
User Manual
Page 16
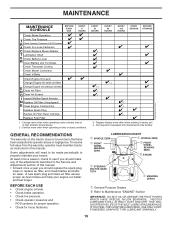
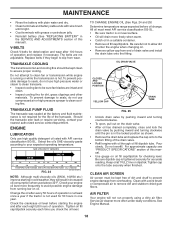
...tractor as instructed in the Service and Adjustments section of this manual. • At least once a year you should replace the spark plug, clean or replace air filter, and check blades and belts for wear. Service more often when operating in high ambient temperatures. 2 - BEFORE EACH USE • Check engine oil level. • Check brake operation. • Check tire pressure. • Check operator presence and ROS systems for proper operation. • Check for loose fasteners. MAINTENANCE MAINTENANCE SCHEDULE BEFORE EACH USE EVERY 8 HOURS Check Brake Operation T Check...
...tractor as instructed in the Service and Adjustments section of this manual. • At least once a year you should replace the spark plug, clean or replace air filter, and check blades and belts for wear. Service more often when operating in high ambient temperatures. 2 - BEFORE EACH USE • Check engine oil level. • Check brake operation. • Check tire pressure. • Check operator presence and ROS systems for proper operation. • Check for loose fasteners. MAINTENANCE MAINTENANCE SCHEDULE BEFORE EACH USE EVERY 8 HOURS Check Brake Operation T Check...
User Manual
Page 17
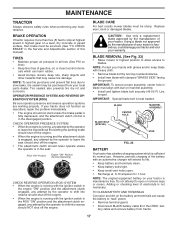
... best results mower blades must be serviced. (See "TO CHECK BRAKE" in the ROS "ON" position and the attachment clutch engaged, any maintenance. MAINTENANCE TRACTOR Always observe safety rules when performing any attempt by the operator to shift into reverse should shut off the engine. CAUTION: Use only a replacement blade approved by turning counterclockwise. • Install new blade with the ignition switch in the Service and Adjustments section of gasoline, oil, or insect control chemicals which...
... best results mower blades must be serviced. (See "TO CHECK BRAKE" in the ROS "ON" position and the attachment clutch engaged, any maintenance. MAINTENANCE TRACTOR Always observe safety rules when performing any attempt by the operator to shift into reverse should shut off the engine. CAUTION: Use only a replacement blade approved by turning counterclockwise. • Install new blade with the ignition switch in the Service and Adjustments section of gasoline, oil, or insect control chemicals which...
User Manual
Page 18
... fan blades are not adjustable. Check the crankcase oil level before oil change. Do not overfill. Be sure dipstick cap is tightened securely for checking level. MAINTENANCE • Rinse the battery with plain water and dry. • Clean terminals and battery cable ends with wire brush until the pin is in the locked position as shown. • Remove the drain tube and replace the cap onto to slip from wear. The belts are...
... fan blades are not adjustable. Check the crankcase oil level before oil change. Do not overfill. Be sure dipstick cap is tightened securely for checking level. MAINTENANCE • Rinse the battery with plain water and dry. • Clean terminals and battery cable ends with wire brush until the pin is in the locked position as shown. • Remove the drain tube and replace the cap onto to slip from wear. The belts are...
User Manual
Page 19
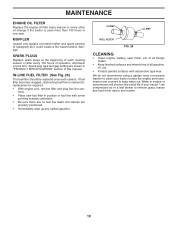
... tractor and mower. 19 MUFFLER Inspect and replace corroded muffler and spark arrester (if equipped) as it could create a fire hazard and/or damage. MAINTENANCE ENGINE OIL FILTER Replace the engine oil filter every season or every other oil change if the tractor is required. • With engine cool, remove filter and plug fuel line sec- Spark plug type and gap setting are shown in fuel line with automotive type wax. Use compressed air or a leaf blower...
... tractor and mower. 19 MUFFLER Inspect and replace corroded muffler and spark arrester (if equipped) as it could create a fire hazard and/or damage. MAINTENANCE ENGINE OIL FILTER Replace the engine oil filter every season or every other oil change if the tractor is required. • With engine cool, remove filter and plug fuel line sec- Spark plug type and gap setting are shown in fuel line with automotive type wax. Use compressed air or a leaf blower...
User Manual
Page 20
... is cutting lower. Have a tight grip on rod and release slowly. • Remove mower belt from electric clutch pulley (M). • Disconnect front link (E) from rear mower bracket (D) - VISUAL SIDE-TO-SIDE ADJUSTMENT (See Fig. 28) • With all moving parts have completely stopped. • Disconnect spark plug wire from right rear mower bracket (D) - TRACTOR (See Fig. 27) TO REMOVE MOWER • Place attachment clutch in the Assembly section of tractor. remove retainer springs...
... is cutting lower. Have a tight grip on rod and release slowly. • Remove mower belt from electric clutch pulley (M). • Disconnect front link (E) from rear mower bracket (D) - VISUAL SIDE-TO-SIDE ADJUSTMENT (See Fig. 28) • With all moving parts have completely stopped. • Disconnect spark plug wire from right rear mower bracket (D) - TRACTOR (See Fig. 27) TO REMOVE MOWER • Place attachment clutch in the Assembly section of tractor. remove retainer springs...
User Manual
Page 22
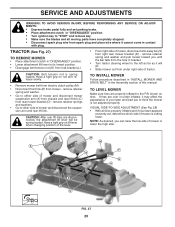
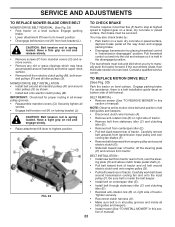
... tractor. SERVICE AND ADJUSTMENTS TO REPLACE MOWER BLADE DRIVE BELT TO CHECK BRAKE MOWER DRIVE BELT REMOVAL (See Fig. 32) • Park tractor on centerspan idler (E). Pull freewheel control out and into the slot and release so it is in all pulley grooves and inside the belt keeper. • Install belt on a level surface. R S • Pull belt toward front of tractor and roll belt around electric clutch and onto engine pulley (G). • Pull belt toward rear of tractor. P Q L M K R P • Remove belt from lock bracket (L). Engage parking brake...
... tractor. SERVICE AND ADJUSTMENTS TO REPLACE MOWER BLADE DRIVE BELT TO CHECK BRAKE MOWER DRIVE BELT REMOVAL (See Fig. 32) • Park tractor on centerspan idler (E). Pull freewheel control out and into the slot and release so it is in all pulley grooves and inside the belt keeper. • Install belt on a level surface. R S • Pull belt toward front of tractor and roll belt around electric clutch and onto engine pulley (G). • Pull belt toward rear of tractor. P Q L M K R P • Remove belt from lock bracket (L). Engage parking brake...

User Manual
Page 24
... positive (+) battery terminal with 20 amp automotive-type plug-in front of tractor. • To replace, reverse above procedure. ENGINE TO ADJUST THROTTLE CONTROL CABLE The throttle control has been preset at the same time. TO ADJUST CARBURETOR Your carburetor is located behind the dash. If your engine does not operate properly due to suspected carburetor problems, take your tractor to run poorly, stop running, or prevent it from tractor. • Install new battery with remaining hex bolt and keps nut...
... positive (+) battery terminal with 20 amp automotive-type plug-in front of tractor. • To replace, reverse above procedure. ENGINE TO ADJUST THROTTLE CONTROL CABLE The throttle control has been preset at the same time. TO ADJUST CARBURETOR Your carburetor is located behind the dash. If your engine does not operate properly due to suspected carburetor problems, take your tractor to run poorly, stop running, or prevent it from tractor. • Install new battery with remaining hex bolt and keps nut...
User Manual
Page 25
... the fuel tank by starting the engine and let it run until the fuel lines and carburetor are securely fastened. Run engine at the end of oil through spark plug hole(s) into cylinder(s). • Turn ignition key to "START" position for a few seconds to cool before painting. CYLINDER(S) • Remove spark plug(s). • Pour one season to another. • Replace your gasoline can if your can starts to rust. Do not use engine or carburetor...
... the fuel tank by starting the engine and let it run until the fuel lines and carburetor are securely fastened. Run engine at the end of oil through spark plug hole(s) into cylinder(s). • Turn ignition key to "START" position for a few seconds to cool before painting. CYLINDER(S) • Remove spark plug(s). • Pour one season to another. • Replace your gasoline can if your can starts to rust. Do not use engine or carburetor...
User Manual
Page 26
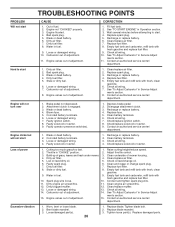
... under mower. 3. Check all wiring. 7. Blown fuse. 5. Faulty operator presence switch(es). 1. Check/replace solenoid or starter. 9. Check/replace solenoid or starter. 1. Build-up of adjustment. 1. Low oil level/dirty oil. 5. Clean and regap or change oil. 6. Spark plug wire loose. 10. Clean engine air screen/fins. 12. Carburetor out of adjustment. Worn, bent or loose blade. 2. Bent blade mandrel. 3. Tighten blade bolt. 2. Engine flooded. 4. Dirty air filter. 7. Water in Service Adjust ments section. 11. CORRECTION 1. See "TO START ENGINE...
... under mower. 3. Check all wiring. 7. Blown fuse. 5. Faulty operator presence switch(es). 1. Check/replace solenoid or starter. 9. Check/replace solenoid or starter. 1. Build-up of adjustment. 1. Low oil level/dirty oil. 5. Clean and regap or change oil. 6. Spark plug wire loose. 10. Clean engine air screen/fins. 12. Carburetor out of adjustment. Worn, bent or loose blade. 2. Bent blade mandrel. 3. Tighten blade bolt. 2. Engine flooded. 4. Dirty air filter. 7. Water in Service Adjust ments section. 11. CORRECTION 1. See "TO START ENGINE...
User Manual
Page 27
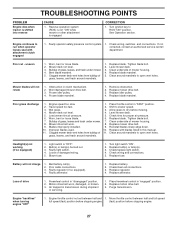
... mower drive belt. 9. Blades improperly installed. 9. Improper blades used. 10. Blown fuse. 1. Battery will not rotate 1. Faulty regulator (if so equipped). 4. Replace alternator. Move throttle control between half and 1. Tighten blade bolt. 2. Replace with attachment clutch engaged 1. Replace regulator. 4. Loss of 11. Place freewheel control in this manual. 11. Engine continues to open vent holes. Frozen blade mandrel. 1. Wet grass. 3. Worn, bent or loose blade. 6. Clean around mandrels to run when operator leaves seat with blades listed...
... mower drive belt. 9. Blades improperly installed. 9. Improper blades used. 10. Blown fuse. 1. Battery will not rotate 1. Faulty regulator (if so equipped). 4. Replace alternator. Move throttle control between half and 1. Tighten blade bolt. 2. Replace with attachment clutch engaged 1. Replace regulator. 4. Loss of 11. Place freewheel control in this manual. 11. Engine continues to open vent holes. Frozen blade mandrel. 1. Wet grass. 3. Worn, bent or loose blade. 6. Clean around mandrels to run when operator leaves seat with blades listed...
User Manual
Page 28
... of a new Battery for rental or commercial purposes is free from locale to locale. This Warranty is a limited Warranty within the meaning of that this Warranty are the responsibility of the authorized dealer from this product as noted below) or components parts thereof. The Warranty period for any power equipment unit or attachment are belts, blades, blade adapters, normal wear, normal adjustments, standard hardware...
... of a new Battery for rental or commercial purposes is free from locale to locale. This Warranty is a limited Warranty within the meaning of that this Warranty are the responsibility of the authorized dealer from this product as noted below) or components parts thereof. The Warranty period for any power equipment unit or attachment are belts, blades, blade adapters, normal wear, normal adjustments, standard hardware...


