
User Manual
Page 2
... the machine. CHILDREN Tragic accidents can change the stability of other attachments. Never remove gas cap or add fuel with manufacturer's recommended parts, when necessary. Wrap the blade(s) or wear gloves, and use grass catcher on the slope. BECOME ALERT!!! YOUR SAFETY IS INVOLVED. .14111,0 6.013, CAUTION: Always disconnect spark plug wire and place wire where it . Always turn off blades, set parking brake, stop or shift while on...
... the machine. CHILDREN Tragic accidents can change the stability of other attachments. Never remove gas cap or add fuel with manufacturer's recommended parts, when necessary. Wrap the blade(s) or wear gloves, and use grass catcher on the slope. BECOME ALERT!!! YOUR SAFETY IS INVOLVED. .14111,0 6.013, CAUTION: Always disconnect spark plug wire and place wire where it . Always turn off blades, set parking brake, stop or shift while on...

User Manual
Page 4
... 16 Replacement 16 Brake Adjustment 22 C Carburetor Adjustment Controls, Tractor Customer Responsibilities Engine: Air Filter Air Screen Cooling Fins Engine Oil Fuel Filter Spark Plug(s) Tractor: Battery Blade Lubrication Chart Maintenance Schedule Tire Care Transaxle Cutting Height, Mower 25 11 15-19 18 18 18 13,17 19 19 17 16 15 15 7,16,23 17 12 E Electrical: Interlocks and Relays 24 Schematic 29 Wiring Diagram 30 Engine: Air Filter Air Screen Cooling Fins Oil Change Oil Level Oil Type Preparation Starting Storage Filter: Air Filter Fuel Fuel: Type Storage Fuse H Hood Removal...
... 16 Replacement 16 Brake Adjustment 22 C Carburetor Adjustment Controls, Tractor Customer Responsibilities Engine: Air Filter Air Screen Cooling Fins Engine Oil Fuel Filter Spark Plug(s) Tractor: Battery Blade Lubrication Chart Maintenance Schedule Tire Care Transaxle Cutting Height, Mower 25 11 15-19 18 18 18 13,17 19 19 17 16 15 15 7,16,23 17 12 E Electrical: Interlocks and Relays 24 Schematic 29 Wiring Diagram 30 Engine: Air Filter Air Screen Cooling Fins Oil Change Oil Level Oil Type Preparation Starting Storage Filter: Air Filter Fuel Fuel: Type Storage Fuse H Hood Removal...
User Manual
Page 6
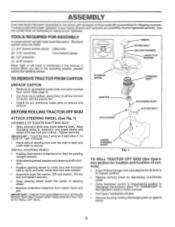
... shaft. Slide steering wheel adapter onto steering shaft extension. Position steering wheel so cross bars are in the operating position (seated behind the steering wheel). IMPORTANT: CHECK FOR AND REMOVE ANY STAPLES IN SKID THAT MAY PUNCTURE TIRES WHERE TRACTOR IS TO ROLL OFF SKID. Standard wrench sizes are pointing straight forward. TOOLS REQUIRED FOR ASSEMBLY A socket wrench set will make assembly easier. ASSEMELY Your new tractor has been assembled...
... shaft. Slide steering wheel adapter onto steering shaft extension. Position steering wheel so cross bars are in the operating position (seated behind the steering wheel). IMPORTANT: CHECK FOR AND REMOVE ANY STAPLES IN SKID THAT MAY PUNCTURE TIRES WHERE TRACTOR IS TO ROLL OFF SKID. Standard wrench sizes are pointing straight forward. TOOLS REQUIRED FOR ASSEMBLY A socket wrench set will make assembly easier. ASSEMELY Your new tractor has been assembled...
User Manual
Page 8
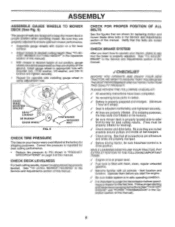
... to operate your tractor, check to -rear for best cutting results. (Tires must be properly leveled. Follow proper starting and transmission purging instructions (See "TO START ENGINE" and "PURGE TRANSMISSION" in "PRODUCT SPECIFICATIONS" on your tractor for the first time. Verify that are designed to PSI shown in the Operation section of this manual). 8 ASSEMBLY ASSEMBLE GAUGE WHEELS TO MOWER DECK (See Fig. 5) The gauge wheels are shown for replacing motion and mower blade drive belts in the Service and Adjustments...
... to operate your tractor, check to -rear for best cutting results. (Tires must be properly leveled. Follow proper starting and transmission purging instructions (See "TO START ENGINE" and "PURGE TRANSMISSION" in "PRODUCT SPECIFICATIONS" on your tractor for the first time. Verify that are designed to PSI shown in the Operation section of this manual). 8 ASSEMBLY ASSEMBLE GAUGE WHEELS TO MOWER DECK (See Fig. 5) The gauge wheels are shown for replacing motion and mower blade drive belts in the Service and Adjustments...

User Manual
Page 10
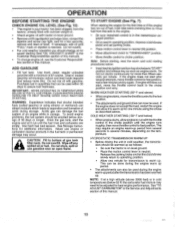
... of tractor. THROTTLE/CHOKE CONTROL - Used to raise and lower the mower deck or other attachments mounted to familiarize yourself with the locations of various controls and adjustments. Disengages transmission for starting and controlling engine speed. CLUTCH/BRAKE PEDAL: Used for starting the engine. MOTION CONTROL LEVER: Selects the speed and direction of the American National Standards Institute. ATTACHMENT LIFT LEVER - PARKING BRAKE: Locks clutch/brake pedal into the brake position. LIFT LEVER PLUNGER: Used to your tractor. IGNITION SWITCH: Used for declutching...
... of tractor. THROTTLE/CHOKE CONTROL - Used to raise and lower the mower deck or other attachments mounted to familiarize yourself with the locations of various controls and adjustments. Disengages transmission for starting and controlling engine speed. CLUTCH/BRAKE PEDAL: Used for starting the engine. MOTION CONTROL LEVER: Selects the speed and direction of the American National Standards Institute. ATTACHMENT LIFT LEVER - PARKING BRAKE: Locks clutch/brake pedal into the brake position. LIFT LEVER PLUNGER: Used to your tractor. IGNITION SWITCH: Used for declutching...

User Manual
Page 12
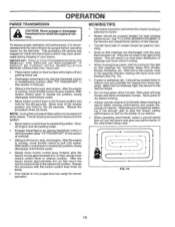
... engine running and the attachment clutch engaged will shut off the engine. Any attempt by inserting retainer spring into forward hole of tying hood to neutral (N) position. Use an appropriate means of control rod. • Do not push or tow tractor at the rear drawbar of cut. • Lower mower with attachment lift control. • Pull freewheel control knob out and hold in position by the operator to slowest setting...
... engine running and the attachment clutch engaged will shut off the engine. Any attempt by inserting retainer spring into forward hole of tying hood to neutral (N) position. Use an appropriate means of control rod. • Do not push or tow tractor at the rear drawbar of cut. • Lower mower with attachment lift control. • Pull freewheel control knob out and hold in position by the operator to slowest setting...
User Manual
Page 13
...; Check engine oil with tractor on level ground. • Remove oil fill cap/dipstick and wipe clean, reinsert the dipstick and screw cap tight, wait for the first time or if the engine has run out of fuel, it will increase carbon and lead oxide deposits and reduce valve life). Drain the gas tank, start the engine and let it run with the throttle control in the Customer Responsibilities section of this manual). • To change oil...
...; Check engine oil with tractor on level ground. • Remove oil fill cap/dipstick and wipe clean, reinsert the dipstick and screw cap tight, wait for the first time or if the engine has run out of fuel, it will increase carbon and lead oxide deposits and reduce valve life). Drain the gas tank, start the engine and let it run with the throttle control in the Customer Responsibilities section of this manual). • To change oil...
User Manual
Page 14
... (N) position. See "TO LEVEL MOWER HOUSING" in the tractor seat, start by placing freewheel control in freewheeling position (See "TO TRANSPORT" in this manual. • The left hand turns until finished (See Fig. 10). • If grass is running, move motion control lever to full forward position and hold for the first time. Have the cut relatively high; The air is wet. Repeat this procedure with engine off and parking brake set...
... (N) position. See "TO LEVEL MOWER HOUSING" in the tractor seat, start by placing freewheel control in freewheeling position (See "TO TRANSPORT" in this manual. • The left hand turns until finished (See Fig. 10). • If grass is running, move motion control lever to full forward position and hold for the first time. Have the cut relatively high; The air is wet. Repeat this procedure with engine off and parking brake set...

User Manual
Page 15
... SERVICE PS`C.1 SERVICE DATES Check Brake Operation Check Tire Pressure V Vi T Check for Loose Fasteners R Sharpen/Replace Mower Blades A C Lubrication Chart T Check Battery LeveVRecharge V7 V4 V V 4/6 Clean Battery and Terminals V V R Check Transaxle Cooling Adjust Blade Belt(s) Tension Vs Adjust Motion Drive Belt(s) Tension Check Engine Oil Level Change Engine Oil • VE2,3 V E Clean Air Filter N Clean Air Screen Inspect Muffler/Spark Arrester V2 I/2 V Replace Oil Filter (If equipped) N Clean Engine Cooling Fins E Replace Spark Plug 64,2 6/2 V V Replace Air...
... SERVICE PS`C.1 SERVICE DATES Check Brake Operation Check Tire Pressure V Vi T Check for Loose Fasteners R Sharpen/Replace Mower Blades A C Lubrication Chart T Check Battery LeveVRecharge V7 V4 V V 4/6 Clean Battery and Terminals V V R Check Transaxle Cooling Adjust Blade Belt(s) Tension Vs Adjust Motion Drive Belt(s) Tension Check Engine Oil Level Change Engine Oil • VE2,3 V E Clean Air Filter N Clean Air Screen Inspect Muffler/Spark Arrester V2 I/2 V Replace Oil Filter (If equipped) N Clean Engine Cooling Fins E Replace Spark Plug 64,2 6/2 V V Replace Air...

User Manual
Page 16
.... BLADE MANDREL ASSEMBLY FLAT WASHER LOCK WASHER HEX BOLT (GRADE 8)* TRAILING EDGE *A GRADE 8 HEAT TREATED BOLT CAN BE IDENTIFIED BY SIX LINES ON THE BOLT HEAD. tery cable and remove battery from your local parts dealer. If blade is sufficient for normal use a nail for 1 hour. NOTE: Do not use . TIRES • Maintain proper air pressure in a horizontal position. TO CLEAN BATTERY AND TERMINALS Corrosion and dirt on a grinding wheel. Lbs...
.... BLADE MANDREL ASSEMBLY FLAT WASHER LOCK WASHER HEX BOLT (GRADE 8)* TRAILING EDGE *A GRADE 8 HEAT TREATED BOLT CAN BE IDENTIFIED BY SIX LINES ON THE BOLT HEAD. tery cable and remove battery from your local parts dealer. If blade is sufficient for normal use a nail for 1 hour. NOTE: Do not use . TIRES • Maintain proper air pressure in a horizontal position. TO CLEAN BATTERY AND TERMINALS Corrosion and dirt on a grinding wheel. Lbs...

User Manual
Page 17
....) improve starting the engine and after 100 hours of operation and replace if necessary. Check the crankcase oil level before oil change. Pour slowly. TRANSAXLE PUMP FLUID The transaxle was sealed at "FULL" line on oil. Select the oil's SAE viscosity grade according to clean fan or transmission while engine is running low on dipstick. Remove drain plug. • After oil has drained completely, replace oil drain plug and tighten securely. • Refill engine with API service classification...
....) improve starting the engine and after 100 hours of operation and replace if necessary. Check the crankcase oil level before oil change. Pour slowly. TRANSAXLE PUMP FLUID The transaxle was sealed at "FULL" line on oil. Select the oil's SAE viscosity grade according to clean fan or transmission while engine is running low on dipstick. Remove drain plug. • After oil has drained completely, replace oil drain plug and tighten securely. • Refill engine with API service classification...

User Manual
Page 18
... 1/2 to 3/4 turn. • Fill crankcase with a wire brush or compressed air to prevent engine damage from overheating. • Remove screws from overheating. DIPSTICK TUBE ASSEMBLY AIR SCREEN 0 ENGINE COOLING FINS SPARK PLUG 18 FIG. 15 If very dirty or damaged, replace pre-cleaner. • Reinstall pre-cleaner over cartridge. Use a suitable container to catch oil. • Apply a thin coating of this manual. • Start engine and check for oil leaks. Service air cleaner...
... 1/2 to 3/4 turn. • Fill crankcase with a wire brush or compressed air to prevent engine damage from overheating. • Remove screws from overheating. DIPSTICK TUBE ASSEMBLY AIR SCREEN 0 ENGINE COOLING FINS SPARK PLUG 18 FIG. 15 If very dirty or damaged, replace pre-cleaner. • Reinstall pre-cleaner over cartridge. Use a suitable container to catch oil. • Apply a thin coating of this manual. • Start engine and check for oil leaks. Service air cleaner...

User Manual
Page 19
... fuel line leaks and clamps are covered to clean your tractor unless the electrical system, muffler, air filter and carburetor are properly positioned. • Immediately wipe up any spilled gasoline. of all foreign matter. • Keep finished surfaces and wheels free of operation, whichever occurs first. If fuel filter becomes clogged, obstructing fuel flow to carburetor, replacement is required. • With engine cool, remove filter and plug fuel line sections. • Place new fuel filter in position in "PRODUCT SPECIFICATIONS...
... fuel line leaks and clamps are covered to clean your tractor unless the electrical system, muffler, air filter and carburetor are properly positioned. • Immediately wipe up any spilled gasoline. of all foreign matter. • Keep finished surfaces and wheels free of operation, whichever occurs first. If fuel filter becomes clogged, obstructing fuel flow to carburetor, replacement is required. • With engine cool, remove filter and plug fuel line sections. • Place new fuel filter in position in "PRODUCT SPECIFICATIONS...

User Manual
Page 20
...-SWAY BAR RETAINER SPRINGS (BOTH SIDES) FIG. 17 CLUTCH LEVER RETAINER SPRING ENGINE PULLEY RETAINER SPRINGS (BOTH SIDES) 20 SERVICE AND ADJUSTMENTS CAUTION: BEFORE PERFORMING ANY SERVICE OR ADJUSTMENTS: • Depress clutch/brake pedal fully and set parking brake. • Place motion control lever in neutral (N) position. • Place attachment clutch in "DISENGAGED" position. • Turn ignition key "OFF" and remove key. • Make sure the blades and all moving parts have completely stopped. • Disconnect spark plug wire from spark plug...
...-SWAY BAR RETAINER SPRINGS (BOTH SIDES) FIG. 17 CLUTCH LEVER RETAINER SPRING ENGINE PULLEY RETAINER SPRINGS (BOTH SIDES) 20 SERVICE AND ADJUSTMENTS CAUTION: BEFORE PERFORMING ANY SERVICE OR ADJUSTMENTS: • Depress clutch/brake pedal fully and set parking brake. • Place motion control lever in neutral (N) position. • Place attachment clutch in "DISENGAGED" position. • Turn ignition key "OFF" and remove key. • Make sure the blades and all moving parts have completely stopped. • Disconnect spark plug wire from spark plug...
User Manual
Page 22
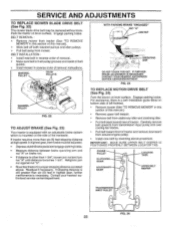
... engine pulley. • Install new belt by reversing above . Contact your nearest authorized service center/department. If tractor requires more than 1-3/4", loosen jam nut and turn nut "A" until distance becomes 1-3/4". IF FURTHER BRAKE ADJUSTMENT IS NECESSARY CONTACT YOUR NEAREST AUTHORIZED SERVICE CENTER/DEPARTMENT FIG. 23 TO REPLACE MOTION DRIVE BELT (See Fig. 24) Park the tractor on level surface. BELT REMOVAL - • Remove mower from tractor (See "TO REMOVE MOWER" in highest gear, then brake must be replaced...
... engine pulley. • Install new belt by reversing above . Contact your nearest authorized service center/department. If tractor requires more than 1-3/4", loosen jam nut and turn nut "A" until distance becomes 1-3/4". IF FURTHER BRAKE ADJUSTMENT IS NECESSARY CONTACT YOUR NEAREST AUTHORIZED SERVICE CENTER/DEPARTMENT FIG. 23 TO REPLACE MOTION DRIVE BELT (See Fig. 24) Park the tractor on level surface. BELT REMOVAL - • Remove mower from tractor (See "TO REMOVE MOWER" in highest gear, then brake must be replaced...

User Manual
Page 25
... throttle control cable is adjusted properly (see above). If the carburetor does need adjustment, proceed as described below before loosening cable. Turning the idle mixture valve out (counterclockwise) increases the supply of fuel to a point midway between those two positions. X (ART #1915) 25 FINAL SETTING - • Start engine and allow to remove the limiter cap. High speed stop is equipped with an idle fuel adjusting needle with engine running , move throttle control lever from slow to the engine giving a leaner fuel/ air mixture...
... throttle control cable is adjusted properly (see above). If the carburetor does need adjustment, proceed as described below before loosening cable. Turning the idle mixture valve out (counterclockwise) increases the supply of fuel to a point midway between those two positions. X (ART #1915) 25 FINAL SETTING - • Start engine and allow to remove the limiter cap. High speed stop is equipped with an idle fuel adjusting needle with engine running , move throttle control lever from slow to the engine giving a leaner fuel/ air mixture...

User Manual
Page 26
... of oil through spark plug hole(s) into cylinder(s). • Turn ignition key to "START' position for 30 days or more. Do not drain the gas tank and carburetor if using fuel stabilizer. sand lightly before storing in . ACIDIC GAS CAN DAMAGE THE FUEL SYSTEM OF AN ENGINE WHILE IN STORAGE. • Drain the fuel tank. • Start the engine and let it run until the fuel lines and carburetor are securely fastened. Always follow the mix ratio...
... of oil through spark plug hole(s) into cylinder(s). • Turn ignition key to "START' position for 30 days or more. Do not drain the gas tank and carburetor if using fuel stabilizer. sand lightly before storing in . ACIDIC GAS CAN DAMAGE THE FUEL SYSTEM OF AN ENGINE WHILE IN STORAGE. • Drain the fuel tank. • Start the engine and let it run until the fuel lines and carburetor are securely fastened. Always follow the mix ratio...

User Manual
Page 27
... oil level/change spark plug. 7. Drain fuel tank and carburetor, refill tank with fresh gasoline. 6. Replace blade. Stale or dirty fuel. 6. Blown fuse. 5. Depress clutch/brake pedal. 2. Corroded battery terminals. 3. Loss of mower housing. 4. Clean engine air screen/fins. 12. Replace blade mandrel. 3. Replace spark plug. 5. Contact an authorized service center/department. Water in fuel. 8. Dirty air filter. 2. Replace fuel filter. 8. Check all wiring. 7. Replace fuel filter. 5. Clean underside of power 1. Adjust throttle control. 3. Tighten blade bolt...
... oil level/change spark plug. 7. Drain fuel tank and carburetor, refill tank with fresh gasoline. 6. Replace blade. Stale or dirty fuel. 6. Blown fuse. 5. Depress clutch/brake pedal. 2. Corroded battery terminals. 3. Loss of mower housing. 4. Clean engine air screen/fins. 12. Replace blade mandrel. 3. Replace spark plug. 5. Contact an authorized service center/department. Water in fuel. 8. Dirty air filter. 2. Replace fuel filter. 8. Check all wiring. 7. Replace fuel filter. 5. Clean underside of power 1. Adjust throttle control. 3. Tighten blade bolt...

User Manual
Page 28
... drive belt worn. 9. Check wiring and connections. 5. Wet grass. 4. Blades improperly installed. 10. Bulb(s) burned out. 3. Faulty light switch. 4. Engine throttle control not set at "SLOW" position for 30 seconds before mowing. 4. Replace/sharpen blade. Check/clean all connections. 3. Low/uneven tire air pressure. 6. Replace fuse. Clogged mower deck vent holes from buildup of mower housing. 8. Check tires for proper air pressure. 6. Check/replace light switch. 4. Replace blade mandrel. 5. Replace idler pulley. 4. Replace battery. 2. TROUBLESHOOTING...
... drive belt worn. 9. Check wiring and connections. 5. Wet grass. 4. Blades improperly installed. 10. Bulb(s) burned out. 3. Faulty light switch. 4. Engine throttle control not set at "SLOW" position for 30 seconds before mowing. 4. Replace/sharpen blade. Check/clean all connections. 3. Low/uneven tire air pressure. 6. Replace fuse. Clogged mower deck vent holes from buildup of mower housing. 8. Check tires for proper air pressure. 6. Check/replace light switch. 4. Replace blade mandrel. 5. Replace idler pulley. 4. Replace battery. 2. TROUBLESHOOTING...
User Manual
Page 35
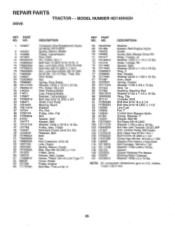
... Ga. Asm, Shaft Spring, Torsion Washer 17/32 x 3/4 x 16 Ga. Nut Hex Jam Toplock 1/2-20 UNF Arm, Control Pump 500 Hydro Bolt, Head Hex 5/16 x 18 x 1 Bolt H 5/16-18 UNC x 1-1/4 Screw Hex Wh Hd #10-24 x 1-5/8 Adaptor Fan Hydro Lt Hyd Alum Bolt Carriage 3/8-16 x 1.25 Washer 11/32 x 5/8 x 16 Ga. inches. 1 inch = 25.4 mm. 35. MODEL NUMBER HD145H42H DRIVE KEY PART NO. Thds. Pin, Cotter 1/8 x 3/4 Rod, Parking Brake Cap, Parking Brake Bracket, Transmission Bolt Hex...
... Ga. Asm, Shaft Spring, Torsion Washer 17/32 x 3/4 x 16 Ga. Nut Hex Jam Toplock 1/2-20 UNF Arm, Control Pump 500 Hydro Bolt, Head Hex 5/16 x 18 x 1 Bolt H 5/16-18 UNC x 1-1/4 Screw Hex Wh Hd #10-24 x 1-5/8 Adaptor Fan Hydro Lt Hyd Alum Bolt Carriage 3/8-16 x 1.25 Washer 11/32 x 5/8 x 16 Ga. inches. 1 inch = 25.4 mm. 35. MODEL NUMBER HD145H42H DRIVE KEY PART NO. Thds. Pin, Cotter 1/8 x 3/4 Rod, Parking Brake Cap, Parking Brake Bracket, Transmission Bolt Hex...


