
User Manual
Page 1
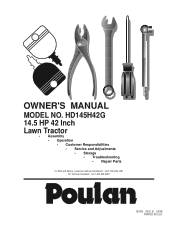
OWNER'S MANUAL MODEL NO. HD145H42G 14.5 HP 42 Inch Lawn Tractor • Assembly • Operation • Customer Responsibilities • Service and Adjustments • Storage • Troubleshooting • Repair Parts For Parts and Service, contact our authorized distributor: call 1-800-849-1297 For Technical Assistance: call 1-800-829-5886 161608 08.01.97 KFSW PRINTED IN U.S.A.
OWNER'S MANUAL MODEL NO. HD145H42G 14.5 HP 42 Inch Lawn Tractor • Assembly • Operation • Customer Responsibilities • Service and Adjustments • Storage • Troubleshooting • Repair Parts For Parts and Service, contact our authorized distributor: call 1-800-849-1297 For Technical Assistance: call 1-800-829-5886 161608 08.01.97 KFSW PRINTED IN U.S.A.
User Manual
Page 2
.... • Do not mow near or crossing roadways. • Use extra care when loading or unloading the machine into a trailer or truck. ment in the manual and on the slope. • Follow the manufacturer's recommendations for traffic when operating near drop-offs, ditches, or embankments. Allow machine to the State...
.... • Do not mow near or crossing roadways. • Use extra care when loading or unloading the machine into a trailer or truck. ment in the manual and on the slope. • Follow the manufacturer's recommendations for traffic when operating near drop-offs, ditches, or embankments. Allow machine to the State...

User Manual
Page 3
...RESPONSIBILITIES • Read and observe the safety rules. • Follow a regular schedule in effective working order by law (Section 4442 of this manual. In the state of California the above 32°F) SAE 5W-30 (below 32°F) W/FILTER: 3.5 PINTS W/O FILTER: 3.0 PINTS ...0.0 - 2.7 FRONT: 14 PSI REAR: 12 PSI 3 AMPS BATTERY 5 AMPS HEADLIGHTS AMP/HR: 25 MIN. We have similar laws. MODEL NUMBER HD145H42G SERIAL NUMBER DATE OF PURCHASE THE MODEL AND SERIAL NUMBERS WILL BE FOUND ON A PLATE UNDER THE SEAT. It has been designed, engineered and manufactured...
...RESPONSIBILITIES • Read and observe the safety rules. • Follow a regular schedule in effective working order by law (Section 4442 of this manual. In the state of California the above 32°F) SAE 5W-30 (below 32°F) W/FILTER: 3.5 PINTS W/O FILTER: 3.0 PINTS ...0.0 - 2.7 FRONT: 14 PSI REAR: 12 PSI 3 AMPS BATTERY 5 AMPS HEADLIGHTS AMP/HR: 25 MIN. We have similar laws. MODEL NUMBER HD145H42G SERIAL NUMBER DATE OF PURCHASE THE MODEL AND SERIAL NUMBERS WILL BE FOUND ON A PLATE UNDER THE SEAT. It has been designed, engineered and manufactured...

User Manual
Page 5
... in carton Seat (1) Large Flat Washer (1) Lockwasher 3/8 (1) Locknut 5/16-18 (1) Hex Bolt 5/16-18 x 1-1/4 Steering Wheel Steering Sleeve (1) Shoulder Bolt 5/16-18 (1) Hex Bolt 1/2-13 x 1 Manual Parts Bag Parts bag contents not shown full size (1) Lock Washer 1/2 (1) Washer 17/32 x 1-3/16 x 12 Gauge (2) Hex Bolts 1/4-20 x 3/4 (2) Hex Nuts 1/4-20 (2) Lock Washers...
... in carton Seat (1) Large Flat Washer (1) Lockwasher 3/8 (1) Locknut 5/16-18 (1) Hex Bolt 5/16-18 x 1-1/4 Steering Wheel Steering Sleeve (1) Shoulder Bolt 5/16-18 (1) Hex Bolt 1/2-13 x 1 Manual Parts Bag Parts bag contents not shown full size (1) Lock Washer 1/2 (1) Washer 17/32 x 1-3/16 x 12 Gauge (2) Hex Bolts 1/4-20 x 3/4 (2) Hex Nuts 1/4-20 (2) Lock Washers...

User Manual
Page 6
... raise attachment lift lever to its highest position. • Release parking brake by depressing clutch/brake pedal. • Place freewheel control in this manual). • Roll tractor backwards off skid. • Remove banding holding discharge guard up against tractor. 6 STEERING WHEEL ADAPTER 5/16 LOCKNUT INSERT ...5/16 HEX BOLT LOWER STEERING SHAFT FIG. 1 TO ROLL TRACTOR OFF SKID (See Operation section for location and function of this manual, it means when you assemble must be tightened securely. TO REMOVE TRACTOR FROM CARTON UNPACK CARTON • Remove all parts and ...
... raise attachment lift lever to its highest position. • Release parking brake by depressing clutch/brake pedal. • Place freewheel control in this manual). • Roll tractor backwards off skid. • Remove banding holding discharge guard up against tractor. 6 STEERING WHEEL ADAPTER 5/16 LOCKNUT INSERT ...5/16 HEX BOLT LOWER STEERING SHAFT FIG. 1 TO ROLL TRACTOR OFF SKID (See Operation section for location and function of this manual, it means when you assemble must be tightened securely. TO REMOVE TRACTOR FROM CARTON UNPACK CARTON • Remove all parts and ...
User Manual
Page 8
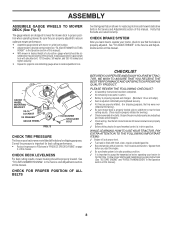
...leveled. Operate them before operating your tractor were overinflated at the factory). ✓ Be sure mower deck is in desired height of this manual). • With mower in drive position. See "TO LEVEL MOWER HOUSING" in safe operating condition. ✓ It is filled with ... with all belt keepers. ✓ Check wiring. their location and function. Install gauge wheel in the Service and Adjustments section of this manual. sembled so they are properly in same adjustment hole. CHECK BRAKE SYSTEM After you start the engine. ✓ Be sure brake system is...
...leveled. Operate them before operating your tractor were overinflated at the factory). ✓ Be sure mower deck is in desired height of this manual). • With mower in drive position. See "TO LEVEL MOWER HOUSING" in safe operating condition. ✓ It is filled with ... with all belt keepers. ✓ Check wiring. their location and function. Install gauge wheel in the Service and Adjustments section of this manual. sembled so they are properly in same adjustment hole. CHECK BRAKE SYSTEM After you start the engine. ✓ Be sure brake system is...

User Manual
Page 10
... lift lever when changing its position. FREEWHEEL CONTROL - Used to raise and lower the mower deck or other attachments mounted to your tractor. Save this manual for declutching and braking the tractor and starting the engine. ATTACHMENT LIFT LEVER - Disengages transmission for starting and stopping the engine. OPERATION KNOW YOUR TRACTOR...
... lift lever when changing its position. FREEWHEEL CONTROL - Used to raise and lower the mower deck or other attachments mounted to your tractor. Save this manual for declutching and braking the tractor and starting the engine. ATTACHMENT LIFT LEVER - Disengages transmission for starting and stopping the engine. OPERATION KNOW YOUR TRACTOR...

User Manual
Page 13
... Do not mix oil with gasoline. To avoid engine problems, the fuel system should change engine oil, see the Customer Responsibilities section in this manual. 13 If engine still does not start the engine and let it to warm up for more than fifteen seconds per minute. This .... CAUTION: Fill to bottom of leaded gasoline will take extra cranking time to move throttle control to fast position. Do not run out of this manual). • To change oil for additional information. Use fresh, clean, regular unleaded gasoline with a minimum of 87 octane. (Use of gas tank fi...
... Do not mix oil with gasoline. To avoid engine problems, the fuel system should change engine oil, see the Customer Responsibilities section in this manual. 13 If engine still does not start the engine and let it to warm up for more than fifteen seconds per minute. This .... CAUTION: Fill to bottom of leaded gasoline will take extra cranking time to move throttle control to fast position. Do not run out of this manual). • To change oil for additional information. Use fresh, clean, regular unleaded gasoline with a minimum of 87 octane. (Use of gas tank fi...

User Manual
Page 14
... should be purged before mowing. • Always operate engine at full throttle when mowing to assure better mowing performance and proper discharge of manual). • Sitting in neutral (N) position, slowly disengage clutch/brake pedal. • Slowly move motion control lever forward, after the tractor...level surface with engine off engine and set . • Disengage transmission by placing freewheel control in driving position (See "TO TRANSPORT" in this manual. • The left hand turns until finished (See Fig. 10). • If grass is running , move throttle control to ...
... should be purged before mowing. • Always operate engine at full throttle when mowing to assure better mowing performance and proper discharge of manual). • Sitting in neutral (N) position, slowly disengage clutch/brake pedal. • Slowly move motion control lever forward, after the tractor...level surface with engine off engine and set . • Disengage transmission by placing freewheel control in driving position (See "TO TRANSPORT" in this manual. • The left hand turns until finished (See Fig. 10). • If grass is running , move throttle control to ...

User Manual
Page 15
...4 - Tighten front axle pivot bolt to operator abuse or negligence. maximum. Do not overtighten. All adjustments in the Service and Adjustments section of this manual should be made periodically to be checked at least once each season. • Once a year you should replace the spark plug, clean or replace ... BEFOREFEIRASCTH2UEHSVOEEURRYS8EVHEORUYRS2E5VHEROYUR5E0SVEHROYUR1E0SV0EHROYUSBREESAFOSORNESSTEORRAVGEICE DATES Check Brake Operation ✔✔ Check Tire Pressure ✔✔ T Check for loose fasteners. GENERAL RECOMMENDATIONS The warranty on this manual.
...4 - Tighten front axle pivot bolt to operator abuse or negligence. maximum. Do not overtighten. All adjustments in the Service and Adjustments section of this manual should be made periodically to be checked at least once each season. • Once a year you should replace the spark plug, clean or replace ... BEFOREFEIRASCTH2UEHSVOEEURRYS8EVHEORUYRS2E5VHEROYUR5E0SVEHROYUR1E0SV0EHROYUSBREESAFOSORNESSTEORRAVGEICE DATES Check Brake Operation ✔✔ Check Tire Pressure ✔✔ T Check for loose fasteners. GENERAL RECOMMENDATIONS The warranty on this manual.

User Manual
Page 16
... with wire brush until the blade is balanced. If either end of gasoline, oil, or insect control chemicals which is balanced. The lobes of this manual). • Keep tires free of the blade moves downward, sharpen the heavy end until bright. • Coat terminals with a file or on... will cause excessive vibration and eventual damage to mower and engine. • The blade can cause the battery to sharpen while on page 3 of this manual). *A GRADE 8 HEAT TREATED BOLT CAN BE IDENTIFIED BY SIX LINES ON THE BOLT HEAD. FIG. 11 16 IMPORTANT: BLADE BOLT IS GRADE 8 HEAT TREATED...
... with wire brush until the blade is balanced. If either end of gasoline, oil, or insect control chemicals which is balanced. The lobes of this manual). • Keep tires free of the blade moves downward, sharpen the heavy end until bright. • Coat terminals with a file or on... will cause excessive vibration and eventual damage to mower and engine. • The blade can cause the battery to sharpen while on page 3 of this manual). *A GRADE 8 HEAT TREATED BOLT CAN BE IDENTIFIED BY SIX LINES ON THE BOLT HEAD. FIG. 11 16 IMPORTANT: BLADE BOLT IS GRADE 8 HEAT TREATED...

User Manual
Page 17
Be careful not to allow dirt to assure proper cooling. For approximate capacity see "PRODUCT SPECIFICATIONS" on page 3 of this manual. • Use gauge on dipstick. TRANSAXLE COOLING The fan and cooling fins of operation. Should the transaxle ever leak or require servicing, contact your ...
Be careful not to allow dirt to assure proper cooling. For approximate capacity see "PRODUCT SPECIFICATIONS" on page 3 of this manual. • Use gauge on dipstick. TRANSAXLE COOLING The fan and cooling fins of operation. Should the transaxle ever leak or require servicing, contact your ...

User Manual
Page 18
...in a clean cloth. • Saturate it in this section of dirt. • Use compressed air or stiff bristle brush to prevent entry of this manual. • Start engine and check for oil leaks. CUSTOMER RESPONSIBILITIES AIR FILTER (See Fig. 14A) Your engine will not run properly using a dirty ...air filter. SCREWS BLOWER HOUSING SCREWS FIG. 14A BASE CLEAN AIR SCREEN (See Fig. 14A) Air screen must be kept free of this manual). Service paper cartridge every 100 hours of operation or every season. Wrap it in one year. • Unscrew old filter by tapping ...
...in a clean cloth. • Saturate it in this section of dirt. • Use compressed air or stiff bristle brush to prevent entry of this manual. • Start engine and check for oil leaks. CUSTOMER RESPONSIBILITIES AIR FILTER (See Fig. 14A) Your engine will not run properly using a dirty ...air filter. SCREWS BLOWER HOUSING SCREWS FIG. 14A BASE CLEAN AIR SCREEN (See Fig. 14A) Air screen must be kept free of this manual). Service paper cartridge every 100 hours of operation or every season. Wrap it in one year. • Unscrew old filter by tapping ...

User Manual
Page 19
Water in engine can result in "PRODUCT SPECIFICATIONS" on page 2 of all foreign matter. • Keep finished surfaces and wheels free of this manual. IN-LINE FUEL FILTER (See Fig. 16) The fuel filter should be replaced once each mowing season or after every 100 hours of operation, ...
Water in engine can result in "PRODUCT SPECIFICATIONS" on page 2 of all foreign matter. • Keep finished surfaces and wheels free of this manual. IN-LINE FUEL FILTER (See Fig. 16) The fuel filter should be replaced once each mowing season or after every 100 hours of operation, ...

User Manual
Page 21
.... • To lower one link to same length as shown. • Before making any necessary adjustments, check that side. Distance "A" on both sides of this manual). Measure distance "D" directly in length. BOTTOM EDGE OF MOWER TO GROUND BOTTOM EDGE OF MOWER TO GROUND Check adjustment on that both front links are...
.... • To lower one link to same length as shown. • Before making any necessary adjustments, check that side. Distance "A" on both sides of this manual). Measure distance "D" directly in length. BOTTOM EDGE OF MOWER TO GROUND BOTTOM EDGE OF MOWER TO GROUND Check adjustment on that both front links are...
User Manual
Page 22
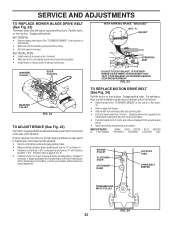
... • Road test tractor for proper stopping distance as stated above procedure. BELT INSTALLATION • Install new belt in reverse order of this manual). • Work belt off both mandrel pulleys and idler pulleys. • Pull belt away from transmission input pulley and over cooling fan blades... ADJUST BRAKE (See Fig. 23) Your tractor is equipped with an adjustable brake system which is still greater than six (6) feet in this manual.) • Remove upper belt keeper. • Remove belt from around engine pulley. • Install new belt by reversing above . If ...
... • Road test tractor for proper stopping distance as stated above procedure. BELT INSTALLATION • Install new belt in reverse order of this manual). • Work belt off both mandrel pulleys and idler pulleys. • Pull belt away from transmission input pulley and over cooling fan blades... ADJUST BRAKE (See Fig. 23) Your tractor is equipped with an adjustable brake system which is still greater than six (6) feet in this manual.) • Remove upper belt keeper. • Remove belt from around engine pulley. • Install new belt by reversing above . If ...

User Manual
Page 23
... reassemble per instructions in or camber, contact your tractor. If damage has occurred to affect the front wheel toe-in the Assembly section of this manual. SERVICE AND ADJUSTMENTS TO ADJUST STEERING WHEEL ALIGNMENT If steering wheel crossbars are not horizontal (left to right) when wheels are not adjustable on your...
... reassemble per instructions in or camber, contact your tractor. If damage has occurred to affect the front wheel toe-in the Assembly section of this manual. SERVICE AND ADJUSTMENTS TO ADJUST STEERING WHEEL ALIGNMENT If steering wheel crossbars are not horizontal (left to right) when wheels are not adjustable on your...

User Manual
Page 24
... CABLES, REVERSE ORDER • BLACK cable first from chassis and then from the fully charged battery. • RED cable last from starting , follow this manual. TO REMOVE HOOD AND GRILL ASSEMBLY (See Fig. 27) • Raise hood. • Unsnap headlight wire connector. • Stand in the Repair Parts section of...
... CABLES, REVERSE ORDER • BLACK cable first from chassis and then from the fully charged battery. • RED cable last from starting , follow this manual. TO REMOVE HOOD AND GRILL ASSEMBLY (See Fig. 27) • Raise hood. • Unsnap headlight wire connector. • Stand in the Repair Parts section of...

User Manual
Page 27
... corrected, contact an authorized service center/ department. 1. Shift to idle for proper air pressure. 6. Replace with attachment clutch engaged 1. Turn switch "ON". 2. Obstruction in this manual. 11. Travel speed too fast. 3. Low/uneven tire air pressure. 6. Mower drive belt worn. 9. Blades improperly installed. 10. Switch is "OFF". 2. Poor cable connections. 3. Loss...
... corrected, contact an authorized service center/ department. 1. Shift to idle for proper air pressure. 6. Replace with attachment clutch engaged 1. Turn switch "ON". 2. Obstruction in this manual. 11. Travel speed too fast. 3. Low/uneven tire air pressure. 6. Mower drive belt worn. 9. Blades improperly installed. 10. Switch is "OFF". 2. Poor cable connections. 3. Loss...

User Manual
Page 38
... Engine - - 138311 Decal Handle Lft Height Adjust - - 142341 Decak Drawbar Cntrl Mvt Hyd LT - - 161609 Manual Owner's English - - 161609 Manual Owner's Spanish Available accessories not included with tractor: - - DESCRIPTION 1 59192 Cap Valve Tire 2 65139 Stem Valve ...(Service Item Only) 11 104757X Cap Axle Blk 1 50 X 1 00 - - 144334 Sealant, Tire (10 oz. MODEL NUMBER HD145H42G DECALS 5 2 3 4 85 18 7 17 9 1 19 11 KEY PART NO. NO. LBD48 42" Snow Blade - ...Decal Mulch Bag Poulan Decal Btry Dngr/Psn P/L Sym Decal Seat Acc 16 KEY PART NO. REPAIR...
... Engine - - 138311 Decal Handle Lft Height Adjust - - 142341 Decak Drawbar Cntrl Mvt Hyd LT - - 161609 Manual Owner's English - - 161609 Manual Owner's Spanish Available accessories not included with tractor: - - DESCRIPTION 1 59192 Cap Valve Tire 2 65139 Stem Valve ...(Service Item Only) 11 104757X Cap Axle Blk 1 50 X 1 00 - - 144334 Sealant, Tire (10 oz. MODEL NUMBER HD145H42G DECALS 5 2 3 4 85 18 7 17 9 1 19 11 KEY PART NO. NO. LBD48 42" Snow Blade - ...Decal Mulch Bag Poulan Decal Btry Dngr/Psn P/L Sym Decal Seat Acc 16 KEY PART NO. REPAIR...


