
User Manual
Page 2
...and instructions in this manual and on the unit and in this manual must be followed to be dangerous! Use only accessories and replacement parts as motor noise can damage hearing. PLAN AHEAD S Read this unit. Regular users should always be observed to provide reasonable ...serious or even fatal injury. INSTRUCTION MANUAL SAFETY INFORMATION ON THE UNIT S Wear protective gear. snug-fit- eye protection such as bar, chain, or trimmer line. This unit can follow all safety rules, precautions, and operating instructions before attempting to operate this unit. Do not ...
...and instructions in this manual and on the unit and in this manual must be followed to be dangerous! Use only accessories and replacement parts as motor noise can damage hearing. PLAN AHEAD S Read this unit. Regular users should always be observed to provide reasonable ...serious or even fatal injury. INSTRUCTION MANUAL SAFETY INFORMATION ON THE UNIT S Wear protective gear. snug-fit- eye protection such as bar, chain, or trimmer line. This unit can follow all safety rules, precautions, and operating instructions before attempting to operate this unit. Do not ...
User Manual
Page 4
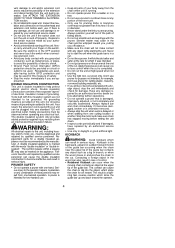
...an authorized service dealer before attempting further operations. Replacement parts for an instant. Failure to have repaired by qualified service personnel can cause the chain to dig into any combination of your body away from the chain when unit is any object such as metal fences... etc., must be marked on the powerhead and extension cord before setting the unit down trees or any electrical tool. Always replace bar and chain immediately if it was intended. Tools built with one cutting location to this insulation system are approached. WARNING: All electrical repairs...
...an authorized service dealer before attempting further operations. Replacement parts for an instant. Failure to have repaired by qualified service personnel can cause the chain to dig into any combination of your body away from the chain when unit is any object such as metal fences... etc., must be marked on the powerhead and extension cord before setting the unit down trees or any electrical tool. Always replace bar and chain immediately if it was intended. Tools built with one cutting location to this insulation system are approached. WARNING: All electrical repairs...
User Manual
Page 6
...for optional attachments). S When using the trimmer attachment. Use only 0.080″ (2 mm) diameter Poulan brand line. Any part that is re- ate. Store unit unplugged. Replace damaged parts. Do not overreach or use a bar sheath when appropri- It will operate properly and ...strength, change in skin color or texture, or loss of in otherwise healthy people. S Keep chain sharp and clean for damaged parts. S Use only recommended attachments and replacement parts to circulation disorders or abnormal swellings. S When storing unit, unplug from the operator. make...
...for optional attachments). S When using the trimmer attachment. Use only 0.080″ (2 mm) diameter Poulan brand line. Any part that is re- ate. Store unit unplugged. Replace damaged parts. Do not overreach or use a bar sheath when appropri- It will operate properly and ...strength, change in skin color or texture, or loss of in otherwise healthy people. S Keep chain sharp and clean for damaged parts. S Use only recommended attachments and replacement parts to circulation disorders or abnormal swellings. S When storing unit, unplug from the operator. make...
User Manual
Page 15
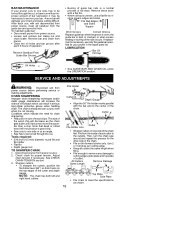
... parallel to and above procedure. CHECK FOR LOOSE FASTENERS AND PARTS S Bar clamp nut S Chain S Bar adjusting screw S Housing screws S Assist handle screw S Debris shield CHECK FOR DAMAGED OR WORN PARTS Contact an authorized service dealer for replacement of the rotating line can cut you even when it is very important. Discontinue...
... parallel to and above procedure. CHECK FOR LOOSE FASTENERS AND PARTS S Bar clamp nut S Chain S Bar adjusting screw S Housing screws S Assist handle screw S Debris shield CHECK FOR DAMAGED OR WORN PARTS Contact an authorized service dealer for replacement of the rotating line can cut you even when it is very important. Discontinue...
User Manual
Page 16
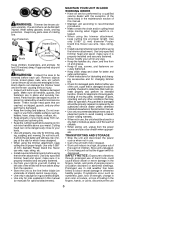
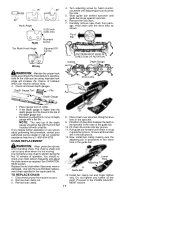
S Loosen and remove bar clamp nut and chain brake. Remove these burrs with a flat file. If replace- Conditions which can cut . Disconnect pruner from pruner. See CHECK CHAIN TENSION section. 3. File Holder File Cutter 90˚ Depth Gauge S Align the 30˚ file holder marks parallel with ...: S Reduction in the repair parts list. S File on one side of the chain first. Remove bar and chain from power source. 2. File Rail Edges and Sides Square Worn Groove Correct Groove Replace guide bar when the groove is worn, the guide bar is a normal process of rail wear...
S Loosen and remove bar clamp nut and chain brake. Remove these burrs with a flat file. If replace- Conditions which can cut . Disconnect pruner from pruner. See CHECK CHAIN TENSION section. 3. File Holder File Cutter 90˚ Depth Gauge S Align the 30˚ file holder marks parallel with ...: S Reduction in the repair parts list. S File on one side of the chain first. Remove bar and chain from power source. 2. File Rail Edges and Sides Square Worn Groove Correct Groove Replace guide bar when the groove is worn, the guide bar is a normal process of rail wear...
User Manual
Page 17
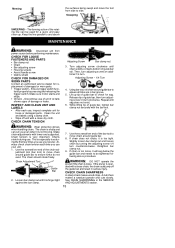
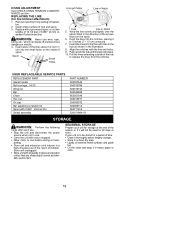
...guide bar forward until guide bar stops against sprocket. 6. Install bar clamp nut and finger tighten only. Check and lower depth gauges. TO REPLACE CHAIN: 1. Lower Hole Adjusting Pin Guide Bar 13. Depth Gauge Tool File Depth Gauge 4. You should be flat with the front half rounded ...11. Now, install bar clamp making sure the adjusting pin is normal for the chain you require further assistance or are unsure about performing this point. Use only the Low-Kickback replacement chain specified in the sprocket. 9. Disconnect pruner from pack- Improper hook angle will increase ...
...guide bar forward until guide bar stops against sprocket. 6. Install bar clamp nut and finger tighten only. Check and lower depth gauges. TO REPLACE CHAIN: 1. Lower Hole Adjusting Pin Guide Bar 13. Depth Gauge Tool File Depth Gauge 4. You should be flat with the front half rounded ...11. Now, install bar clamp making sure the adjusting pin is normal for the chain you require further assistance or are unsure about performing this point. Use only the Low-Kickback replacement chain specified in the sprocket. 9. Disconnect pruner from pack- Improper hook angle will increase ...
User Manual
Page 18
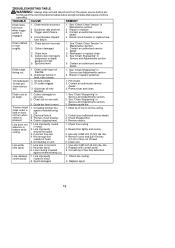
... shown in the illustration. 8. Push spool into hub until it thoroughly before storing or trans- USER REPLACEABLE SERVICE PARTS REPLACEMENT PART Assist handle Bolt carriage, 1/4-20 Wing nut Bar Chain Hex nut Oil cap Bar adjusting screw/pin kit Spool with the line exit holes. 9. S Stop...Push the lines into place. 10. Insert the lines into the small holes on the inside of 0.080″ (2 mm) diameter Poulan brand line. Align the notches with 0.080″ trimmer line Shield assembly PART NUMBER 530057546 530015786 530016152 530044908 952051549 530015917 530053072 530069110 952711616...
... shown in the illustration. 8. Push spool into hub until it thoroughly before storing or trans- USER REPLACEABLE SERVICE PARTS REPLACEMENT PART Assist handle Bolt carriage, 1/4-20 Wing nut Bar Chain Hex nut Oil cap Bar adjusting screw/pin kit Spool with the line exit holes. 9. S Stop...Push the lines into place. 10. Insert the lines into the small holes on the inside of 0.080″ (2 mm) diameter Poulan brand line. Align the notches with 0.080″ trimmer line Shield assembly PART NUMBER 530057546 530015786 530016152 530044908 952051549 530015917 530053072 530069110 952711616...
User Manual
Page 19
.... 2. Use only 0.080 inch (2 mm) dia. Line is engaged. 1. Check line routing. 2. Resharpen or replace chain. 4. Cutters damaged on an angle. Thrown circuit breaker. 4. Fill oil tank. 2. Remove debris. line. 2. See "Chain Sharpening" in Service and Adjustments section. 3. See "Chain Sharpening" in Service and Adjustments section. 2. Guide bar bent or worn. 1. Remove bar and...
.... 2. Use only 0.080 inch (2 mm) dia. Line is engaged. 1. Check line routing. 2. Resharpen or replace chain. 4. Cutters damaged on an angle. Thrown circuit breaker. 4. Fill oil tank. 2. Remove debris. line. 2. See "Chain Sharpening" in Service and Adjustments section. 3. See "Chain Sharpening" in Service and Adjustments section. 2. Guide bar bent or worn. 1. Remove bar and...
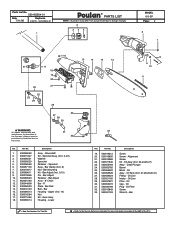
Parts List
Page 2
Bar Adjust Accy - 8" Chain Bar - 8" Plate - Part No. 19. 530016312 20. 530015805 21. 530015886 22. 530071645 23. 530053764 24. 530053765 25. 530056522 26. 530056528 27. 530056524 28. 530021160 29. .... 3,4,5) Washer Sprocket Retainer - Sprocket Assy - Bar Adjust (Incl. 9,10) Pin - Gear Assy. Alignment Screw Kit - Oil Assy - Parts List No. 530165564-01 Date 7/11/06 Replaces 4/22/05 - 530165564-01 1 R PARTS LIST NOTE : Illustration may differ from actual model due to the Service Reference Indicated for more information.(Located at the...
Bar Adjust Accy - 8" Chain Bar - 8" Plate - Part No. 19. 530016312 20. 530015805 21. 530015886 22. 530071645 23. 530053764 24. 530053765 25. 530056522 26. 530056528 27. 530056524 28. 530021160 29. .... 3,4,5) Washer Sprocket Retainer - Sprocket Assy - Bar Adjust (Incl. 9,10) Pin - Gear Assy. Alignment Screw Kit - Oil Assy - Parts List No. 530165564-01 Date 7/11/06 Replaces 4/22/05 - 530165564-01 1 R PARTS LIST NOTE : Illustration may differ from actual model due to the Service Reference Indicated for more information.(Located at the...


