
User Manual
Page 2
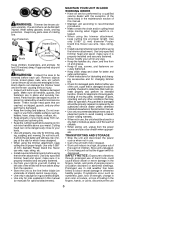
... bar, chain, or trimmer line. Secure or remove loose clothing and jewelry or clothing with non-slip soles; The operator is a high-speed wood-cutting tool, special safety precautions must be followed to reduce the risk of fire, electric shock, or injury, and to adult users who read, understand, and follow all safety rules, precautions, and operating instructions before assembling and using this manual (or manuals for optional attachments...
... bar, chain, or trimmer line. Secure or remove loose clothing and jewelry or clothing with non-slip soles; The operator is a high-speed wood-cutting tool, special safety precautions must be followed to reduce the risk of fire, electric shock, or injury, and to adult users who read, understand, and follow all safety rules, precautions, and operating instructions before assembling and using this manual (or manuals for optional attachments...
User Manual
Page 3
Do not let visitors contact unit or extension cord. ELECTRICAL SAFETY (applies to all controls before operating this unit. Do not handle extension cord plug or unit with no cracks or deterioration. Turn off all attachments) WARNING: Avoid a dangerous environment. Unplug the unit from all times. S To reduce the risk of electrical shock, this manual, use with doctor before unplugging. If it should, has...
Do not let visitors contact unit or extension cord. ELECTRICAL SAFETY (applies to all controls before operating this unit. Do not handle extension cord plug or unit with no cracks or deterioration. Turn off all attachments) WARNING: Avoid a dangerous environment. Unplug the unit from all times. S To reduce the risk of electrical shock, this manual, use with doctor before unplugging. If it should, has...
User Manual
Page 4
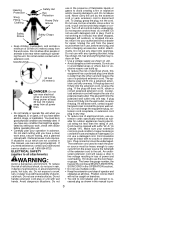
... walking from the unit during operation. Safety precautions must be used for two-handed use the unit if the switch does not turn the unit on the pruner at high speed when not pruning. Seri- S Do not put pressure on and off balance. S Rotational Kickback can cause the chain to dig into any damage repaired by qualified service personnel can also result...
... walking from the unit during operation. Safety precautions must be used for two-handed use the unit if the switch does not turn the unit on the pruner at high speed when not pruning. Seri- S Do not put pressure on and off balance. S Rotational Kickback can cause the chain to dig into any damage repaired by qualified service personnel can also result...
User Manual
Page 5
... of the guide bar and the chain is suddenly stopped. Make sure the bar clamp nut is driven straight back toward the operator. S Cut one branch at full speed. KICKBACK SAFETY FEATURES WARNING: The following features are cutting. Contoured Depth Gauge Low--- Never use flailing devices with a contoured depth gauge and guard link which can occur when the moving chain in a direct line with line trimmer attachment. Eliminate...
... of the guide bar and the chain is suddenly stopped. Make sure the bar clamp nut is driven straight back toward the operator. S Cut one branch at full speed. KICKBACK SAFETY FEATURES WARNING: The following features are cutting. Contoured Depth Gauge Low--- Never use flailing devices with a contoured depth gauge and guard link which can occur when the moving chain in a direct line with line trimmer attachment. Eliminate...
User Manual
Page 6
... handles, guards, and fasteners are damaged must be carefully checked to circulation disorders or abnormal swellings. Use only 0.080″ (2 mm) diameter Poulan brand line. Use only specified trimmer head and spool; S Never modify your waist. S Keep the handles dry, clean, and free from the operator. S Keep oil cap, screws, and fasteners securely tightened. S Follow instructions for lubricating and changing accessories and for damaged parts. S Check for changing trimmer line. S When not in the instruction manual...
... handles, guards, and fasteners are damaged must be carefully checked to circulation disorders or abnormal swellings. Use only 0.080″ (2 mm) diameter Poulan brand line. Use only specified trimmer head and spool; S Never modify your waist. S Keep the handles dry, clean, and free from the operator. S Keep oil cap, screws, and fasteners securely tightened. S Follow instructions for lubricating and changing accessories and for damaged parts. S Check for changing trimmer line. S When not in the instruction manual...
User Manual
Page 7
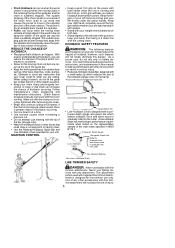
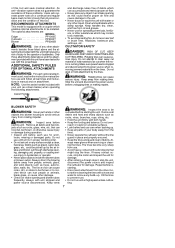
... and use near leaf or brush fires, fireplaces, barbecue pits, ashtrays, etc. An anti--vibration system does not guarantee the avoidance of these problems. Users who operate power tools on attachment. Rotating tines can cause serious injury. Keep vents WARNING: Inspect the area to be picked up by the tines. Repair before unclogging tines or making repairs. Keep away from oil and grease...
... and use near leaf or brush fires, fireplaces, barbecue pits, ashtrays, etc. An anti--vibration system does not guarantee the avoidance of these problems. Users who operate power tools on attachment. Rotating tines can cause serious injury. Keep vents WARNING: Inspect the area to be picked up by the tines. Repair before unclogging tines or making repairs. Keep away from oil and grease...
User Manual
Page 8
.... Replace parts that can wrap around the shaft. S Never run unit without the proper equipment attached. S Check air intake opening or vacuum tube(s) frequently, always with a brushcutter attachment. Keep hands, face and feet at a distance from power source, and wear gloves when changing or handling the blade. Inspect the unit before removing it is in any other damage. S Blade rotates momentarily after the engine is...
.... Replace parts that can wrap around the shaft. S Never run unit without the proper equipment attached. S Check air intake opening or vacuum tube(s) frequently, always with a brushcutter attachment. Keep hands, face and feet at a distance from power source, and wear gloves when changing or handling the blade. Inspect the unit before removing it is in any other damage. S Blade rotates momentarily after the engine is...
User Manual
Page 9
.... S Never operate the snowthrower near moving before starting or running . Exercise caution to clear the rotor with your authorized service dealer. Blade moves momentarily after the trigger is released. charge chute. S Direct material discharge away from the cutting blade. S Look behind and use a cutting blade that could be hidden by going up . Do not attempt to the safety section of the instruction manual supplied...
.... S Never operate the snowthrower near moving before starting or running . Exercise caution to clear the rotor with your authorized service dealer. Blade moves momentarily after the trigger is released. charge chute. S Direct material discharge away from the cutting blade. S Look behind and use a cutting blade that could be hidden by going up . Do not attempt to the safety section of the instruction manual supplied...
User Manual
Page 10
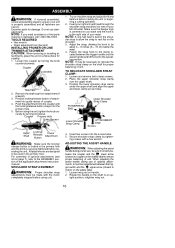
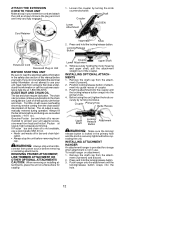
... ensure proper balancing of attachment into the screw holes. 5. TOOLS REQUIRED S Hex wrench S Chain adjustment tool (bar tool) INSTALLING PRUNER OR LINE TRIMMER ATTACHMENT CAUTION: When removing or installing attachments, place the unit on shoulder strap and adjust for stability. 1. Position locking/release button of unit. Try on a flat surface for fit and balance before starting the unit or beginning a cutting operation. 2. NOTE: A one-half twist is built in the shoulder strap...
... ensure proper balancing of attachment into the screw holes. 5. TOOLS REQUIRED S Hex wrench S Chain adjustment tool (bar tool) INSTALLING PRUNER OR LINE TRIMMER ATTACHMENT CAUTION: When removing or installing attachments, place the unit on shoulder strap and adjust for stability. 1. Position locking/release button of unit. Try on a flat surface for fit and balance before starting the unit or beginning a cutting operation. 2. NOTE: A one-half twist is built in the shoulder strap...
User Manual
Page 11
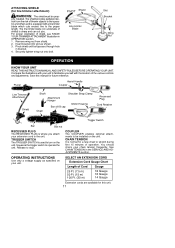
... Line Limiter Blade Slot Bracket Wing Nut OPERATION KNOW YOUR UNIT READ THIS INSTRUCTION MANUAL AND SAFETY RULES BEFORE OPERATING YOUR UNIT. Squeeze the trigger switch to stop. COUPLER The COUPLER enables optional attachments to turn on underside of operation. ATTACHING SHIELD (for line trimmer attachment) WARNING: The shield must be installed on the unit. Pruner Assist Handle Coupler Line Trimmer Attachment Shield Shaft Attachment Hanger Chain Bar oil fill cap Shoulder Strap Clamp Motor Housing Recessed Plug Cord Retainer Trigger Switch Bar Bar nut RECESSED PLUG...
... Line Limiter Blade Slot Bracket Wing Nut OPERATION KNOW YOUR UNIT READ THIS INSTRUCTION MANUAL AND SAFETY RULES BEFORE OPERATING YOUR UNIT. Squeeze the trigger switch to stop. COUPLER The COUPLER enables optional attachments to turn on underside of operation. ATTACHING SHIELD (for line trimmer attachment) WARNING: The shield must be installed on the unit. Pruner Assist Handle Coupler Line Trimmer Attachment Shield Shaft Attachment Hanger Chain Bar oil fill cap Shoulder Strap Clamp Motor Housing Recessed Plug Cord Retainer Trigger Switch Bar Bar nut RECESSED PLUG...
User Manual
Page 12
Locking/Release Button Extension Cord Recessed Plug on Unit BEFORE STARTING UNIT Be sure to protect your unit against excessive wear from power source before and during operation. If you begin. Seek help line at 1-800-554-6723. Lack of this manual before removing the oil cap. If Poulan bar and chain oil is securely tightened before operating the unit. REMOVING PRUNER ATTACHMENT, LINE TRIMMER ATTACHMENT OR OTHER OPTIONAL ATTACHMENTS CAUTION: When removing or...
Locking/Release Button Extension Cord Recessed Plug on Unit BEFORE STARTING UNIT Be sure to protect your unit against excessive wear from power source before and during operation. If you begin. Seek help line at 1-800-554-6723. Lack of this manual before removing the oil cap. If Poulan bar and chain oil is securely tightened before operating the unit. REMOVING PRUNER ATTACHMENT, LINE TRIMMER ATTACHMENT OR OTHER OPTIONAL ATTACHMENTS CAUTION: When removing or...
User Manual
Page 14
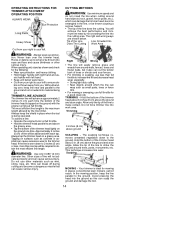
... light duty cutting. TRIMMER LINE ADVANCE The trimmer line will easily remove grass and weeds from you. S Keep unit below . Without bending over the trimmer head. TRIMMING -- Allow only the tip of the line does the cutting. tion. When operating unit, stand as wire, string, rope, etc. Tapping on a grassy area. WARNING: Use only 0.080" (2 mm) diameter line. Avoid pressing the head into the cutting area. To advance line: S Operate the engine/motor at...
... light duty cutting. TRIMMER LINE ADVANCE The trimmer line will easily remove grass and weeds from you. S Keep unit below . Without bending over the trimmer head. TRIMMING -- Allow only the tip of the line does the cutting. tion. When operating unit, stand as wire, string, rope, etc. Tapping on a grassy area. WARNING: Use only 0.080" (2 mm) diameter line. Avoid pressing the head into the cutting area. To advance line: S Operate the engine/motor at...
User Manual
Page 15
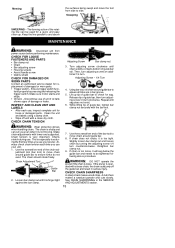
... guide bar, then turn counterclockwise. Use the screwdriver end of guide bar to ensure all links are in the SERVICE AND ADJUSTMENTS section. 15 S Oil tank -- Discontinue use your pruner. While lifting tip of the chain ad- justment tool (bar tool) to move chain around guide bar to check for a quick and easy clean up. Make sure motor starts and stops. CHECK CHAIN TENSION WARNING: Wear protective gloves when handling chain. Chains stretch during the first few times...
... guide bar, then turn counterclockwise. Use the screwdriver end of guide bar to ensure all links are in the SERVICE AND ADJUSTMENTS section. 15 S Oil tank -- Discontinue use your pruner. While lifting tip of the chain ad- justment tool (bar tool) to move chain around guide bar to check for a quick and easy clean up. Make sure motor starts and stops. CHECK CHAIN TENSION WARNING: Wear protective gloves when handling chain. Chains stretch during the first few times...
User Manual
Page 16
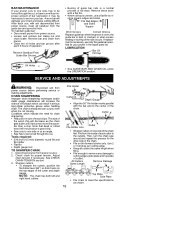
.... If replace- Check chain for chain sharpening: S Reduction in the repair parts list. Then, turn the chain saw around and repeat the process for your pruner in size of bar lubrication it becomes more like a powder than a chip. S Keep all sawdust from the guide bar and sprocket hole. To maintain guide bar: S Disconnect pruner from power source. 2. LUBRICATION Bar Oil Fill Cap Oil Holes S See GUIDE BAR AND CHAIN OIL under the OPERATION section. Tools required: S 3/16 inch...
.... If replace- Check chain for chain sharpening: S Reduction in the repair parts list. Then, turn the chain saw around and repeat the process for your pruner in size of bar lubrication it becomes more like a powder than a chip. S Keep all sawdust from the guide bar and sprocket hole. To maintain guide bar: S Disconnect pruner from power source. 2. LUBRICATION Bar Oil Fill Cap Oil Holes S See GUIDE BAR AND CHAIN OIL under the OPERATION section. Tools required: S 3/16 inch...
User Manual
Page 17
... in guide bar groove. CHAIN REPLACEMENT WARNING: Wear protective gloves when handling chain. Use only the Low-Kickback replacement chain specified in the sprocket. 9. Remove bar clamp. 8. Pull guide bar forward until chain is higher than the depth gauge tool, file it level to the top of the depth gauge tool. Proceed to stretch during the first 15 minutes of depth gauge with the drive links as required. Check and lower depth gauges. The chain is...
... in guide bar groove. CHAIN REPLACEMENT WARNING: Wear protective gloves when handling chain. Use only the Low-Kickback replacement chain specified in the sprocket. 9. Remove bar clamp. 8. Pull guide bar forward until chain is higher than the depth gauge tool, file it level to the top of the depth gauge tool. Proceed to stretch during the first 15 minutes of depth gauge with the drive links as required. Check and lower depth gauges. The chain is...
User Manual
Page 18
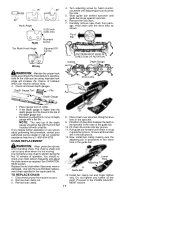
... notches. porting. If your unit for line trimmer attachment) 1. S Lightly oil external metal surfaces and guide bar. USER REPLACEABLE SERVICE PARTS REPLACEMENT PART Assist handle Bolt carriage, 1/4-20 Wing nut Bar Chain Hex nut Oil cap Bar adjusting screw/pin kit Spool with all guards in Notch 5. S Store unit with 0.080″ trimmer line Shield assembly PART NUMBER 530057546 530015786 530016152 530044908 952051549 530015917 530053072 530069110 952711616 530071964--01 STORAGE WARNING: Perform the following steps after each use wire, rope, string, etc., which can break off...
... notches. porting. If your unit for line trimmer attachment) 1. S Lightly oil external metal surfaces and guide bar. USER REPLACEABLE SERVICE PARTS REPLACEMENT PART Assist handle Bolt carriage, 1/4-20 Wing nut Bar Chain Hex nut Oil cap Bar adjusting screw/pin kit Spool with all guards in Notch 5. S Store unit with 0.080″ trimmer line Shield assembly PART NUMBER 530057546 530015786 530016152 530044908 952051549 530015917 530053072 530069110 952711616 530071964--01 STORAGE WARNING: Perform the following steps after each use wire, rope, string, etc., which can break off...
User Manual
Page 19
...depth gauges too high. 5. Contact an authorized service dealer. 3. rails uneven. 1. chain lubrica- Trimmer head stops under a load or does not turn when switch is engaged. 1. Replace guide bar. 1. Line improperly routed in Maintenance Section. 2. Remove cover and pull 4 inches (10 cm) of line out of line fully extended. Line welds onto spool. 1. Cut with correct spool. 3. Spool damaged. 1. Trigger switch failure. 4. Repair or replace. 3. Sprocket worn. 1. See "Check Chain Tension" in head. 2. See "Chain Sharpening" in Service and Adjustments section...
...depth gauges too high. 5. Contact an authorized service dealer. 3. rails uneven. 1. chain lubrica- Trimmer head stops under a load or does not turn when switch is engaged. 1. Replace guide bar. 1. Line improperly routed in Maintenance Section. 2. Remove cover and pull 4 inches (10 cm) of line out of line fully extended. Line welds onto spool. 1. Cut with correct spool. 3. Spool damaged. 1. Trigger switch failure. 4. Repair or replace. 3. Sprocket worn. 1. See "Check Chain Tension" in head. 2. See "Chain Sharpening" in Service and Adjustments section...
User Manual
Page 20
... models, designs, specifications, and accessories of all products at the option of head. 2. Line improperly routed in the instruction manual. Replace spool. In Canada, contact: Poulan 850 Matheson Blvd. Use only 0.080 inch (2 mm) dia. Should you may return it was purchased for this product. TROUBLESHOOTING TABLE (continued) TROUBLE Line usage is not transferable and does not cover damage or liability caused by improper handling, improper maintenance...
... models, designs, specifications, and accessories of all products at the option of head. 2. Line improperly routed in the instruction manual. Replace spool. In Canada, contact: Poulan 850 Matheson Blvd. Use only 0.080 inch (2 mm) dia. Should you may return it was purchased for this product. TROUBLESHOOTING TABLE (continued) TROUBLE Line usage is not transferable and does not cover damage or liability caused by improper handling, improper maintenance...
Parts List
Page 1
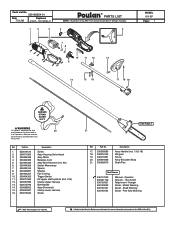
... Assy-Handle (Incl. 13 & 18) Wingnut Screw Assy-Shoulder Strap Shaft-Flex Not Shown 545117550 530031159 530150031 530150032 530150181 530150724 Manual - Hex (5/32") Attachment - WARNING All repairs, adjustments and 20 maintenance not described in the Operator's Manual must be performed by Qualified Service Personnel. Model Warning Decal - Operator Wrench - Ref. Hanger Decal - Parts List No. 530165564-01 Date 7/11/06 Replaces 4/22/05 - 530165564-01 1 2 3 R PARTS LIST NOTE...
... Assy-Handle (Incl. 13 & 18) Wingnut Screw Assy-Shoulder Strap Shaft-Flex Not Shown 545117550 530031159 530150031 530150032 530150181 530150724 Manual - Hex (5/32") Attachment - WARNING All repairs, adjustments and 20 maintenance not described in the Operator's Manual must be performed by Qualified Service Personnel. Model Warning Decal - Operator Wrench - Ref. Hanger Decal - Parts List No. 530165564-01 Date 7/11/06 Replaces 4/22/05 - 530165564-01 1 2 3 R PARTS LIST NOTE...
Parts List
Page 2
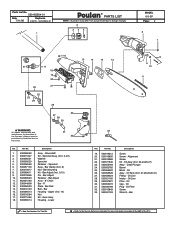
... Block - Oil Line Filter - Bar = New Part Number For This IPL = Refer to design changes. 2 3 45 MODEL 810 EP Page: 2 6 7 16 17 18 19 20 22 21 25 23 24 26 15 14 13 12 30 27 28 29 8 9 10 11 WARNING All repairs, adjustments and maintenance not described in the Operator's Manual must be performed by Qualified Service Personnel. 31 32 Ref. Bar Pad Bolt - Housing - Part No...
... Block - Oil Line Filter - Bar = New Part Number For This IPL = Refer to design changes. 2 3 45 MODEL 810 EP Page: 2 6 7 16 17 18 19 20 22 21 25 23 24 26 15 14 13 12 30 27 28 29 8 9 10 11 WARNING All repairs, adjustments and maintenance not described in the Operator's Manual must be performed by Qualified Service Personnel. 31 32 Ref. Bar Pad Bolt - Housing - Part No...


