
User Manual
Page 3
... Valve 21 Mower Deck Lifting Lever 21 Tracking 21 Blade Control Lever 22 Manual Transport 22 operatioN 23 Training 23 Steering 23 Before Starting 24 Starting the Engine 24 Jumper cables 27 Running 28 Operating on Hills 29 Mowing Tips 30 Stopping the Engine 31 Manual Transport 32 maintenance 33 Maintenance Schedule 33 Battery 35 Safety System 36 Tire Pressures 36 Parking Brake 37 V-belts 37 Deck Belt 37 EZT Belt 38 Cutting Blades 38 Blade replacement 38 Adjusting the Mower Deck 39 Leveling Deck...
... Valve 21 Mower Deck Lifting Lever 21 Tracking 21 Blade Control Lever 22 Manual Transport 22 operatioN 23 Training 23 Steering 23 Before Starting 24 Starting the Engine 24 Jumper cables 27 Running 28 Operating on Hills 29 Mowing Tips 30 Stopping the Engine 31 Manual Transport 32 maintenance 33 Maintenance Schedule 33 Battery 35 Safety System 36 Tire Pressures 36 Parking Brake 37 V-belts 37 Deck Belt 37 EZT Belt 38 Cutting Blades 38 Blade replacement 38 Adjusting the Mower Deck 39 Leveling Deck...

User Manual
Page 6
... one of the valve covers. The wheel motors and hydrostatic pumps have these available when ordering spare parts. Engine Transmission 6 The engine's manufacturing number is delivered, the machine has, for example, been inspected and adjusted by your retailer. INTRODUCTION Good Service PoulanPro's products are : • The machine's type designation (I.D.). • The manufacturer's type number (Model). • The machine's serial number (Serial no.) Please have the type designation and serial number available when...
... one of the valve covers. The wheel motors and hydrostatic pumps have these available when ordering spare parts. Engine Transmission 6 The engine's manufacturing number is delivered, the machine has, for example, been inspected and adjusted by your retailer. INTRODUCTION Good Service PoulanPro's products are : • The machine's type designation (I.D.). • The manufacturer's type number (Model). • The machine's serial number (Serial no.) Please have the type designation and serial number available when...
User Manual
Page 9
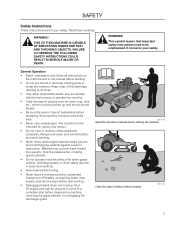
... and behind before starting the machine Clear the area of objects such as rocks, toys, wire, etc., which could be emphasized. Shut off blades, set parking brake, stop before cleaning the machine, removing the grass catcher, or unclogging the discharge guard. 8011-512 Read the operator's manual before operating. SAFETY Safety Instructions These instructions are familiar with the instructions, to a complete stop engine, and remove keys before mowing...
... and behind before starting the machine Clear the area of objects such as rocks, toys, wire, etc., which could be emphasized. Shut off blades, set parking brake, stop before cleaning the machine, removing the grass catcher, or unclogging the discharge guard. 8011-512 Read the operator's manual before operating. SAFETY Safety Instructions These instructions are familiar with the instructions, to a complete stop engine, and remove keys before mowing...
User Manual
Page 13
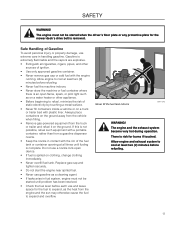
... the exhaust system become very hot during operation. If this is removed. Gasoline is extremely flammable and the vapors are explosive. • Extinguish all times until problem has been resolved. • Check the fuel level before refueling. 13 Replace gas cap and tighten securely. • Do not start the engine near spilled fuel. • Never use and leave space for burns if touched. Allow...
... the exhaust system become very hot during operation. If this is removed. Gasoline is extremely flammable and the vapors are explosive. • Extinguish all times until problem has been resolved. • Check the fuel level before refueling. 13 Replace gas cap and tighten securely. • Do not start the engine near spilled fuel. • Never use and leave space for burns if touched. Allow...
User Manual
Page 14
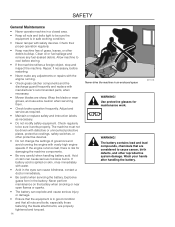
... maintenance work. Wash your hands after handling the battery. Check their proper operation regularly. • Keep machine free of governors and avoid running . • Check grass catcher components and the discharge guard frequently and replace with overly high engine speeds. Wrap the blade or wear gloves, and use extra caution when servicing them. • Check brake operation frequently. Check regularly to cool before restarting. • Never make any fuel-soaked debris. If the engine runs...
... maintenance work. Wash your hands after handling the battery. Check their proper operation regularly. • Keep machine free of governors and avoid running . • Check grass catcher components and the discharge guard frequently and replace with overly high engine speeds. Wrap the blade or wear gloves, and use extra caution when servicing them. • Check brake operation frequently. Check regularly to cool before restarting. • Never make any fuel-soaked debris. If the engine runs...

User Manual
Page 15
...; Do not make adjustments with the engine running. • The machine is mounted tightly and no flammable substances are sharp and can cause battery explosion, fire or eye injury. Only use protective gloves when handling them. • Check the parking brake's functionality regularly. Avoid electrical sparking and its consequences by removing grass, leaves, and other debris that the fuel filler cap is tested and...
...; Do not make adjustments with the engine running. • The machine is mounted tightly and no flammable substances are sharp and can cause battery explosion, fire or eye injury. Only use protective gloves when handling them. • Check the parking brake's functionality regularly. Avoid electrical sparking and its consequences by removing grass, leaves, and other debris that the fuel filler cap is tested and...
User Manual
Page 24
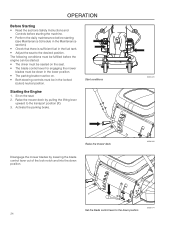
... parking brake. Starting the Engine 1. Start conditions Raise the mower deck Disengage the mower blades by pulling the lifting lever upward to the transport position (F). 3. The following conditions must be fulfilled before starting (see Maintenance Schedule in the Maintenance section). • Check that there is sufficient fuel in the fuel tank. • Adjust the seat to the down in the locked (outer) neutral position. Sit on . • Both steering controls must be...
... parking brake. Starting the Engine 1. Start conditions Raise the mower deck Disengage the mower blades by pulling the lifting lever upward to the transport position (F). 3. The following conditions must be fulfilled before starting (see Maintenance Schedule in the Maintenance section). • Check that there is sufficient fuel in the fuel tank. • Adjust the seat to the down in the locked (outer) neutral position. Sit on . • Both steering controls must be...

User Manual
Page 27
... to the POSITIVE (+) terminal on the mower with the discharged battery, away from batteries. Do not use your battery is a odorless, colorless, poisonous gas. If your mower to start the engine, it to start other reproductive system damage. operation Slowly slide the choke control back to the NEGATIVE (-) terminal of the fully charged battery. 3. Set the desired engine speed with a 12-volt negative grounded system. Keep sparks, flame and...
... to the POSITIVE (+) terminal on the mower with the discharged battery, away from batteries. Do not use your battery is a odorless, colorless, poisonous gas. If your mower to start the engine, it to start other reproductive system damage. operation Slowly slide the choke control back to the NEGATIVE (-) terminal of the fully charged battery. 3. Set the desired engine speed with a 12-volt negative grounded system. Keep sparks, flame and...
User Manual
Page 33
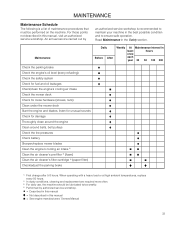
... ● ♦ ■ Check the mower deck ● Check for loose hardware (screws, nuts) ● Clean under the mower deck ● Start the engine and blades, listen for unusual sounds ♦ Check for damage ♦ Thoroughly clean around the engine ♦ Clean around belts, belt pulleys ♦ Check the tire pressures Check battery Sharpen/replace mower blades Clean the engine's cooling air intake 2) Clean the air cleaner's pre-filter 2) (foam) Clean the air cleaner's filter cartridge 2) (paper filter) Check/adjust the parking brake ● ● ●...
... ● ♦ ■ Check the mower deck ● Check for loose hardware (screws, nuts) ● Clean under the mower deck ● Start the engine and blades, listen for unusual sounds ♦ Check for damage ♦ Thoroughly clean around the engine ♦ Clean around belts, belt pulleys ♦ Check the tire pressures Check battery Sharpen/replace mower blades Clean the engine's cooling air intake 2) Clean the air cleaner's pre-filter 2) (foam) Clean the air cleaner's filter cartridge 2) (paper filter) Check/adjust the parking brake ● ● ●...
User Manual
Page 34
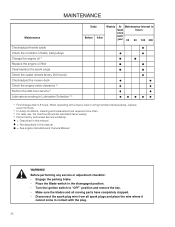
... At Maintenance interval in least hours once each year 25 50 100 300 Check/adjust throttle cable Check the condition of belts, belt pulleys Change the engine oil 1) Replace the engine oil filter Clean/replace the spark plugs Check the caster wheels (every 200 hours) Check/adjust the mower deck Check the engine valve clearance 4) Perform the 300-hour service 4) Lubricate according to "OFF" position and remove the key. • Make sure the blades and all moving parts have completely stopped. • Disconnect the spark plug wire...
... At Maintenance interval in least hours once each year 25 50 100 300 Check/adjust throttle cable Check the condition of belts, belt pulleys Change the engine oil 1) Replace the engine oil filter Clean/replace the spark plugs Check the caster wheels (every 200 hours) Check/adjust the mower deck Check the engine valve clearance 4) Perform the 300-hour service 4) Lubricate according to "OFF" position and remove the key. • Make sure the blades and all moving parts have completely stopped. • Disconnect the spark plug wire...
User Manual
Page 37
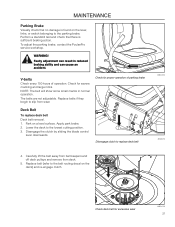
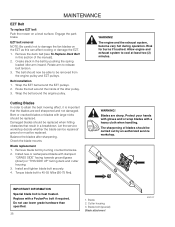
... the deck to replace deck belt 8050-005 8058-074 4. MAINTENANCE Parking Brake Visually check that there is found on a level surface. Disengage clutch to the lowest cutting position. 3. Replace belt (refer to slip from deck. 5. Perform a standstill test and check that no damage is sufficient braking action. Check for excessive wear 8050-013 37 Carefully lift the belt away from belt keepers and off deck pulleys and remove from wear. Replace belts if...
... the deck to replace deck belt 8050-005 8058-074 4. MAINTENANCE Parking Brake Visually check that there is found on a level surface. Disengage clutch to the lowest cutting position. 3. Replace belt (refer to slip from deck. 5. Perform a standstill test and check that no damage is sufficient braking action. Check for excessive wear 8050-013 37 Carefully lift the belt away from belt keepers and off deck pulleys and remove from wear. Replace belts if...
User Manual
Page 38
... housing. 3. Torque blade bolt to damage the fan blades on a level surface. Risk for burns if touched. Balance the blades after sharpening. Belt installation 1. Install new or resharpened blade with large nicks should be carried out by turning counterclockwise. 2. Check the blade mounts. Blade replacement 1. Engage the park brake. Remove the deck belt (see To Replace Deck Belt in the belt by pushing the spring loaded idler arm inward. Blade bolt (special) Blade attachment 8052-007 The belt should be replaced...
... housing. 3. Torque blade bolt to damage the fan blades on a level surface. Risk for burns if touched. Balance the blades after sharpening. Belt installation 1. Install new or resharpened blade with large nicks should be carried out by turning counterclockwise. 2. Check the blade mounts. Blade replacement 1. Engage the park brake. Remove the deck belt (see To Replace Deck Belt in the belt by pushing the spring loaded idler arm inward. Blade bolt (special) Blade attachment 8052-007 The belt should be replaced...
User Manual
Page 39
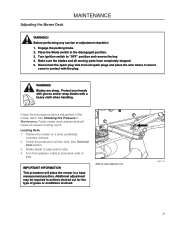
... blades with the plug. Disconnect the spark plug wire from all four tires. Check the tire pressure before adjustment of grass or conditions involved. Faulty mower deck adjustments will place the mower in contact with a heavy cloth when handling. Additional adjustment may be required to side. Engage the parking brake. 2. WARNING! Position the mower on a level, preferably concrete, surface. 2. Turn front adjuster nut(s) to level deck side to achieve desired cut for the type of the mower deck...
... blades with the plug. Disconnect the spark plug wire from all four tires. Check the tire pressure before adjustment of grass or conditions involved. Faulty mower deck adjustments will place the mower in contact with a heavy cloth when handling. Additional adjustment may be required to side. Engage the parking brake. 2. WARNING! Position the mower on a level, preferably concrete, surface. 2. Turn front adjuster nut(s) to level deck side to achieve desired cut for the type of the mower deck...
User Manual
Page 42
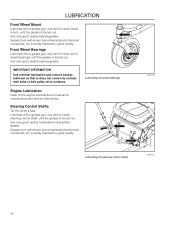
... belts or belt pulley drive surfaces. Use only good quality bearing grease. Lubricating the wheel bearings Engine Lubrication Refer to the engine manufacturer's manual for maintenance and service instructions. Use only good quality molybdenum disulphide grease. Grease from well-known brand names (petrochemical companies, etc.) usually maintains a good quality. Front Wheel Bearings Lubricate with a grease gun, one zerk for each steering control shaft, until the grease is forced out. LUBRICATION Front Wheel...
... belts or belt pulley drive surfaces. Use only good quality bearing grease. Lubricating the wheel bearings Engine Lubrication Refer to the engine manufacturer's manual for maintenance and service instructions. Use only good quality molybdenum disulphide grease. Grease from well-known brand names (petrochemical companies, etc.) usually maintains a good quality. Front Wheel Bearings Lubricate with a grease gun, one zerk for each steering control shaft, until the grease is forced out. LUBRICATION Front Wheel...

User Manual
Page 43
... fuel filter or jet. • Clogged ventilation valve on the battery terminal cable connections. • Fuse blown. • Ignition system faulty. • Fault in fuel. • Clogged air filter. 43 Cause • Blade lever is loose. • Defective ignition cable. • Defective spark plug electrode. • Defective spark plug connection. • Rich fuel mixture or fuel-air mixture. • Wrong fuel type. • Water in the starter safety circuit. TROUBLESHOOTING Problem The engine will not start. The starter does not turn...
... fuel filter or jet. • Clogged ventilation valve on the battery terminal cable connections. • Fuse blown. • Ignition system faulty. • Fault in fuel. • Clogged air filter. 43 Cause • Blade lever is loose. • Defective ignition cable. • Defective spark plug electrode. • Defective spark plug connection. • Rich fuel mixture or fuel-air mixture. • Wrong fuel type. • Water in the starter safety circuit. TROUBLESHOOTING Problem The engine will not start. The starter does not turn...
User Manual
Page 53
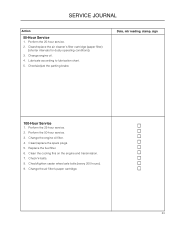
Clean/replace the air cleaner's filter cartridge (paper filter) (shorter intervals for dusty operating conditions). 3. Change the engine oil filter. 4. Lubricate according to lubrication chart. 5. Check/adjust the parking brake. Change engine oil. 4. Date, mtr reading, stamp, sign 100-Hour Service 1. Clean the cooling fins on the engine and transmission. 7. Check V-belts. 8. Check/tighten caster wheel axle bolts (every 200 hours). 9. Perform the 25-hour service. 2. Clean/replace the spark plugs. 5. Replace the fuel filter. 6. Perform the 50-hour service. 3. Change ...
Clean/replace the air cleaner's filter cartridge (paper filter) (shorter intervals for dusty operating conditions). 3. Change the engine oil filter. 4. Lubricate according to lubrication chart. 5. Check/adjust the parking brake. Change engine oil. 4. Date, mtr reading, stamp, sign 100-Hour Service 1. Clean the cooling fins on the engine and transmission. 7. Check V-belts. 8. Check/tighten caster wheel axle bolts (every 200 hours). 9. Perform the 25-hour service. 2. Clean/replace the spark plugs. 5. Replace the fuel filter. 6. Perform the 50-hour service. 3. Change ...

Parts List
Page 1
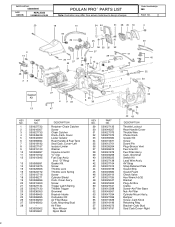
... Oil Cap Ass'y. (Incl. "O" Ring) Screw Ignition Module Screw Screw Clamp Crankshaft Bearing Flywheel Key Connecting Rod Ass'y. Nut--Flywheel Spring--Starter Dog Washer Starter Pulley Starter Spring Baffle Plate Fan Housing Ass'y. ORDER COMPLETE ASSEMBLY. Spark Plug (RCJ--6Y) Clamp Ass'y. PARTS LIST NO. 530085495 DATE 8/30/00 REPLACES 530085495-- 1/14/99 WARNING All repairs, adjustments and maintenance not de- Screw Washer Muffler Cover T1 T2 Spark Arrestor Screen Gasket Kit Muffler Gasket Snap Ring Cylinder Ass'y. scribed in the Operator's Manual...
... Oil Cap Ass'y. (Incl. "O" Ring) Screw Ignition Module Screw Screw Clamp Crankshaft Bearing Flywheel Key Connecting Rod Ass'y. Nut--Flywheel Spring--Starter Dog Washer Starter Pulley Starter Spring Baffle Plate Fan Housing Ass'y. ORDER COMPLETE ASSEMBLY. Spark Plug (RCJ--6Y) Clamp Ass'y. PARTS LIST NO. 530085495 DATE 8/30/00 REPLACES 530085495-- 1/14/99 WARNING All repairs, adjustments and maintenance not de- Screw Washer Muffler Cover T1 T2 Spark Arrestor Screen Gasket Kit Muffler Gasket Snap Ring Cylinder Ass'y. scribed in the Operator's Manual...
Parts List
Page 2
... Throttle Lock Spring Screw Cylinder Shield Carb. Intake Carburetor Kit Air Filter Base Carb. Cover--Left Isolator Limiter Washer Impulse Line Kit "C" Clip Fuel Cap Ass'y. (Incl. Mounting Stud Air Filter Non -- AV Strap Strap Retainer Plate Sound Strip Sound Foam Check Valve Hex Wrench 5/32 Bracket Plug--Air Box Clamp Screw--Air Filter Base Nut--Air Filter Cylinder Mount Ass'y. Grommet Switch Kit Lead Wire Ass'y. Cover Lower Isolator Rear Handle & Fuel Tank Seal Carb. Bumper Screw--Carb Knob Retaining Ring Bracket--Carb Stud Seal Carb Cover--Right 2 Cover Ass'y. Carb. PARTS...
... Throttle Lock Spring Screw Cylinder Shield Carb. Intake Carburetor Kit Air Filter Base Carb. Cover--Left Isolator Limiter Washer Impulse Line Kit "C" Clip Fuel Cap Ass'y. (Incl. Mounting Stud Air Filter Non -- AV Strap Strap Retainer Plate Sound Strip Sound Foam Check Valve Hex Wrench 5/32 Bracket Plug--Air Box Clamp Screw--Air Filter Base Nut--Air Filter Cylinder Mount Ass'y. Grommet Switch Kit Lead Wire Ass'y. Cover Lower Isolator Rear Handle & Fuel Tank Seal Carb. Bumper Screw--Carb Knob Retaining Ring Bracket--Carb Stud Seal Carb Cover--Right 2 Cover Ass'y. Carb. PARTS...

Parts List
Page 3
...) Bar-- 20"-- ORDER COMPLETE ASSEMBLY. Oiler Gear Spur "O" Ring Handlebar Ass'y. Bar Adjusting Pin Retainer Screw Bar Stud Vent Pin 28 KEY NO. Oiler Adjustment Screw Screw Oil Pickup & Filter Oiler Intake Line Clutch Bearing Drum Sprocket Clutch Plate Clutch Ass'y. Top Chain Pad Thrust Washer Crankcase Plug Rim Floating (3/8) n = NEW PART NUMBER FOR THIS IPL K = REFER TO THE SERVICE REFERENCE INDICATED FOR MORE INFORMATION. (LOCATED AT END OF IPL) D = THESE PARTS ARE ILLUSTRATED FOR CLARITY. PARTS LIST...
...) Bar-- 20"-- ORDER COMPLETE ASSEMBLY. Oiler Gear Spur "O" Ring Handlebar Ass'y. Bar Adjusting Pin Retainer Screw Bar Stud Vent Pin 28 KEY NO. Oiler Adjustment Screw Screw Oil Pickup & Filter Oiler Intake Line Clutch Bearing Drum Sprocket Clutch Plate Clutch Ass'y. Top Chain Pad Thrust Washer Crankcase Plug Rim Floating (3/8) n = NEW PART NUMBER FOR THIS IPL K = REFER TO THE SERVICE REFERENCE INDICATED FOR MORE INFORMATION. (LOCATED AT END OF IPL) D = THESE PARTS ARE ILLUSTRATED FOR CLARITY. PARTS LIST...
Parts List
Page 4
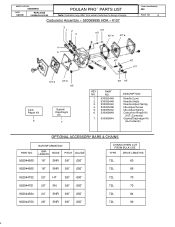
... design changes Carburetor Assembly -- 530069895 HDA -- #137 3 12 3 KIT KIT KIT D KIT D Chain Saw Model(s): 380 PAGE NO. 4 4 5 KIT KIT KIT KIT D KIT D KIT Carb. PART NO. 530035449 530035448 530035243 530035238 530035242 530069849 530069844 DESCRIPTION Needle (Low) Needle (High) Needle Adjust Spring Idle Adjust Screw Idle Adjust Spring Carburetor Repair Kit ( KIT=Contents) Gasket/Diaphragm Kit ( D=Contents) OPTIONAL ACCESSORY BARS & CHAINS PART NO. 952044560 BAR INFORMATION BAR LENGTH NOSE PITCH GAUGE 16" SNR 3/8" .050" CHAINS WHEN CUT FROM BULK USE TYPE DRIVE LENGTHS...
... design changes Carburetor Assembly -- 530069895 HDA -- #137 3 12 3 KIT KIT KIT D KIT D Chain Saw Model(s): 380 PAGE NO. 4 4 5 KIT KIT KIT KIT D KIT D KIT Carb. PART NO. 530035449 530035448 530035243 530035238 530035242 530069849 530069844 DESCRIPTION Needle (Low) Needle (High) Needle Adjust Spring Idle Adjust Screw Idle Adjust Spring Carburetor Repair Kit ( KIT=Contents) Gasket/Diaphragm Kit ( D=Contents) OPTIONAL ACCESSORY BARS & CHAINS PART NO. 952044560 BAR INFORMATION BAR LENGTH NOSE PITCH GAUGE 16" SNR 3/8" .050" CHAINS WHEN CUT FROM BULK USE TYPE DRIVE LENGTHS...


