User Guide
Page 2
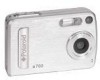
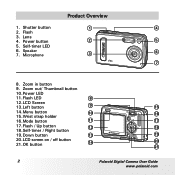
Down button 13 19 20.LCD screen on / off button 21.OK button 14 20 21 2 Polaroid Digital Camera User Guide www.polaroid.com Product Overview 1. Power button 5. Shutter button 2. Zoom out/ Thumbnail button 10.Power LED 11.Flash LED 8 12.LCD Screen 13.Left button 9 15 14.Menu button 10 15.Wrist strap holder 16 16.Mode button 11 17 17.Flash / Up button 12 18 18.Self-timer / Right button 19. Microphone ���� POLAROID DIGITAL CAME RA 7 8. Lens 4. Speaker 7. Zoom in button 9. Flash 3. Self-timer LED 6.
Down button 13 19 20.LCD screen on / off button 21.OK button 14 20 21 2 Polaroid Digital Camera User Guide www.polaroid.com Product Overview 1. Power button 5. Shutter button 2. Zoom out/ Thumbnail button 10.Power LED 11.Flash LED 8 12.LCD Screen 13.Left button 9 15 14.Menu button 10 15.Wrist strap holder 16 16.Mode button 11 17 17.Flash / Up button 12 18 18.Self-timer / Right button 19. Microphone ���� POLAROID DIGITAL CAME RA 7 8. Lens 4. Speaker 7. Zoom in button 9. Flash 3. Self-timer LED 6.
User Guide
Page 4
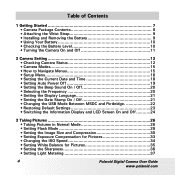
... 9 • Using Your Battery 10 • Checking the Battery Level 10 • Turning the Camera On and Off 11 2 Camera Setting 12 • Checking Camera Status 12 • Camera Modes 15 • How to Navigate Menus 15 • Setup Menu 16 • Setting the Current Date and Time 18 • Setting Auto Power Off 19... Pictures 33 • Changing the ISO Speed 34 • Setting White Balance for Pictures 35 • Setting the Sharpness 36 • Setting Light Metering 37 4 Polaroid Digital Camera User Guide www...
... 9 • Using Your Battery 10 • Checking the Battery Level 10 • Turning the Camera On and Off 11 2 Camera Setting 12 • Checking Camera Status 12 • Camera Modes 15 • How to Navigate Menus 15 • Setup Menu 16 • Setting the Current Date and Time 18 • Setting Auto Power Off 19... Pictures 33 • Changing the ISO Speed 34 • Setting White Balance for Pictures 35 • Setting the Sharpness 36 • Setting Light Metering 37 4 Polaroid Digital Camera User Guide www...
User Guide
Page 15
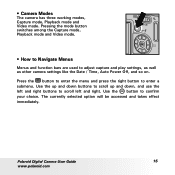
... left and right buttons to adjust capture and play settings, as well as other camera settings like the Date / Time, Auto Power Off, and so on. Polaroid Digital Camera User Guide 15 www.polaroid.com Press the button to enter the menu and press the right button to confirm your choice. Use the button to enter...
... left and right buttons to adjust capture and play settings, as well as other camera settings like the Date / Time, Auto Power Off, and so on. Polaroid Digital Camera User Guide 15 www.polaroid.com Press the button to enter the menu and press the right button to confirm your choice. Use the button to enter...
User Guide
Page 16
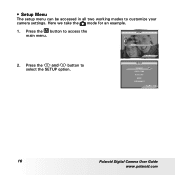
• Setup Menu The setup menu can be accessed in all two working modes to access the main menu. Here we take the mode for an example. 1. Press the button to customize your camera settings. SETUP FORMAT DATE / TIME AUTO OFF BEEP FREQUENCY 2/2 1/2 16 Polaroid Digital Camera User Guide www.polaroid.com SETUP STRONG AVERAGE SETUP 2. Press the and button to select the SETUP option.
• Setup Menu The setup menu can be accessed in all two working modes to access the main menu. Here we take the mode for an example. 1. Press the button to customize your camera settings. SETUP FORMAT DATE / TIME AUTO OFF BEEP FREQUENCY 2/2 1/2 16 Polaroid Digital Camera User Guide www.polaroid.com SETUP STRONG AVERAGE SETUP 2. Press the and button to select the SETUP option.
User Guide
Page 18
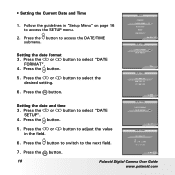
Setting the date format 3. Press the button. 5. DATE / TIME DD / MM / YY 00 : 00 : 2006 01 : 01 :01 18 Polaroid Digital Camera User Guide www.polaroid.com Press the or button to select the 6. button to select "DATE FORMAT". 4. DATE / TIME DATE FORMAT DATE SETUP 5. button to select "DATE SETUP". 4. Press ... button. Follow the guidelines in the field. Press the button. • Setting the Current Date and Time 1. Press the button. Press the or in "Setup Menu" on page 16 to access the SETUP...
Setting the date format 3. Press the button. 5. DATE / TIME DD / MM / YY 00 : 00 : 2006 01 : 01 :01 18 Polaroid Digital Camera User Guide www.polaroid.com Press the or button to select the 6. button to select "DATE FORMAT". 4. DATE / TIME DATE FORMAT DATE SETUP 5. button to select "DATE SETUP". 4. Press ... button. Follow the guidelines in the field. Press the button. • Setting the Current Date and Time 1. Press the button. Press the or in "Setup Menu" on page 16 to access the SETUP...
User Guide
Page 19
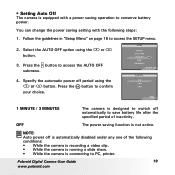
... menu. 2. • Setting Auto Off The camera is equipped with the following conditions: • While the camera is recording a video clip. • While the camera is running a slide show. • While the camera is connecting to PC, printer. Press the button to confirm your choice. Specify the automatic power off period using the or button. 3. Polaroid Digital Camera...
... menu. 2. • Setting Auto Off The camera is equipped with the following conditions: • While the camera is recording a video clip. • While the camera is running a slide show. • While the camera is connecting to PC, printer. Press the button to confirm your choice. Specify the automatic power off period using the or button. 3. Polaroid Digital Camera...
User Guide
Page 20
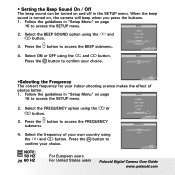
... NOTE: 50 HZ 20 60 HZ For European users For United States users Polaroid Digital Camera User Guide www.polaroid.com FORMAT DATE / TIME AUTO OFF BEEP FREQUENCY 1/2 4. Select the FREQUENCY option using the and button. 3. Follow the guidelines in "Setup Menu" on page 16 to confirm your choice. Press the button to access the...
... NOTE: 50 HZ 20 60 HZ For European users For United States users Polaroid Digital Camera User Guide www.polaroid.com FORMAT DATE / TIME AUTO OFF BEEP FREQUENCY 1/2 4. Select the FREQUENCY option using the and button. 3. Follow the guidelines in "Setup Menu" on page 16 to confirm your choice. Press the button to access the...
User Guide
Page 21
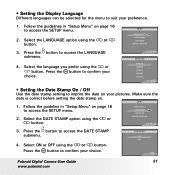
... to imprint the date on . Press the button to access the LANGUAGE submenu. 4. Follow the guidelines in "Setup Menu" on page 16 to access the SETUP menu. 2. Press the button to access the DATE STAMP submenu. 4. SETUP 1. Select the language you prefer using the or... 3. • Setting the Display Language Different languages can be selected for the menu to suit your choice. SETUP LANGUAGE DATE STAMP USB MODE DEFAULT SETTING 3. Follow the guideline in "Setup Menu" on page 16 to access the SETUP menu. 2. DATE STAMP ON OFF Polaroid Digital Camera User Guide 21 www...
... to imprint the date on . Press the button to access the LANGUAGE submenu. 4. Follow the guidelines in "Setup Menu" on page 16 to access the SETUP menu. 2. Press the button to access the DATE STAMP submenu. 4. SETUP 1. Select the language you prefer using the or... 3. • Setting the Display Language Different languages can be selected for the menu to suit your choice. SETUP LANGUAGE DATE STAMP USB MODE DEFAULT SETTING 3. Follow the guideline in "Setup Menu" on page 16 to access the SETUP menu. 2. DATE STAMP ON OFF Polaroid Digital Camera User Guide 21 www...
User Guide
Page 22
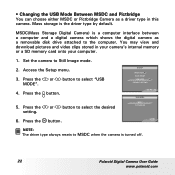
... interface between a computer and a digital camera which shows the digital camera as a driver type in your camera's internal memory or a SD memory card onto your computer. 1. Access the Setup menu. 3. Press the or button to select "USB MODE". 4. Press the button. MSDC(Mass Storage Digital Camera) is turned off. 22 Polaroid Digital Camera User Guide www.polaroid.com SETUP LANGUAGE DATE STAMP...
... interface between a computer and a digital camera which shows the digital camera as a driver type in your camera's internal memory or a SD memory card onto your computer. 1. Access the Setup menu. 3. Press the or button to select "USB MODE". 4. Press the button. MSDC(Mass Storage Digital Camera) is turned off. 22 Polaroid Digital Camera User Guide www.polaroid.com SETUP LANGUAGE DATE STAMP...

User Guide
Page 23
... will cancel the operation and return to restore default settings. LANGUAGE DATE STAMP USB MODE DEFAULT SETTING 2/2 3. Press the button to the previous menu. Polaroid Digital Camera User Guide 23 www.polaroid.com Press the button. 4. Select OK using the and button. SETUP 1. Select the DEFAULT SETTING option using the or button. • Restoring Default...
... will cancel the operation and return to restore default settings. LANGUAGE DATE STAMP USB MODE DEFAULT SETTING 2/2 3. Press the button to the previous menu. Polaroid Digital Camera User Guide 23 www.polaroid.com Press the button. 4. Select OK using the and button. SETUP 1. Select the DEFAULT SETTING option using the or button. • Restoring Default...

User Guide
Page 30
Image size setting 1. Press the button to email while larger size and fine quality pictures are better for printing. 30 Polaroid Digital Camera User Guide www.polaroid.com IMAGE SIZE 3072 X 2304 SUPER FINE AUTO AUTO AUTO 1/2 IMAGE SIZE 3072 X 2304 2304 X 1728 2048 X 1536 1600 X 1200 640 X ...; Setting the Image Size and Compression Image size refers to access the main menu. Select the image size you prefer using the or button. Picture quality depends on the JPEG file compression that the camera applies when the picture is recomended to give up confirmation and return previous. ...
Image size setting 1. Press the button to email while larger size and fine quality pictures are better for printing. 30 Polaroid Digital Camera User Guide www.polaroid.com IMAGE SIZE 3072 X 2304 SUPER FINE AUTO AUTO AUTO 1/2 IMAGE SIZE 3072 X 2304 2304 X 1728 2048 X 1536 1600 X 1200 640 X ...; Setting the Image Size and Compression Image size refers to access the main menu. Select the image size you prefer using the or button. Picture quality depends on the JPEG file compression that the camera applies when the picture is recomended to give up confirmation and return previous. ...

User Guide
Page 31
Press the or button to access the COMPRESSION submenu. 5. Press the button to select the COMPRESSION option. 4. COMPRESSION 3072 X 2304 SUPER FINE AUTO AUTO AUTO 1/2 COMPRESSION SUPER FINE FINE NORMAL Polaroid Digital Camera User Guide 31 www.polaroid.com Select the compression you prefer using the or button. Compression setting 1. Press the button to confirm your choice, press the button to . 2. Press the mode button to set the camera mode to give up confirmation and return previous. Press the button to access the main menu. 3.
Press the or button to access the COMPRESSION submenu. 5. Press the button to select the COMPRESSION option. 4. COMPRESSION 3072 X 2304 SUPER FINE AUTO AUTO AUTO 1/2 COMPRESSION SUPER FINE FINE NORMAL Polaroid Digital Camera User Guide 31 www.polaroid.com Select the compression you prefer using the or button. Compression setting 1. Press the button to confirm your choice, press the button to . 2. Press the mode button to set the camera mode to give up confirmation and return previous. Press the button to access the main menu. 3.

User Guide
Page 33
button to confirm. Press the button to enter EXPOSURE 3072X 2304 SUPER FINE AUTO AUTO AUTO 1/2 4. Press the submenu. Polaroid Digital Camera User Guide 33 www.polaroid.com This setting can adjust the exposure compensation value (EV) within the range of -2EV to +2EV in order to compensate ...for current lighting conditions. Press the mode button to set the camera mode to access the main menu. 3. NOTE: • A higher EV is ...
button to confirm. Press the button to enter EXPOSURE 3072X 2304 SUPER FINE AUTO AUTO AUTO 1/2 4. Press the submenu. Polaroid Digital Camera User Guide 33 www.polaroid.com This setting can adjust the exposure compensation value (EV) within the range of -2EV to +2EV in order to compensate ...for current lighting conditions. Press the mode button to set the camera mode to access the main menu. 3. NOTE: • A higher EV is ...
User Guide
Page 34
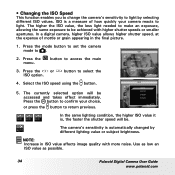
In a digital camera, higher ISO value allows higher shutter speed, at the expense of how quickly your choice, or press the button to access the main 3. Press the menu. • Changing the ISO Speed This function enables you to change the camera's sensitivity to be achieved with more noise. ...higher shutter speeds or smaller apertures. button to . 2. Use as low an ISO value as possible. 34 Polaroid Digital Camera User Guide www.polaroid.com Press the mode button to set the camera mode to select the ISO 3072 X 2304 SUPER FINE AUTO AUTO AUTO 1/2 4. ISO AUTO ISO100 ISO200 ...
In a digital camera, higher ISO value allows higher shutter speed, at the expense of how quickly your choice, or press the button to access the main 3. Press the menu. • Changing the ISO Speed This function enables you to change the camera's sensitivity to be achieved with more noise. ...higher shutter speeds or smaller apertures. button to . 2. Use as low an ISO value as possible. 34 Polaroid Digital Camera User Guide www.polaroid.com Press the mode button to set the camera mode to select the ISO 3072 X 2304 SUPER FINE AUTO AUTO AUTO 1/2 4. ISO AUTO ISO100 ISO200 ...

User Guide
Page 35
...effect immediately. Select the right type of white balance using the or button. 6. Press the or button to access the main menu. 3. Press the mode button to set the camera mode to enter submenu. 5. Press the button to . 2. When shooting under the type of lighting environment. 1. •...Outdoor sunny day Daylight Cloudy Cloudy Indoors, illuminated by light bulbs Indoors, illuminated by cool white fluorescent lighting Tungsten Fluorescent Polaroid Digital Camera User Guide 35 www.polaroid.com Press the button to confirm your choice, or press the button to return previous.
...effect immediately. Select the right type of white balance using the or button. 6. Press the or button to access the main menu. 3. Press the mode button to set the camera mode to enter submenu. 5. Press the button to . 2. When shooting under the type of lighting environment. 1. •...Outdoor sunny day Daylight Cloudy Cloudy Indoors, illuminated by light bulbs Indoors, illuminated by cool white fluorescent lighting Tungsten Fluorescent Polaroid Digital Camera User Guide 35 www.polaroid.com Press the button to confirm your choice, or press the button to return previous.

User Guide
Page 36
... of the picture. Press the or button to access the main menu. 3. • Setting the Sharpness Use the sharpness setting to highlight or blend the edges of the picture. 36 Polaroid Digital Camera User Guide www.polaroid.com Press the mode button to set the camera mode to access the SHARPNESS submenu. 5. SHARPNESS STRONG AVERAGE SETUP...
... of the picture. Press the or button to access the main menu. 3. • Setting the Sharpness Use the sharpness setting to highlight or blend the edges of the picture. 36 Polaroid Digital Camera User Guide www.polaroid.com Press the mode button to set the camera mode to access the SHARPNESS submenu. 5. SHARPNESS STRONG AVERAGE SETUP...

User Guide
Page 37
... the subject centered on the LCD screen. Press the mode button to set the camera mode LIGHT METERING to give an optimum picture exposure. Select the metering method using ...will be accessed and takes effect immediately. Evaluates the lighting conditions of light enters into the camera lens. 1. AVERAGE SETUP 3. When shooting under these conditions Select this setting Evaluates the lighting.... Press the button to return previous. Spot Polaroid Digital Camera User Guide 37 www.polaroid.com Press the button to confirm your choice, press the button to access the ...
... the subject centered on the LCD screen. Press the mode button to set the camera mode LIGHT METERING to give an optimum picture exposure. Select the metering method using ...will be accessed and takes effect immediately. Evaluates the lighting conditions of light enters into the camera lens. 1. AVERAGE SETUP 3. When shooting under these conditions Select this setting Evaluates the lighting.... Press the button to return previous. Spot Polaroid Digital Camera User Guide 37 www.polaroid.com Press the button to confirm your choice, press the button to access the ...
User Guide
Page 41
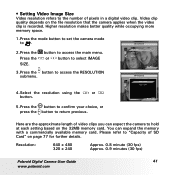
... previous. Resolution: 640 x 480 320 x 240 Approx. 0.8 minute (30 fps) Approx. 0.9 minutes (30 fps) Polaroid Digital Camera User Guide 41 www.polaroid.com You can expect the camera to the number of video clips you can expand the memory with a commercially available memory card. Video clip quality depends on... when the video clip is recorded. button to access the RESOLUTION submenu. Press the button to access the main menu. Press the mode button to set the camera mode to select IMAGE IMAGE SIZE 640 X 480 AUTO SETUP 3. or button to . 2. • Setting Video Image...
... previous. Resolution: 640 x 480 320 x 240 Approx. 0.8 minute (30 fps) Approx. 0.9 minutes (30 fps) Polaroid Digital Camera User Guide 41 www.polaroid.com You can expect the camera to the number of video clips you can expand the memory with a commercially available memory card. Video clip quality depends on... when the video clip is recorded. button to access the RESOLUTION submenu. Press the button to access the main menu. Press the mode button to set the camera mode to select IMAGE IMAGE SIZE 640 X 480 AUTO SETUP 3. or button to . 2. • Setting Video Image...

User Guide
Page 42
... confirm your choice, or press the button to access the main menu. 3. The currently selected option will be accessed and takes effect immediately. When shooting under the type of lighting that is available. 1.Press the mode button to set the camera mode to select White 640 X 480 AUTO SETUP 4. Press the button... light bulbs Indoors, illuminated by pressing or button . 5. Use button to enter submenu, then select the value by cool white fluorescent lighting 42 Tungsten Fluorescent Polaroid Digital Camera User Guide www.polaroid.com button to . WHITE BALANCE 2.
... confirm your choice, or press the button to access the main menu. 3. The currently selected option will be accessed and takes effect immediately. When shooting under the type of lighting that is available. 1.Press the mode button to set the camera mode to select White 640 X 480 AUTO SETUP 4. Press the button... light bulbs Indoors, illuminated by pressing or button . 5. Use button to enter submenu, then select the value by cool white fluorescent lighting 42 Tungsten Fluorescent Polaroid Digital Camera User Guide www.polaroid.com button to . WHITE BALANCE 2.

User Guide
Page 44
... OFF using the or button. LOCK THIS UNLOCK THIS LOCK ALL UNLOCK ALL 5. MENU 1. ERASE PROTECT SLIDE SHOW COPY TO CARD PRINT SETTING MENU 3. Press the button to confirm your confirmation and return previous. 44 Polaroid Digital Camera User Guide www.polaroid.com Movie 0001/0002 3. Use the and button to select the video clip you...
... OFF using the or button. LOCK THIS UNLOCK THIS LOCK ALL UNLOCK ALL 5. MENU 1. ERASE PROTECT SLIDE SHOW COPY TO CARD PRINT SETTING MENU 3. Press the button to confirm your confirmation and return previous. 44 Polaroid Digital Camera User Guide www.polaroid.com Movie 0001/0002 3. Use the and button to select the video clip you...

