User Manual
Page 1
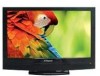
This manual should help you still have questions, call our help ? If you understand your new product. Need some help line found on the insert with this icon: Or visit www.polaroid.com/support. Questions? 23" HD LCD TV Your TV may look different from the one pictured.
This manual should help you still have questions, call our help ? If you understand your new product. Need some help line found on the insert with this icon: Or visit www.polaroid.com/support. Questions? 23" HD LCD TV Your TV may look different from the one pictured.
User Manual
Page 2
...low-power analog broadcasts via an antenna. "Polaroid" and "Polaroid and Pixel" are trademarks of this label on February 17, 2009. To find out how to properly dispose of Dolby Laboratories. All rights reserved. This TV incorporates High-Definition Multimedia Interface (HDMITM...document. Changes, technical inaccuracies, and typographic errors will need a TV Converter to receive over the air TV programming, with an older television receiver, a signal splitter might be necessary to continue to www.polaroid.com and click on the environment and human health. For ...
...low-power analog broadcasts via an antenna. "Polaroid" and "Polaroid and Pixel" are trademarks of this label on February 17, 2009. To find out how to properly dispose of Dolby Laboratories. All rights reserved. This TV incorporates High-Definition Multimedia Interface (HDMITM...document. Changes, technical inaccuracies, and typographic errors will need a TV Converter to receive over the air TV programming, with an older television receiver, a signal splitter might be necessary to continue to www.polaroid.com and click on the environment and human health. For ...
User Manual
Page 3
... the equipment into an outlet on Energy Star, please visit www. If you adjust the settings of your TV, increasing the brightness for instance, your TV to correct the interference by one or more information on a circuit which can radiate radio frequency energy and,...and used in a residential installation. However, there is connected to radio communications. ENERGY STAR® qualified TV The factory default settings allow your TV may cause harmful interference to . 4. Changes or modifications not expressly approved by the Energy Star program. Consult the dealer...
... the equipment into an outlet on Energy Star, please visit www. If you adjust the settings of your TV, increasing the brightness for instance, your TV to correct the interference by one or more information on a circuit which can radiate radio frequency energy and,...and used in a residential installation. However, there is connected to radio communications. ENERGY STAR® qualified TV The factory default settings allow your TV may cause harmful interference to . 4. Changes or modifications not expressly approved by the Energy Star program. Consult the dealer...
User Manual
Page 7
... Instructions 2 Antenna Safety Instructions 4 Chapter 1 Introducing the LCD TV Key Features ...6 Package Contents ...7 Your LCD TV...9 Your Remote Control 13 Chapter 2 Installing the LCD TV Connecting a TV Cable or an Antenna 15 Connecting an A/V Device with Composite... Connector 20 Connecting an A/V Device with S-Video Connector 21 Connecting an A/V Device with Component(YPbPr) Connector 22 Connecting an AV Equipment with HDMI Connector 23...
... Instructions 2 Antenna Safety Instructions 4 Chapter 1 Introducing the LCD TV Key Features ...6 Package Contents ...7 Your LCD TV...9 Your Remote Control 13 Chapter 2 Installing the LCD TV Connecting a TV Cable or an Antenna 15 Connecting an A/V Device with Composite... Connector 20 Connecting an A/V Device with S-Video Connector 21 Connecting an A/V Device with Component(YPbPr) Connector 22 Connecting an AV Equipment with HDMI Connector 23...
User Manual
Page 8
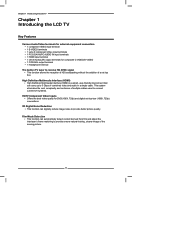
... ▪ This function can digitally reduce image noise to 5 Gbps of combined video and audio in TV tuner to provide a more natural-looking, clearer image of the moving picture. 6 Chapter 1 Introducing the LCD TV Chapter 1 Introducing the LCD TV Key Features Various Audio/Video terminals for external equipment connection ▪ 1 composite VIDEO input terminal ▪...
... ▪ This function can digitally reduce image noise to 5 Gbps of combined video and audio in TV tuner to provide a more natural-looking, clearer image of the moving picture. 6 Chapter 1 Introducing the LCD TV Chapter 1 Introducing the LCD TV Key Features Various Audio/Video terminals for external equipment connection ▪ 1 composite VIDEO input terminal ▪...
User Manual
Page 9
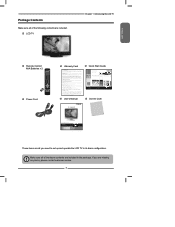
... Control WRITE down your display. If you are set up the colored boxes to match up and operate the LCD TV in accordance with this icon: Or visit www.polaroid.com. You will be required to submit a legible copy of your bill of sale when requesting warranty service. (If a...purchase of the product. Product features, specifications, and appearances are subject to change without notice. 20080501 Screen Cloth 15" / 19" HD LCD TV Your TV may be User's Manual Quick Start Guide CHECK to decide what the connections look different from state to your HDTV through your HDTV. (Refer...
... Control WRITE down your display. If you are set up the colored boxes to match up and operate the LCD TV in accordance with this icon: Or visit www.polaroid.com. You will be required to submit a legible copy of your bill of sale when requesting warranty service. (If a...purchase of the product. Product features, specifications, and appearances are subject to change without notice. 20080501 Screen Cloth 15" / 19" HD LCD TV Your TV may be User's Manual Quick Start Guide CHECK to decide what the connections look different from state to your HDTV through your HDTV. (Refer...
User Manual
Page 10
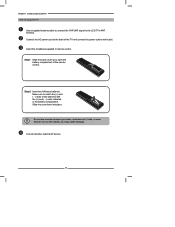
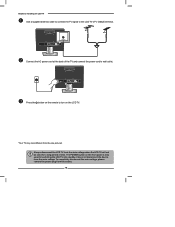
Connect the AC power cord at the back of the TV and connect the power cord to open the battery compartment of the batteries with the (+) and ( - ) ends indicated in remote control. Step2 Insert two AAA .... Insert the 2 batteries supplied in the battery compartment. Connect another external AV device. 8 Make sure to the LCD TV's ANT. Step1 Slide the back cover up to wall outlet. Chapter 1 Introducing the LCD TV How to setup the TV Use a supplied antenna cable to connect the VHF/UHF signal to match the (+) and ( - ) ends of...
Connect the AC power cord at the back of the TV and connect the power cord to open the battery compartment of the batteries with the (+) and ( - ) ends indicated in remote control. Step2 Insert two AAA .... Insert the 2 batteries supplied in the battery compartment. Connect another external AV device. 8 Make sure to the LCD TV's ANT. Step1 Slide the back cover up to wall outlet. Chapter 1 Introducing the LCD TV How to setup the TV Use a supplied antenna cable to connect the VHF/UHF signal to match the (+) and ( - ) ends of...

User Manual
Page 11
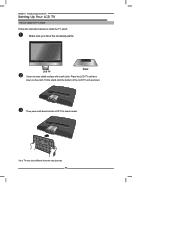
...See the VESA mounting bracket instructions (not provided) to finish mounting your TV on a wall, please follow the instructions below: Remove the base of the TV stand. To attach this LCD TV to the wall. *Your TV may look different from the one pictured. 9 ENGLISH Use a Phillip's head ...screwdriver to mount your TV to a wall, a standard 100x100 VESA mounting bracket is connected to the back of the TV stand. Setting Up Your LCD TV Chapter 1 Introducing the LCD TV How to Remove the TV Stand If you would like to remove the screw inside the...
...See the VESA mounting bracket instructions (not provided) to finish mounting your TV on a wall, please follow the instructions below: Remove the base of the TV stand. To attach this LCD TV to the wall. *Your TV may look different from the one pictured. 9 ENGLISH Use a Phillip's head ...screwdriver to mount your TV to a wall, a standard 100x100 VESA mounting bracket is connected to the back of the TV stand. Setting Up Your LCD TV Chapter 1 Introducing the LCD TV How to Remove the TV Stand If you would like to remove the screw inside the...
User Manual
Page 12
Chapter 1 Introducing the LCD TV Setting Up Your LCD TV How to install the TV Stand Follow the instructions below to install the TV stand: Make sure you have the necessary parts,: LCD TV Stand Cover an even stable surface with a soft cloth. Place the LCD TV unit facedown on the cloth. Fit the stand onto the bottom of the LCD TV unit as shown: Then push until stand into the LCD TV's stand socket. *Your TV may look different from the one pictured. 10
Chapter 1 Introducing the LCD TV Setting Up Your LCD TV How to install the TV Stand Follow the instructions below to install the TV stand: Make sure you have the necessary parts,: LCD TV Stand Cover an even stable surface with a soft cloth. Place the LCD TV unit facedown on the cloth. Fit the stand onto the bottom of the LCD TV unit as shown: Then push until stand into the LCD TV's stand socket. *Your TV may look different from the one pictured. 10
User Manual
Page 13
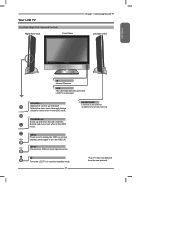
.../Left /Right Side View and Controls Right Side View Front View Chapter 1 Introducing the LCD TV Left Side View ENGLISH IR Infrared Receiver LED The LED light indicates when the LCD TV is activated. Turns the LCD TV on screen display), press again to the external headphone for items when in the OSD mode. CHANNEL▲... (on and into standby mode. 11 HEADPHONE Connects to turn the OSD off. Selects the main-menu item and change values for private listening. *Your TV may look different from different input signal sources.
.../Left /Right Side View and Controls Right Side View Front View Chapter 1 Introducing the LCD TV Left Side View ENGLISH IR Infrared Receiver LED The LED light indicates when the LCD TV is activated. Turns the LCD TV on screen display), press again to the external headphone for items when in the OSD mode. CHANNEL▲... (on and into standby mode. 11 HEADPHONE Connects to turn the OSD off. Selects the main-menu item and change values for private listening. *Your TV may look different from different input signal sources.
User Manual
Page 14
... IN/ PC AUDIO IN Connects the PC, or other AV equipment with component(YPbPr) video and audio output jacks. *Your TV may look different from the one pictured. Chapter 1 Introducing the LCD TV Rear View and Jacks S-VIDEO/VIDEO/AUDIO(L/R) IN Connects to the audio jack on external video equipment. VHF/UHF IN...
... IN/ PC AUDIO IN Connects the PC, or other AV equipment with component(YPbPr) video and audio output jacks. *Your TV may look different from the one pictured. Chapter 1 Introducing the LCD TV Rear View and Jacks S-VIDEO/VIDEO/AUDIO(L/R) IN Connects to the audio jack on external video equipment. VHF/UHF IN...
User Manual
Page 15
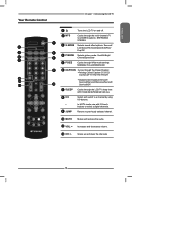
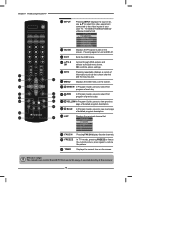
...Increases and decreases volume. 12 CH.+- Scans up and down the channels 13 GUIDE EXIT 12 INFO MENU 1 Turns the LCD TV on and off. 2 MTS Cycles through the multi-channels TV sound(MTS) options: SAP/MONO/ STEREO 3 S.MODE Selects sound effect options: Surround/ Live/Dance/Techno/Classic/Soft/...Closed Caption:CC1/CC2/ CC3/CC4/TT1/TT2/TT3/TT4/Off Digital Closed Caption:Service1/ Service2/Service3/Service4/Service5/ Service6/Off 7 SLEEP Cycles through the LCD TV sleep timer: OFF/10/20/30/40/50/60/90/120 mins 8 0-9 Select and switch to a channel by using 0-9 buttons. 9 JUMP ...
...Increases and decreases volume. 12 CH.+- Scans up and down the channels 13 GUIDE EXIT 12 INFO MENU 1 Turns the LCD TV on and off. 2 MTS Cycles through the multi-channels TV sound(MTS) options: SAP/MONO/ STEREO 3 S.MODE Selects sound effect options: Surround/ Live/Dance/Techno/Classic/Soft/...Closed Caption:CC1/CC2/ CC3/CC4/TT1/TT2/TT3/TT4/Off Digital Closed Caption:Service1/ Service2/Service3/Service4/Service5/ Service6/Off 7 SLEEP Cycles through the LCD TV sleep timer: OFF/10/20/30/40/50/60/90/120 mins 8 0-9 Select and switch to a channel by using 0-9 buttons. 9 JUMP ...
User Manual
Page 16
... GUIDE Pressing INPUT displays the source list, use ▲▼ to select the video equipment connected to the video inputs of detailed program description. 23 LIST 26 Displays the received channel list Channel List 7-1 KABC-DT 9-1 KQED-HD 9-2 KOED-SD 8 CCT 12 13 15 24 FAV.CH ... press to view previous page of detailed program description. 25 22 BLUE In Program Guide, press to view next page of your LCD TV : TV/VIDEO1/VIDEO2/VIDEO3/ VIDEO4/COMPUTER Input Source TV(CABLE/AIR) VIDEO1 (AV) VIDEO2 (S-VIDEO) VIDEO3 (YPbPr) VIDEO4 (HDMI) COMPUTER(VGA) Displays the Program Guide on the ...
... GUIDE Pressing INPUT displays the source list, use ▲▼ to select the video equipment connected to the video inputs of detailed program description. 23 LIST 26 Displays the received channel list Channel List 7-1 KABC-DT 9-1 KQED-HD 9-2 KOED-SD 8 CCT 12 13 15 24 FAV.CH ... press to view previous page of detailed program description. 25 22 BLUE In Program Guide, press to view next page of your LCD TV : TV/VIDEO1/VIDEO2/VIDEO3/ VIDEO4/COMPUTER Input Source TV(CABLE/AIR) VIDEO1 (AV) VIDEO2 (S-VIDEO) VIDEO3 (YPbPr) VIDEO4 (HDMI) COMPUTER(VGA) Displays the Program Guide on the ...
User Manual
Page 17
... through a 300-75-ohm adapter (not included). 300-ohm twin-lead cable (flat) 15 Connecting a TV Cable or an Antenna Antenna Connection The antenna requirements for good color TV reception are completed. The following is a brief explanation of the type of any AC power cords to a.... F-type connector 75-ohm coaxial cable (round) ■ A 300-ohm system is strongly recommended. ENGLISH Chapter 2 Installing the LCD TV Chapter 2 Installing the LCD TV Refer to the owner's manual of connection that is provided with the various antenna systems. ■ A 75-ohm system is generally...
... through a 300-75-ohm adapter (not included). 300-ohm twin-lead cable (flat) 15 Connecting a TV Cable or an Antenna Antenna Connection The antenna requirements for good color TV reception are completed. The following is a brief explanation of the type of any AC power cords to a.... F-type connector 75-ohm coaxial cable (round) ■ A 300-ohm system is strongly recommended. ENGLISH Chapter 2 Installing the LCD TV Chapter 2 Installing the LCD TV Refer to the owner's manual of connection that is provided with the various antenna systems. ■ A 75-ohm system is generally...
User Manual
Page 18
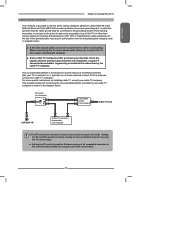
.../or UHF antennas UHF Antenna Combiner (not included) OUT IN 300-ohm twinlead cable 75-ohm coaxial cable 300-ohm twinlead cable VHF Antenna *Your TV may look different from the one of the following two diagrams when connecting an outdoor antenna. Combination VHF/UHF antenna VHF/UHF Antenna 300/75...
.../or UHF antennas UHF Antenna Combiner (not included) OUT IN 300-ohm twinlead cable 75-ohm coaxial cable 300-ohm twinlead cable VHF Antenna *Your TV may look different from the one of the following two diagrams when connecting an outdoor antenna. Combination VHF/UHF antenna VHF/UHF Antenna 300/75...
User Manual
Page 19
...channels is required to the point of these premium pay channels. This converter/descrambler is necessary for normal viewing of scrambled channels. (Set your TV to channel 3 or 4, typically one of cable entry as close to provide two inputs (A and B). RF switch (not included) A OUT...company, and/ or program owner. ■ A 75-ohm coaxial cable connector is built into the ANT. ENGLISH Chapter 2 Installing the LCD TV Cable TV (CATV) Connection This reminder is shown in particular, specifies that provides guidelines for proper grounding and, in the diagram below. terminal...
...channels is required to the point of these premium pay channels. This converter/descrambler is necessary for normal viewing of scrambled channels. (Set your TV to channel 3 or 4, typically one of cable entry as close to provide two inputs (A and B). RF switch (not included) A OUT...company, and/ or program owner. ■ A 75-ohm coaxial cable connector is built into the ANT. ENGLISH Chapter 2 Installing the LCD TV Cable TV (CATV) Connection This reminder is shown in particular, specifies that provides guidelines for proper grounding and, in the diagram below. terminal...
User Manual
Page 20
... button on the remote to turn on the front panel is only used for switching the LCD TV into standby, it does not disconnect the device from the one pictured. The POWER button on the LCD TV. *Your TV may look different from the main voltage. To completely disconnect the main voltage, please remove the...
... button on the remote to turn on the front panel is only used for switching the LCD TV into standby, it does not disconnect the device from the one pictured. The POWER button on the LCD TV. *Your TV may look different from the main voltage. To completely disconnect the main voltage, please remove the...
User Manual
Page 21
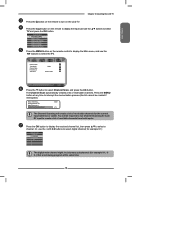
... (AV) VIDEO2 (S-VIDEO) VIDEO3 (YPbPr) VIDEO4 (HDMI) COMPUTER(VGA) Press the MENU button on the LCD TV. Channel Scan Tuner Mode Channel Skip Favorite List Time Zone Cable Eastern Time TV Select Exit Press the ▼ button to display the Input List. Analog Channels: 25 Digital Channels: 0 ...Cable 47% The Channel Scanning will be created if interrupted) Status: Scanning..... ENGLISH Chapter 2 Installing the LCD TV Press the button on the remote to turn on the remote control to display the Main menu, and use the ▪ with 0-9 buttons ...
... (AV) VIDEO2 (S-VIDEO) VIDEO3 (YPbPr) VIDEO4 (HDMI) COMPUTER(VGA) Press the MENU button on the LCD TV. Channel Scan Tuner Mode Channel Skip Favorite List Time Zone Cable Eastern Time TV Select Exit Press the ▼ button to display the Input List. Analog Channels: 25 Digital Channels: 0 ...Cable 47% The Channel Scanning will be created if interrupted) Status: Scanning..... ENGLISH Chapter 2 Installing the LCD TV Press the button on the remote to turn on the remote control to display the Main menu, and use the ▪ with 0-9 buttons ...
User Manual
Page 22
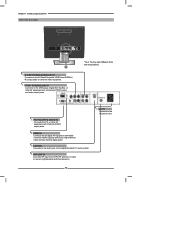
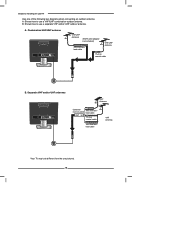
...connect the external A/V device's composite video/audio jacks to the LCD TV's VIDEO IN jacks. Press the button on the remote to turn on the LCD TV. To view the A/V device's with Composite Connector Rear of the LCD TV or other connected equipment. Connect all A/V devices have the ...ability to connect to a TV. Chapter 2 Installing the LCD TV Connecting an A/V Device with component input, press ...
...connect the external A/V device's composite video/audio jacks to the LCD TV's VIDEO IN jacks. Press the button on the remote to turn on the LCD TV. To view the A/V device's with Composite Connector Rear of the LCD TV or other connected equipment. Connect all A/V devices have the ...ability to connect to a TV. Chapter 2 Installing the LCD TV Connecting an A/V Device with component input, press ...

User Manual
Page 23
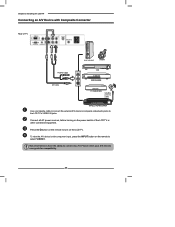
...cable to connect the external A/V device's S-Video output jack to turn on the LCD TV. ENGLISH Chapter 2 Installing the LCD TV Connecting an A/V Device with component input, press the INPUT button on the power switch of TV GAME CONSOLE AUDIO Cable S-VIDEO OUT L S-VIDEO Cable R DVD PLAYER Use an ...audio cable to connect the external A/V device's audio output jacks to the LCD TV's audio inputs. To view the A/V device's with S-Video ...
...cable to connect the external A/V device's S-Video output jack to turn on the LCD TV. ENGLISH Chapter 2 Installing the LCD TV Connecting an A/V Device with component input, press the INPUT button on the power switch of TV GAME CONSOLE AUDIO Cable S-VIDEO OUT L S-VIDEO Cable R DVD PLAYER Use an ...audio cable to connect the external A/V device's audio output jacks to the LCD TV's audio inputs. To view the A/V device's with S-Video ...


