User Manual
Page 1
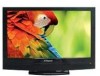
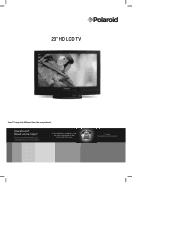
Need some help line found on the insert with this icon: Or visit www.polaroid.com/support. 23" HD LCD TV Your TV may look different from the one pictured. Questions? This manual should help you still have questions, call our help ? If you understand your new product.
Need some help line found on the insert with this icon: Or visit www.polaroid.com/support. 23" HD LCD TV Your TV may look different from the one pictured. Questions? This manual should help you still have questions, call our help ? If you understand your new product.
User Manual
Page 8
...matching to provide a more natural-looking, clearer image of the moving picture. 6 Film-Mode Detection ▪ This function can carry up to 5 Gbps of combined video and audio in TV tuner to receive HD ATSC signal ▪ This function allows the ...built-in a single cable. This system eliminates the cost, complexity and confusion of multiple cables used to provide better picture quality. Chapter 1 Introducing the LCD TV Chapter 1 Introducing the LCD TV Key Features Various Audio/Video terminals for external equipment connection ▪ 1 composite VIDEO input terminal ▪ 1 S-VIDEO...
...matching to provide a more natural-looking, clearer image of the moving picture. 6 Film-Mode Detection ▪ This function can carry up to 5 Gbps of combined video and audio in TV tuner to receive HD ATSC signal ▪ This function allows the ...built-in a single cable. This system eliminates the cost, complexity and confusion of multiple cables used to provide better picture quality. Chapter 1 Introducing the LCD TV Chapter 1 Introducing the LCD TV Key Features Various Audio/Video terminals for external equipment connection ▪ 1 composite VIDEO input terminal ▪ 1 S-VIDEO...
User Manual
Page 9
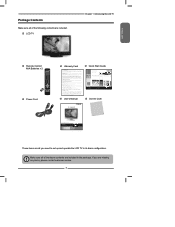
... • EFFECTIVE DATE OF WARRANTY: Your warranty period begins on the date of sale to the original consumer/end user. LCD TV Chapter 1 Introducing the LCD TV ENGLISH SP/DIF Remote Control/ AAA Batteries x 2 S.MODE MTS P. MODE CAPTION SLEEP P.SIZE MUTE VOL. INPUT CH....A/V Equipment and TV Signal Sources you need and what kind of your A/V equipment. Need help connecting your A/V equipment to your questions. Consult your HDTV? "Polaroid" and "Polaroid and Pixel" are set up the colored boxes to receive an incredible High Definition picture. Product features, ...
... • EFFECTIVE DATE OF WARRANTY: Your warranty period begins on the date of sale to the original consumer/end user. LCD TV Chapter 1 Introducing the LCD TV ENGLISH SP/DIF Remote Control/ AAA Batteries x 2 S.MODE MTS P. MODE CAPTION SLEEP P.SIZE MUTE VOL. INPUT CH....A/V Equipment and TV Signal Sources you need and what kind of your A/V equipment. Need help connecting your A/V equipment to your questions. Consult your HDTV? "Polaroid" and "Polaroid and Pixel" are set up the colored boxes to receive an incredible High Definition picture. Product features, ...

User Manual
Page 11
... the rod that is required. Setting Up Your LCD TV Chapter 1 Introducing the LCD TV How to Remove the TV Stand If you would like to mount your TV to the wall. *Your TV may look different from the one pictured. 9 Slide the neck of the TV. See the VESA mounting bracket instructions (not provided...) to remove the screw inside the neck of the TV stand. ENGLISH...
... the rod that is required. Setting Up Your LCD TV Chapter 1 Introducing the LCD TV How to Remove the TV Stand If you would like to mount your TV to the wall. *Your TV may look different from the one pictured. 9 Slide the neck of the TV. See the VESA mounting bracket instructions (not provided...) to remove the screw inside the neck of the TV stand. ENGLISH...
User Manual
Page 12
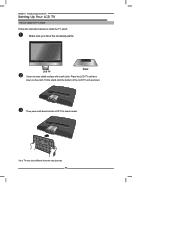
Place the LCD TV unit facedown on the cloth. Chapter 1 Introducing the LCD TV Setting Up Your LCD TV How to install the TV Stand Follow the instructions below to install the TV stand: Make sure you have the necessary parts,: LCD TV Stand Cover an even stable surface with a soft cloth. Fit the stand onto the bottom of the LCD TV unit as shown: Then push until stand into the LCD TV's stand socket. *Your TV may look different from the one pictured. 10
Place the LCD TV unit facedown on the cloth. Chapter 1 Introducing the LCD TV Setting Up Your LCD TV How to install the TV Stand Follow the instructions below to install the TV stand: Make sure you have the necessary parts,: LCD TV Stand Cover an even stable surface with a soft cloth. Fit the stand onto the bottom of the LCD TV unit as shown: Then push until stand into the LCD TV's stand socket. *Your TV may look different from the one pictured. 10
User Manual
Page 13
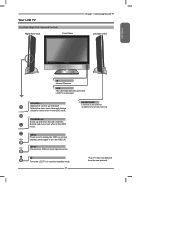
... channels. INPUT Choose from the one pictured. Your LCD TV Front/Left /Right Side View and Controls Right Side View Front View Chapter 1 Introducing the LCD TV Left Side View ENGLISH IR Infrared Receiver LED The LED light indicates when the LCD TV is activated. Selects the main-menu ...item and change values for private listening. *Your TV may look different from different input signal sources. Turns the LCD TV on screen display), press again to the external headphone...
... channels. INPUT Choose from the one pictured. Your LCD TV Front/Left /Right Side View and Controls Right Side View Front View Chapter 1 Introducing the LCD TV Left Side View ENGLISH IR Infrared Receiver LED The LED light indicates when the LCD TV is activated. Selects the main-menu ...item and change values for private listening. *Your TV may look different from different input signal sources. Turns the LCD TV on screen display), press again to the external headphone...
User Manual
Page 14
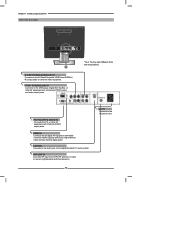
HDMI IN Connects the all digital AV equipment with component(YPbPr) video and audio output jacks. *Your TV may look different from the one pictured. YPbPr IN/AUDIO(L/R) IN Connects to the AC power cord. VHF/UHF IN Connects RF input from VHF/UHF antenna or cable to receive high/.... 12 AC IN Connects to the DVD player, Digital Set-Top-Box, or other AV equipment with VGA and AUDIO output jacks. Chapter 1 Introducing the LCD TV Rear View and Jacks S-VIDEO/VIDEO/AUDIO(L/R) IN Connects to the audio jack on external video equipment. COAXIAL Connects to the S-Video/Composite VIDEO and...
HDMI IN Connects the all digital AV equipment with component(YPbPr) video and audio output jacks. *Your TV may look different from the one pictured. YPbPr IN/AUDIO(L/R) IN Connects to the AC power cord. VHF/UHF IN Connects RF input from VHF/UHF antenna or cable to receive high/.... 12 AC IN Connects to the DVD player, Digital Set-Top-Box, or other AV equipment with VGA and AUDIO output jacks. Chapter 1 Introducing the LCD TV Rear View and Jacks S-VIDEO/VIDEO/AUDIO(L/R) IN Connects to the audio jack on external video equipment. COAXIAL Connects to the S-Video/Composite VIDEO and...
User Manual
Page 15
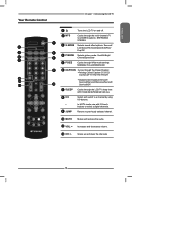
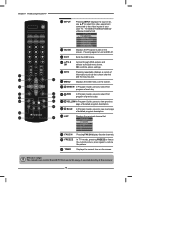
... 13 INPUT CH. GUIDE EXIT 12 INFO MENU 1 Turns the LCD TV on and off. 2 MTS Cycles through the multi-channels TV sound(MTS) options: SAP/MONO/ STEREO 3 S.MODE Selects sound effect options: Surround/ Live/Dance/Techno/Classic/Soft/Rock/ Pop/Off. 4 P.MODE Selects picture mode: Vivid/Hi-Bright/ Cinema/Sport/User 5 P.SIZE Cycles...
... 13 INPUT CH. GUIDE EXIT 12 INFO MENU 1 Turns the LCD TV on and off. 2 MTS Cycles through the multi-channels TV sound(MTS) options: SAP/MONO/ STEREO 3 S.MODE Selects sound effect options: Surround/ Live/Dance/Techno/Classic/Soft/Rock/ Pop/Off. 4 P.MODE Selects picture mode: Vivid/Hi-Bright/ Cinema/Sport/User 5 P.SIZE Cycles...
User Manual
Page 16
...VIDEO2 (S-VIDEO) VIDEO3 (YPbPr) VIDEO4 (HDMI) COMPUTER(VGA) Displays the Program Guide on the screen. Effective range: The remote can control the LCD TV from up to restore the picture. 26 TIMER Displays the current time on the screen. GUIDE EXIT 16 17 19 20 INFO MENU LIST FREEZE FAV.CH TIMER...14 GUIDE Pressing INPUT displays the source list, use ▲▼ to select the video equipment connected to the video inputs of detailed program description. 23 LIST 26 Displays the received channel list Channel List 7-1 KABC-DT 9-1 KQED-HD 9-2 KOED-SD 8 CCT 12 13 15 24 FAV.CH ...
...VIDEO2 (S-VIDEO) VIDEO3 (YPbPr) VIDEO4 (HDMI) COMPUTER(VGA) Displays the Program Guide on the screen. Effective range: The remote can control the LCD TV from up to restore the picture. 26 TIMER Displays the current time on the screen. GUIDE EXIT 16 17 19 20 INFO MENU LIST FREEZE FAV.CH TIMER...14 GUIDE Pressing INPUT displays the source list, use ▲▼ to select the video equipment connected to the video inputs of detailed program description. 23 LIST 26 Displays the received channel list Channel List 7-1 KABC-DT 9-1 KQED-HD 9-2 KOED-SD 8 CCT 12 13 15 24 FAV.CH ...
User Manual
Page 18
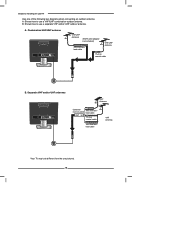
.../or UHF antennas UHF Antenna Combiner (not included) OUT IN 300-ohm twinlead cable 75-ohm coaxial cable 300-ohm twinlead cable VHF Antenna *Your TV may look different from the one of the following two diagrams when connecting an outdoor antenna. A. B: Shows how to use a separate VHF and/or UHF... (not included) 300-ohm twinlead cable VHF/UHF Antenna 75-ohm coaxial cable B. A: Shows how to use a VHF/UHF combination outdoor antenna. Chapter 2 Installing the LCD TV Use one pictured. 16
.../or UHF antennas UHF Antenna Combiner (not included) OUT IN 300-ohm twinlead cable 75-ohm coaxial cable 300-ohm twinlead cable VHF Antenna *Your TV may look different from the one of the following two diagrams when connecting an outdoor antenna. A. B: Shows how to use a separate VHF and/or UHF... (not included) 300-ohm twinlead cable VHF/UHF Antenna 75-ohm coaxial cable B. A: Shows how to use a VHF/UHF combination outdoor antenna. Chapter 2 Installing the LCD TV Use one pictured. 16
User Manual
Page 20
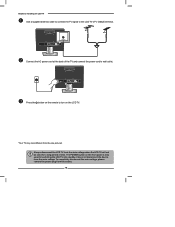
...pictured. VHF/UHF IN Connect the AC power cord at the back of time. Always disconnect the LCD TV from the main voltage when the LCD TV will not be used for a long period of the TV and connect the power cord to the LCD TV's TV CABLE terminal. The POWER button on the LCD TV. *Your TV... may look different from the socket. 18 Chapter 2 Installing the LCD TV Use a supplied ...
...pictured. VHF/UHF IN Connect the AC power cord at the back of time. Always disconnect the LCD TV from the main voltage when the LCD TV will not be used for a long period of the TV and connect the power cord to the LCD TV's TV CABLE terminal. The POWER button on the LCD TV. *Your TV... may look different from the socket. 18 Chapter 2 Installing the LCD TV Use a supplied ...
User Manual
Page 31
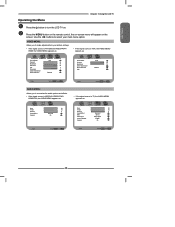
...LCD TV Press the button to turn the LCD TV on the screen. VIDEO MENU: Allows you to customize the audio options and effects. ▪ If the signal source is VIDEO/S-VIDEO/YPbPr/ HDMI/VGA, the AUDIO MENU appears as: ▪ If the signal source is VGA, the VIDEO MENU appears as: Picture... Video Select Exit AUDIO MENU: Allows you to make adjustments to select your picture settings. ▪ If the signal source is TV/VIDEO/S-VIDEO/YPbPr/ HDMI, the VIDEO MENU appears as: ▪ If the signal source is TV, the AUDIO MENU appears as: Bass Treble Balance Sound Effect Speaker 50 50...
...LCD TV Press the button to turn the LCD TV on the screen. VIDEO MENU: Allows you to customize the audio options and effects. ▪ If the signal source is VIDEO/S-VIDEO/YPbPr/ HDMI/VGA, the AUDIO MENU appears as: ▪ If the signal source is VGA, the VIDEO MENU appears as: Picture... Video Select Exit AUDIO MENU: Allows you to make adjustments to select your picture settings. ▪ If the signal source is TV/VIDEO/S-VIDEO/YPbPr/ HDMI, the VIDEO MENU appears as: ▪ If the signal source is TV, the AUDIO MENU appears as: Bass Treble Balance Sound Effect Speaker 50 50...
User Manual
Page 33
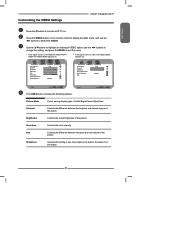
...individual VIDEO option, use the ◄► buttons to see crisp edges in the picture; Press the MENU button on . ENGLISH Customizing the VIDEO Settings Chapter 3 Using the LCD TV Press the button to turn the LCD TV on the remote control to display the Main menu, and use the ◄►... press the MENU to exit the menu ▪ If the signal source is TV/VIDEO/S-VIDEO/YPbPr/ HDMI, the VIDEO MENU appears as: ▪ If the signal source is VGA, the VIDEO MENU appears as: Picture Mode User Contrast 50 Brightness 54 Saturation 54 Hue 0 Sharpness 5 Color Temperature ...
...individual VIDEO option, use the ◄► buttons to see crisp edges in the picture; Press the MENU button on . ENGLISH Customizing the VIDEO Settings Chapter 3 Using the LCD TV Press the button to turn the LCD TV on the remote control to display the Main menu, and use the ◄►... press the MENU to exit the menu ▪ If the signal source is TV/VIDEO/S-VIDEO/YPbPr/ HDMI, the VIDEO MENU appears as: ▪ If the signal source is VGA, the VIDEO MENU appears as: Picture Mode User Contrast 50 Brightness 54 Saturation 54 Hue 0 Sharpness 5 Color Temperature ...
User Manual
Page 34
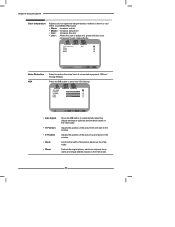
... V. Press the OK button to reduce the noise level of the picture based on the VGA mode Controls the signal phase, which can improve focus clarity and image stability based on the VGA mode 32 Position ▪ V. Chapter 3 Using the LCD TV Color temperature Adjusts color components independently to achieve a warm or cool...
... V. Press the OK button to reduce the noise level of the picture based on the VGA mode Controls the signal phase, which can improve focus clarity and image stability based on the VGA mode 32 Position ▪ V. Chapter 3 Using the LCD TV Color temperature Adjusts color components independently to achieve a warm or cool...

User Manual
Page 46
...without parent NC-17 No one 17 and under admitted X No one 17 and under the age of America(MPAA) as broadcasted on cable TV and not edited for all ages PG Parental Guidance Suggested. Movie Ratings includes the following options: G PG PG-13 R NC-17 X... Allowed Rating Blocked Rating U.S. Movie Ratings Select Back RATING DESCRIPTION G General Audiences. Movie is used for original movies rated by the Motion Picture Association of 13 R Restricted. May contain material not suited for younger viewers PG-13 Contains content that may not be appropriate for viewers under...
...without parent NC-17 No one 17 and under admitted X No one 17 and under the age of America(MPAA) as broadcasted on cable TV and not edited for all ages PG Parental Guidance Suggested. Movie Ratings includes the following options: G PG PG-13 R NC-17 X... Allowed Rating Blocked Rating U.S. Movie Ratings Select Back RATING DESCRIPTION G General Audiences. Movie is used for original movies rated by the Motion Picture Association of 13 R Restricted. May contain material not suited for younger viewers PG-13 Contains content that may not be appropriate for viewers under...


