User Guide
Page 2
... be corrected in the instruction manual. Confidential unpublished works. © 1992 -1997 Dolby Laboratories, Inc. All rights reserved. ©2006 by . Changes, technical inaccuracies, and typographic errors will be collected separately....HDMI Licensing LLC. This TV incorporates High-Definition Multimedia Interface (HDMITM) technology. Manufactured under license from Dolby Laboratories. All rights reserved. "Polaroid" and "Polaroid and Pixel" are trademarks of this label on the environment and human health. For service, support and warranty information, visit www.polaroid...
... be corrected in the instruction manual. Confidential unpublished works. © 1992 -1997 Dolby Laboratories, Inc. All rights reserved. ©2006 by . Changes, technical inaccuracies, and typographic errors will be collected separately....HDMI Licensing LLC. This TV incorporates High-Definition Multimedia Interface (HDMITM) technology. Manufactured under license from Dolby Laboratories. All rights reserved. "Polaroid" and "Polaroid and Pixel" are trademarks of this label on the environment and human health. For service, support and warranty information, visit www.polaroid...
User Guide
Page 4
...; NO USER-SERVICEABLE PARTS INSIDE. ▪ REFER SERVICING TO QUALIFIED SERVICE PERSONNEL. Use of controls, adjustments or performance of procedures other than those specified herein may result in the installation, use, servicing and maintenance of important operating and maintenance instructions in the literature accompanying the appliance. Removing the grounding pin will increase the risk of the serial/model plate. ▪ Never overload wall outlets and...
...; NO USER-SERVICEABLE PARTS INSIDE. ▪ REFER SERVICING TO QUALIFIED SERVICE PERSONNEL. Use of controls, adjustments or performance of procedures other than those specified herein may result in the installation, use, servicing and maintenance of important operating and maintenance instructions in the literature accompanying the appliance. Removing the grounding pin will increase the risk of the serial/model plate. ▪ Never overload wall outlets and...
User Guide
Page 6
... the mast and supporting structure, grounding of the lead-in contact with overhead power lines, or any other electric light or power circuits. ▪ When installing an outdoor antenna system, extreme caution should be taken to grounding electrodes, and requirements for the grounding electrode. Warnings and Precautions Outdoor Antenna Safety Instructions If an outdoor antenna is connected, follow the precautions...
... the mast and supporting structure, grounding of the lead-in contact with overhead power lines, or any other electric light or power circuits. ▪ When installing an outdoor antenna system, extreme caution should be taken to grounding electrodes, and requirements for the grounding electrode. Warnings and Precautions Outdoor Antenna Safety Instructions If an outdoor antenna is connected, follow the precautions...
User Guide
Page 7
... Remote Control 12 Chapter 2 Installing the LCD TV Connecting a TV Cable or an Antenna 14 Connecting an A/V Device with Composite Connector 19 Connecting an A/V Device with S-Video Connector 20 Connecting an A/V Device with Component(YPbPr) Connector 21 Connecting an AV Equipment with HDMI Connector 22 Connecting an AV Equipment with DVI Connector 23 Connecting a PC...24 Connecting an Audio Receiver or a Dolby Digital 5.1 Sound System 25 Chapter 3 Using The Features Wide Screen Viewing...30 Using the Program Guide...27 Operating...
... Remote Control 12 Chapter 2 Installing the LCD TV Connecting a TV Cable or an Antenna 14 Connecting an A/V Device with Composite Connector 19 Connecting an A/V Device with S-Video Connector 20 Connecting an A/V Device with Component(YPbPr) Connector 21 Connecting an AV Equipment with HDMI Connector 22 Connecting an AV Equipment with DVI Connector 23 Connecting a PC...24 Connecting an Audio Receiver or a Dolby Digital 5.1 Sound System 25 Chapter 3 Using The Features Wide Screen Viewing...30 Using the Program Guide...27 Operating...
User Guide
Page 8
... video and audio in TV tuner to receive HD ATSC signal ▪ This function allows the reception of HD broadcasting without the addition of a set top box. Chapter 1 Introducing the LCD TV Chapter 1 Introducing the LCD TV Key Features Various Audio/Video terminals for external equipment connection ▪ 1 composite VIDEO input terminal ▪ 1 S-VIDEO terminals ▪ 1 sets of component Video input terminals ▪ 1 PC(VGA IN)/PC AUDIO IN input terminals ▪ 1 HDMI input terminal ▪ 1 set of Audio(L/R) output...
... video and audio in TV tuner to receive HD ATSC signal ▪ This function allows the reception of HD broadcasting without the addition of a set top box. Chapter 1 Introducing the LCD TV Chapter 1 Introducing the LCD TV Key Features Various Audio/Video terminals for external equipment connection ▪ 1 composite VIDEO input terminal ▪ 1 S-VIDEO terminals ▪ 1 sets of component Video input terminals ▪ 1 PC(VGA IN)/PC AUDIO IN input terminals ▪ 1 HDMI input terminal ▪ 1 set of Audio(L/R) output...
User Guide
Page 9
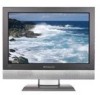
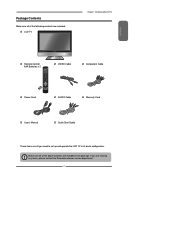
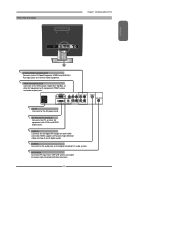
LCD TV Chapter 1 Introducing the LCD TV ENGLISH Remote Control/ AAA Batteries x 2 S.MODE MTS P. If you need to set up and operate the LCD TV in the package. MODE CAPTION SLEEP P.SIZE MUTE VOL. INPUT CH. Package Contents Make sure all of the following contents are missing any items, please contact the Polaroid customer service department. 7 GUIDE EXIT INFO MENU LIST FREEZE FAV.CH TIMER Power Cord VIDEO Cable AUDIO Cable Component Cable Warranty Card User's Manual Quick Start Guide These items are all you are included...
LCD TV Chapter 1 Introducing the LCD TV ENGLISH Remote Control/ AAA Batteries x 2 S.MODE MTS P. If you need to set up and operate the LCD TV in the package. MODE CAPTION SLEEP P.SIZE MUTE VOL. INPUT CH. Package Contents Make sure all of the following contents are missing any items, please contact the Polaroid customer service department. 7 GUIDE EXIT INFO MENU LIST FREEZE FAV.CH TIMER Power Cord VIDEO Cable AUDIO Cable Component Cable Warranty Card User's Manual Quick Start Guide These items are all you are included...

User Guide
Page 10
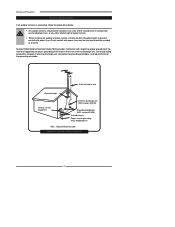
Place the LCD TV unit facedown on the cloth. The package contains: LCD TV Stand Cover an even stable surface with a soft cloth. Fit the stand onto the bottom of the LCD TV unit as shown: Then push until stand into the LCD TV's stand socket. 8 Chapter 1 Introducing the LCD TV Setting Up Your LCD TV How to install the TV Stand Follow the instructions below to install the TV stand: Open the box, and make sure all necessary parts are in the box.
Place the LCD TV unit facedown on the cloth. The package contains: LCD TV Stand Cover an even stable surface with a soft cloth. Fit the stand onto the bottom of the LCD TV unit as shown: Then push until stand into the LCD TV's stand socket. 8 Chapter 1 Introducing the LCD TV Setting Up Your LCD TV How to install the TV Stand Follow the instructions below to install the TV stand: Open the box, and make sure all necessary parts are in the box.
User Guide
Page 12
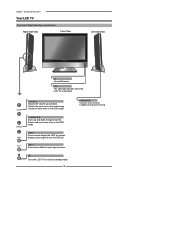
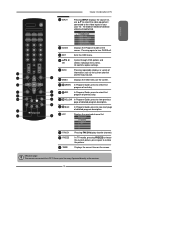
.... Turns the LCD TV on screen display), press again to the external headphone for items when in the OSD mode. Selects sub-menu item when in the OSD mode. Selects the main-menu item and change values for private listening. VOLUME + Adjusts the volume up and down . Chapter 1 Introducing the LCD TV Your LCD TV Front/Left /Right Side View and Controls Right Side View Front View Left Side View IR Infrared Receiver LED The LED light...
.... Turns the LCD TV on screen display), press again to the external headphone for items when in the OSD mode. Selects sub-menu item when in the OSD mode. Selects the main-menu item and change values for private listening. VOLUME + Adjusts the volume up and down . Chapter 1 Introducing the LCD TV Your LCD TV Front/Left /Right Side View and Controls Right Side View Front View Left Side View IR Infrared Receiver LED The LED light...
User Guide
Page 13
... other AV equipment with component(YPbPr) video and audio output jacks. VHF/UHF IN Connects RF input from VHF/UHF antenna or cable to the AC power cord. HDMI IN Connects the all digital AV equipment with VGA and AUDIO output jacks. Rear View and Jacks Chapter 1 Introducing the LCD TV ENGLISH S-VIDEO/VIDEO/AUDIO(L/R) IN Connects to the S-Video/Composite VIDEO and AUDIO(L/ R) output jacks on the digital/standard 5.1 audio system. HDMI IN Y Pb Pr VIDEO IN S-VIDEO IN COAXIAL VHF...
... other AV equipment with component(YPbPr) video and audio output jacks. VHF/UHF IN Connects RF input from VHF/UHF antenna or cable to the AC power cord. HDMI IN Connects the all digital AV equipment with VGA and AUDIO output jacks. Rear View and Jacks Chapter 1 Introducing the LCD TV ENGLISH S-VIDEO/VIDEO/AUDIO(L/R) IN Connects to the S-Video/Composite VIDEO and AUDIO(L/ R) output jacks on the digital/standard 5.1 audio system. HDMI IN Y Pb Pr VIDEO IN S-VIDEO IN COAXIAL VHF...
User Guide
Page 14
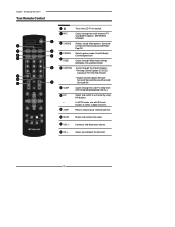
INPUT CH. Chapter 1 Introducing the LCD TV Your Remote Control 1 2 S.MODE MTS P. MODE 3 4 CAPTION SLEEP P.SIZE 6 5 7 8 9 10 MUTE 12 11 VOL. In HDTV mode, use with 0-9 and buttons to select a digital channels. 9 JUMP Returns to a channel by using 0-9 buttons. GUIDE EXIT INFO MENU 1 Turns the LCD TV on and off. 22 MTS Cycles through the multi-channels TV sound(MTS) options: SAP/MONO/ STEREO 3 S.MODE Selects sound effect options: Surround/ Live/Dance/Techno/Classic/Soft/Rock/ Pop/Off. 4 P.MODE 5 P.SIZE Selects picture mode: Vivid...
INPUT CH. Chapter 1 Introducing the LCD TV Your Remote Control 1 2 S.MODE MTS P. MODE 3 4 CAPTION SLEEP P.SIZE 6 5 7 8 9 10 MUTE 12 11 VOL. In HDTV mode, use with 0-9 and buttons to select a digital channels. 9 JUMP Returns to a channel by using 0-9 buttons. GUIDE EXIT INFO MENU 1 Turns the LCD TV on and off. 22 MTS Cycles through the multi-channels TV sound(MTS) options: SAP/MONO/ STEREO 3 S.MODE Selects sound effect options: Surround/ Live/Dance/Techno/Classic/Soft/Rock/ Pop/Off. 4 P.MODE 5 P.SIZE Selects picture mode: Vivid...
User Guide
Page 15
... (HDMI) COMPUTER(VGA) Displays the Program Guide on the screen. Effective range: The remote can control the LCD TV from up to restore the picture. 26 TIMER Displays the current time on the screen. ENGLISH S.MODE MTS P. INPUT CH. 13 GUIDE EXIT 14 16 INFO 17 MENU 19 20 LIST FREEZE FAV.CH TIMER 23 24 Chapter 2 Installing the LCD TV 13 INPUT 14 GUIDE Pressing INPUT displays the source list, use ▲▼ to select the video equipment connected to the video inputs...
... (HDMI) COMPUTER(VGA) Displays the Program Guide on the screen. Effective range: The remote can control the LCD TV from up to restore the picture. 26 TIMER Displays the current time on the screen. ENGLISH S.MODE MTS P. INPUT CH. 13 GUIDE EXIT 14 16 INFO 17 MENU 19 20 LIST FREEZE FAV.CH TIMER 23 24 Chapter 2 Installing the LCD TV 13 INPUT 14 GUIDE Pressing INPUT displays the source list, use ▲▼ to select the video equipment connected to the video inputs...

User Guide
Page 18
... for proper grounding and, in the diagram below. Chapter 2 Installing the LCD TV Cable TV (CATV) Connection This reminder is provided to call the CATV system installer's attention to Article 820-40 of the National Electrical Code (NEC) that provides guidelines for normal viewing of scrambled channels. (Set your TV to channel 3 or 4, typically one of these premium pay channels. Since the signals of these channels is used.
... for proper grounding and, in the diagram below. Chapter 2 Installing the LCD TV Cable TV (CATV) Connection This reminder is provided to call the CATV system installer's attention to Article 820-40 of the National Electrical Code (NEC) that provides guidelines for normal viewing of scrambled channels. (Set your TV to channel 3 or 4, typically one of these premium pay channels. Since the signals of these channels is used.
User Guide
Page 19
ENGLISH Chapter 2 Installing the LCD TV Use a supplied antenna cable to connect the TV signal to wall outlet. Always disconnect the LCD TV from the main voltage when the LCD TV will not be used for a long period of the TV and connect the power cord to the LCD TV's TV CABLE terminal. The POWER button on the LCD TV. VHF/UHF IN Connect the AC power cord at the back of time. To completely disconnect the main voltage, please remove the power plug from the...
ENGLISH Chapter 2 Installing the LCD TV Use a supplied antenna cable to connect the TV signal to wall outlet. Always disconnect the LCD TV from the main voltage when the LCD TV will not be used for a long period of the TV and connect the power cord to the LCD TV's TV CABLE terminal. The POWER button on the LCD TV. VHF/UHF IN Connect the AC power cord at the back of time. To completely disconnect the main voltage, please remove the power plug from the...
User Guide
Page 20
... a list of receivable channels. Or, use the ◄► buttons to select the TV. Chapter 2 Installing the LCD TV Press the button on the remote to select TV and press the OK button. Use the ▲▼ buttons to turn on the remote control to display the Main menu, and use the ▪ with 0-9 buttons to create a list of available channels from both inputs. Press the MENU button at the same time. 18 Channel Scan Tuner Mode Channel Skip Favorite List Time Zone Cable Eastern Time TV Select...
... a list of receivable channels. Or, use the ◄► buttons to select the TV. Chapter 2 Installing the LCD TV Press the button on the remote to select TV and press the OK button. Use the ▲▼ buttons to turn on the remote control to display the Main menu, and use the ▪ with 0-9 buttons to create a list of available channels from both inputs. Press the MENU button at the same time. 18 Channel Scan Tuner Mode Channel Skip Favorite List Time Zone Cable Eastern Time TV Select...
User Guide
Page 21
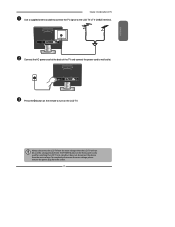
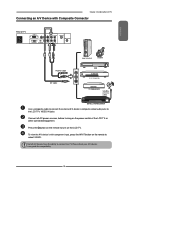
ENGLISH Chapter 2 Installing the LCD TV Connecting an A/V Device with component input, press the INPUT button on the remote to the LCD TV's VIDEO IN jacks. Please check your A/V devices user guide for compatibility. 19 Connect all A/V devices have the ability to connect to turn on the LCD TV. Not all AC power sources, before turning on the remote to a TV. Press the button on the power switch of TV HDMI IN Y Pb Pr VIDEO IN S-VIDEO IN COAXIAL VHF/UHF IN PC...
ENGLISH Chapter 2 Installing the LCD TV Connecting an A/V Device with component input, press the INPUT button on the remote to the LCD TV's VIDEO IN jacks. Please check your A/V devices user guide for compatibility. 19 Connect all A/V devices have the ability to connect to turn on the LCD TV. Not all AC power sources, before turning on the remote to a TV. Press the button on the power switch of TV HDMI IN Y Pb Pr VIDEO IN S-VIDEO IN COAXIAL VHF/UHF IN PC...
User Guide
Page 22
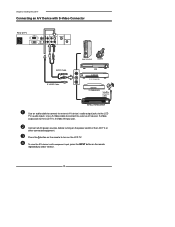
... power switch of TV HDMI IN Y Pb Pr VIDEO IN S-VIDEO IN COAXIAL VHF/UHF IN PC/VGA IN PC AUDIO IN L AUDIO IN R GAME CONSOLE AUDIO Cable S-VIDEO OUT L S-VIDEO Cable R D V D PLA YER Use an audio cable to connect the external A/V device's audio output jacks to the LCD TV's audio inputs. Use a S-Video cable to connect the external A/V device's S-Video output jack to select VIDEO2. 20 To view the A/V device's with S-Video Connector Rear of the LCD TV or other connected equipment. Press the button on the remote to turn...
... power switch of TV HDMI IN Y Pb Pr VIDEO IN S-VIDEO IN COAXIAL VHF/UHF IN PC/VGA IN PC AUDIO IN L AUDIO IN R GAME CONSOLE AUDIO Cable S-VIDEO OUT L S-VIDEO Cable R D V D PLA YER Use an audio cable to connect the external A/V device's audio output jacks to the LCD TV's audio inputs. Use a S-Video cable to connect the external A/V device's S-Video output jack to select VIDEO2. 20 To view the A/V device's with S-Video Connector Rear of the LCD TV or other connected equipment. Press the button on the remote to turn...
User Guide
Page 23
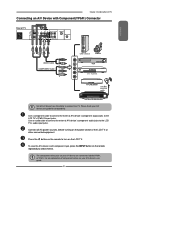
... to connect to select VIDEO3. Use a component cable to connect the external A/V device's component output jacks to the LCD TV's audio input jacks. Press the button on the remote to turn on the remote repeatedly to a TV. ENGLISH Chapter 2 Installing the LCD TV Connecting an A/V Device with component input, press the INPUT button on the LCD TV. For an explanation of the LCD TV or other connected equipment. To view the A/V device's with Component(YPbPr) Connector Rear of TV HDMI IN Y Pb Pr VIDEO IN S-VIDEO IN...
... to connect to select VIDEO3. Use a component cable to connect the external A/V device's component output jacks to the LCD TV's audio input jacks. Press the button on the remote to turn on the remote repeatedly to a TV. ENGLISH Chapter 2 Installing the LCD TV Connecting an A/V Device with component input, press the INPUT button on the LCD TV. For an explanation of the LCD TV or other connected equipment. To view the A/V device's with Component(YPbPr) Connector Rear of TV HDMI IN Y Pb Pr VIDEO IN S-VIDEO IN...
User Guide
Page 24
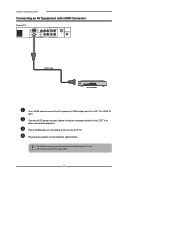
... AUDIO IN L AUDIO IN R L AUDIO IN R HDMI Cable AV EQUIPMENT Use a HDMI cable to connect the AV equipment's HDMI output jack to turn on the LCD TV. The HDMI connector provides both video and audio signals, it's not necessary to select VIDEO4. Chapter 2 Installing the LCD TV Connecting an AV Equipment with HDMI Connector Rear of the LCD TV or other connected equipment. Press the Input button on the remote to the LCD TV's HDMI IN jacks. Press the button on the remote to connect the audio cable...
... AUDIO IN L AUDIO IN R L AUDIO IN R HDMI Cable AV EQUIPMENT Use a HDMI cable to connect the AV equipment's HDMI output jack to turn on the LCD TV. The HDMI connector provides both video and audio signals, it's not necessary to select VIDEO4. Chapter 2 Installing the LCD TV Connecting an AV Equipment with HDMI Connector Rear of the LCD TV or other connected equipment. Press the Input button on the remote to the LCD TV's HDMI IN jacks. Press the button on the remote to connect the audio cable...
User Guide
Page 29
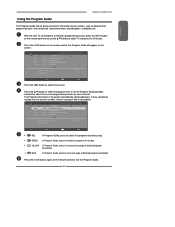
... select the program from a list, the Program Guide provides introduction about the current program being shown on the remote control to your screen, such as program title, program duration, time remaining, rating information, closed caption, availability, etc. EYEWITHNESS NEWS TV-PG Press the ◄► button to select first program of next day. GREEN In Program Guide, press to select the channel. EYEWITHNESS NEWS TV-PG RED In Program Guide, press to view next...
... select the program from a list, the Program Guide provides introduction about the current program being shown on the remote control to your screen, such as program title, program duration, time remaining, rating information, closed caption, availability, etc. EYEWITHNESS NEWS TV-PG Press the ◄► button to select first program of next day. GREEN In Program Guide, press to select the channel. EYEWITHNESS NEWS TV-PG RED In Program Guide, press to view next...
User Guide
Page 36
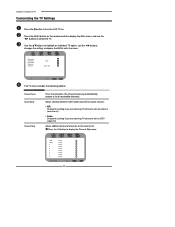
... TV channels with an antenna (over the air) ▪ Cable Choose this setting if you are receiving TV channels with a CATV (cable TV) Allows addition/removal of receivable channels. Press the OK button to turn the LCD TV on. Chapter 3 Using the LCD TV Customizing the TV Settings Press the button to display the Channel Skip menu: 2 ABC 3 DISC 4 5 6 7 8 9 10 Analog Analog Analog Analog Analog Analog Analog Analog Analog Channel Skip Select Back 34 Use the ▲▼buttons to select the TV. Channel Scan Tuner Mode Channel Skip Favorite List Time Zone Cable Eastern Time TV...
... TV channels with an antenna (over the air) ▪ Cable Choose this setting if you are receiving TV channels with a CATV (cable TV) Allows addition/removal of receivable channels. Press the OK button to turn the LCD TV on. Chapter 3 Using the LCD TV Customizing the TV Settings Press the button to display the Channel Skip menu: 2 ABC 3 DISC 4 5 6 7 8 9 10 Analog Analog Analog Analog Analog Analog Analog Analog Analog Channel Skip Select Back 34 Use the ▲▼buttons to select the TV. Channel Scan Tuner Mode Channel Skip Favorite List Time Zone Cable Eastern Time TV...


