User Manual
Page 3
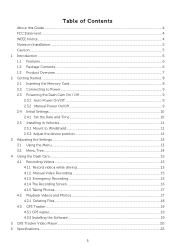
... the Memory Card ...8 2.2 Connecting to Power ...9 2.3 Powering the Dash Cam On / Off ...9 2.3.1 Auto Power On/Off ...9 2.3.2 Manual Power On/Off...9 2.4 Initial Settings...10 2.4.1 Set the Date and Time...10 2.5 Installing in Vehicles ...11 2.5.1 Mount to Windshield ...11 2.5.2 Adjust the device position...12 3 Adjusting the Settings ...13 3.1 Using the Menu ...13 3.2 Menu Tree...14 4 Using the Dash Cam ...15 4.1 Recording Videos ...15 4.1.1 Record videos while driving ...15 4.1.2 Manual Video Recording ...15 4.1.3 Emergency Recording...15 4.1.4 The Recording Screen ...16 4.1.5 Taking Photos...
... the Memory Card ...8 2.2 Connecting to Power ...9 2.3 Powering the Dash Cam On / Off ...9 2.3.1 Auto Power On/Off ...9 2.3.2 Manual Power On/Off...9 2.4 Initial Settings...10 2.4.1 Set the Date and Time...10 2.5 Installing in Vehicles ...11 2.5.1 Mount to Windshield ...11 2.5.2 Adjust the device position...12 3 Adjusting the Settings ...13 3.1 Using the Menu ...13 3.2 Menu Tree...14 4 Using the Dash Cam ...15 4.1 Recording Videos ...15 4.1.1 Record videos while driving ...15 4.1.2 Manual Video Recording ...15 4.1.3 Emergency Recording...15 4.1.4 The Recording Screen ...16 4.1.5 Taking Photos...
User Manual
Page 4
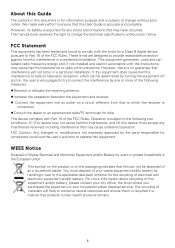
... this equipment. However, there is recycled in a particular installation. WEEE Notice Disposal of electrical and electronic equipment and/or battery. Connect the equipment into an outlet on , the user is accurate and complete. However, no guarantee that interference will help . Operation is subject to radio communications. About this Guide The content in the European Union This symbol...
... this equipment. However, there is recycled in a particular installation. WEEE Notice Disposal of electrical and electronic equipment and/or battery. Connect the equipment into an outlet on , the user is accurate and complete. However, no guarantee that interference will help . Operation is subject to radio communications. About this Guide The content in the European Union This symbol...
User Manual
Page 5
... operation. Do NOT install the Dash Cam in unclear videos or snapshots. Finger grease may be left on a regular basis. 4. Never short-circuit the battery. AV out port uses normal AV cable. Install the device near the rear-view mirror to open -field view. Do not install the device on Installation 1. and it rains. 3. These functions can cause explosion. Notes on a tinted window. Never disassemble or attempt repair...
... operation. Do NOT install the Dash Cam in unclear videos or snapshots. Finger grease may be left on a regular basis. 4. Never short-circuit the battery. AV out port uses normal AV cable. Install the device near the rear-view mirror to open -field view. Do not install the device on Installation 1. and it rains. 3. These functions can cause explosion. Notes on a tinted window. Never disassemble or attempt repair...
User Manual
Page 6
Dash Cam Bracket User Manual Quick start guide USB cable with car adapter Software CD This device is specifically designed for real time video and audio recording when driving. 1.1 Features HD camera (1920x1080 @ 30fps) 2.5" LED color screen 156 degree Wide angle lens Automatic Emergency recording for collision detection Supports micro-SDHC up to 32GB (Class 6 or greater speed required for purchasing this advanced Dash Cam. 1 Introduction Thank you for HD video recording) 1.2Package Contents The package contains...
Dash Cam Bracket User Manual Quick start guide USB cable with car adapter Software CD This device is specifically designed for real time video and audio recording when driving. 1.1 Features HD camera (1920x1080 @ 30fps) 2.5" LED color screen 156 degree Wide angle lens Automatic Emergency recording for collision detection Supports micro-SDHC up to 32GB (Class 6 or greater speed required for purchasing this advanced Dash Cam. 1 Introduction Thank you for HD video recording) 1.2Package Contents The package contains...

User Manual
Page 7
... Angle Lens 3 Speaker Lock Button 4 Power Button 5 Reset No. Item 6 Lock 7 USB Connector 8 Memory Card Slot 9 LED Panel 10 Scroll Stick (Arrow) * POWER Button: Press for 1 second during recording for REC. Lock Button: Press for 1 second during recording for mode switching. Press for 3 seconds for Power On / Off. * Scroll Stick (Arrow): Push left for light compensation, push up for zoom in, push down for zoom out, push right for menu, press for Screen On...
... Angle Lens 3 Speaker Lock Button 4 Power Button 5 Reset No. Item 6 Lock 7 USB Connector 8 Memory Card Slot 9 LED Panel 10 Scroll Stick (Arrow) * POWER Button: Press for 1 second during recording for REC. Lock Button: Press for 1 second during recording for mode switching. Press for 3 seconds for Power On / Off. * Scroll Stick (Arrow): Push left for light compensation, push up for zoom in, push down for zoom out, push right for menu, press for Screen On...
User Manual
Page 8
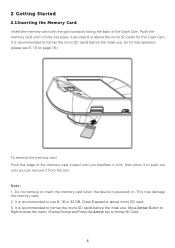
... 6 speed or above the micro SD cards for format operation please see 5.1.6 on . Move Arrow Button to Right to format SD Card. 2 Getting Started 2.1Inserting the Memory Card Insert the memory card with the gold contacts facing the back of the memory card inward until you can remove it clicks into place. (Use class 6 or above micro SD card. 3. It is recommended to use , for this Dash Cam;
... 6 speed or above the micro SD cards for format operation please see 5.1.6 on . Move Arrow Button to Right to format SD Card. 2 Getting Started 2.1Inserting the Memory Card Insert the memory card with the gold contacts facing the back of the memory card inward until you can remove it clicks into place. (Use class 6 or above micro SD card. 3. It is recommended to use , for this Dash Cam;
User Manual
Page 9
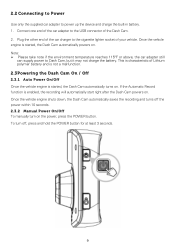
.... To turn off the power within 10 seconds. 2.3.2 Manual Power On/Off To manually turn on . 2.2 Connecting to Power Use only the supplied car adapter to the USB connector of the Dash Cam. 2. This is enabled, the recording will automatically start right after the Dash Cam powers on . Once the vehicle engine shuts down, the Dash Cam automatically saves the recording and turns off , press and hold the POWER button for...
.... To turn off the power within 10 seconds. 2.3.2 Manual Power On/Off To manually turn on . 2.2 Connecting to Power Use only the supplied car adapter to the USB connector of the Dash Cam. 2. This is enabled, the recording will automatically start right after the Dash Cam powers on . Once the vehicle engine shuts down, the Dash Cam automatically saves the recording and turns off , press and hold the POWER button for...

User Manual
Page 10
... Settings 2.4.1 Set the Date and Time To set the correct date and time, do the following: (For button positions refer to right and enter the menu. 2. Resolution Loop Recording WDR Exposure Motion Detection Record Audio Date Stamp G-sensor Default Settings 1080FHD Speeding Alert 3 Minutes/file ON +0 OFF ON ON Low LDWS Key Tone Language Screen Saver Driver Fatigue Alert Alert Sound OFF OFF ON English OFF 2 Hours ON Repeat step 3 until the date...
... Settings 2.4.1 Set the Date and Time To set the correct date and time, do the following: (For button positions refer to right and enter the menu. 2. Resolution Loop Recording WDR Exposure Motion Detection Record Audio Date Stamp G-sensor Default Settings 1080FHD Speeding Alert 3 Minutes/file ON +0 OFF ON ON Low LDWS Key Tone Language Screen Saver Driver Fatigue Alert Alert Sound OFF OFF ON English OFF 2 Hours ON Repeat step 3 until the date...

User Manual
Page 11
... (as in the picture), the Dash Cam can reach best performance in Vehicles 2.5.1 Mount to Windshield 1. 2.5 Installing in some of the location/method to mount appropriately. Warning: Do not install the device on the windshield and press down the clamp to mount the car holder to the device. But before mounting, please check with your local DMV...
... (as in the picture), the Dash Cam can reach best performance in Vehicles 2.5.1 Mount to Windshield 1. 2.5 Installing in some of the location/method to mount appropriately. Warning: Do not install the device on the windshield and press down the clamp to mount the car holder to the device. But before mounting, please check with your local DMV...

User Manual
Page 12
Then tighten the knobs to 360°. 3. Rotate the knob to swivel the device horizontally up to make sure the device is securely locked in place. 2.5.2 Adjust the device position 1. Rotate the knob to swivel the device vertically. 2.
Then tighten the knobs to 360°. 3. Rotate the knob to swivel the device horizontally up to make sure the device is securely locked in place. 2.5.2 Adjust the device position 1. Rotate the knob to swivel the device vertically. 2.

User Manual
Page 13
... data saved on -screen display (OSD) menu. 1. Move the Arrow button up window. To format SD Card: Select Format under Setup Menu. 3 Adjusting the Settings 3.1Using the Menu You can customize the video recording and other general settings via the on SD Card will be erased after 3, 5, or 10 mins of Dash Cam. Move the Arrow button right to confirm the setting. 5. Screen Saver: this setting allows screen to enter the selected menu. 4. To wake the screen during screen...
... data saved on -screen display (OSD) menu. 1. Move the Arrow button up window. To format SD Card: Select Format under Setup Menu. 3 Adjusting the Settings 3.1Using the Menu You can customize the video recording and other general settings via the on SD Card will be erased after 3, 5, or 10 mins of Dash Cam. Move the Arrow button right to confirm the setting. 5. Screen Saver: this setting allows screen to enter the selected menu. 4. To wake the screen during screen...
User Manual
Page 14
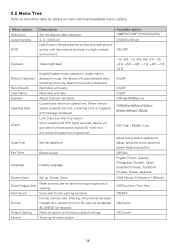
Recording with audio Recording with harmonious contrast in a high contrast environment. Date/Time Set the date/time Key Tone Button Sound Language Display Language Screen Saver Set up /down to adjust, press the Arrow button to the below table for the warning functions. When vehicle speed exceeds the limit, a warning tone is detected. Format memory card. Warning: Once format has been Format initiated, ALL content on menu items and available menu options. OFF/ON English, French, Spanish, Portuguese...
Recording with audio Recording with harmonious contrast in a high contrast environment. Date/Time Set the date/time Key Tone Button Sound Language Display Language Screen Saver Set up /down to adjust, press the Arrow button to the below table for the warning functions. When vehicle speed exceeds the limit, a warning tone is detected. Format memory card. Warning: Once format has been Format initiated, ALL content on menu items and available menu options. OFF/ON English, French, Spanish, Portuguese...
User Manual
Page 15
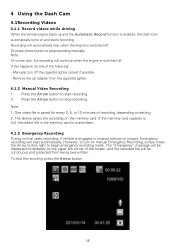
... automatically stop recording manually. One video file is enabled, the Dash Cam automatically turns on and starts recording. To stop recording. Manually turn on the memory card. Press the Arrow button to start automatically. The device saves the recording on manual Emergency Recording, simply move the Arrow button right to stop the recording, press the Arrow button. Press the Arrow button to begin emergency recording mode. However, to stop when the engine is switched off. The "Emergency" message will be displayed...
... automatically stop recording manually. One video file is enabled, the Dash Cam automatically turns on and starts recording. To stop recording. Manually turn on the memory card. Press the Arrow button to start automatically. The device saves the recording on manual Emergency Recording, simply move the Arrow button right to stop the recording, press the Arrow button. Press the Arrow button to begin emergency recording mode. However, to stop when the engine is switched off. The "Emergency" message will be displayed...
User Manual
Page 16
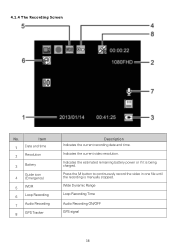
Wide Dynamic Range Loop Recording Time Audio Recording ON/OFF GPS signal Indicates the current video resolution. Indicates the estimated remaining battery power or if it is manually stopped. 4.1.4 The Recording Screen No. Item 1 Date and time 2 Resolution 3 Battery Guide icon 4 (Emergency) 5 WDR 6 Loop Recording 7 Audio Recording 8 GPS Tracker Description Indicates the current recording date and time. Press the M button to continuously record the video in one file until the recording is being charged.
Wide Dynamic Range Loop Recording Time Audio Recording ON/OFF GPS signal Indicates the current video resolution. Indicates the estimated remaining battery power or if it is manually stopped. 4.1.4 The Recording Screen No. Item 1 Date and time 2 Resolution 3 Battery Guide icon 4 (Emergency) 5 WDR 6 Loop Recording 7 Audio Recording 8 GPS Tracker Description Indicates the current recording date and time. Press the M button to continuously record the video in one file until the recording is being charged.
User Manual
Page 17
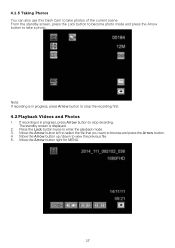
... to stop the recording first. 4.2 Playback Videos and Photos 1. If recording is in progress, press Arrow button to take photos of the current scene. Move the Arrow button up / down to enter the playback mode. 3. Press the Lock button twice to view the previous file. 5. Note: If recording is displayed. 2. 4.1.5 Taking Photos You can also use this Dash Cam to take a photo. Move the Arrow button right for MENU. From the standby screen...
... to stop the recording first. 4.2 Playback Videos and Photos 1. If recording is in progress, press Arrow button to take photos of the current scene. Move the Arrow button up / down to enter the playback mode. 3. Press the Lock button twice to view the previous file. 5. Note: If recording is displayed. 2. 4.1.5 Taking Photos You can also use this Dash Cam to take a photo. Move the Arrow button right for MENU. From the standby screen...

User Manual
Page 18
... Arrow button to enter the playback mode. 3. NOTE: DELETED FILES CANNOT BE RECOVERED. 4.2.1 Deleting Files To delete file(s), do the following: 1. Move Arrow button up / down to stop recording. 2. ENSURE THE FILES HAVE BACKUP BEFORE DELETION. Item Delete Current Delete All Description Delete the current displayed file. If recording is in progress, press Arrow button to select "Delete Current" or "Delete All". Move Arrow button up / down to select File move Arrow button right for MENU. 4. Deletes all files. 5.
... Arrow button to enter the playback mode. 3. NOTE: DELETED FILES CANNOT BE RECOVERED. 4.2.1 Deleting Files To delete file(s), do the following: 1. Move Arrow button up / down to stop recording. 2. ENSURE THE FILES HAVE BACKUP BEFORE DELETION. Item Delete Current Delete All Description Delete the current displayed file. If recording is in progress, press Arrow button to select "Delete Current" or "Delete All". Move Arrow button up / down to select File move Arrow button right for MENU. 4. Deletes all files. 5.
User Manual
Page 19
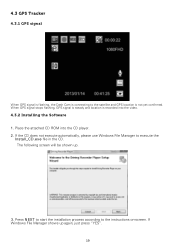
... stops flashing, GPS signal is steady and location is not yet confirmed. If the CD does not execute automatically, please use Windows File Manager to the satellite and GPS location is recorded into the CD player. 2. If Windows File Manager shows up . 3. Place the attached CD ROM into the video. 4.3.2 Installing the Software 1. Press NEXT to start the installation process according to the instructions...
... stops flashing, GPS signal is steady and location is not yet confirmed. If the CD does not execute automatically, please use Windows File Manager to the satellite and GPS location is recorded into the CD player. 2. If Windows File Manager shows up . 3. Place the attached CD ROM into the video. 4.3.2 Installing the Software 1. Press NEXT to start the installation process according to the instructions...
User Manual
Page 21
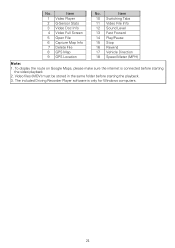
... Windows computers. The included Driving Recorder Player software is connected before starting the video playback 2. Video files (MOV) must be stored in the same folder before starting the playback. 3. No. Item 1 Video Player 2 G-Sensor Stats 3 Video Doc Info 4 Video Full Screen 5 Open File 6 Capture Map Info 7 Delete File 8 GPS Map 9 GPS Location No. Item 10 Switching Tabs 11 Video File Info 12 Sound Level 13 Fast Foward 14 Play/Pause 15 Stop 16 Rewind 17 Vehicle Direction 18 Speed...
... Windows computers. The included Driving Recorder Player software is connected before starting the video playback 2. Video files (MOV) must be stored in the same folder before starting the playback. 3. No. Item 1 Video Player 2 G-Sensor Stats 3 Video Doc Info 4 Video Full Screen 5 Open File 6 Capture Map Info 7 Delete File 8 GPS Map 9 GPS Location No. Item 10 Switching Tabs 11 Video File Info 12 Sound Level 13 Fast Foward 14 Play/Pause 15 Stop 16 Rewind 17 Vehicle Direction 18 Speed...
User Manual
Page 22
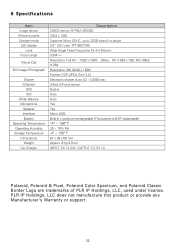
6 Specifications Item Image sensor Effective pixels Storage media LED display Lens Focus range Movie Clip Still image (Photograph) Shutter G-Sensor GPS ISO White Balance Microphone Speaker Interface Battery Operating Temperature Operating Humidity Storage Temperature Dimensions Weight Car Charger Description CMOS sensor APTINA AR0330 2304 x 1536 Supports Micro SDHC, up to 32GB class 6 or above 2.5" LED color TFT 960*240 Wide Angle Fixed Focus lens F2.4+/-5%mm 0.3M~∞ Resolution: Full HD 1920...
6 Specifications Item Image sensor Effective pixels Storage media LED display Lens Focus range Movie Clip Still image (Photograph) Shutter G-Sensor GPS ISO White Balance Microphone Speaker Interface Battery Operating Temperature Operating Humidity Storage Temperature Dimensions Weight Car Charger Description CMOS sensor APTINA AR0330 2304 x 1536 Supports Micro SDHC, up to 32GB class 6 or above 2.5" LED color TFT 960*240 Wide Angle Fixed Focus lens F2.4+/-5%mm 0.3M~∞ Resolution: Full HD 1920...


