
User Guide
Page 4
... Contents 8 • Attaching the Hand Strap 9 • Installing the Batteries 9 • Connecting the AC Adapter (Optional 10 • Turning the Camera On and Off 10 • Checking the Battery Power Level 11 2 Camera Setting 12 • Checking Camera Status 12 • Camera Modes 12 • Drive Mode 17 • How to Default Settings 29 •... Pictures in Macro Mode 34 • Taking Pictures in Different Scene Shooting Modes 35 • Setting Self-timer 38 • Taking Continuous Pictures 39 4 Polaroid i532 Digital Camera User Guide www.polaroid-digital.com
... Contents 8 • Attaching the Hand Strap 9 • Installing the Batteries 9 • Connecting the AC Adapter (Optional 10 • Turning the Camera On and Off 10 • Checking the Battery Power Level 11 2 Camera Setting 12 • Checking Camera Status 12 • Camera Modes 12 • Drive Mode 17 • How to Default Settings 29 •... Pictures in Macro Mode 34 • Taking Pictures in Different Scene Shooting Modes 35 • Setting Self-timer 38 • Taking Continuous Pictures 39 4 Polaroid i532 Digital Camera User Guide www.polaroid-digital.com
User Guide
Page 6
...; Polaroid-digital Online Services 97 • Customer Support 97 • ArcSoft Software Help 97 13 Appendix 98 • Technical Specifications 98 • Storage Capacities 100 • Uninstalling Polaroid i532 Driver (PC only 105 • Camera Default Settings 106 • Using Your Batteries 107 • Tips, Your Safety & Maintenance 107 • Regulatory Information 108 6 Polaroid i532 Digital Camera User Guide www.polaroid-digital...
...; Polaroid-digital Online Services 97 • Customer Support 97 • ArcSoft Software Help 97 13 Appendix 98 • Technical Specifications 98 • Storage Capacities 100 • Uninstalling Polaroid i532 Driver (PC only 105 • Camera Default Settings 106 • Using Your Batteries 107 • Tips, Your Safety & Maintenance 107 • Regulatory Information 108 6 Polaroid i532 Digital Camera User Guide www.polaroid-digital...
User Guide
Page 9
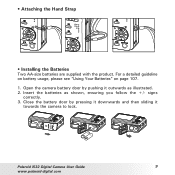
Insert the batteries as illustrated. 2. For a detailed guideline on battery usage, please see "Using Your Batteries" on page 107. 1. Close the battery door by pushing it towards the camera to lock. Open the camera battery door by pressing it downwards and then sliding it outwards as shown, ensuring you follow the +/- Polaroid i532 Digital Camera User Guide 9 www.polaroid-digital.com signs correctly. 3. • Attaching the Hand Strap • Installing the Batteries Two AA-size batteries are supplied with the product.
Insert the batteries as illustrated. 2. For a detailed guideline on battery usage, please see "Using Your Batteries" on page 107. 1. Close the battery door by pushing it towards the camera to lock. Open the camera battery door by pressing it downwards and then sliding it outwards as shown, ensuring you follow the +/- Polaroid i532 Digital Camera User Guide 9 www.polaroid-digital.com signs correctly. 3. • Attaching the Hand Strap • Installing the Batteries Two AA-size batteries are supplied with the product.
User Guide
Page 10
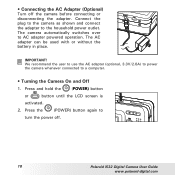
... and Off 1. The AC adapter can be used with or without the battery in place. We recommend the user to use the AC adapter (optional, 3.3V/2.0A) to power the camera whenever connected to AC adapter powered operation. Press the (POWER) button again to the household power outlet. ...Press and hold the (POWER) button or button until the LCD screen is activated. 2. • Connecting the AC Adapter (Optional) Turn off . 10 Polaroid i532 Digital Camera User Guide www.polaroid-digital.com Connect the plug to the camera as shown and connect the adapter to turn the power off the...
... and Off 1. The AC adapter can be used with or without the battery in place. We recommend the user to use the AC adapter (optional, 3.3V/2.0A) to power the camera whenever connected to AC adapter powered operation. Press the (POWER) button again to the household power outlet. ...Press and hold the (POWER) button or button until the LCD screen is activated. 2. • Connecting the AC Adapter (Optional) Turn off . 10 Polaroid i532 Digital Camera User Guide www.polaroid-digital.com Connect the plug to the camera as shown and connect the adapter to turn the power off the...
User Guide
Page 11
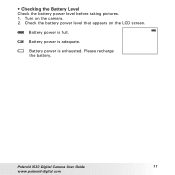
Battery power is exhausted. • Checking the Battery Level Check the battery power level before taking pictures. 1. Turn on the LCD screen. Check the battery power level that appears on the camera. 2. Battery power is adequate. Polaroid i532 Digital Camera User Guide 11 www.polaroid-digital.com Battery power is full. Please recharge the battery.
Battery power is exhausted. • Checking the Battery Level Check the battery power level before taking pictures. 1. Turn on the LCD screen. Check the battery power level that appears on the camera. 2. Battery power is adequate. Polaroid i532 Digital Camera User Guide 11 www.polaroid-digital.com Battery power is full. Please recharge the battery.
User Guide
Page 13
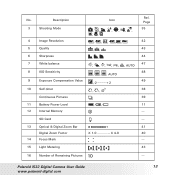
... , , 100 200 , AUTO 9 Exposure Compensation Value ,-2.........+2 49 10 Self-timer 2 , 10 , 38 Continuous Pictures 39 11 Battery Power Level , , 11 12 Internal Memory IN --- Polaroid i532 Digital Camera User Guide 13 www.polaroid-digital.com SD Card --- 13 Optical & Digital Zoom Bar 41 Digital Zoom Factor X 1.0 X 4.0 40 14 Focus Mark --- 15 Light Metering , , 43 16 Number of Remaining Pictures...
... , , 100 200 , AUTO 9 Exposure Compensation Value ,-2.........+2 49 10 Self-timer 2 , 10 , 38 Continuous Pictures 39 11 Battery Power Level , , 11 12 Internal Memory IN --- Polaroid i532 Digital Camera User Guide 13 www.polaroid-digital.com SD Card --- 13 Optical & Digital Zoom Bar 41 Digital Zoom Factor X 1.0 X 4.0 40 14 Focus Mark --- 15 Light Metering , , 43 16 Number of Remaining Pictures...
User Guide
Page 22
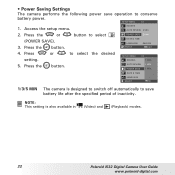
... (Video) and (Playback) modes. 22 Polaroid i532 Digital Camera User Guide www.polaroid-digital.com Access the setup menu. DATE & TIME LANGUAGE SELECT ENGLISH EXIT 4. Press the or button to select the desired SETUP MENU SOUNDS 1/3 1 MIN. 5. NOTE: This setting is designed to switch off automatically to save operation to conserve battery power. Press the button. Press...
... (Video) and (Playback) modes. 22 Polaroid i532 Digital Camera User Guide www.polaroid-digital.com Access the setup menu. DATE & TIME LANGUAGE SELECT ENGLISH EXIT 4. Press the or button to select the desired SETUP MENU SOUNDS 1/3 1 MIN. 5. NOTE: This setting is designed to switch off automatically to save operation to conserve battery power. Press the button. Press...

User Guide
Page 23
... 3 SEC. Press the button to select a field, such year, month, day, hour, minute, and date format. 5. Polaroid i532 Digital Camera User Guide 23 www.polaroid-digital.com Press the or button to exit the menu. NOTE: • If the batteries are removed for about two days, the DATE&TIME setting will be lost. • This setting is...
... 3 SEC. Press the button to select a field, such year, month, day, hour, minute, and date format. 5. Polaroid i532 Digital Camera User Guide 23 www.polaroid-digital.com Press the or button to exit the menu. NOTE: • If the batteries are removed for about two days, the DATE&TIME setting will be lost. • This setting is...

User Guide
Page 32
..., please read this note first: NOTE: Never remove the batteries, disconnect the AC adapter from being saved. Frame your settings when turning the camera on again. 1. NOTE: Most settings are saved by the camera when the power is turned off so that the same setting... the camera's internal memory or a memory card. • Taking Pictures in Normal Mode Take a single picture at approximately 2.6 inches to infinity (80 cm to the Still Image mode. 2. 3 Taking Pictures Before you verify your subject using the LCD screen. 32 Polaroid i532 Digital Camera User Guide www.polaroid-digital.com
..., please read this note first: NOTE: Never remove the batteries, disconnect the AC adapter from being saved. Frame your settings when turning the camera on again. 1. NOTE: Most settings are saved by the camera when the power is turned off so that the same setting... the camera's internal memory or a memory card. • Taking Pictures in Normal Mode Take a single picture at approximately 2.6 inches to infinity (80 cm to the Still Image mode. 2. 3 Taking Pictures Before you verify your subject using the LCD screen. 32 Polaroid i532 Digital Camera User Guide www.polaroid-digital.com
User Guide
Page 68
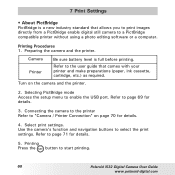
Camera Printer Be sure battery level is a new industry standard that comes with your printer and make preparations (paper, ink cassette, cartridge, etc.) as required. Connecting the camera to the printer Refer to select the print settings. Use the camera's function and navigation buttons to "Camera / Printer Connection" on the camera and the printer. 2. Preparing the camera...4. 7 Print Settings • About PictBridge PictBridge is full before printing. Printing Procedures 1. Refer to start printing. 68 Polaroid i532 Digital Camera User Guide www.polaroid-digital.com
Camera Printer Be sure battery level is a new industry standard that comes with your printer and make preparations (paper, ink cassette, cartridge, etc.) as required. Connecting the camera to the printer Refer to select the print settings. Use the camera's function and navigation buttons to "Camera / Printer Connection" on the camera and the printer. 2. Preparing the camera...4. 7 Print Settings • About PictBridge PictBridge is full before printing. Printing Procedures 1. Refer to start printing. 68 Polaroid i532 Digital Camera User Guide www.polaroid-digital.com
User Guide
Page 82
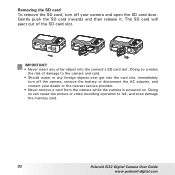
...the risk of the SD card slot. The SD card will eject out of damage to fail, and even damage the memory card. 82 Polaroid i532 Digital Camera User Guide www.polaroid-digital.com Gently push the SD card inwards and then release it. IMPORTANT! • Never insert any foreign objects ever get into the... card. • Should water or any other object into the card slot, immediately turn off the camera, remove the battery or disconnect the AC adapter, and contact your camera and open the SD card door. Removing the SD card To remove the SD card, turn off your dealer or the nearest ...
...the risk of the SD card slot. The SD card will eject out of damage to fail, and even damage the memory card. 82 Polaroid i532 Digital Camera User Guide www.polaroid-digital.com Gently push the SD card inwards and then release it. IMPORTANT! • Never insert any foreign objects ever get into the... card. • Should water or any other object into the card slot, immediately turn off the camera, remove the battery or disconnect the AC adapter, and contact your camera and open the SD card door. Removing the SD card To remove the SD card, turn off your dealer or the nearest ...
User Guide
Page 95
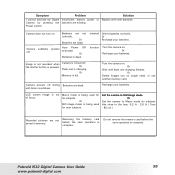
... Macro mode for far subjects. Do not remove the memory card before the save operation is charging. Polaroid i532 Digital Camera User Guide 95 www.polaroid-digital.com Or Batteries are not correctly. Or Recharge your batteries. Or Wait until flash unit charging finishes. Or Delete images you no longer need, or use another memory card. Recharge your...
... Macro mode for far subjects. Do not remove the memory card before the save operation is charging. Polaroid i532 Digital Camera User Guide 95 www.polaroid-digital.com Or Batteries are not correctly. Or Recharge your batteries. Or Wait until flash unit charging finishes. Or Delete images you no longer need, or use another memory card. Recharge your...
User Guide
Page 96
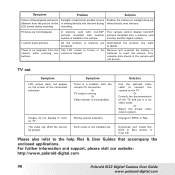
... put it in memory are not displayed. For further information and support, please visit our website: http://www.polaroid-digital.com 96 Polaroid i532 Digital Camera User Guide www.polaroid-digital.com All the pictures in its video mode Or Select the proper video output system. There is loaded in ...Pictures are Unprotected the pictures you want protected. Remove and re-install the battery or batteries to the help files & User Guides that accompany the enclosed applications. The LCD screen is frozen or the camera is not installed yet. The video clip (AVI) file cannot be lost....
... put it in memory are not displayed. For further information and support, please visit our website: http://www.polaroid-digital.com 96 Polaroid i532 Digital Camera User Guide www.polaroid-digital.com All the pictures in its video mode Or Select the proper video output system. There is loaded in ...Pictures are Unprotected the pictures you want protected. Remove and re-install the battery or batteries to the help files & User Guides that accompany the enclosed applications. The LCD screen is frozen or the camera is not installed yet. The video clip (AVI) file cannot be lost....
User Guide
Page 99
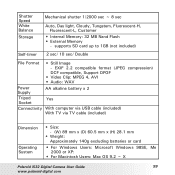
... (JPEG compression) DCF compatible, Support DPOF • Video Clip: MPEG 4, AVI • Audio: WAV Power Supply AA alkaline battery x 2 Tripod Yes Socket Connectivity With computer via USB cable (included) With TV via TV cable (included) Dimension Operating System •...mm x (H) 28.1 mm • Weight: Approximately 140g excluding batteries or card • For Windows Users: Microsoft Windows 98SE, Me 2000 or XP: • For Macintosh Users: Mac OS 9.2 ~ X Polaroid i532 Digital Camera User Guide 99 www.polaroid-digital.com supports SD card up to 1GB (not included) Self-timer...
... (JPEG compression) DCF compatible, Support DPOF • Video Clip: MPEG 4, AVI • Audio: WAV Power Supply AA alkaline battery x 2 Tripod Yes Socket Connectivity With computer via USB cable (included) With TV via TV cable (included) Dimension Operating System •...mm x (H) 28.1 mm • Weight: Approximately 140g excluding batteries or card • For Windows Users: Microsoft Windows 98SE, Me 2000 or XP: • For Macintosh Users: Mac OS 9.2 ~ X Polaroid i532 Digital Camera User Guide 99 www.polaroid-digital.com supports SD card up to 1GB (not included) Self-timer...
User Guide
Page 107
.... • Do not short the supply terminals. • Do not dispose the batteries in fire. • Remove batteries from the camera when not in use. Polaroid i532 Digital Camera User Guide 107 www.polaroid-digital.com WARNING! • Batteries should only be operated within the following activities that reduces battery life: • Reviewing your pictures on the LCD screen. • Using...
.... • Do not short the supply terminals. • Do not dispose the batteries in fire. • Remove batteries from the camera when not in use. Polaroid i532 Digital Camera User Guide 107 www.polaroid-digital.com WARNING! • Batteries should only be operated within the following activities that reduces battery life: • Reviewing your pictures on the LCD screen. • Using...


