
User Guide
Page 5
...LCD TV Connecting a TV Cable or an Antenna 14 Connecting a VCR ...18 Connecting a Video Camera or Play Station 19 Connecting a DVD Player 20 Connecting a Digital TV Cable Box or Digital Satellite Receiver 22 Connecting an AV Equipment with HDMI Connector 23 Connecting an AV Equipment with DVI Connector 24 Connecting a PC...25 Connecting an Audio... ...27 Wide Screen Viewing...29 Operating the Menu...30 Setting up the HDTV Function ...32 Customizing the VIDEO Settings...35 Customizing the AUDIO Settings...36 Customizing the SETUP Settings ...37 Using the V-CHIP Settings...39 Using the ...
...LCD TV Connecting a TV Cable or an Antenna 14 Connecting a VCR ...18 Connecting a Video Camera or Play Station 19 Connecting a DVD Player 20 Connecting a Digital TV Cable Box or Digital Satellite Receiver 22 Connecting an AV Equipment with HDMI Connector 23 Connecting an AV Equipment with DVI Connector 24 Connecting a PC...25 Connecting an Audio... ...27 Wide Screen Viewing...29 Operating the Menu...30 Setting up the HDTV Function ...32 Customizing the VIDEO Settings...35 Customizing the AUDIO Settings...36 Customizing the SETUP Settings ...37 Using the V-CHIP Settings...39 Using the ...
User Guide
Page 6
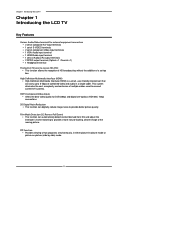
...friendly interconnect that can digitally reduce image noise to provide better picture quality. Chapter 1 Introducing the LCD TV Chapter 1 Introducing the LCD TV Key Features Various Audio/Video terminals for DVD(480p) and digital set top box. This system eliminates the cost, complexity ...of component Video input terminals ▪ 1 VGA/ Audio input terminal ▪ 1 HDMI/Auido input terminal ▪ 1 sets of Audio(L/R) output terminals ▪ 2 SPDIF output terminal (Optical x 1 /Coaxial x 1) ▪ 1 Headphone terminal The built-in TV tuner to receive HD ATSC ▪ This function allows...
...friendly interconnect that can digitally reduce image noise to provide better picture quality. Chapter 1 Introducing the LCD TV Chapter 1 Introducing the LCD TV Key Features Various Audio/Video terminals for DVD(480p) and digital set top box. This system eliminates the cost, complexity ...of component Video input terminals ▪ 1 VGA/ Audio input terminal ▪ 1 HDMI/Auido input terminal ▪ 1 sets of Audio(L/R) output terminals ▪ 2 SPDIF output terminal (Optical x 1 /Coaxial x 1) ▪ 1 Headphone terminal The built-in TV tuner to receive HD ATSC ▪ This function allows...
User Guide
Page 7
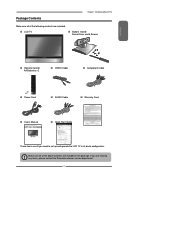
LCD TV Bottom Stand / Screw Driver and 6 Screws ENGLISH Remote Control/ AA Batteries x 2 VIDEO Cable Component Cable Power Cord AUDIO Cable Warranty Card User's Manual Quick Start Guide These items are included in its basic configuration. If you need to set up and operate the LCD TV in the package. Package Contents Chapter 1 Introducing the LCD TV Make sure all of the above contents are all of the following contents are missing any items, please contact the Polaroid customer service department. 7 Make sure all you are included.
LCD TV Bottom Stand / Screw Driver and 6 Screws ENGLISH Remote Control/ AA Batteries x 2 VIDEO Cable Component Cable Power Cord AUDIO Cable Warranty Card User's Manual Quick Start Guide These items are included in its basic configuration. If you need to set up and operate the LCD TV in the package. Package Contents Chapter 1 Introducing the LCD TV Make sure all of the above contents are all of the following contents are missing any items, please contact the Polaroid customer service department. 7 Make sure all you are included.

User Guide
Page 10
... mode. EARPHONE Connects to the composite Video and Audio output jacks on external video equipment. VIDEO L AUDIO R VIDEO1 IN MENU Press once to display the OSD (on and into standby mode. 10 Chapter 1 Introducing the LCD TV Your LCD TV Front/Right Side View and Controls LED The LED... light indicates when the LCD TV is activated. INPUT Chooses from different ...
... mode. EARPHONE Connects to the composite Video and Audio output jacks on external video equipment. VIDEO L AUDIO R VIDEO1 IN MENU Press once to display the OSD (on and into standby mode. 10 Chapter 1 Introducing the LCD TV Your LCD TV Front/Right Side View and Controls LED The LED... light indicates when the LCD TV is activated. INPUT Chooses from different ...

User Guide
Page 11
...VHF/UHF antenna or cable. The AUDIO(L/R) of HDMI IN is for DVI connection. AUDIO OUT-STEREO Connects to the composite VIDEO and AUDIO(L/R) output jacks on external video equipment. Rear View and Jacks Chapter 1 Introducing the LCD TV ENGLISH VIDEO2 IN Connects to the AUDIO(L/R) input jacks on AV equipment. AC...-Top-Box, or other AV equipment with HDMI connector.HDMI supports enhanced, high-definition video and two-channel digital audio. VHF/UHF IN-TV-CABLE Connects RF input from VHF/UHF antenna or cable to the AC power cord. 11 HDMI IN Connects the all digital...
...VHF/UHF antenna or cable. The AUDIO(L/R) of HDMI IN is for DVI connection. AUDIO OUT-STEREO Connects to the composite VIDEO and AUDIO(L/R) output jacks on external video equipment. Rear View and Jacks Chapter 1 Introducing the LCD TV ENGLISH VIDEO2 IN Connects to the AUDIO(L/R) input jacks on AV equipment. AC...-Top-Box, or other AV equipment with HDMI connector.HDMI supports enhanced, high-definition video and two-channel digital audio. VHF/UHF IN-TV-CABLE Connects RF input from VHF/UHF antenna or cable to the AC power cord. 11 HDMI IN Connects the all digital...

User Guide
Page 12
.... Increases and decreases volume. 8 CH+- Pressing again restores audio. 19 10 ASPECT Cycles through the LCD TV sleep time: 13 OFF/30/60/90/120 mins. 12 14 6 ► Other device function keys 15 7 VOL+- Chapter 1 Introducing the LCD TV Your Remote Control This package includes a Polaroid remote control that enables you to control up and...
.... Increases and decreases volume. 8 CH+- Pressing again restores audio. 19 10 ASPECT Cycles through the LCD TV sleep time: 13 OFF/30/60/90/120 mins. 12 14 6 ► Other device function keys 15 7 VOL+- Chapter 1 Introducing the LCD TV Your Remote Control This package includes a Polaroid remote control that enables you to control up and...
User Guide
Page 18
... Y Pb Pr AUD IO STEREO DIGITAL OPTICAL TV CABLE HDTV AIR L R L Y Pb Pr AUD IO COAXIAL L R R YPbPr2 IN VHF/UHF IN AV Cable AUDIO Cable S-VIDEO Cable A B METHOD A: Use a composite cable to connect the VCR's composite video/audio jacks to the LCD TV's S-VIDEO IN input jack. Use a ...S-Video cable to connect the VCR's s-video output jack to the LCD TV's VIDEO2 IN jacks. To watch a videotape, press the Input button on the remote to...
... Y Pb Pr AUD IO STEREO DIGITAL OPTICAL TV CABLE HDTV AIR L R L Y Pb Pr AUD IO COAXIAL L R R YPbPr2 IN VHF/UHF IN AV Cable AUDIO Cable S-VIDEO Cable A B METHOD A: Use a composite cable to connect the VCR's composite video/audio jacks to the LCD TV's S-VIDEO IN input jack. Use a ...S-Video cable to connect the VCR's s-video output jack to the LCD TV's VIDEO2 IN jacks. To watch a videotape, press the Input button on the remote to...
User Guide
Page 19
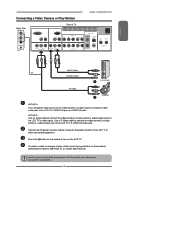
...play station, press the Input button on the remote to the LCD TV's VIDEO2 IN jacks or VIDEO1 IN jacks. Connect all cameras have the ability to connect to the LCD TV's audio inputs. Press the button on the remote to the LCD TV's S-VIDEO IN input jack. Not all AC power sources,... before turning on the LCD TV. METHOD B: Use an audio cable to connect the video camera's or play station's composite...
...play station, press the Input button on the remote to the LCD TV's VIDEO2 IN jacks or VIDEO1 IN jacks. Connect all cameras have the ability to connect to the LCD TV's audio inputs. Press the button on the remote to the LCD TV's S-VIDEO IN input jack. Not all AC power sources,... before turning on the LCD TV. METHOD B: Use an audio cable to connect the video camera's or play station's composite...
User Guide
Page 20
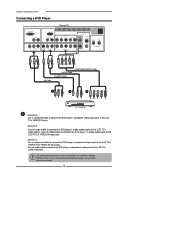
...component cable to connect the DVD player's component output jacks to the LCD TV's audio input jacks. Use a S-Video cable to connect the DVD player's s-video output jack to the LCD TV's audio inputs. Chapter 2 Installing the LCD TV Connecting a DVD Player Rear of component video, see your DVD ...player are sometimes labeled YPbPr, or YCbCr. For an explanation of TV HDMI IN AUD IO L R VGA IN AUD IO L...
...component cable to connect the DVD player's component output jacks to the LCD TV's audio input jacks. Use a S-Video cable to connect the DVD player's s-video output jack to the LCD TV's audio inputs. Chapter 2 Installing the LCD TV Connecting a DVD Player Rear of component video, see your DVD ...player are sometimes labeled YPbPr, or YCbCr. For an explanation of TV HDMI IN AUD IO L R VGA IN AUD IO L...
User Guide
Page 22
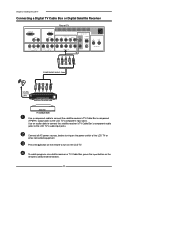
... AUD IO COAXIAL L R R YPbPr2 IN VHF/UHF IN or Pb Pr COMPONENT/AUDIO Cable Pb Pr Use a component cable to connect the satellite receiver's/TV Cable Box's component (YPbPr1) output jacks to the LCD TV's audio input jacks. Use an audio cable to connect the satellite receiver's/TV Cable Box's component audio jacks to the LCD TV's component input jacks.
... AUD IO COAXIAL L R R YPbPr2 IN VHF/UHF IN or Pb Pr COMPONENT/AUDIO Cable Pb Pr Use a component cable to connect the satellite receiver's/TV Cable Box's component (YPbPr1) output jacks to the LCD TV's audio input jacks. Use an audio cable to connect the satellite receiver's/TV Cable Box's component audio jacks to the LCD TV's component input jacks.
User Guide
Page 23
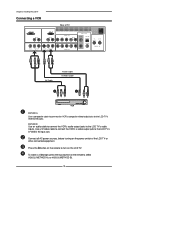
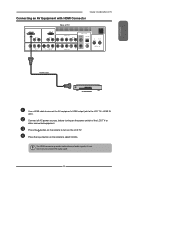
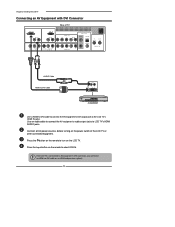
...on the remote to connect the audio cable. 23 The HDMI connector provides both video and audio signals, it's not necessary to select VIDEO6. Press the button on the remote to the LCD TV's HDMI IN jacks. ENGLISH Chapter 2 Installing the LCD TV Connecting an AV Equipment with HDMI... Connector Rear of the LCD TV or other connected equipment. Connect all...
...on the remote to connect the audio cable. 23 The HDMI connector provides both video and audio signals, it's not necessary to select VIDEO6. Press the button on the remote to the LCD TV's HDMI IN jacks. ENGLISH Chapter 2 Installing the LCD TV Connecting an AV Equipment with HDMI... Connector Rear of the LCD TV or other connected equipment. Connect all...
User Guide
Page 24
... Y Pb Pr AUD IO COAXIAL L R R YPbPr2 IN VHF/UHF IN AUDIO Cable HDMI-to-DVI Cable AUD IO L R DVI IN AV EQUIPMENT Use a HDMI-to-DVI cable to connect the AV equipment's DVI output jack to turn on the LCD TV. Press the Input button on the remote to -DVI cable or... an HDMI adapter(not suplied). 24 Press the button on the remote to the LCD TV's HDMI IN jacks. Chapter 2 Installing the LCD TV Connecting an AV Equipment with DVI Connector Rear of the LCD TV or other connected equipment. Use an audio cable to connect the AV equipment's audio output jacks to LCD TV's HDMI AUDIO jacks.
... Y Pb Pr AUD IO COAXIAL L R R YPbPr2 IN VHF/UHF IN AUDIO Cable HDMI-to-DVI Cable AUD IO L R DVI IN AV EQUIPMENT Use a HDMI-to-DVI cable to connect the AV equipment's DVI output jack to turn on the LCD TV. Press the Input button on the remote to -DVI cable or... an HDMI adapter(not suplied). 24 Press the button on the remote to the LCD TV's HDMI IN jacks. Chapter 2 Installing the LCD TV Connecting an AV Equipment with DVI Connector Rear of the LCD TV or other connected equipment. Use an audio cable to connect the AV equipment's audio output jacks to LCD TV's HDMI AUDIO jacks.
User Guide
Page 25
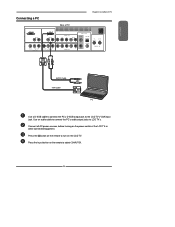
... input jack. Connect all AC power sources, before turning on the LCD TV. Press the Input button on the remote to LCD TV's. Use an audio cable to connect the PC's audio output jacks to select COMPUTER. 25 ENGLISH Connecting a PC Rear of TV Chapter 3 Using the LCD TV HDMI IN AUD IO L R VGA IN AUD IO L R VIDEO L R AUD...
... input jack. Connect all AC power sources, before turning on the LCD TV. Press the Input button on the remote to LCD TV's. Use an audio cable to connect the PC's audio output jacks to select COMPUTER. 25 ENGLISH Connecting a PC Rear of TV Chapter 3 Using the LCD TV HDMI IN AUD IO L R VGA IN AUD IO L R VIDEO L R AUD...

User Guide
Page 26
... OUT YPbPr1 IN Y Pb Pr AUD IO STEREO DIGITAL OPTICAL TV CABLE HDTV AIR L R L Y Pb Pr AUD IO COAXIAL L R R YPbPr2 IN VHF/UHF IN AUDIO Cable B A Audio Receievr Audio Amplifier Connecting to Audio Receiver: Use an audio cable to connect the audio receiver's audio LINE IN jacks to LCD TV's OPTICAL OUT jacks. Connecting to Digital 5.1 Sound System: METHOD A: Use...
... OUT YPbPr1 IN Y Pb Pr AUD IO STEREO DIGITAL OPTICAL TV CABLE HDTV AIR L R L Y Pb Pr AUD IO COAXIAL L R R YPbPr2 IN VHF/UHF IN AUDIO Cable B A Audio Receievr Audio Amplifier Connecting to Audio Receiver: Use an audio cable to connect the audio receiver's audio LINE IN jacks to LCD TV's OPTICAL OUT jacks. Connecting to Digital 5.1 Sound System: METHOD A: Use...

User Guide
Page 27
...3 5 4 ▪ Press ◄ ► to activate either the main or sub window, then press the Input button to display the Input List: Sub TV(CABLE/AIR) VIDEO1 (SIDE) VIDEO2 (REAR) VIDEO3 (S-VIDEO) VIDEO4 (YPbPr1) VIDEO5 (YPbPr2) COMPUTER (VGA) ▪ Press ▲▼ to enter picture in...the position of video from component input (YPbPr). Only one source's audio is heard. the user may select which source's audio is played at a time; ENGLISH Chapter 3 USING THE FEATURES Chapter 3 Using the LCD TV Using Picture-In-Picture The PIP/POP feature allows simultaneous viewing of...
...3 5 4 ▪ Press ◄ ► to activate either the main or sub window, then press the Input button to display the Input List: Sub TV(CABLE/AIR) VIDEO1 (SIDE) VIDEO2 (REAR) VIDEO3 (S-VIDEO) VIDEO4 (YPbPr1) VIDEO5 (YPbPr2) COMPUTER (VGA) ▪ Press ▲▼ to enter picture in...the position of video from component input (YPbPr). Only one source's audio is heard. the user may select which source's audio is played at a time; ENGLISH Chapter 3 USING THE FEATURES Chapter 3 Using the LCD TV Using Picture-In-Picture The PIP/POP feature allows simultaneous viewing of...

User Guide
Page 28
... selected together. Press the PIP button again to view images side by side. Chapter 3 Using the LCD TV Press the PIP button again to exit. 28 Main Sub ▪ Press ◄ ► to toggle the audio source between the main window and the sub window. ▪ Press the OK button to swap the... pictures between the main and sub windows. ▪ Press ◄ ► to activate either the main or sub window, then press the Input button to display the Input List: Sub TV(CABLE...
... selected together. Press the PIP button again to view images side by side. Chapter 3 Using the LCD TV Press the PIP button again to exit. 28 Main Sub ▪ Press ◄ ► to toggle the audio source between the main window and the sub window. ▪ Press the OK button to swap the... pictures between the main and sub windows. ▪ Press ◄ ► to activate either the main or sub window, then press the Input button to display the Input List: Sub TV(CABLE...
User Guide
Page 30
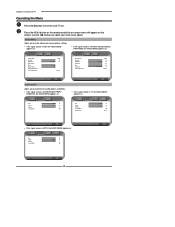
...Exit ▪ If the signal source is TV, the AUDIO MENU appears as: Bass Treble Balance Sound Effect 50 Bass 50 Treble 0 Balance Off Sound Effect MTS System 50 50 0 Off Stereo Audio Select Exit Audio ▪ If the signal source is HDTV, the AUDIO MENU appears as: Bass 50 Treble 50 ...Balance 0 Sound Effect Off Select Exit Audio Select Exit 30 VIDEO MENU: Allows you to make adjustments to your main menu option. Press the MENU button on the remote control,the on-screen menu will appear on . Chapter 3 Using the LCD TV Operating the Menu Press the button to...
...Exit ▪ If the signal source is TV, the AUDIO MENU appears as: Bass Treble Balance Sound Effect 50 Bass 50 Treble 0 Balance Off Sound Effect MTS System 50 50 0 Off Stereo Audio Select Exit Audio ▪ If the signal source is HDTV, the AUDIO MENU appears as: Bass 50 Treble 50 ...Balance 0 Sound Effect Off Select Exit Audio Select Exit 30 VIDEO MENU: Allows you to make adjustments to your main menu option. Press the MENU button on the remote control,the on-screen menu will appear on . Chapter 3 Using the LCD TV Operating the Menu Press the button to...

User Guide
Page 31
...Closed Caption V-Chip Parental Default English 15 off Setup Select Exit TV MENU: Allows you to set up a variety of features: Language, Closed Caption, factory reset, V-Chip, Parental Control sleep timer. ENGLISH Chapter 3 Using the LCD TV SETUP MENU: Allows you to edit and label channels. Press the... MENU button to change the value of the sub-menu, and press the OK button. Audio Language Time Zone SPDIF Type Auto Scan Manual Scan Channel Skip...
...Closed Caption V-Chip Parental Default English 15 off Setup Select Exit TV MENU: Allows you to set up a variety of features: Language, Closed Caption, factory reset, V-Chip, Parental Control sleep timer. ENGLISH Chapter 3 Using the LCD TV SETUP MENU: Allows you to edit and label channels. Press the... MENU button to change the value of the sub-menu, and press the OK button. Audio Language Time Zone SPDIF Type Auto Scan Manual Scan Channel Skip...
User Guide
Page 32
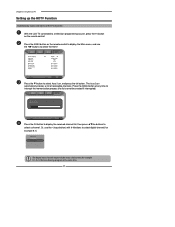
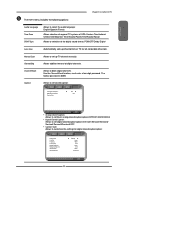
...Auto Scan, and press the OK button. The Auto Scan automatically creates a list of receivable channels. Audio Language Time Zone SPDIF Type Auto Scan Manual Scan Channel Skip Channel Block Caption ◄ English ►...MENU button on the remote control. Or, use the ◄► buttons to a television programming source, press the TV button on the remote control to display the Main menu, and use the ▪ (Input button) with 0-9 buttons... Press the MENU button at the same time. 32 Chapter 3 Using the LCD TV Setting up the HDTV Function Automatically scans and stores all the...
...Auto Scan, and press the OK button. The Auto Scan automatically creates a list of receivable channels. Audio Language Time Zone SPDIF Type Auto Scan Manual Scan Channel Skip Channel Block Caption ◄ English ►...MENU button on the remote control. Or, use the ◄► buttons to a television programming source, press the TV button on the remote control to display the Main menu, and use the ▪ (Input button) with 0-9 buttons... Press the MENU button at the same time. 32 Chapter 3 Using the LCD TV Setting up the HDTV Function Automatically scans and stores all the...
User Guide
Page 33
.../Spanish/French. Use the Channel Block function, must enter a four-digit password. The factory password is 0000. ENGLISH Chapter 3 Using the LCD TV The HDTV menu includes the following options: Audio Language Time Zone SPDIF Type Allows to block digital channels. Manual Scan Allows to set digital closed caption options:Service1/Service2/Service3...
.../Spanish/French. Use the Channel Block function, must enter a four-digit password. The factory password is 0000. ENGLISH Chapter 3 Using the LCD TV The HDTV menu includes the following options: Audio Language Time Zone SPDIF Type Allows to block digital channels. Manual Scan Allows to set digital closed caption options:Service1/Service2/Service3...

