Operation Manual
Page 3
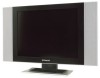
... enjoy the many functions and excellent features of controls 3 Remote Control 5 Installation 7 Basic Operations 14 Main OSD introduction 15 Channel setting 16 Selecting Channel 18 Picture adjustment 19 Sound setting 20 System setting 22 OSD Setting 27 Timer setting 28 Operations in this LCD TV. Contents Important safety cautions 1 Identification of this set.
... enjoy the many functions and excellent features of controls 3 Remote Control 5 Installation 7 Basic Operations 14 Main OSD introduction 15 Channel setting 16 Selecting Channel 18 Picture adjustment 19 Sound setting 20 System setting 22 OSD Setting 27 Timer setting 28 Operations in this LCD TV. Contents Important safety cautions 1 Identification of this set.
Operation Manual
Page 8
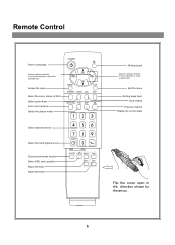
Remote Control Power on/standby Volume up /down selector. Exit the menu Setting sleep timer Clock setting Previous channel Display the current state Flip the cover open in the direction shown by the arrow. 5 In the menu operation, adjust the selected item Access the menu Select the mono, stereo or SAP Select zoom mode Auto correct picture Switch the picture mode Direct channel selector Select the input signal source Sound preset mode selector Select OSD menu position Adjust the bass Adjust the treble Muting sound Channel up /down selector. In menu operations, used to select item.
Remote Control Power on/standby Volume up /down selector. Exit the menu Setting sleep timer Clock setting Previous channel Display the current state Flip the cover open in the direction shown by the arrow. 5 In the menu operation, adjust the selected item Access the menu Select the mono, stereo or SAP Select zoom mode Auto correct picture Switch the picture mode Direct channel selector Select the input signal source Sound preset mode selector Select OSD menu position Adjust the bass Adjust the treble Muting sound Channel up /down selector. In menu operations, used to select item.
Operation Manual
Page 10
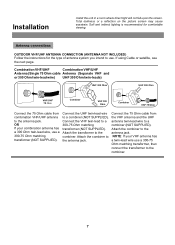
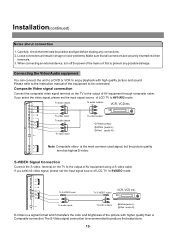
... to the antenna jack. Installation Install the unit in a room where direct light will not fall upon the screen. Total darkness or a reflection on the picture screen may cause eyestrain. Attach the combiner to the combiner. 7
... to the antenna jack. Installation Install the unit in a room where direct light will not fall upon the screen. Total darkness or a reflection on the picture screen may cause eyestrain. Attach the combiner to the combiner. 7
Operation Manual
Page 13
... mode. Please refer to the instruction manual of AV equipment using a S-video cable. S-VIDEO Signal Connection Connect the S-video terminal on the TV to the output of LCD TV to be connected. To S-VIDEO input R w To audio inputs To S-VIDEO output R w To audio outputs VCR, VCD etc. To ...which transfers the color and brightness of the main unit first to produce the best picture. 10 When connecting an external device, turn off the power of the picture with high quality picture and sound. Carefully check the terminals for position and type before making any possible ...
... mode. Please refer to the instruction manual of AV equipment using a S-video cable. S-VIDEO Signal Connection Connect the S-video terminal on the TV to the output of LCD TV to be connected. To S-VIDEO input R w To audio inputs To S-VIDEO output R w To audio outputs VCR, VCD etc. To ...which transfers the color and brightness of the main unit first to produce the best picture. 10 When connecting an external device, turn off the power of the picture with high quality picture and sound. Carefully check the terminals for position and type before making any possible ...
Operation Manual
Page 16
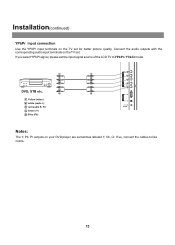
If you select YPbPr signal, please set for better picture quality. G G B B R R R R DVD, STB etc. If so, connect the cables to YPbPr / YCbCr mode. Connect the audio outputs with the corresponding audio input terminals on your DVD player are sometimes labeled Y, Cb, Cr. w w Y Yellow (video) W white (audio L) R red (audio R, Pr) G Green (Y) B Blue (Pb) Notes: The Y, Pb, Pr outputs on the TV set. Installation(continued) YPbPr input connection Use the YPbPr input terminals on the TV set the input signal source of the LCD TV to like colors. 13
If you select YPbPr signal, please set for better picture quality. G G B B R R R R DVD, STB etc. If so, connect the cables to YPbPr / YCbCr mode. Connect the audio outputs with the corresponding audio input terminals on your DVD player are sometimes labeled Y, Cb, Cr. w w Y Yellow (video) W white (audio L) R red (audio R, Pr) G Green (Y) B Blue (Pb) Notes: The Y, Pb, Pr outputs on the TV set. Installation(continued) YPbPr input connection Use the YPbPr input terminals on the TV set the input signal source of the LCD TV to like colors. 13
Operation Manual
Page 18
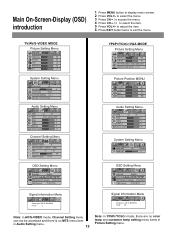
...select the item. 5 Press VOL+/- to select the menu. 3 Press CH6 to access the menu. 4 Press CH5/6 to exit the menu. TV/AV/S-VIDEO MODE Picture Setting Menu brightness 50 contrast 50 color 18 sharpness 32 tint 0 System Setting Menu blue screen on bass treble balance phone volume off 0 0 0... MTS menu item in Audio Setting menu. 15 Note: in YPbPr/YCbCr mode, there are no color temp and customer temp setting menu items in Picture Setting menu. to display menu screen. 2 Press VOL+/- Audio Setting Menu SRS on off MTS mono stereo SAP bass 0 treble 0 balance 0 ...
...select the item. 5 Press VOL+/- to select the menu. 3 Press CH6 to access the menu. 4 Press CH5/6 to exit the menu. TV/AV/S-VIDEO MODE Picture Setting Menu brightness 50 contrast 50 color 18 sharpness 32 tint 0 System Setting Menu blue screen on bass treble balance phone volume off 0 0 0... MTS menu item in Audio Setting menu. 15 Note: in YPbPr/YCbCr mode, there are no color temp and customer temp setting menu items in Picture Setting menu. to display menu screen. 2 Press VOL+/- Audio Setting Menu SRS on off MTS mono stereo SAP bass 0 treble 0 balance 0 ...
Operation Manual
Page 20
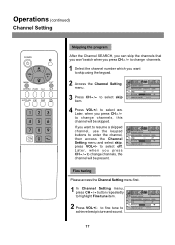
..., use the keypad buttons to enter the channel, then access the Channel Setting menu and select skip, press VOL+/- to fine tune to achieve best picture and sound. Operations (continued) Channel Setting Skipping the program After the Channel SEARCH, you can skip the channels that you won't watch when you press...
..., use the keypad buttons to enter the channel, then access the Channel Setting menu and select skip, press VOL+/- to fine tune to achieve best picture and sound. Operations (continued) Channel Setting Skipping the program After the Channel SEARCH, you can skip the channels that you won't watch when you press...
Operation Manual
Page 22
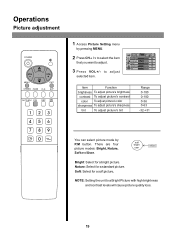
... to adjust selected item. Soft: Select for a standard picture. Nature: Select for a soft picture. soft bright user nature Bright: Select for a bright picture. to a Bright Picture with high brightness and contrast levels will cause picture quality loss. 19 Operations Picture adjustment 1 Access Picture Setting menu by P.M button. There are four picture modes: Bright, Nature, Soft and User. contrast...
... to adjust selected item. Soft: Select for a standard picture. Nature: Select for a soft picture. soft bright user nature Bright: Select for a bright picture. to a Bright Picture with high brightness and contrast levels will cause picture quality loss. 19 Operations Picture adjustment 1 Access Picture Setting menu by P.M button. There are four picture modes: Bright, Nature, Soft and User. contrast...
Operation Manual
Page 32
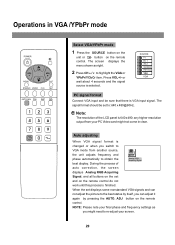
Auto adjusting When VGA signal format is changed or when you switch to VGA mode from your screen. 29 ADJ button on the remote TV control. The screen displays the menu shown as you can adjust it again by itself, you might need to obtain the best display. ...Acquiring Signal, and all buttons on the set displays some nonstandard VGA signals and can not adjust the picture to the best status by pressing the AUTO. During the process of the LCD panel is selected. any higher resolution output from another source, the unit adjusts frequency and phase automatically ...
Auto adjusting When VGA signal format is changed or when you switch to VGA mode from your screen. 29 ADJ button on the remote TV control. The screen displays the menu shown as you can adjust it again by itself, you might need to obtain the best display. ...Acquiring Signal, and all buttons on the set displays some nonstandard VGA signals and can not adjust the picture to the best status by pressing the AUTO. During the process of the LCD panel is selected. any higher resolution output from another source, the unit adjusts frequency and phase automatically ...
Operation Manual
Page 33
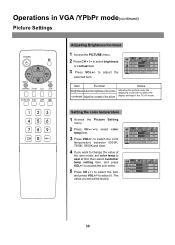
... customer temp setting item, and press VOL+/- to adjust it. The value you want to adjust the selected item. Operations in the TV, AV mode. brightness 50 contrast 50 color temp 5000K 7300K 9300K user customer temp setting Item Function Notes CLK brightness Adjust the brightness ...of the picture. to access the sub-menu. 5 Press CH5/6to select the item and press VOL+/- Setting the color temperature 1 Access the Picture Setting menu. 2 Press CH5/6to select color temp item. 3 Press VOL+/-...
... customer temp setting item, and press VOL+/- to adjust it. The value you want to adjust the selected item. Operations in the TV, AV mode. brightness 50 contrast 50 color temp 5000K 7300K 9300K user customer temp setting Item Function Notes CLK brightness Adjust the brightness ...of the picture. to access the sub-menu. 5 Press CH5/6to select the item and press VOL+/- Setting the color temperature 1 Access the Picture Setting menu. 2 Press CH5/6to select color temp item. 3 Press VOL+/-...
Operation Manual
Page 34
...a highly directional antenna may improve the picture. !Check that the unit is properly connected to repair any TV yourself. 31 Then plug the power cord in your TV by electrical interference (e.g. Adjust the contrast, color and brightness settings. No picture !Check antenna connections at the same ...be inserted with polarity (+, -) aligned. Never attempt to the unit. !Possible broadcast station trouble. Unstable or not synchronized VGA picture !Check if you have selected the correct VGA mode in again and turn on again once. Symptoms Ghost or double images No ...
...a highly directional antenna may improve the picture. !Check that the unit is properly connected to repair any TV yourself. 31 Then plug the power cord in your TV by electrical interference (e.g. Adjust the contrast, color and brightness settings. No picture !Check antenna connections at the same ...be inserted with polarity (+, -) aligned. Never attempt to the unit. !Possible broadcast station trouble. Unstable or not synchronized VGA picture !Check if you have selected the correct VGA mode in again and turn on again once. Symptoms Ghost or double images No ...

