User Guide
Page 2
... on the environment and human health. Changes, technical inaccuracies, and typographic errors will be collected separately. This product contains electrical or electronic materials. All rights reserved. This TV incorporates High-Definition Multimedia Interface (HDMITM) technology. All rights reserved. For service, support and warranty information, visit www.polaroid.com. Presence of Polaroid Corporation, Waltham, MA, USA. To...
... on the environment and human health. Changes, technical inaccuracies, and typographic errors will be collected separately. This product contains electrical or electronic materials. All rights reserved. This TV incorporates High-Definition Multimedia Interface (HDMITM) technology. All rights reserved. For service, support and warranty information, visit www.polaroid.com. Presence of Polaroid Corporation, Waltham, MA, USA. To...
User Guide
Page 4
... damage to overturn. ▪ Do not disable the 3-wire grounding type plug. This equipment and recommended cart or stand should not be observed in the installation, use, servicing and maintenance of important operating and maintenance instructions in hazardous radiation exposure. To reduce the risk of the serial/model plate. ▪ Never overload wall outlets and extensions. 2 Quick stops, excessive force, and uneven surfaces...
... damage to overturn. ▪ Do not disable the 3-wire grounding type plug. This equipment and recommended cart or stand should not be observed in the installation, use, servicing and maintenance of important operating and maintenance instructions in hazardous radiation exposure. To reduce the risk of the serial/model plate. ▪ Never overload wall outlets and extensions. 2 Quick stops, excessive force, and uneven surfaces...
User Guide
Page 6
... at all costs. Warnings and Precautions Outdoor Antenna Safety Instructions If an outdoor antenna is connected, follow the precautions below: ▪ An outdoor antenna should not be located in any area where it could come in contact with overhead power lines, or any other electric light or power circuits. ▪ When installing an outdoor antenna system, extreme caution should be taken...
... at all costs. Warnings and Precautions Outdoor Antenna Safety Instructions If an outdoor antenna is connected, follow the precautions below: ▪ An outdoor antenna should not be located in any area where it could come in contact with overhead power lines, or any other electric light or power circuits. ▪ When installing an outdoor antenna system, extreme caution should be taken...
User Guide
Page 7
... Connector 25 Connecting a PC...26 Connecting an Audio Receiver or a Dolby Digital 5.1 Sound System 27 Chapter 3 USING THE FEATURES Using The Built-in DVD...28 Using The USB Storage and SD Card Reader 30 Wide Screen Viewing...33 Using the Program Guide...34 Operating the Menu...35 Customizing the VIDEO Settings...37 Customizing the AUDIO Settings...39 Customizing the TV Settings...41 Customizing the SETUP Settings ...43 Using the Program Block Settings...46 Specifications ...51 Programming your Remote Control 52 5
... Connector 25 Connecting a PC...26 Connecting an Audio Receiver or a Dolby Digital 5.1 Sound System 27 Chapter 3 USING THE FEATURES Using The Built-in DVD...28 Using The USB Storage and SD Card Reader 30 Wide Screen Viewing...33 Using the Program Guide...34 Operating the Menu...35 Customizing the VIDEO Settings...37 Customizing the AUDIO Settings...39 Customizing the TV Settings...41 Customizing the SETUP Settings ...43 Using the Program Block Settings...46 Specifications ...51 Programming your Remote Control 52 5
User Guide
Page 8
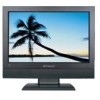
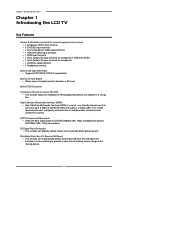
... to provide better picture quality. Chapter 1 Introducing the LCD TV Chapter 1 Introducing the LCD TV Key Features Various Audio/Video terminals for external equipment connection ▪ 1 composite VIDEO input terminal ▪ 1 S-VIDEO input terminals ▪ 1 sets of component Video input terminals ▪ 1 VGA/VGA LINE input terminals ▪ 1 HDMI input terminal ▪ 1 set of Audio(L/R) input terminals for component ▪ 1 COAXIAL output terminal ▪ 1 Headphone terminal Built-In Slot-type DVD Player ▪ Supports DVD/SVCD/VCD/CD compatibility. High Definition...
... to provide better picture quality. Chapter 1 Introducing the LCD TV Chapter 1 Introducing the LCD TV Key Features Various Audio/Video terminals for external equipment connection ▪ 1 composite VIDEO input terminal ▪ 1 S-VIDEO input terminals ▪ 1 sets of component Video input terminals ▪ 1 VGA/VGA LINE input terminals ▪ 1 HDMI input terminal ▪ 1 set of Audio(L/R) input terminals for component ▪ 1 COAXIAL output terminal ▪ 1 Headphone terminal Built-In Slot-type DVD Player ▪ Supports DVD/SVCD/VCD/CD compatibility. High Definition...
User Guide
Page 9
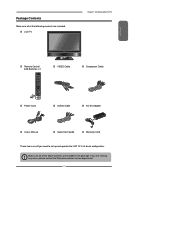
If you need to set up and operate the LCD TV in the package. Make sure all you are included. LCD TV Chapter 1 Introducing the LCD TV ENGLISH Remote Control/ AAA Batteries x 2 SET UP TV CAB/ SAT DVD AUX SLEEP DVD MENU VOL CH PAGE MUTE ASPECT LAST GUIDE LIVE TV PIP MENU OK INFO CC EXIT DVR 1 2 3 ABC DEF 4 5 6 GHI JKL MNO 7 8 9 PQRS TUV WXYZ INPUT . 0 ENTER Power Cord VIDEO Cable Component Cable AUDIO Cable AC-DC Adapter User's Manual Quick Start Guide Warranty Card These...
If you need to set up and operate the LCD TV in the package. Make sure all you are included. LCD TV Chapter 1 Introducing the LCD TV ENGLISH Remote Control/ AAA Batteries x 2 SET UP TV CAB/ SAT DVD AUX SLEEP DVD MENU VOL CH PAGE MUTE ASPECT LAST GUIDE LIVE TV PIP MENU OK INFO CC EXIT DVR 1 2 3 ABC DEF 4 5 6 GHI JKL MNO 7 8 9 PQRS TUV WXYZ INPUT . 0 ENTER Power Cord VIDEO Cable Component Cable AUDIO Cable AC-DC Adapter User's Manual Quick Start Guide Warranty Card These...

User Guide
Page 10
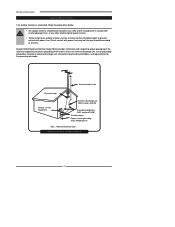
To attach this LCD TV to install the TV stand: Open the box, and make sure all necessary parts are in the box. Chapter 1 Introducing the LCD TV Setting Up Your LCD TV How to install the TV Stand Follow the instructions below to a wall a standard 100x100 VESA mounting bracket is required. 8 The package contains: LCD TV Stand Cover an even stable surface with a soft cloth. Using a Phillips screwdriver remove the screw which is removed. The stand socket section should...
To attach this LCD TV to install the TV stand: Open the box, and make sure all necessary parts are in the box. Chapter 1 Introducing the LCD TV Setting Up Your LCD TV How to install the TV Stand Follow the instructions below to a wall a standard 100x100 VESA mounting bracket is required. 8 The package contains: LCD TV Stand Cover an even stable surface with a soft cloth. Using a Phillips screwdriver remove the screw which is removed. The stand socket section should...
User Guide
Page 12
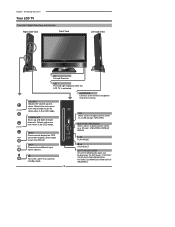
... View and Controls Right Side View Front View Left Side View IR Infrared Receiver LED The LED light indicates when the LCD TV is activated. USB Allows access to digital content stored on screen display), press again to turn the OSD off. CHANNEL▲▼ Scans up and down through channels. Selects sub-menu item when in the OSD mode. Selects the main-menu item and change values for private listening. INPUT Chooses from different input signal sources. MENU...
... View and Controls Right Side View Front View Left Side View IR Infrared Receiver LED The LED light indicates when the LCD TV is activated. USB Allows access to digital content stored on screen display), press again to turn the OSD off. CHANNEL▲▼ Scans up and down through channels. Selects sub-menu item when in the OSD mode. Selects the main-menu item and change values for private listening. INPUT Chooses from different input signal sources. MENU...

User Guide
Page 13
..., or other AV equipment with VGA and AUDIO output jacks. YPbPr IN Connects to receive high/standard definition television. 11 VHF/UHF IN Connects RF input from VHF/UHF antenna or cable to the DVD player, Digital Set-Top-Box, or other AV equipment with component(YPbPr) video and audio output jacks. HDMI IN Connects the all digital AV equipment with HDMI connector.HDMI supports enhanced, high-definition video and two-channel digital audio.
..., or other AV equipment with VGA and AUDIO output jacks. YPbPr IN Connects to receive high/standard definition television. 11 VHF/UHF IN Connects RF input from VHF/UHF antenna or cable to the DVD player, Digital Set-Top-Box, or other AV equipment with component(YPbPr) video and audio output jacks. HDMI IN Connects the all digital AV equipment with HDMI connector.HDMI supports enhanced, high-definition video and two-channel digital audio.
User Guide
Page 14
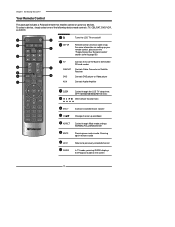
... your remote control, please see the "Programming Your Remote Control" section (refer to previously selected channel 11 GUIDE In TV mode, pressing GUIDE displays the Program Guide on and off 2 SET UP Remote control universal code setup. Chapter 1 Introducing the LCD TV Your Remote Control This package includes a Polaroid remote that enables control of the following device mode controls: TV, CBL/SAT, DVD/VCR, or AUDIO. 2 SET UP 1 3 TV CAB/ SAT DVD AUX SLEEP 4 DVD MENU 5 6 VOL CH PAGE 7 8 9 MUTE ASPECT LAST 10 LIVE TV GUIDE PIP MENU 11 1 Turns the LCD TV on...
... your remote control, please see the "Programming Your Remote Control" section (refer to previously selected channel 11 GUIDE In TV mode, pressing GUIDE displays the Program Guide on and off 2 SET UP Remote control universal code setup. Chapter 1 Introducing the LCD TV Your Remote Control This package includes a Polaroid remote that enables control of the following device mode controls: TV, CBL/SAT, DVD/VCR, or AUDIO. 2 SET UP 1 3 TV CAB/ SAT DVD AUX SLEEP 4 DVD MENU 5 6 VOL CH PAGE 7 8 9 MUTE ASPECT LAST 10 LIVE TV GUIDE PIP MENU 11 1 Turns the LCD TV on...
User Guide
Page 15
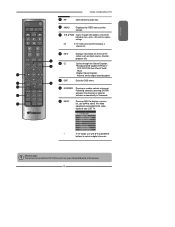
... remote can control the LCD TV from up to select a digital channels. Following selection, pressing ENTER activates the channel, or channel activates automatically in 3 seconds 7 8 9 PQRS TUV WXYZ 19 INPUT . 0 ENTER 19 INPUT Pressing INPUT to display a source list, use ▲▼ to select the video equipment connected to the video inputs of your LCD TV: Main TV(CABLE/AIR) VIDEO1 (AV) VIDEO2 (S-VIDEO) VIDEO3 (YPbPr) DVD USB CARD READER VIDEO4 (HDMI) COMPUTER(VGA) ▪ In TV mode, use with 0-9 and ENTER buttons...
... remote can control the LCD TV from up to select a digital channels. Following selection, pressing ENTER activates the channel, or channel activates automatically in 3 seconds 7 8 9 PQRS TUV WXYZ 19 INPUT . 0 ENTER 19 INPUT Pressing INPUT to display a source list, use ▲▼ to select the video equipment connected to the video inputs of your LCD TV: Main TV(CABLE/AIR) VIDEO1 (AV) VIDEO2 (S-VIDEO) VIDEO3 (YPbPr) DVD USB CARD READER VIDEO4 (HDMI) COMPUTER(VGA) ▪ In TV mode, use with 0-9 and ENTER buttons...
User Guide
Page 20
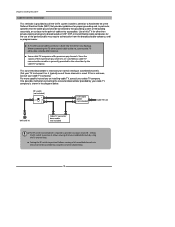
Since the signals of these channels is used. Setting the RF switch to position A allows viewing of all scrambled channels via the converter/descrambler by the cable TV company. Chapter 2 Installing the LCD TV Cable TV (CATV) Connection This reminder is provided to call the CATV system installer's attention to Article 820-40 of the National Electrical Code (NEC) that the cable ground shall be connected to the grounding system...
Since the signals of these channels is used. Setting the RF switch to position A allows viewing of all scrambled channels via the converter/descrambler by the cable TV company. Chapter 2 Installing the LCD TV Cable TV (CATV) Connection This reminder is provided to call the CATV system installer's attention to Article 820-40 of the National Electrical Code (NEC) that the cable ground shall be connected to the grounding system...
User Guide
Page 21
... wall outlet. The POWER button on the remote to the DC 12V port at the back of time. Main TV(CABLE/AIR) VIDEO1 (AV) VIDEO2 (S-VIDEO) VIDEO3 (YPbPr) DVD USB CARD READER VIDEO4 (HDMI) COMPUTER(VGA) 19 ENGLISH Chapter 2 Installing the LCD TV Use a supplied antenna cable to connect the TV signal to turn on the LCD TV. VHF/UHF IN Connect the DC plug of the AC-DC adapter to display the Input List. To completely disconnect the main voltage, please remove...
... wall outlet. The POWER button on the remote to the DC 12V port at the back of time. Main TV(CABLE/AIR) VIDEO1 (AV) VIDEO2 (S-VIDEO) VIDEO3 (YPbPr) DVD USB CARD READER VIDEO4 (HDMI) COMPUTER(VGA) 19 ENGLISH Chapter 2 Installing the LCD TV Use a supplied antenna cable to connect the TV signal to turn on the LCD TV. VHF/UHF IN Connect the DC plug of the AC-DC adapter to display the Input List. To completely disconnect the main voltage, please remove...
User Guide
Page 22
... a list of receivable channels. Chapter 2 Installing the LCD TV Press the MENU button on the remote control to display the Main menu, and use the ▪ (INPUT button) with 0-9 buttons to select digital channel( for example 9.1) Channel List 5-2 RF5-2 9-1 KQED-HD 9-2 KOED-SD 8 CCT 12 13 15 The digital main channel might include many subchannels (for each RF input to create a list of available channels from both inputs. The Channel Scan automatically creates a list of receivable channels for the current input (antenna or cable...
... a list of receivable channels. Chapter 2 Installing the LCD TV Press the MENU button on the remote control to display the Main menu, and use the ▪ (INPUT button) with 0-9 buttons to select digital channel( for example 9.1) Channel List 5-2 RF5-2 9-1 KQED-HD 9-2 KOED-SD 8 CCT 12 13 15 The digital main channel might include many subchannels (for each RF input to create a list of available channels from both inputs. The Channel Scan automatically creates a list of receivable channels for the current input (antenna or cable...
User Guide
Page 23
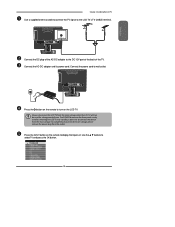
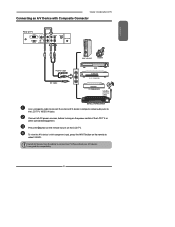
... the button on the remote to turn on the power switch of TV HDMI IN YPbPr IN Y Pb Pr VIDEO S-VIDEO COAXIAL VHF/UHF IN VGA IN VGA LINE IN R GAME CONSOLE AUDIO Cable AV Cable VIDEO OUT L R D V D PLA YER Use a composite cable to connect the external A/V device's composite video/audio jacks to the LCD TV's VIDEO IN jacks. Please check your A/V devices user guide for compatibility. 21 ENGLISH Chapter 2 Installing the LCD TV Connecting an A/V Device with component input, press the INPUT button...
... the button on the remote to turn on the power switch of TV HDMI IN YPbPr IN Y Pb Pr VIDEO S-VIDEO COAXIAL VHF/UHF IN VGA IN VGA LINE IN R GAME CONSOLE AUDIO Cable AV Cable VIDEO OUT L R D V D PLA YER Use a composite cable to connect the external A/V device's composite video/audio jacks to the LCD TV's VIDEO IN jacks. Please check your A/V devices user guide for compatibility. 21 ENGLISH Chapter 2 Installing the LCD TV Connecting an A/V Device with component input, press the INPUT button...

User Guide
Page 25
... component video jacks on the power switch of the LCD TV or other connected equipment. Use an audio cable to connect the external A/V device's component audio jacks to the LCD TV's YPbPr IN input jacks. Press the button on the remote to turn on the remote to a TV. To view the A/V device's with Component(YPbPr) Connector Rear of component video, see your A/V device user guide for compatibility. Please check your A/V device's user guide. 23 ENGLISH Chapter 2 Installing the LCD TV Connecting an A/V Device with component input, press the INPUT button...
... component video jacks on the power switch of the LCD TV or other connected equipment. Use an audio cable to connect the external A/V device's component audio jacks to the LCD TV's YPbPr IN input jacks. Press the button on the remote to turn on the remote to a TV. To view the A/V device's with Component(YPbPr) Connector Rear of component video, see your A/V device user guide for compatibility. Please check your A/V device's user guide. 23 ENGLISH Chapter 2 Installing the LCD TV Connecting an A/V Device with component input, press the INPUT button...

User Guide
Page 38
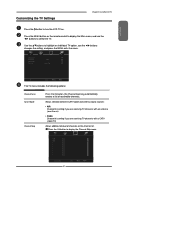
... Language Time Setup Parental Gamma Reset Default English Middle Setup Select Exit ▪ If the signal source is VIDOE/S-VIDEO/YPbPr, the SETUP MENU appears as: OSD Language Time Setup Closed Caption Parental Gamma Reset Default English Middle Setup Select Exit Setup Select Exit Use the ▲▼ buttons to highlight the option of the item. Press the EXIT button to change the value of the sub-menu, and press the OK button. Channel Scan Tuner Mode Channel Skip Time Zone Cable Eastern Time TV...
... Language Time Setup Parental Gamma Reset Default English Middle Setup Select Exit ▪ If the signal source is VIDOE/S-VIDEO/YPbPr, the SETUP MENU appears as: OSD Language Time Setup Closed Caption Parental Gamma Reset Default English Middle Setup Select Exit Setup Select Exit Use the ▲▼ buttons to highlight the option of the item. Press the EXIT button to change the value of the sub-menu, and press the OK button. Channel Scan Tuner Mode Channel Skip Time Zone Cable Eastern Time TV...
User Guide
Page 43
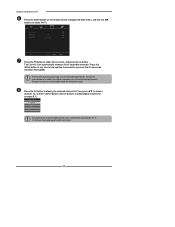
... remote control to select the TV. Press the OK button to turn the LCD TV on the channel list. ENGLISH Customizing the TV Settings Chapter 3 Using the LCD TV Press the button to display the Channel Skip menu: 2 ABC 3 DISC 4 5 6 7 8 9 10 Analog Analog Analog Analog Analog Analog Analog Analog Analog Channel Skip 41 Select Exit Allows selection between CATV cable and antenna signal sources: ▪ AIR Choose this setting if you are receiving TV channels with an antenna (over the air) ▪ Cable Choose this setting if you are receiving TV channels...
... remote control to select the TV. Press the OK button to turn the LCD TV on the channel list. ENGLISH Customizing the TV Settings Chapter 3 Using the LCD TV Press the button to display the Channel Skip menu: 2 ABC 3 DISC 4 5 6 7 8 9 10 Analog Analog Analog Analog Analog Analog Analog Analog Analog Channel Skip 41 Select Exit Allows selection between CATV cable and antenna signal sources: ▪ AIR Choose this setting if you are receiving TV channels with an antenna (over the air) ▪ Cable Choose this setting if you are receiving TV channels...
User Guide
Page 53
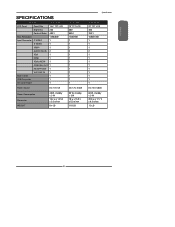
Resolution 1280x800 Input Connector C-VIDEO 1 S-VIDEO 1 YPbPr 1 AUDIO IN(L/R) 2 VGA 1 HDMI 1 VGA LINE IN 1 COAXIAL OUT 1 HEADPHONE 1 VHF/UHF IN 1 Built-in DVD 1 USB Connector 1 SD Card Reader 1 Power Source DC 12V, 5A Power Consumption Dimension WEIGHT 48 W, standby < 3 W 15.2 w x 13.5 h x 5.2 d inch 8.4 LB 1913-TDXB 19" TFT LCD 300 850:1 1400x900 1 1 1 2 1 1 1 1 1 1 1 1 1 DC 12V, 5.83A 55 W, standby < 3 W 18 w x 15.9 h x 5.2 d inch 11.8 LB Specifications 2213-TDXB 22" TFT LCD 400 700:1 1680X1050 1 1 1 2 1 1 1 1 1 1 1 1 1 DC 12V, 5.83A 60 W, standby < 3 W 20...
Resolution 1280x800 Input Connector C-VIDEO 1 S-VIDEO 1 YPbPr 1 AUDIO IN(L/R) 2 VGA 1 HDMI 1 VGA LINE IN 1 COAXIAL OUT 1 HEADPHONE 1 VHF/UHF IN 1 Built-in DVD 1 USB Connector 1 SD Card Reader 1 Power Source DC 12V, 5A Power Consumption Dimension WEIGHT 48 W, standby < 3 W 15.2 w x 13.5 h x 5.2 d inch 8.4 LB 1913-TDXB 19" TFT LCD 300 850:1 1400x900 1 1 1 2 1 1 1 1 1 1 1 1 1 DC 12V, 5.83A 55 W, standby < 3 W 18 w x 15.9 h x 5.2 d inch 11.8 LB Specifications 2213-TDXB 22" TFT LCD 400 700:1 1680X1050 1 1 1 2 1 1 1 1 1 1 1 1 1 DC 12V, 5.83A 60 W, standby < 3 W 20...
User Guide
Page 56
... SET UP until the red LED blinks twice; Replace battery with an infrared remote control. An entry error has occurred (for example,TV). See "Changing Volume Lock". The LED blinks twice. Enter 9-9-3 and then press VOL+. Unlocking a Single Device's Volume Control Press a device key (TV, VCR/DVD, CBL/ SAT, or AUX). The LED blinks four times. LED blinks when you press a key. Programming Your Remote Control Changing Volume Lock The remote comes preset to allow independent volume control of the current mode. then release. Troubleshooting PROBLEM...
... SET UP until the red LED blinks twice; Replace battery with an infrared remote control. An entry error has occurred (for example,TV). See "Changing Volume Lock". The LED blinks twice. Enter 9-9-3 and then press VOL+. Unlocking a Single Device's Volume Control Press a device key (TV, VCR/DVD, CBL/ SAT, or AUX). The LED blinks four times. LED blinks when you press a key. Programming Your Remote Control Changing Volume Lock The remote comes preset to allow independent volume control of the current mode. then release. Troubleshooting PROBLEM...


