User Guide
Page 2
...HDMI Licensing LLC. This TV incorporates High-Definition Multimedia Interface (HDMITM) technology. Presence of this product, please go to www.polaroid.com and click on "Company" or call the customer service number for ensuring that this document. For service, support and warranty information, visit www.polaroid... product means it should not be corrected in the instruction manual. Changes are responsible for your country listed in subsequent editions. Changes, technical inaccuracies, and typographic errors will be disposed of Dolby Laboratories. All rights reserved...
...HDMI Licensing LLC. This TV incorporates High-Definition Multimedia Interface (HDMITM) technology. Presence of this product, please go to www.polaroid.com and click on "Company" or call the customer service number for ensuring that this document. For service, support and warranty information, visit www.polaroid... product means it should not be corrected in the instruction manual. Changes are responsible for your country listed in subsequent editions. Changes, technical inaccuracies, and typographic errors will be disposed of Dolby Laboratories. All rights reserved...
User Guide
Page 6
... the grounding electrode. Warnings and Precautions Outdoor Antenna Safety Instructions If an outdoor antenna is connected, follow the precautions below: ▪ An outdoor antenna should not be located in any area where it could come in contact with overhead power lines, or any other electric light or power circuits. ▪ When installing an outdoor antenna system, extreme caution should be taken...
... the grounding electrode. Warnings and Precautions Outdoor Antenna Safety Instructions If an outdoor antenna is connected, follow the precautions below: ▪ An outdoor antenna should not be located in any area where it could come in contact with overhead power lines, or any other electric light or power circuits. ▪ When installing an outdoor antenna system, extreme caution should be taken...
User Guide
Page 7
... Connector 25 Connecting a PC...26 Connecting an Audio Receiver or a Dolby Digital 5.1 Sound System 27 Chapter 3 USING THE FEATURES Using The Built-in DVD...28 Using The USB Storage and SD Card Reader 30 Wide Screen Viewing...33 Using the Program Guide...34 Operating the Menu...35 Customizing the VIDEO Settings...37 Customizing the AUDIO Settings...39 Customizing the TV Settings...41 Customizing the SETUP Settings ...43 Using the Program Block Settings...46 Specifications ...51 Programming your Remote Control 52 5
... Connector 25 Connecting a PC...26 Connecting an Audio Receiver or a Dolby Digital 5.1 Sound System 27 Chapter 3 USING THE FEATURES Using The Built-in DVD...28 Using The USB Storage and SD Card Reader 30 Wide Screen Viewing...33 Using the Program Guide...34 Operating the Menu...35 Customizing the VIDEO Settings...37 Customizing the AUDIO Settings...39 Customizing the TV Settings...41 Customizing the SETUP Settings ...43 Using the Program Block Settings...46 Specifications ...51 Programming your Remote Control 52 5
User Guide
Page 8
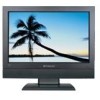
... combined video and audio in a single cable. Chapter 1 Introducing the LCD TV Chapter 1 Introducing the LCD TV Key Features Various Audio/Video terminals for external equipment connection ▪ 1 composite VIDEO input terminal ▪ 1 S-VIDEO input terminals ▪ 1 sets of component Video input terminals ▪ 1 VGA/VGA LINE input terminals ▪ 1 HDMI input terminal ▪ 1 set of Audio(L/R) input terminals for component ▪ 1 COAXIAL output terminal ▪ 1 Headphone terminal Built-In Slot-type DVD Player ▪ Supports DVD/SVCD/VCD/CD compatibility. Built-In USB...
... combined video and audio in a single cable. Chapter 1 Introducing the LCD TV Chapter 1 Introducing the LCD TV Key Features Various Audio/Video terminals for external equipment connection ▪ 1 composite VIDEO input terminal ▪ 1 S-VIDEO input terminals ▪ 1 sets of component Video input terminals ▪ 1 VGA/VGA LINE input terminals ▪ 1 HDMI input terminal ▪ 1 set of Audio(L/R) input terminals for component ▪ 1 COAXIAL output terminal ▪ 1 Headphone terminal Built-In Slot-type DVD Player ▪ Supports DVD/SVCD/VCD/CD compatibility. Built-In USB...
User Guide
Page 9
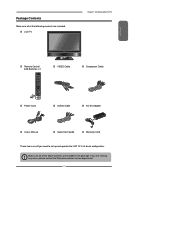
... Polaroid customer service department. 7 LCD TV Chapter 1 Introducing the LCD TV ENGLISH Remote Control/ AAA Batteries x 2 SET UP TV CAB/ SAT DVD AUX SLEEP DVD MENU VOL CH PAGE MUTE ASPECT LAST GUIDE LIVE TV PIP MENU OK INFO CC EXIT DVR 1 2 3 ABC DEF 4 5 6 GHI JKL MNO 7 8 9 PQRS TUV WXYZ INPUT . 0 ENTER Power Cord VIDEO Cable Component Cable AUDIO Cable AC-DC Adapter User's Manual Quick Start Guide Warranty Card These items are included in its basic configuration. If you need to set...
... Polaroid customer service department. 7 LCD TV Chapter 1 Introducing the LCD TV ENGLISH Remote Control/ AAA Batteries x 2 SET UP TV CAB/ SAT DVD AUX SLEEP DVD MENU VOL CH PAGE MUTE ASPECT LAST GUIDE LIVE TV PIP MENU OK INFO CC EXIT DVR 1 2 3 ABC DEF 4 5 6 GHI JKL MNO 7 8 9 PQRS TUV WXYZ INPUT . 0 ENTER Power Cord VIDEO Cable Component Cable AUDIO Cable AC-DC Adapter User's Manual Quick Start Guide Warranty Card These items are included in its basic configuration. If you need to set...

User Guide
Page 10
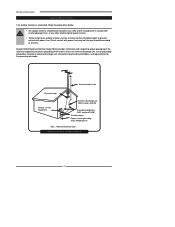
... locator rod connected to install the TV stand: Open the box, and make sure all necessary parts are in the box. The stand socket section should be detached. Using a Phillips screwdriver remove the screw which is required. 8 Chapter 1 Introducing the LCD TV Setting Up Your LCD TV How to install the TV Stand Follow the instructions below to the TV. For wall mounting the stand socket attached to a wall a standard 100x100 VESA mounting bracket is inside the stand socket. To Remove...
... locator rod connected to install the TV stand: Open the box, and make sure all necessary parts are in the box. The stand socket section should be detached. Using a Phillips screwdriver remove the screw which is required. 8 Chapter 1 Introducing the LCD TV Setting Up Your LCD TV How to install the TV Stand Follow the instructions below to the TV. For wall mounting the stand socket attached to a wall a standard 100x100 VESA mounting bracket is inside the stand socket. To Remove...
User Guide
Page 12
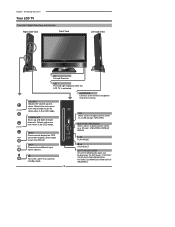
...-TYPE DVD PLAYER Any of the following disc types can be played on screen display), press again to turn the OSD off. INPUT Chooses from different input signal sources. Turns the LCD TV on and into standby mode. 10 HEADPHONE Connects to display the OSD (on the DVD player: DVD/VCD/ CD/CD-R/CD-RW/JPEG/KODAK PICTURE CD/WMA/DVD+R/RW/DVD-R/ RW/MPEG-4 CHANNEL▲▼ Scans up and down through channels. MENU Press once to the external...
...-TYPE DVD PLAYER Any of the following disc types can be played on screen display), press again to turn the OSD off. INPUT Chooses from different input signal sources. Turns the LCD TV on and into standby mode. 10 HEADPHONE Connects to display the OSD (on the DVD player: DVD/VCD/ CD/CD-R/CD-RW/JPEG/KODAK PICTURE CD/WMA/DVD+R/RW/DVD-R/ RW/MPEG-4 CHANNEL▲▼ Scans up and down through channels. MENU Press once to the external...

User Guide
Page 13
... other AV equipment with HDMI connector.HDMI supports enhanced, high-definition video and two-channel digital audio. VHF/UHF IN Connects RF input from VHF/UHF antenna or cable to the S-Video/Composite VIDEO and AUDIO(L/ R) output jacks on the digital/standard 5.1 audio system. Rear View and Jacks Chapter 1 Introducing the LCD TV ENGLISH S-VIDEO/VIDEO/AUDIO(L/R) IN Connects to receive high/standard definition television. 11 SPDIF OUT Connects to the audio jack on external video equipment.
... other AV equipment with HDMI connector.HDMI supports enhanced, high-definition video and two-channel digital audio. VHF/UHF IN Connects RF input from VHF/UHF antenna or cable to the S-Video/Composite VIDEO and AUDIO(L/ R) output jacks on the digital/standard 5.1 audio system. Rear View and Jacks Chapter 1 Introducing the LCD TV ENGLISH S-VIDEO/VIDEO/AUDIO(L/R) IN Connects to receive high/standard definition television. 11 SPDIF OUT Connects to the audio jack on external video equipment.
User Guide
Page 14
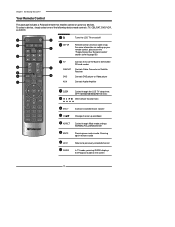
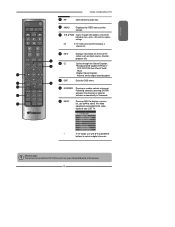
... selected channel 11 GUIDE In TV mode, pressing GUIDE displays the Program Guide on and off 2 SET UP Remote control universal code setup. Increases and decreases volume 7 CH▲▼ Change channel up to page 56) 3 TV CAB/SAT DVD AUX Controls the LCD TV/Built-in DVD/USB / SD card reader. Chapter 1 Introducing the LCD TV Your Remote Control This package includes a Polaroid remote that enables control of the following device mode controls: TV, CBL/SAT, DVD/VCR, or AUDIO. 2 SET UP 1 3 TV CAB/ SAT DVD AUX SLEEP 4 DVD MENU 5 6 VOL...
... selected channel 11 GUIDE In TV mode, pressing GUIDE displays the Program Guide on and off 2 SET UP Remote control universal code setup. Increases and decreases volume 7 CH▲▼ Change channel up to page 56) 3 TV CAB/SAT DVD AUX Controls the LCD TV/Built-in DVD/USB / SD card reader. Chapter 1 Introducing the LCD TV Your Remote Control This package includes a Polaroid remote that enables control of the following device mode controls: TV, CBL/SAT, DVD/VCR, or AUDIO. 2 SET UP 1 3 TV CAB/ SAT DVD AUX SLEEP 4 DVD MENU 5 6 VOL...
User Guide
Page 15
... remote can control the LCD TV from up to select a digital channels. GUIDE LIVE TV PIP MENU 16 CC 13 Cycles through OSD options and selects individual menu items. OK confirms option settings OK In TV mode, pressing OK to display a channel list VOL CH PAGE 15 INFO Displays information on the LCD TV screen such as input source, channel, MUTE ASPECT LAST 12 program title. ENGLISH Chapter 2 Installing the LCD TV SET UP TV CAB/ SAT DVD AUX SLEEP DVD MENU 12 PIP...
... remote can control the LCD TV from up to select a digital channels. GUIDE LIVE TV PIP MENU 16 CC 13 Cycles through OSD options and selects individual menu items. OK confirms option settings OK In TV mode, pressing OK to display a channel list VOL CH PAGE 15 INFO Displays information on the LCD TV screen such as input source, channel, MUTE ASPECT LAST 12 program title. ENGLISH Chapter 2 Installing the LCD TV SET UP TV CAB/ SAT DVD AUX SLEEP DVD MENU 12 PIP...
User Guide
Page 20
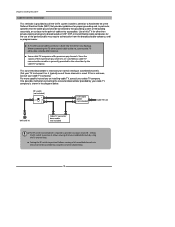
... IN B 2 set for the use of the general public may require authorization from the broadcast/cable company, and/ or program owner. ■ A 75-ohm coaxial cable connector is required to provide two inputs (A and B). If this TV for other than private viewing of programs broadcasted on installing cable TV, consult your TV to channel 3 or 4, typically one of these premium pay channels. Chapter 2 Installing the LCD TV Cable TV (CATV) Connection This...
... IN B 2 set for the use of the general public may require authorization from the broadcast/cable company, and/ or program owner. ■ A 75-ohm coaxial cable connector is required to provide two inputs (A and B). If this TV for other than private viewing of programs broadcasted on installing cable TV, consult your TV to channel 3 or 4, typically one of these premium pay channels. Chapter 2 Installing the LCD TV Cable TV (CATV) Connection This...
User Guide
Page 21
Connect the power cord to the LCD TV's TV CABLE terminal. To completely disconnect the main voltage, please remove the power plug from the main voltage. ENGLISH Chapter 2 Installing the LCD TV Use a supplied antenna cable to connect the TV signal to wall outlet. Press the button on the remote to display the Input List. Press the INPUT button on the remote to turn on the front panel is only used for switching the LCD TV into standby, it does not disconnect the device from the socket...
Connect the power cord to the LCD TV's TV CABLE terminal. To completely disconnect the main voltage, please remove the power plug from the main voltage. ENGLISH Chapter 2 Installing the LCD TV Use a supplied antenna cable to connect the TV signal to wall outlet. Press the button on the remote to display the Input List. Press the INPUT button on the remote to turn on the front panel is only used for switching the LCD TV into standby, it does not disconnect the device from the socket...
User Guide
Page 22
... 0-9 buttons to select digital channel( for example 9.1) Channel List 5-2 RF5-2 9-1 KQED-HD 9-2 KOED-SD 8 CCT 12 13 15 The digital main channel might include many subchannels (for example 9-1, 92..) that are showing program at any time to interrupt the memorization process.(the list cannot be required to run Channel Scanning for the current input (antenna or cable). Press the MENU button at the same time. 20 Channel Scan Tuner Mode Channel Skip Time Zone Cable Eastern Time TV...
... 0-9 buttons to select digital channel( for example 9.1) Channel List 5-2 RF5-2 9-1 KQED-HD 9-2 KOED-SD 8 CCT 12 13 15 The digital main channel might include many subchannels (for example 9-1, 92..) that are showing program at any time to interrupt the memorization process.(the list cannot be required to run Channel Scanning for the current input (antenna or cable). Press the MENU button at the same time. 20 Channel Scan Tuner Mode Channel Skip Time Zone Cable Eastern Time TV...
User Guide
Page 23
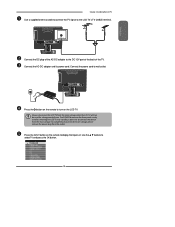
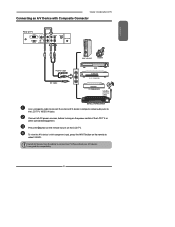
... power switch of TV HDMI IN YPbPr IN Y Pb Pr VIDEO S-VIDEO COAXIAL VHF/UHF IN VGA IN VGA LINE IN R GAME CONSOLE AUDIO Cable AV Cable VIDEO OUT L R D V D PLA YER Use a composite cable to connect the external A/V device's composite video/audio jacks to the LCD TV's VIDEO IN jacks. Please check your A/V devices user guide for compatibility. 21 ENGLISH Chapter 2 Installing the LCD TV Connecting an A/V Device with component input, press the INPUT button on the remote to select VIDEO1. To view...
... power switch of TV HDMI IN YPbPr IN Y Pb Pr VIDEO S-VIDEO COAXIAL VHF/UHF IN VGA IN VGA LINE IN R GAME CONSOLE AUDIO Cable AV Cable VIDEO OUT L R D V D PLA YER Use a composite cable to connect the external A/V device's composite video/audio jacks to the LCD TV's VIDEO IN jacks. Please check your A/V devices user guide for compatibility. 21 ENGLISH Chapter 2 Installing the LCD TV Connecting an A/V Device with component input, press the INPUT button on the remote to select VIDEO1. To view...

User Guide
Page 25
... turning on the power switch of component video, see your A/V device are sometimes labeled YPbPr, or YCbCr. Connect all A/V device have the ability to connect to a TV. The component video jacks on your A/V device's user guide. 23 For an explanation of the LCD TV or other connected equipment. Use a component cable to connect the external A/V device's component output jacks to the LCD TV's audio input jacks. Press the button on the remote to turn on the LCD TV. ENGLISH Chapter 2 Installing the LCD TV Connecting...
... turning on the power switch of component video, see your A/V device are sometimes labeled YPbPr, or YCbCr. Connect all A/V device have the ability to connect to a TV. The component video jacks on your A/V device's user guide. 23 For an explanation of the LCD TV or other connected equipment. Use a component cable to connect the external A/V device's component output jacks to the LCD TV's audio input jacks. Press the button on the remote to turn on the LCD TV. ENGLISH Chapter 2 Installing the LCD TV Connecting...

User Guide
Page 36
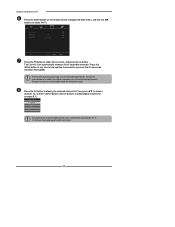
...LCD TV connected to a television programming source, press the INPUT button on the remote control and use the ▲▼ buttons to select the channel. It may sometimes include only the channel number, without a program title or description. 3-1 Today Today Today Tomorrow 7:00 PM 7:30 PM 9:30 PM 12:30 AM Monday 15...; button to select TV and press the OK button. Chapter 3 Using the LCD TV Using the Program Guide The Program Guide feature brings all sorts of information to your screen, such as program title, program duration, time remaining, rating information, closed caption, ...
...LCD TV connected to a television programming source, press the INPUT button on the remote control and use the ▲▼ buttons to select the channel. It may sometimes include only the channel number, without a program title or description. 3-1 Today Today Today Tomorrow 7:00 PM 7:30 PM 9:30 PM 12:30 AM Monday 15...; button to select TV and press the OK button. Chapter 3 Using the LCD TV Using the Program Guide The Program Guide feature brings all sorts of information to your screen, such as program title, program duration, time remaining, rating information, closed caption, ...

User Guide
Page 38
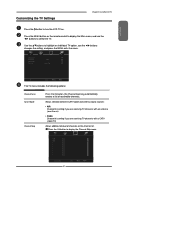
... signal source is VIDOE/S-VIDEO/YPbPr, the SETUP MENU appears as: OSD Language Time Setup Closed Caption Parental Gamma Reset Default English Middle Setup Select Exit Setup Select Exit Use the ▲▼ buttons to highlight the option of the item. Press the EXIT button to edit and label channels. While in adjustment mode, and use the ◄► buttons to change the value of the sub-menu, and press the OK button. Channel Scan Tuner Mode Channel Skip Time Zone Cable...
... signal source is VIDOE/S-VIDEO/YPbPr, the SETUP MENU appears as: OSD Language Time Setup Closed Caption Parental Gamma Reset Default English Middle Setup Select Exit Setup Select Exit Use the ▲▼ buttons to highlight the option of the item. Press the EXIT button to edit and label channels. While in adjustment mode, and use the ◄► buttons to change the value of the sub-menu, and press the OK button. Channel Scan Tuner Mode Channel Skip Time Zone Cable...
User Guide
Page 43
... individual TV option, use the ◄► buttons to display the Channel Skip menu: 2 ABC 3 DISC 4 5 6 7 8 9 10 Analog Analog Analog Analog Analog Analog Analog Analog Analog Channel Skip 41 Select Exit Allows selection between CATV cable and antenna signal sources: ▪ AIR Choose this setting if you are receiving TV channels with an antenna (over the air) ▪ Cable Choose this setting if you are receiving TV channels with a CATV (cable TV) Allows addition/removal of receivable channels. Use the ▲▼buttons to turn the LCD TV on the channel list.
... individual TV option, use the ◄► buttons to display the Channel Skip menu: 2 ABC 3 DISC 4 5 6 7 8 9 10 Analog Analog Analog Analog Analog Analog Analog Analog Analog Channel Skip 41 Select Exit Allows selection between CATV cable and antenna signal sources: ▪ AIR Choose this setting if you are receiving TV channels with an antenna (over the air) ▪ Cable Choose this setting if you are receiving TV channels with a CATV (cable TV) Allows addition/removal of receivable channels. Use the ▲▼buttons to turn the LCD TV on the channel list.
User Guide
Page 53
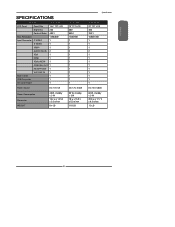
...1513-TDXB LCD Panel Panel Size 15.4" TFT LCD Brightness 230 Contrast Ratio 400:1 Max. Resolution 1280x800 Input Connector C-VIDEO 1 S-VIDEO 1 YPbPr 1 AUDIO IN(L/R) 2 VGA 1 HDMI 1 VGA LINE IN 1 COAXIAL OUT 1 HEADPHONE 1 VHF/UHF IN 1 Built-in DVD 1 USB Connector 1 SD Card Reader 1 Power Source DC 12V, 5A Power Consumption Dimension WEIGHT 48 W, standby < 3 W 15.2 w x 13.5 h x 5.2 d inch 8.4 LB 1913-TDXB 19" TFT LCD 300 850:1 1400x900 1 1 1 2 1 1 1 1 1 1 1 1 1 DC 12V, 5.83A 55 W, standby < 3 W 18 w x 15.9 h x 5.2 d inch 11.8 LB Specifications 2213-TDXB 22" TFT LCD...
...1513-TDXB LCD Panel Panel Size 15.4" TFT LCD Brightness 230 Contrast Ratio 400:1 Max. Resolution 1280x800 Input Connector C-VIDEO 1 S-VIDEO 1 YPbPr 1 AUDIO IN(L/R) 2 VGA 1 HDMI 1 VGA LINE IN 1 COAXIAL OUT 1 HEADPHONE 1 VHF/UHF IN 1 Built-in DVD 1 USB Connector 1 SD Card Reader 1 Power Source DC 12V, 5A Power Consumption Dimension WEIGHT 48 W, standby < 3 W 15.2 w x 13.5 h x 5.2 d inch 8.4 LB 1913-TDXB 19" TFT LCD 300 850:1 1400x900 1 1 1 2 1 1 1 1 1 1 1 1 1 DC 12V, 5.83A 55 W, standby < 3 W 18 w x 15.9 h x 5.2 d inch 11.8 LB Specifications 2213-TDXB 22" TFT LCD...
User Guide
Page 56
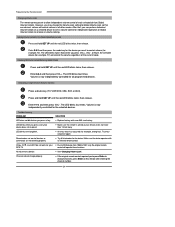
..., TV) will operate these functions. then release. Troubleshooting PROBLEM SOLUTION LED does not blink when you may change channels, press Enter on a device. Try all listed codes for all volume locking. Due to RCA design from 1983 to 1987, only the original remote control will control the volume regardless of each selected device (Global Volume Unlock). Locking Volume Control to One Mode (Global Volume Lock) Press and hold SET UP until the red LED blinks twice; The LED blinks twice...
..., TV) will operate these functions. then release. Troubleshooting PROBLEM SOLUTION LED does not blink when you may change channels, press Enter on a device. Try all listed codes for all volume locking. Due to RCA design from 1983 to 1987, only the original remote control will control the volume regardless of each selected device (Global Volume Unlock). Locking Volume Control to One Mode (Global Volume Lock) Press and hold SET UP until the red LED blinks twice; The LED blinks twice...


