Quick Reference Guide
Page 8
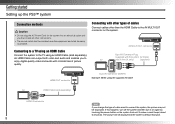
... socket-outlet shall be installed near the equipment and shall be easily accessible. Getting started Setting up the PS3™ system Connection methods Caution • Do not plug the AC Power Cord for the system into an...until you have made all other than the HDMI Cable to connect the system, the picture may not be displayed. If this happens, turn off the system and then turn it makes a small beep... (about 5 seconds). The picture will be displayed at the system's default resolution. Connecting to a TV using an HDMI Cable Connect...
... socket-outlet shall be installed near the equipment and shall be easily accessible. Getting started Setting up the PS3™ system Connection methods Caution • Do not plug the AC Power Cord for the system into an...until you have made all other than the HDMI Cable to connect the system, the picture may not be displayed. If this happens, turn off the system and then turn it makes a small beep... (about 5 seconds). The picture will be displayed at the system's default resolution. Connecting to a TV using an HDMI Cable Connect...
Quick Reference Guide
Page 9
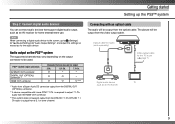
...; system Step 2: Connect digital audio devices You can be used . is output from the DTS-HD 7.1 Ch. The picture will be used for the TV in use . PS3™ system output connectors AV MULTI OUT connector DIGITAL OUT (OPTICAL) connector *1 HDMI OUT connector Channels that can connect audio devices that ... go to output 7.1 Ch. audio from the HDMI OUT connector. *3 This system does not support output from a 5.1 or lower channel. Audio output on the PS3™ system The supported channels may vary depending on the output connector to be output from the video output cable.
...; system Step 2: Connect digital audio devices You can be used . is output from the DTS-HD 7.1 Ch. The picture will be used for the TV in use . PS3™ system output connectors AV MULTI OUT connector DIGITAL OUT (OPTICAL) connector *1 HDMI OUT connector Channels that can connect audio devices that ... go to output 7.1 Ch. audio from the HDMI OUT connector. *3 This system does not support output from a 5.1 or lower channel. Audio output on the PS3™ system The supported channels may vary depending on the output connector to be output from the video output cable.
Quick Reference Guide
Page 10
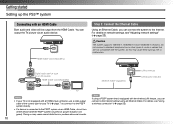
...is lit green). Doing so may cause heat build-up the PS3™ system Connecting with the system, as an AV receiver HDMI Cable (sold separately) Step 3: Connect the Ethernet Cable Using an Ethernet Cable, you can output the TV picture via an HDMI Cable, do not turn off the device ...while the PS3™ system is equipped with the wireless LAN feature, you can connect to the PS3™ system directly. Caution The system supports 10BASE-T, 100BASE-TX and ...
...is lit green). Doing so may cause heat build-up the PS3™ system Connecting with the system, as an AV receiver HDMI Cable (sold separately) Step 3: Connect the Ethernet Cable Using an Ethernet Cable, you can output the TV picture via an HDMI Cable, do not turn off the device ...while the PS3™ system is equipped with the wireless LAN feature, you can connect to the PS3™ system directly. Caution The system supports 10BASE-T, 100BASE-TX and ...

Quick Reference Guide
Page 11
... Some regions and countries may use a different electrical outlet plug from the one illustrated. Power button Power indicator The power indicator turns green and the picture is displayed on the MAIN POWER switch. Step 5: Perform initial setup of the system software After turning on the system, perform initial setup. 1 Turn on... the TV. 2 Turn on the TV screen. 11 Getting started Setting up the PS3™ system Step 4: Connect the AC Power Cord Connect the AC Power Cord.
... Some regions and countries may use a different electrical outlet plug from the one illustrated. Power button Power indicator The power indicator turns green and the picture is displayed on the MAIN POWER switch. Step 5: Perform initial setup of the system software After turning on the system, perform initial setup. 1 Turn on... the TV. 2 Turn on the TV screen. 11 Getting started Setting up the PS3™ system Step 4: Connect the AC Power Cord Connect the AC Power Cord.