User Guide
Page 5
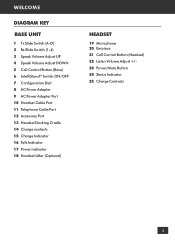
... 1 Tx Slide Switch (A-D) 2 Rx Slide Switch (1-4) 3 Speak Volume Adjust UP 4 Speak Volume Adjust DOWN 5 Call Control Button (Base) 6 IntelliStandTM Switch ON/OFF 7 Configuration Dial 8 AC Power Adapter 9 AC Power Adapter Port 10 Handset Cable Port 11 Telephone Cable Port 12 Accessory Port 13 Headset Docking Cradle 14 Charge contacts 15 Charge Indicator...
... 1 Tx Slide Switch (A-D) 2 Rx Slide Switch (1-4) 3 Speak Volume Adjust UP 4 Speak Volume Adjust DOWN 5 Call Control Button (Base) 6 IntelliStandTM Switch ON/OFF 7 Configuration Dial 8 AC Power Adapter 9 AC Power Adapter Port 10 Handset Cable Port 11 Telephone Cable Port 12 Accessory Port 13 Headset Docking Cradle 14 Charge contacts 15 Charge Indicator...
User Guide
Page 16
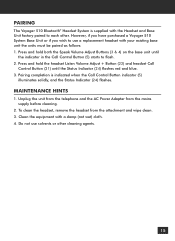
... to each other cleaning agents. 15 MAINTENANCE HINTS 1. Do not use a replacement headset with a damp (not wet) cloth. 4. PAIRING The Voyager 510 Bluetooth® Headset System is indicated when the Call Control Button indicator (5) illuminates solidly, and the Status Indicator (24) flashes. Press and hold... 2. Unplug the unit from the telephone and the AC Power Adapter from the attachment and wipe clean. 3. Clean the equipment with your existing base unit the units must be paired as follows: 1. However, if you have purchased a Voyager 510 System Base Unit or if you wish to flash....
... to each other cleaning agents. 15 MAINTENANCE HINTS 1. Do not use a replacement headset with a damp (not wet) cloth. 4. PAIRING The Voyager 510 Bluetooth® Headset System is indicated when the Call Control Button indicator (5) illuminates solidly, and the Status Indicator (24) flashes. Press and hold... 2. Unplug the unit from the telephone and the AC Power Adapter from the attachment and wipe clean. 3. Clean the equipment with your existing base unit the units must be paired as follows: 1. However, if you have purchased a Voyager 510 System Base Unit or if you wish to flash....
User Guide
Page 17
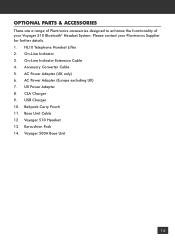
... Cable 4. Accessory Converter Cable 5. USB Charger 10. Beltpack Carry Pouch 11. Voyager 510 Headset 13. US Power Adapter 8. OPTIONAL PARTS & ACCESSORIES There are a range of Plantronics accessories designed to enhance the functionality of your Plantronics Supplier for further details. 1. HL10 Telephone Handset Lifter 2. Please contact your Voyager 510 Bluetooth® Headset System. AC Power Adapter (UK only) 6.
... Cable 4. Accessory Converter Cable 5. USB Charger 10. Beltpack Carry Pouch 11. Voyager 510 Headset 13. US Power Adapter 8. OPTIONAL PARTS & ACCESSORIES There are a range of Plantronics accessories designed to enhance the functionality of your Plantronics Supplier for further details. 1. HL10 Telephone Handset Lifter 2. Please contact your Voyager 510 Bluetooth® Headset System. AC Power Adapter (UK only) 6.
User Guide
Page 19
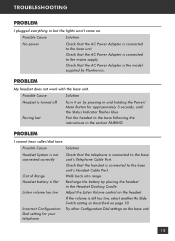
...the Power/ Mute Button for your telephone Check that the telephone is connected to the base unit's Handset Cable Port. Recharge the battery by Plantronics. Adjust the Listen Volume control on page 10. Walk back into range. If the volume is still too low, select another Rx Slide...Dial settings on . Check that the handset is connected to the base following the instructions in the Headset Docking Cradle. Check that the AC Power Adapter is connected to the base unit's Telephone Cable Port. Possible Cause Solution Headset System is not connected correctly Out of Range ...
...the Power/ Mute Button for your telephone Check that the telephone is connected to the base unit's Handset Cable Port. Recharge the battery by Plantronics. Adjust the Listen Volume control on page 10. Walk back into range. If the volume is still too low, select another Rx Slide...Dial settings on . Check that the handset is connected to the base following the instructions in the Headset Docking Cradle. Check that the AC Power Adapter is connected to the base unit's Telephone Cable Port. Possible Cause Solution Headset System is not connected correctly Out of Range ...

