
User Guide
Page 2
... 7 Pair 8 Pair again to base 8 Pair to mobile device 8 Pair mode 8 Fit and charge 9 Customize Your Headset 9 Charge your headset and spare battery 13 Talk time 13 Headset battery status 13 Load software 14 The Basics 15 Power on or off 15 Adjust volume 15 Make, answer, end calls 15 More Features 17 Voice assistant (smartphone feature) 17 Enable and use Amazon Alexa (smartphone feature) 17 Enable Tile 17 Change your default line 17 Online indicator 17 Troubleshooting 18 Headset 18 Desk phone...
... 7 Pair 8 Pair again to base 8 Pair to mobile device 8 Pair mode 8 Fit and charge 9 Customize Your Headset 9 Charge your headset and spare battery 13 Talk time 13 Headset battery status 13 Load software 14 The Basics 15 Power on or off 15 Adjust volume 15 Make, answer, end calls 15 More Features 17 Voice assistant (smartphone feature) 17 Enable and use Amazon Alexa (smartphone feature) 17 Enable Tile 17 Change your default line 17 Online indicator 17 Troubleshooting 18 Headset 18 Desk phone...
User Guide
Page 3
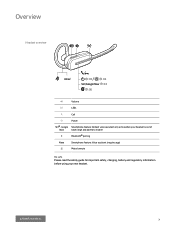
Overview Headset overview Alexa* :02 :04 Siri/Google Now :02 :06 Volume LEDs Call Power Siri®, Google Smartphone feature: Default voice assistant only active when your headset is out of Now base range and paired to mobile Bluetooth® pairing Alexa Smartphone feature: Voice assistant (requires app) Mute/unmute Be safe Please read the safety guide for important safety, charging, battery and regulatory information before using your new headset. 3
Overview Headset overview Alexa* :02 :04 Siri/Google Now :02 :06 Volume LEDs Call Power Siri®, Google Smartphone feature: Default voice assistant only active when your headset is out of Now base range and paired to mobile Bluetooth® pairing Alexa Smartphone feature: Voice assistant (requires app) Mute/unmute Be safe Please read the safety guide for important safety, charging, battery and regulatory information before using your new headset. 3

User Guide
Page 4
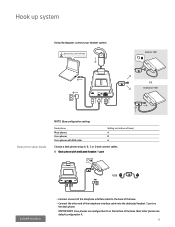
...call control with your headset. 2 HL10 lifter Automatically lifts handset and returns it to the cradle. Enables remote call control with your headset. 4 Base overview 1 234 5 67 8 9 12 Accessories 10 11 1 Computer button 2 Bluetooth LED 3 Desk phone button 4 Charging LED 5 USB port 6 Power jack 7 Handset lifter jack 8 Telephone interface cable jack 9 Headset Bluetooth pairing button 10 Desk phone listening volume 11 Desk phone speaking volume 12 Desk phone configuration switch 1 Electronic hookswitch cable (EHS cable) Electronically and automatically answers/ends a desk phone call...
...call control with your headset. 2 HL10 lifter Automatically lifts handset and returns it to the cradle. Enables remote call control with your headset. 4 Base overview 1 234 5 67 8 9 12 Accessories 10 11 1 Computer button 2 Bluetooth LED 3 Desk phone button 4 Charging LED 5 USB port 6 Power jack 7 Handset lifter jack 8 Telephone interface cable jack 9 Headset Bluetooth pairing button 10 Desk phone listening volume 11 Desk phone speaking volume 12 Desk phone configuration switch 1 Electronic hookswitch cable (EHS cable) Electronically and automatically answers/ends a desk phone call...
User Guide
Page 5
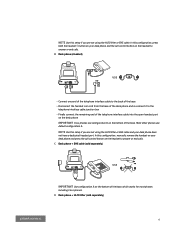
plantronics.com /software Plantronics Hub for Windows/Mac HEADSET PORT OR NO HEADSET PORT Desk phone setup details NOTE Base configuration settings Desk phone Most phones Cisco phones Cisco phones with dedicated headset port USE • Connect one end of the telephone interface cable to the back of the base • Connect the other phones use configuration D on the desk phone IMPORTANT Cisco phones use default configuration A. 5 A Desk phone with EHS cable Setting (on bottom of the telephone interface cable into the...
plantronics.com /software Plantronics Hub for Windows/Mac HEADSET PORT OR NO HEADSET PORT Desk phone setup details NOTE Base configuration settings Desk phone Most phones Cisco phones Cisco phones with dedicated headset port USE • Connect one end of the telephone interface cable to the back of the base • Connect the other phones use configuration D on the desk phone IMPORTANT Cisco phones use default configuration A. 5 A Desk phone with EHS cable Setting (on bottom of the telephone interface cable into the...
User Guide
Page 6
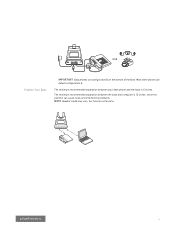
... other phones use configuration D on the headset to answer or end calls. D Desk phone + HL10 lifter (sold separately) USE IMPORTANT Use configuration A on the desk phone IMPORTANT Cisco phones use default configuration A. In this configuration, manually remove the handset on your desk phone and the call control button on the bottom of the base, which works for most phones including Cisco phones. C Desk phone + EHS cable (sold separately) 6 B Desk phone (standard) USE • Connect one end of the telephone interface cable...
... other phones use configuration D on the headset to answer or end calls. D Desk phone + HL10 lifter (sold separately) USE IMPORTANT Use configuration A on the desk phone IMPORTANT Cisco phones use default configuration A. In this configuration, manually remove the handset on your desk phone and the call control button on the bottom of the base, which works for most phones including Cisco phones. C Desk phone + EHS cable (sold separately) 6 B Desk phone (standard) USE • Connect one end of the telephone interface cable...
User Guide
Page 7
Incorrect position can cause noise and interference problems. NOTE Headset cradle may vary, but function is 12 inches. USE Position Your Base IMPORTANT Cisco phones use default configuration A. The minimum recommended separation between your desk phone and the base is 6 inches. The minimum recommended separation between the base and computer is the same. 7 Most other phones use configuration D on the bottom of the base.
Incorrect position can cause noise and interference problems. NOTE Headset cradle may vary, but function is 12 inches. USE Position Your Base IMPORTANT Cisco phones use default configuration A. The minimum recommended separation between your desk phone and the base is 6 inches. The minimum recommended separation between the base and computer is the same. 7 Most other phones use configuration D on the bottom of the base.
User Guide
Page 8
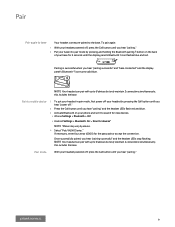
... your headset powered off ." 2 Press the Call button until you hear "pairing" and the headset LEDs flash red and blue. 3 Activate Bluetooth on your phone and set it to search for new devices. • iPhone Settings > Bluetooth > On* • Android Settings > Bluetooth: On > Scan for devices* NOTE *Menus may vary by pressing and holding the Bluetooth pairing button on the back of your base for the passcode or accept the connection. this includes the base. NOTE Your headset can pair...
... your headset powered off ." 2 Press the Call button until you hear "pairing" and the headset LEDs flash red and blue. 3 Activate Bluetooth on your phone and set it to search for new devices. • iPhone Settings > Bluetooth > On* • Android Settings > Bluetooth: On > Scan for devices* NOTE *Menus may vary by pressing and holding the Bluetooth pairing button on the back of your base for the passcode or accept the connection. this includes the base. NOTE Your headset can pair...

User Guide
Page 9
... has a replaceable battery. Align the earloop as shown and insert it over-the-ear, over -the-head or behind -the-head. Rotate the earloop up 90°. 90º NOTE Ensure the earloop is flat against the headset before rotating. 2 Choose the size and style of eartip that fits most comfortably. Use only the battery type supplied by Plantronics. Align...
... has a replaceable battery. Align the earloop as shown and insert it over-the-ear, over -the-head or behind -the-head. Rotate the earloop up 90°. 90º NOTE Ensure the earloop is flat against the headset before rotating. 2 Choose the size and style of eartip that fits most comfortably. Use only the battery type supplied by Plantronics. Align...

User Guide
Page 10
... towards your ear to allow the pivoting earpiece to bring the microphone close to your cheek. 3 To correctly position your headset, see Position Your Headset. Align the earloop as possible without touching. Align the eartip with the notch facing the microphone as shown and insert the headset into your headset, see Position Your Headset. The microphone can be adjusted inward by...
... towards your ear to allow the pivoting earpiece to bring the microphone close to your cheek. 3 To correctly position your headset, see Position Your Headset. Align the earloop as possible without touching. Align the eartip with the notch facing the microphone as shown and insert the headset into your headset, see Position Your Headset. The microphone can be adjusted inward by...

User Guide
Page 11
Align the eartip with the notch facing the microphone as shown. Behind-the-Head Assembly 1 Align the headband as shown. The headband can be worn on the right or left side. 3 To optimize the position of the eartip that fits most comfortably. If you want to the left , switch the stem to wear it up . Press on the left side of the headband. 2 Choose the size and style of the headset, push the headset in so the microphone is close to attach. 11 Ensure the headband sits flat against the headset, then rotate it on to your mouth. 2 Rotate the headset up 90°.
Align the eartip with the notch facing the microphone as shown. Behind-the-Head Assembly 1 Align the headband as shown. The headband can be worn on the right or left side. 3 To optimize the position of the eartip that fits most comfortably. If you want to the left , switch the stem to wear it up . Press on the left side of the headband. 2 Choose the size and style of the headset, push the headset in so the microphone is close to attach. 11 Ensure the headband sits flat against the headset, then rotate it on to your mouth. 2 Rotate the headset up 90°.

User Guide
Page 12
NOTE Ensure the large end of the eartip points to the microphone. 3 To position your headset correctly, first slide the stem of the headband so the headset fits comfortably. 4 With a finger on the headset indicator light, push in until the microphone rests as close to your cheek as possible without touching. 12
NOTE Ensure the large end of the eartip points to the microphone. 3 To position your headset correctly, first slide the stem of the headband so the headset fits comfortably. 4 With a finger on the headset indicator light, push in until the microphone rests as close to your cheek as possible without touching. 12
User Guide
Page 13
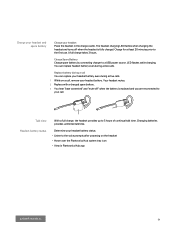
...continual talk time. A full charge takes 3 hours. Your headset mutes. 2 Replace with a charged spare battery. 3 You hear "base connected" and "mute off when the headset is replaced and you are reconnected to your headset battery. Talk time Headset battery status With a full charge, the headset provides up to a USB power source. Charge your headset and spare battery Charge your headset battery status: • Listen to the voice prompts after powering on a call, remove your call You can replace your headset battery even during active calls. You can replace headset battery even...
...continual talk time. A full charge takes 3 hours. Your headset mutes. 2 Replace with a charged spare battery. 3 You hear "base connected" and "mute off when the headset is replaced and you are reconnected to your headset battery. Talk time Headset battery status With a full charge, the headset provides up to a USB power source. Charge your headset and spare battery Charge your headset battery status: • Listen to the voice prompts after powering on a call, remove your call You can replace your headset battery even during active calls. You can replace headset battery even...
User Guide
Page 14
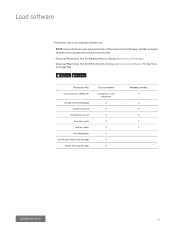
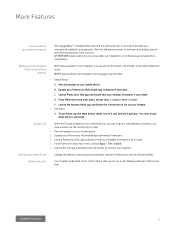
Plantronics Hub Call control for softphones Change headset language Update firmware Turn features on/off View user guide Battery meter Find MyHeadset Use Amazon Alexa (requires app) Enable Tile (requires app) iOS and Android available for iOS/Android by visiting plantronics.com/software. • Download Plantronics Hub for some softphones X X X X X X X X Windows and Mac X X X X X X 14 Load software Plantronics Hub is an invaluable headset tool. NOTE Some softphones require the installation of Plantronics Hub for...
Plantronics Hub Call control for softphones Change headset language Update firmware Turn features on/off View user guide Battery meter Find MyHeadset Use Amazon Alexa (requires app) Enable Tile (requires app) iOS and Android available for iOS/Android by visiting plantronics.com/software. • Download Plantronics Hub for some softphones X X X X X X X X Windows and Mac X X X X X X 14 Load software Plantronics Hub is an invaluable headset tool. NOTE Some softphones require the installation of Plantronics Hub for...
User Guide
Page 15
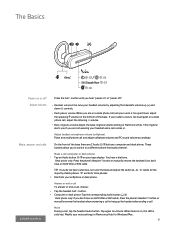
... switch (A--G). Adjust headset microphone volume (softphone) Place a test softphone call (computer or desk phone) 1 Tap an Audio button on a desk phone call . This ringtone alerts you if you are not wearing your softphone or desk phone. You hear a dial tone. Make, answer, end calls On the front of desk phones. Answer or end a call To answer or end a call comes in. If your base display. Mute During a call , adjust the listening volume. • Base ringtone volume Adjust the base ringtone volume setting...
... switch (A--G). Adjust headset microphone volume (softphone) Place a test softphone call (computer or desk phone) 1 Tap an Audio button on a desk phone call . This ringtone alerts you if you are not wearing your softphone or desk phone. You hear a dial tone. Make, answer, end calls On the front of desk phones. Answer or end a call To answer or end a call comes in. If your base display. Mute During a call , adjust the listening volume. • Base ringtone volume Adjust the base ringtone volume setting...
User Guide
Page 16
... 2 desk phone calls can only be put on hold only from your desk phone. NOTE Switching 2 desk phone calls can be done from your desk phone. 16 Switch between calls (flash) To switch between calls: • Press the headset Call button for 2 seconds. Hold a call To hold an active call or resume a held call: • Press the headset Call button for 2 seconds. • Computer or desk phone: Press the corresponding base Audio button flashes red when a call is...
... 2 desk phone calls can only be put on hold only from your desk phone. NOTE Switching 2 desk phone calls can be done from your desk phone. 16 Switch between calls (flash) To switch between calls: • Press the headset Call button for 2 seconds. Hold a call To hold an active call or resume a held call: • Press the headset Call button for 2 seconds. • Computer or desk phone: Press the corresponding base Audio button flashes red when a call is...
User Guide
Page 17
... hear a tone when Alexa is only active when your smartphone's default voice assistant. NOTE Amazon Alexa isn't available in Plantronics Hub. 17 Manage settings in all languages and countries. 1 Enable Alexa A Pair the headset to your mobile device 2 Update your Plantronics Hub mobile app (software) if necessary 3 Launch Plantronics Hub app and ensure that your headset (firmware) is up your default line Change the default outbound phone line/audio channel in Plantronics Hub for Windows...
... hear a tone when Alexa is only active when your smartphone's default voice assistant. NOTE Amazon Alexa isn't available in Plantronics Hub. 17 Manage settings in all languages and countries. 1 Enable Alexa A Pair the headset to your mobile device 2 Update your Plantronics Hub mobile app (software) if necessary 3 Launch Plantronics Hub app and ensure that your headset (firmware) is up your default line Change the default outbound phone line/audio channel in Plantronics Hub for Windows...

User Guide
Page 18
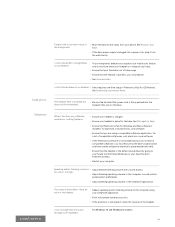
.... If adjusting the distance doesn't help, your telephone. The sound is going out of the headset to make sure the microphone is heard. Cisco phones connected with EHS cable use configuration A. • Make sure your base. Troubleshooting Headset I can't hear a dial tone in this position, adjust the position of range, move closer to the base. See Adjust volume. • If the audio level is connected correctly to a higher setting if necessary. • Adjust the headset's listening volume.
.... If adjusting the distance doesn't help, your telephone. The sound is going out of the headset to make sure the microphone is heard. Cisco phones connected with EHS cable use configuration A. • Make sure your base. Troubleshooting Headset I can't hear a dial tone in this position, adjust the position of range, move closer to the base. See Adjust volume. • If the audio level is connected correctly to a higher setting if necessary. • Adjust the headset's listening volume.
User Guide
Page 19
... a compatible softphone, you are using your softphone application. • Point microphone towards your smartphone • See Voice assistant I can't activate Alexa on my headset. • Alexa requires one-time setup in Plantronics Hub for Windows and Mac software is installed. For a list of base range • Ensure that Plantronics Hub for iOS/Android. too low or too high. • Adjust listening/speaking volumes in the computer's sound control panel...
... a compatible softphone, you are using your softphone application. • Point microphone towards your smartphone • See Voice assistant I can't activate Alexa on my headset. • Alexa requires one-time setup in Plantronics Hub for Windows and Mac software is installed. For a list of base range • Ensure that Plantronics Hub for iOS/Android. too low or too high. • Adjust listening/speaking volumes in the computer's sound control panel...

User Guide
Page 20
... Output, and then select "Internal Speakers" or your PC audio or softphone application. 20 No audio connection to PC. • Go to Start > Control Panel > Sounds and Audio Devices > Audio > Sound Playback and change the default setting from your headset to your PC speakers. Wait for power LED to your PC speakers. For Windows Vista and Windows 7 systems • Go to Start > Control Panel > Sounds > Playback and change the default setting from your headset to illuminate, then reconnect...
... Output, and then select "Internal Speakers" or your PC audio or softphone application. 20 No audio connection to PC. • Go to Start > Control Panel > Sounds and Audio Devices > Audio > Sound Playback and change the default setting from your headset to your PC speakers. Wait for power LED to your PC speakers. For Windows Vista and Windows 7 systems • Go to Start > Control Panel > Sounds > Playback and change the default setting from your headset to illuminate, then reconnect...
User Guide
Page 21
Poly, the propeller design, and the Poly logo are the property of their respective owners. and any use by Plantronics, Inc. 217064-06 03.20 21 Manufactured by Plantronics, Inc. Bluetooth is under license. All other trademarks are trademarks of Bluetooth SIG, Inc. Scorpius 171 2132 LR Hoofddorp Netherlands © 2020 Plantronics, Inc. is a registered trademark of Plantronics, Inc. Support NEED MORE HELP? All rights reserved. plantronics.com/support Plantronics, Inc. 345 Encinal Street Santa Cruz, CA 95060 United States Plantronics B.V.
Poly, the propeller design, and the Poly logo are the property of their respective owners. and any use by Plantronics, Inc. 217064-06 03.20 21 Manufactured by Plantronics, Inc. Bluetooth is under license. All other trademarks are trademarks of Bluetooth SIG, Inc. Scorpius 171 2132 LR Hoofddorp Netherlands © 2020 Plantronics, Inc. is a registered trademark of Plantronics, Inc. Support NEED MORE HELP? All rights reserved. plantronics.com/support Plantronics, Inc. 345 Encinal Street Santa Cruz, CA 95060 United States Plantronics B.V.


