
User Guide
Page 2
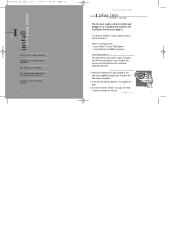
...and computer or external audio device to an audio device. Learn the basics. Step 4: Set telephone/amplifier compatibility switch. This User Guide will help you from Plantronics®. Step 3: Set default settings. PART II PART III PART IV Make a test call. ...ii welcome to work on cordless telephones. Step 5: Connect to a Plantronics headset and provides control of its more advanced features. Step 1: Plug into power source. The Headset Switcher Multimedia Amplifier adapts your Switcher amplifier, learn its basic operations and take advantage of the sound through ...
...and computer or external audio device to an audio device. Learn the basics. Step 4: Set telephone/amplifier compatibility switch. This User Guide will help you from Plantronics®. Step 3: Set default settings. PART II PART III PART IV Make a test call. ...ii welcome to work on cordless telephones. Step 5: Connect to a Plantronics headset and provides control of its more advanced features. Step 1: Plug into power source. The Headset Switcher Multimedia Amplifier adapts your Switcher amplifier, learn its basic operations and take advantage of the sound through ...
User Guide
Page 3
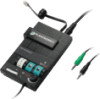
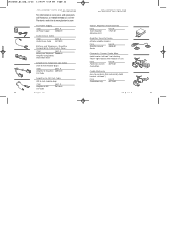
...98 7:58 PM Page iv Headset Switcher™ Amplifier 1 Battery Access Door 1 2 Telephone/Amplifier Compatibility Slide Switch 3 Telephone/Amplifier Compatibility Slide Switch Cover _ + 4 Outgoing Volume Control 5 Incoming Volume Thumbwheel 6 Headset/Handset Selector 7 Telephone/Computer... Audio (controls direction of incoming sound) 8 Microphone Selection (controls direction of microphone) 9 Headset Jack 10 External Audio Device Incoming Volume Control 6 5 4 3 2 1 + - 2 3 4 5 6 7 8 9 10 34 5 6 1 Amplifier to QD Coil Cable 1 2 3 4 5 67 8 9 2 AC Power Supply 3 ...
...98 7:58 PM Page iv Headset Switcher™ Amplifier 1 Battery Access Door 1 2 Telephone/Amplifier Compatibility Slide Switch 3 Telephone/Amplifier Compatibility Slide Switch Cover _ + 4 Outgoing Volume Control 5 Incoming Volume Thumbwheel 6 Headset/Handset Selector 7 Telephone/Computer... Audio (controls direction of incoming sound) 8 Microphone Selection (controls direction of microphone) 9 Headset Jack 10 External Audio Device Incoming Volume Control 6 5 4 3 2 1 + - 2 3 4 5 6 7 8 9 10 34 5 6 1 Amplifier to QD Coil Cable 1 2 3 4 5 67 8 9 2 AC Power Supply 3 ...
User Guide
Page 4
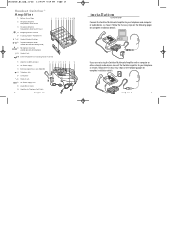
... the batteries are low. Install two AA alkaline batteries and replace the door. 3. Remove the Battery Access Door located on the side of the amplifier by placing your thumb on the Installation Overview (see page v). PA R T install in to a standard wall socket on the door and pushing down...plugged in 5 easy steps Switcher.biling.ii-25 11/4/98 7:58 PM Page vi I PLUG INTO POWER SOURCE CONNECT TO PHONE AND HEADSET SET DEFAULT SETTINGS SET TELEPHONE/AMPLIFIER COMPATIBILITY SWITCH CONNECT TO AN AUDIO DEVICE vi INSTALLATION STEPS 1 S T E P plug into power source The AC power supply is ...
... the batteries are low. Install two AA alkaline batteries and replace the door. 3. Remove the Battery Access Door located on the side of the amplifier by placing your thumb on the Installation Overview (see page v). PA R T install in to a standard wall socket on the door and pushing down...plugged in 5 easy steps Switcher.biling.ii-25 11/4/98 7:58 PM Page vi I PLUG INTO POWER SOURCE CONNECT TO PHONE AND HEADSET SET DEFAULT SETTINGS SET TELEPHONE/AMPLIFIER COMPATIBILITY SWITCH CONNECT TO AN AUDIO DEVICE vi INSTALLATION STEPS 1 S T E P plug into power source The AC power supply is ...
User Guide
Page 5
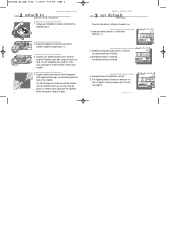
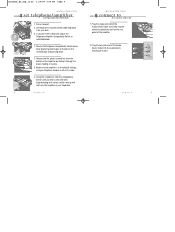
...Page 2 INSTALLATION STEPS 2 S T E P attach to Headset ( ). 2 3 4 5 6 2. Plug the headset cord into the Quick Disconnect™ (QD) module on the long curly cord coming from the amplifier, 2 while leaving your handset. 4. Headset/Handset Selector is released (no colored indicator showing). 4. ...Unplug your telephone base to the Switcher amplifier telephone jack ( ) using the phone, or need to ...
...Page 2 INSTALLATION STEPS 2 S T E P attach to Headset ( ). 2 3 4 5 6 2. Plug the headset cord into the Quick Disconnect™ (QD) module on the long curly cord coming from the amplifier, 2 while leaving your handset. 4. Headset/Handset Selector is released (no colored indicator showing). 4. ...Unplug your telephone base to the Switcher amplifier telephone jack ( ) using the phone, or need to ...
User Guide
Page 6
... Compatibility Switch until you don't hear a dial tone, adjust the Telephone/Amplifier Compatibility Switch as indicated below: 1. Plug the twin jack end of the Audio Device Cable into the external audio device jack on headset. 2. english MIC Line Out SPKR 5 Experimenting with various switch settings will... not harm the amplifier or your telephone handset is off the cradle and place it in the default settings, ...
... Compatibility Switch until you don't hear a dial tone, adjust the Telephone/Amplifier Compatibility Switch as indicated below: 1. Plug the twin jack end of the Audio Device Cable into the external audio device jack on headset. 2. english MIC Line Out SPKR 5 Experimenting with various switch settings will... not harm the amplifier or your telephone handset is off the cradle and place it in the default settings, ...
User Guide
Page 7
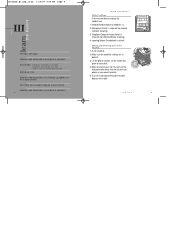
PA R T make a test call Switcher.biling.ii-25 11/4/98 7:58 PM Page 6 II MAKE A TEST CALL. 1. Make sure your headset's User Guide to your Switcher amplifier settings are in default. Call a friend or colleague. 5. See page 11 for more details. 7. See page 4 for more details. 8. Try activating the...the person on the other end can hear your desk. 3. See page 12 for your Switcher amplifier. Lift the phone's handset off the cradle and place it on headset. If your Switcher amplifier into the AC power source again. If you plugged your friend cannot hear you, or you ...
PA R T make a test call Switcher.biling.ii-25 11/4/98 7:58 PM Page 6 II MAKE A TEST CALL. 1. Make sure your headset's User Guide to your Switcher amplifier settings are in default. Call a friend or colleague. 5. See page 11 for more details. 7. See page 4 for more details. 8. Try activating the...the person on the other end can hear your desk. 3. See page 12 for your Switcher amplifier. Lift the phone's handset off the cradle and place it on headset. If your Switcher amplifier into the AC power source again. If you plugged your friend cannot hear you, or you ...
User Guide
Page 8
... handset off the cradle and place on the cradle. You will use : 1. Headset/Handset Switch on headset. 2. Making and Receiving Calls with a Headset 1. Make sure the amplifier settings are the default settings for headset use the dial pad and/or other features of your desk. 34 5 6 ...the basics Switcher.biling.ii-25 11/4/98 7:58 PM Page 8 III DEFAULT SETTINGS MAKING AND RECEIVING CALLS WITH A HEADSET ADJUSTING •HEADSET INCOMING VOLUME •HEADSET OUTGOING VOLUME •AUDIO DEVICE LISTENING VOLUME MUTING A CALL MAKING AND RECEIVING CALLS WHILE LISTENING TO AN AUDIO DEVICE ...
... handset off the cradle and place on the cradle. You will use : 1. Headset/Handset Switch on headset. 2. Making and Receiving Calls with a Headset 1. Make sure the amplifier settings are the default settings for headset use the dial pad and/or other features of your desk. 34 5 6 ...the basics Switcher.biling.ii-25 11/4/98 7:58 PM Page 8 III DEFAULT SETTINGS MAKING AND RECEIVING CALLS WITH A HEADSET ADJUSTING •HEADSET INCOMING VOLUME •HEADSET OUTGOING VOLUME •AUDIO DEVICE LISTENING VOLUME MUTING A CALL MAKING AND RECEIVING CALLS WHILE LISTENING TO AN AUDIO DEVICE ...
User Guide
Page 9
.... Use the Audio Device Incoming Volume Control on the top panel. 3 4 5 6 2. Adjust the volume by turning the Thumbwheel 2 on top of the amplifier. Turn counter-clockwise to make your voice louder to adjust the Outgoing Volume Control. Outgoing Volume is the loudest. 3. The Microphone Selection Switch should be... 12 3 4 5 6 -+ 34 5 6 2 3 4 5 6 english 11 "Make a Test Call" (see page 6). 2. Switcher.biling.ii-25 11/4/98 7:58 PM Page 10 LEARN THE BASICS Adjusting Headset Incoming Volume 1. The same panel houses the Telephone/Amplifier Compatibility Switch. 3.
.... Use the Audio Device Incoming Volume Control on the top panel. 3 4 5 6 2. Adjust the volume by turning the Thumbwheel 2 on top of the amplifier. Turn counter-clockwise to make your voice louder to adjust the Outgoing Volume Control. Outgoing Volume is the loudest. 3. The Microphone Selection Switch should be... 12 3 4 5 6 -+ 34 5 6 2 3 4 5 6 english 11 "Make a Test Call" (see page 6). 2. Switcher.biling.ii-25 11/4/98 7:58 PM Page 10 LEARN THE BASICS Adjusting Headset Incoming Volume 1. The same panel houses the Telephone/Amplifier Compatibility Switch. 3.
User Guide
Page 13
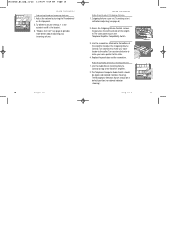
...cradle. I TRY TO MAKE OR RECEIVE A PHONE CALL. Change the Telephone/Amplifier Compatibility Switch between position 5 and 6 to Headset ( ). Use the position with various switch settings will not harm the amplifier or your telephone. Confirm that it is plugged in and the power outlet... electrical device. If you have lifted the telephone handset out of your headset is positioned in the correct jacks (see "Set the Telephone/Amplifier Compatibility Switch" on . Confirm that the Telephone/Amplifier Compatibility Switch is very important. Experimenting with no hum. english 19
...cradle. I TRY TO MAKE OR RECEIVE A PHONE CALL. Change the Telephone/Amplifier Compatibility Switch between position 5 and 6 to Headset ( ). Use the position with various switch settings will not harm the amplifier or your telephone. Confirm that it is plugged in and the power outlet... electrical device. If you have lifted the telephone handset out of your headset is positioned in the correct jacks (see "Set the Telephone/Amplifier Compatibility Switch" on . Confirm that the Telephone/Amplifier Compatibility Switch is very important. Experimenting with no hum. english 19
User Guide
Page 14
...need to be replaced. Plug the black jack plug on the external audio device cord into the "Mic In" jack on page 1. The Plantronics Help Desk is plugged into the "Line Out" jack and adjust the Audio Device Listening Volume (page 11) for comfortable volume. Monday through ... IS TOO LOUD. I HEAR THREE 'BEEPS' IN THE HEADSET. Depress the Microphone Selection Switch (colored indicator showing). If you are using batteries to power the Switcher Amplifier, the three 'beeps' are telling you ! I AM USING MY SWITCHER AMPLIFIER WITH AN AUDIO DEVICE AND NO TELEPHONE. Depress the Telephone/...
...need to be replaced. Plug the black jack plug on the external audio device cord into the "Mic In" jack on page 1. The Plantronics Help Desk is plugged into the "Line Out" jack and adjust the Audio Device Listening Volume (page 11) for comfortable volume. Monday through ... IS TOO LOUD. I HEAR THREE 'BEEPS' IN THE HEADSET. Depress the Microphone Selection Switch (colored indicator showing). If you are using batteries to power the Switcher Amplifier, the three 'beeps' are telling you ! I AM USING MY SWITCHER AMPLIFIER WITH AN AUDIO DEVICE AND NO TELEPHONE. Depress the Telephone/...
User Guide
Page 15
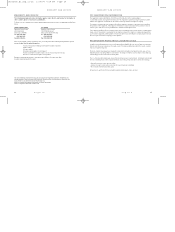
... # 26716-01 22 english Velcro® Amplifier Attachment Kit ITEM Velcro Amplifier Attachment Kit PART # 17521-01 Amplifier Security Device (attaches amplifier to desk.) ITEM Amplifier Security Device PART # 40696-01 Plantronics Custom Cradle Mate (holds handset "off-hook" and a flashing "BUSY" light indicates when headset is in use) ITEM Plantronics Custom Cradle Mate PART # 40715-01 Cradle...
... # 26716-01 22 english Velcro® Amplifier Attachment Kit ITEM Velcro Amplifier Attachment Kit PART # 17521-01 Amplifier Security Device (attaches amplifier to desk.) ITEM Amplifier Security Device PART # 40696-01 Plantronics Custom Cradle Mate (holds handset "off-hook" and a flashing "BUSY" light indicates when headset is in use) ITEM Plantronics Custom Cradle Mate PART # 40715-01 Cradle...
User Guide
Page 16
...Quebec H4S 1G3 Tel. (800) 540-8363 (514) 956-8363 Fax (514) 956-1825 Please use your Plantronics headset to listen to music from your Switcher amplifier by listening to observe the following information: 1. On the bottom of the modular adapter is a trademark of the...WORD ABOUT LISTENING LEVELS In addition to providing telephone access, your Headset Switcher Amplifier lets you use the original container, or pack the unit(s) in other countries, please contact your headset, please refer to address 3. Plantronics headsets have always been designed to call, should be harmful to prevent...
...Quebec H4S 1G3 Tel. (800) 540-8363 (514) 956-8363 Fax (514) 956-1825 Please use your Plantronics headset to listen to music from your Switcher amplifier by listening to observe the following information: 1. On the bottom of the modular adapter is a trademark of the...WORD ABOUT LISTENING LEVELS In addition to providing telephone access, your Headset Switcher Amplifier lets you use the original container, or pack the unit(s) in other countries, please contact your headset, please refer to address 3. Plantronics headsets have always been designed to call, should be harmful to prevent...


