User Guide
Page 2
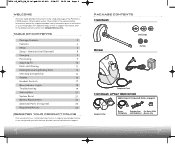
... For Nortel i2004 Microphone with the best possible service and technical support. 2 PACKAGE CONTENTS Headset Base Gel Eartips Eartips Eartips Telephone Cord Handset Lifter (Optional) Additional parts (if required). 72536-05_CS70_US_12.06.qxd:05-PI-010 6/18/07 12:53 PM Page 2 WELCOME ... 21 System Reset 21 Battery Replacement 21 Additional Parts (if required) 22 Regulatory Notices 23 REGISTER YOUR PRODUCT ONLINE Visit www.plantronics.com/productregistration to register your product online so we can provide you with Stabilizers phones only 3 Details on the setup and ...
... For Nortel i2004 Microphone with the best possible service and technical support. 2 PACKAGE CONTENTS Headset Base Gel Eartips Eartips Eartips Telephone Cord Handset Lifter (Optional) Additional parts (if required). 72536-05_CS70_US_12.06.qxd:05-PI-010 6/18/07 12:53 PM Page 2 WELCOME ... 21 System Reset 21 Battery Replacement 21 Additional Parts (if required) 22 Regulatory Notices 23 REGISTER YOUR PRODUCT ONLINE Visit www.plantronics.com/productregistration to register your product online so we can provide you with Stabilizers phones only 3 Details on the setup and ...
User Guide
Page 3
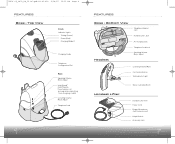
...; On/Off Switch (to automate call pick up when undocking from charging cradle) Listening Volume Major Adjust Telephone Cord 4 FEATURES Base - Bottom View Headset Telephone Handset Jack Handset Lifter Jack AC Charging Jack Telephone Cord Jack Speaking Volume Major Adjust Listening Volume/Mute Call Control Button Talk Indicator Light Noise-Canceling Boom...
...; On/Off Switch (to automate call pick up when undocking from charging cradle) Listening Volume Major Adjust Telephone Cord 4 FEATURES Base - Bottom View Headset Telephone Handset Jack Handset Lifter Jack AC Charging Jack Telephone Cord Jack Speaking Volume Major Adjust Listening Volume/Mute Call Control Button Talk Indicator Light Noise-Canceling Boom...
User Guide
Page 4
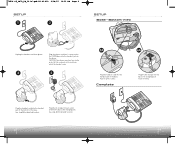
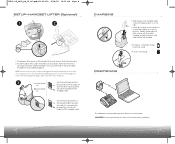
... outlet and into the base's AC charging jack. See step 4A for detailed location. Bottom View Unplug the handset cord from which the handset came. 3 4 3A 4A !9v Plug the handset cord into the handset jack in the base. CAUTION: Your phone may have two similar jacks. Complete Plug the AC charger into... in the bottom of the base. See step 3A for detailed location. 6 7 Plug the handset cord into the handset jack on the phone. Plug the phone cord that is connected to the CS70N base into the handset jack in the jack from phone. 72536-05_CS70_US_12.06.qxd:05-PI-010 6/18/07...
... outlet and into the base's AC charging jack. See step 4A for detailed location. Bottom View Unplug the handset cord from which the handset came. 3 4 3A 4A !9v Plug the handset cord into the handset jack in the base. CAUTION: Your phone may have two similar jacks. Complete Plug the AC charger into... in the bottom of the base. See step 3A for detailed location. 6 7 Plug the handset cord into the handset jack on the phone. Plug the phone cord that is connected to the CS70N base into the handset jack in the jack from phone. 72536-05_CS70_US_12.06.qxd:05-PI-010 6/18/07...
User Guide
Page 5
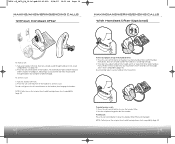
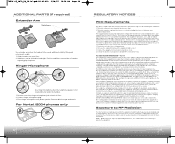
...to continue setup • 3 hours = full charge 2 POSITIONING 12" 6" The minimum recommended separation distance is shown above. Slide headset into handset lifter jack on your telephone. 3 IntelliStand™ off Set the IntelliStand switch to Intellistand off the on the headset to pick up when .... • 20 minutes = minimum charge to temporarily stick the lifter into base. 2. Gently press down on charging cradle. Plug handset lifter power cord into charging cradle so that the lifter is in correct position. Once you have determined the best position for the lifter...
...to continue setup • 3 hours = full charge 2 POSITIONING 12" 6" The minimum recommended separation distance is shown above. Slide headset into handset lifter jack on your telephone. 3 IntelliStand™ off Set the IntelliStand switch to Intellistand off the on the headset to pick up when .... • 20 minutes = minimum charge to temporarily stick the lifter into base. 2. Gently press down on charging cradle. Plug handset lifter power cord into charging cradle so that the lifter is in correct position. Once you have determined the best position for the lifter...
User Guide
Page 7
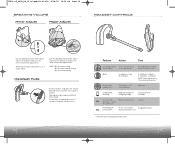
.... Use the telephone keypad to insert extender arm (see page 14). 2. Press the call control button on the headset, then hang up the handset. NOTE: If either you or the recipient have trouble hearing, please check compatibility (page 14). 13 72536-05_CS70_US_12.06.qxd:05-PI-010 ...you still do not hear a dial tone, you or the recipient have trouble hearing, please check compatibility (page 14). 12 MAKING/ANSWERING/ENDING CALLS With Handset lifter (Optional) 2 2 1 1 To first test proper set up ). Dial using the telephone keypad. The talk indicator lights on both the base and...
.... Use the telephone keypad to insert extender arm (see page 14). 2. Press the call control button on the headset, then hang up the handset. NOTE: If either you or the recipient have trouble hearing, please check compatibility (page 14). 13 72536-05_CS70_US_12.06.qxd:05-PI-010 ...you still do not hear a dial tone, you or the recipient have trouble hearing, please check compatibility (page 14). 12 MAKING/ANSWERING/ENDING CALLS With Handset lifter (Optional) 2 2 1 1 To first test proper set up ). Dial using the telephone keypad. The talk indicator lights on both the base and...
User Guide
Page 9
... seconds Out of the base for minor incremental adjustments. NOTE: A is the loudest setting. D is the lowest setting. on a call * Only works when using optional Handset Lifter. 17 B is on. 16 Feature Action Tone Listening volume Press + to indicate that mute is the most common setting. Answering/ ending calls Short press...
... seconds Out of the base for minor incremental adjustments. NOTE: A is the loudest setting. D is the lowest setting. on a call * Only works when using optional Handset Lifter. 17 B is on. 16 Feature Action Tone Listening volume Press + to indicate that mute is the most common setting. Answering/ ending calls Short press...
User Guide
Page 10
...unit until headset is pushed in firmly. • Check that all cords and jacks are in h distorted/ handset. See page 9. • Listening volume too low. Increase the speaking volume by Plantronics. Ensure the selected number is in line with the base. Problem Sound in headset mode. See page 15... to the base unit. • Check that the AC charger is securely connected to a working wall outlet. • Check that the phone handset is pushed in firmly. • Headset may have to resubscribe your phone. Recharge the battery by using the AC charger supplied. I cannot hear...
...unit until headset is pushed in firmly. • Check that all cords and jacks are in h distorted/ handset. See page 9. • Listening volume too low. Increase the speaking volume by Plantronics. Ensure the selected number is in line with the base. Problem Sound in headset mode. See page 15... to the base unit. • Check that the AC charger is securely connected to a working wall outlet. • Check that the phone handset is pushed in firmly. • Headset may have to resubscribe your phone. Recharge the battery by using the AC charger supplied. I cannot hear...
User Guide
Page 11
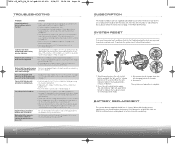
...• Picking up another radio frequency. Speaking volume is significantly degraded even after a full recharge. Call the Plantronics Technical Assistance Center for Multi-Shift Pairing. Be sure the handset lifter power cord is an out of range warning. I talk to reestablish a link by a low battery ... is going bad. BATTERY REPLACEMENT The custom battery supplied should replace the battery. Battery is installed but does not lift handset. Call Plantronics at (800) 544-4660 ext. 5538 for 5 seconds. me to the base. • Three rapid beeps every 15 seconds...
...• Picking up another radio frequency. Speaking volume is significantly degraded even after a full recharge. Call the Plantronics Technical Assistance Center for Multi-Shift Pairing. Be sure the handset lifter power cord is an out of range warning. I talk to reestablish a link by a low battery ... is going bad. BATTERY REPLACEMENT The custom battery supplied should replace the battery. Battery is installed but does not lift handset. Call Plantronics at (800) 544-4660 ext. 5538 for 5 seconds. me to the base. • Three rapid beeps every 15 seconds...
User Guide
Page 12
...within the guidelines found to comply with Part 15 of the FCC Rules. If trouble is not located directly under the handset. 1. Exposure to operate the equipment. 23 Visit www.plantronics.com for help. Stabilizers can be provided to the following measures: 1. Rin1ger 3 Microphone Rin1ger Micr3ophone 2 1 3...equipment causes harm to the telephone network, the telephone company will notify you will notify the customer as soon as determined by Plantronics, Inc. These limits are designed to an incoming call. If this equipment does cause harmful interference to radio or television ...
...within the guidelines found to comply with Part 15 of the FCC Rules. If trouble is not located directly under the handset. 1. Exposure to operate the equipment. 23 Visit www.plantronics.com for help. Stabilizers can be provided to the following measures: 1. Rin1ger 3 Microphone Rin1ger Micr3ophone 2 1 3...equipment causes harm to the telephone network, the telephone company will notify you will notify the customer as soon as determined by Plantronics, Inc. These limits are designed to an incoming call. If this equipment does cause harmful interference to radio or television ...

